About pokeemerald-expansion
pokeemerald-expansion is a GBA ROM hack base that equips developers with a comprehensive toolkit for creating Pokémon ROM hacks. pokeemerald-expansion is built on top of pret’s pokeemerald decompilation project. It is not a playable Pokémon game on its own.
Features
pokeemerald-expansion offers hundreds of features from various core series Pokémon games, along with popular quality-of-life enhancements designed to streamline development and improve the player experience. A full list of those features can be found in FEATURES.md.
Credits

If you use pokeemerald-expansion, please credit RHH (Rom Hacking Hideout). Optionally, include the version number for clarity.
Based off RHH's pokeemerald-expansion 1.16.1 https://github.com/rh-hideout/pokeemerald-expansion/
Please consider crediting all contributors involved in the project!
Choosing pokeemerald or pokeemerald-expansion
pokeemerald-expansionsupports multiplayer functionality with other games built onpokeemerald-expansion. It is not compatible with official Pokémon games.- If compatibility with official games is important, use
pokeemerald. Otherwise, we recommend usingpokeemerald-expansion. pokeemerald-expansionincorporates regular updates frompokeemerald, including bug fixes and documentation improvements.
Getting Started
❗❗ Important: Do not use GitHub’s “Download Zip” option as it will not include commit history. This is necessary if you want to update or merge other feature branches.
If you’re new to git and GitHub, Team Aqua’s Asset Repo has a guide to forking and cloning the repository. Then you can follow one of the following guides:
📥 Installing pokeemerald-expansion
🏗️ Building pokeemerald-expansion
🚚 Migrating from pokeemerald
🚀 Updating pokeemerald-expansion
Documentation
For detailed documentation, visit the pokeemerald-expansion documentation page.
Contributions
If you are looking to report a bug, open a pull request, or request a feature, our CONTRIBUTING.md has guides for each.
Community
Our community uses the ROM Hacking Hideout (RHH) Discord server to communicate and organize. Most of our discussions take place there, and we welcome anybody to join us!
What features are included?
Table of Contents
Configuration files
A lot of features listed below can be turned off as desired. Check which ones in these files
- AI config
- Battle config
- Caps config
- Debug config
- DexNav config
- General config
- HGSS Pokédex config
- Item config
- NPC Follower config
- Overworld config
- Pokémon config
- Save config
- Species enabled
- Summary screen config
Upgraded Battle Engine
- Battle gimmicks: Mega Evolution, Primal Reversion, Ultra Burst, Z-Moves, Dynamax, Gigantamax and Terastallization.
- Newer game battle types: Double Wild Battles, custom Multi Battles, Inverse Battles, 1v2/2v1 battles, Sky Battles.
- Updated battle mechanics: Critical capture, Frostbite support, Poké Ball quick menu, Move description menu, no badge boosts, Gen 4 Fog, obedience, Affection, Party swap upon catch, move effectiveness in battle, FRLG/Gen4+ whiteout money calculation, Gen 4-style shadows.
- Updated move data: Fairy/Stellar types, Physical/Special split, flags.
- Updated calculations: Damage, experience, mid-turn speed, end-battle stats and EVs, Level 100 EVs.
- Every item, ability and move effect up to Gen IX: Includes contest data up to SwSh (source).
- Initial battle conditions: Stat stages, battle terrain, Wild AI flags.
- Faster battles: Simultaneous HP reduction, shortcut to “Run” option, faster battle intro, faster HP drain, faster AI calculations.
- Easier customization: Cleaner codebase to implement custom moves and effects.
- Improved AI: Faster and considers new effects added by Expansion.
- Popular features: Level/EV Caps, Sleep Clause, Type Indicators.
Full Trainer customization
- Compatible with Pokémon Showdown’s team syntax: Create your trainer teams in the teambuilder and paste the results!
- Custom Pokémon data: Nicknames, EVs, IVs, Moves, Abilities, Poké Balls, Friendship, Nature, Gender, Shininess, Dynamax level, Gigantamax Factor and Tera Type.
- “Ace Pokémon”: Will save a specific Pokémon for last.
- Trainer Pools: A trainer may get a pool of randomized Pokémon instead of set teams.
- Custom sliding trainer messages: First Turn, landing a super-effective hit, before Mega Evolution, etc.
- New AI Flag options: Customize the intelligence of your trainers.
- Trainer class Poké Balls: Divers use Dive Balls, Breeders use Nest Balls, etc.
Pokémon data
- Improved Pokémon Data structure: Optimized space to allow fitting more information, such as Tera type, 12-character names, Hyper-trained stats, evolution conditions, saved HP/status effect.
- Updated breeding mechanics: Poké Ball/Egg Move/Ability/Nature inheritance, Level 1 eggs automatic incense babies.
- Updated species data: Stats, Types, Abilities, Hidden Abilities, Egg Groups, EV Yields, movesets, Battle Facility bans, guaranteed perfect IV counts, ORAS Dex numbers.
- Simpler species data manipulation:: Only requires to edit ~5 files instead of vanilla pokeemerald’s 20+ to add a new Pokémon.
- Updated sprites: DS-style sprites with support for Emerald’s 2-frame animations and gender difference.
- Species toggles: You can disable specific groups of Pokémon to save space, including families, cross-gen evolutions, Mega Evolutions, Regional forms, etc.
- Revamped Evolution System: Multiple Evolution conditions can be stacked in order to create complex methods without additional coding. Every condition except Affection and console gyroscope is supported.
- Form Change System. Most form changes can be added without additional coding. This includes support for: Holding/using an item, HP thresholds being met, weather change in and/or out of battle, Fusions, and more.
Interface improvements
- Pokémon Summary: Move relearner, EV/IV checks, Nature colors (feature branch by @DizzyEggg).
- Party Menu: “Move Item” option.
- Pokémon Storage System: Move option as default, access from Box Link item.
- HGSS-style Pokédex (original feature branch by @TheXaman): Detailed in-game information accessible to players.
Engine improvements
- All base pokeemerald bugfixes implemented by default: Anything under the
BUGFIXdefine. - Improved sprite and palette compression: Assets use less space than vanilla compression.
- Modern compiler support: Detect potential errors in your code more easily.
- Dynamic Multichoice (original branch by @SBird1337): Easier way to add multiple-choice menus for scripting.
- High-Quality RNG: No more broken vanilla RNG.
Overworld improvements
- Modern Mechanics: Defog field move, B2W2+ Repel system, Running indoors, Removed field poison, Chain fishing, VS. Seeker, FRLG+ whiteout message.
- Overworld and Follower Pokémon (feature branch by @aarant)
- Includes Dynamic overworld palettes (DOWP) and Overworld Expansion for event IDs beyond 255.
- Includes Pokémon sprites up to Generation IX.
- Day/Night System: (feature branch by @aarant)
- Includes support for non-real time clock.
- NPC Followers: (feature branch by @ghoulslash)
- BW Map Pop-ups (feature branch by @BSBob)
- XY Berry Mechanics: Mutations, moisture, weeds, pests.
- Obtained Item descriptions (feature branch by @ghoulslash).
Developer tools
- Integrated Testing: Pinpoint if your custom mechanics have broken something else in the game or not.
- Pokémon Sprite Visualizer: Test every Pokémon sprite and animation.
- Overworld debug menu (original feature branch by @TheXaman): Support menu with an assortment of features to facilitate debugging, including warping, flag and var toggling, Pokémon and item generation and more.
- Battle Debug Menu: Modify data on the fly in the middle of a battle.
- Learnset Helper: Autogenerate movesets from your custom TM and Tutor data based on official compatibility data.
- Configurable script flags: Disabling Wild encounters, Disabling Trainer battles, Forcing/Disabling Shinies.
- Saveblock Cleansing (feature branch by @ghoulslash)
Instructions
Install instructions for each supported operating system can be found in their respective directories under docs/install/.
Lines to those can be found under each heading.
This file only contains a short introduction to each supported system.
If you run into trouble, ask for help on Discord (see README.md).
After completing the install instructions for your OS, proceed to Building pokeemerald-expansion.
Windows
Windows needs one of the systems to build the project
A note of caution: As Windows 7 and Windows 8 are officially unsupported by Microsoft, some maintainers are unwilling to maintain the Windows 7/8 instructions. Thus, these instructions may break in the future with fixes taking longer than fixes to the Windows 10/11 instructions.
On Windows, the project can be built using the following systems:
- WSL2, fastest
- WSL1, 7 times slower than WSL2
- Msys2, 20 times slower than WSL2
- Cygwin, 30 timer slower than WSL2
NOTE: Only WSL systems are recommended.
Linux
The project can be built on any Linux distribution. Distributions with instructions:
Other distributions have to infer what to do from general instructions.
Mac
Some extra considerations exist to get the testing system working.
ChromeOS
Only tested on x86_64 based systems.
Building pokeemerald-expansion
Follow these steps to build pokeemerald-expansion.
-
Navigate to the directory you want to keep the project in, be aware of any system specific limitations.
-
Download
pokeemerald-expansionwithgitgit clone https://github.com/rh-hideout/pokeemerald-expansion -
Navigate to the newly downloaded project.
cd pokeemerald-expansion -
Build the project.
make -
If everything worked correctly, something very similar to this should be seen.
arm-none-eabi-ld: warning: ../../pokeemerald.elf has a LOAD segment with RWX permissions
Memory region         Used Size  Region Size  %age Used
           EWRAM:      243354 B       256 KB     92.83%
           IWRAM:       30492 B        32 KB     93.05%
             ROM:    26072244 B        32 MB     77.70%
cd build/modern && arm-none-eabi-ld  -T ../../ld_script_modern.ld --print-memory-usage -o ../../pokeemerald.elf <objs> <libs> | cat
tools/gbafix/gbafix pokeemerald.elf -t"POKEMON EMER" -cBPEE -m01 -r0 --silent
arm-none-eabi-objcopy -O binary pokeemerald.elf pokeemerald.gba
tools/gbafix/gbafix pokeemerald.gba -p --silent
And the build ROM will be in the directory as
pokeemerald.gba.
Building guidance
Parallel builds
See the GNU docs and this Stack Exchange thread for more information.
To speed up building, first get the value of nproc by running the following command:
nproc
Builds can then be sped up by running the following command:
make -j<output of nproc>
Replace <output of nproc> with the number that the nproc command returned.
nproc is not available on macOS. The alternative is sysctl -n hw.ncpu (relevant Stack Overflow thread).
Other toolchains
To build using a toolchain other than devkitARM, override the TOOLCHAIN environment variable with the path to your toolchain, which must contain the subdirectory bin.
make TOOLCHAIN="/path/to/toolchain/here
The following is an example:
make TOOLCHAIN="/usr/local/arm-none-eabi"
To compile the modern target with this toolchain, the subdirectories lib, include, and arm-none-eabi must also be present.
Building with debug info
To build pokeemerald.elf with debug symbols and debug-compatible optimization under a modern toolchain:
make debug
Choosing a branch
pokeemerald-expansion has different branches that users can decide to use.
Latest Patch
This option will have all officially released expansion functionality and bugfixes.
master
The master branch has all of the functionality from “Latest Patch”, as well as any bugfixes that have been discovered since that release.
upcoming
The master branch has all of the functionality from “Latest Patch”, as well as any functionality that has been added since that release.
The bugfixes on master are occasionally merged into upcoming, but there is no official cadence.
Migrating from pokeemerald
- Set RHH as a git remote
git remote add RHH https://github.com/rh-hideout/pokeemerald-expansion
- Pull your desired branch There are three different options to pull from.
git pull RHH master # if you've chosen to use the upcoming branch, replace the word master with upcoming.
# If you've chosen the latest patch, replace the word master with expansion
# If you've chosen Latest Patch, replace the word master with expansion/1.11.0 where 1.11.0 is replaced with whatever the latest released version is.
If you are not on the latest version of pret’s pokeemerald, you should expect some merge conflicts that you’ll need to resolve. Once complete, you’ll be using pokeemerald-expansion.
Updating pokeemerald-expansion
- Set RHH as a git remote
git remote add RHH https://github.com/rh-hideout/pokeemerald-expansion
-
Check your current version Your local copy of the changelog will be updated with the version your repo is on.
-
Select a target version We recommend incrementally updating to the next version using the following order below. If you are on a version older than 1.6.2, you should target 1.6.2..
- 1.6.2
- 1.7.4
- 1.8.3
- 1.9.4
- 1.10.3
For example, if your version is 1.7.0, you should update to 1.7.4.
- Pull the target version
git pull RHH expansion/X.Y.Z # Replace X, Y and Z with the target version, such as `1.9.3`, `master`, or `upcoming`.
You may have merge conflicts that you need to resolve.
If you targeted a specific version that is not the latest version listed on the tags page, you should repeat steps 3 and 4 until you are.
Useful additional tools
- porymap for viewing and editing maps
- porytiles for add new metatiles for maps
- poryscript for scripting (VS Code extension)
- Tilemap Studio for viewing and editing tilemaps
Setting up WSL1 (Legacy Portion)
Setting up WSL1 (Legacy Portion)
-
Certain packages are required to build pokeemerald. Install these packages by running the following command:
sudo apt install build-essential git libpng-dev gdebi-coreNote: If the above command does not work, try the above command but replacing
aptwithapt-get. -
Once the packages have finished installing, download the devkitPro pacman package here. The file to download is
devkitpro-pacman.amd64.deb. -
WSL has its own file system that’s not accessible from Windows, but Windows files are accessible from WSL. To install the devkitPro package, you’ll need to change to the current working directory where the package file was saved.
For example, if the package file was saved to C:\Users\<user>\Downloads (the Downloads location for most users), enter this command, where <user> is your Windows username:
cd /mnt/c/Users/<user>/DownloadsNote 1: The Windows C:\ drive is called /mnt/c/ in WSL. Note 2: If the path has spaces, then the path must be wrapped with quotations, e.g.
cd "/mnt/c/users/<user>/Downloads folder". Note 3: Windows path names are case-insensitive so adhering to capitalization isn’t needed -
Once the directory has been changed to the folder containing the devkitPro pacman package, run the following commands to install devkitARM.
sudo gdebi devkitpro-pacman.amd64.deb
sudo dkp-pacman -Sy
sudo dkp-pacman -S gba-dev
The last command will ask for the selection of packages to install. Just press Enter to install all of them, followed by entering Y to proceed with the installation.
Note:
devkitpro-pacman.amd64.debis the expected filename of the devkitPro package downloaded (for the first command). If the downloaded package filename differs, then use that filename instead. -
Run the following command to set devkitPro related environment variables (alternatively, close and re-open WSL):
source /etc/profile.d/devkit-env.sh
Proceed to Choosing where to store pokeemerald (WSL1) of the current INSTALL.md.
Instructions for ChromeOS
-
Enable the Linux terminal by following the instructions on this page. Be sure to allocate enough space for the Linux install.
-
After the Linux terminal has finished installing, run the following command in the terminal to update and upgrade the Linux terminal:
sudo apt update && apt upgrade -
Then install all dependencies by running the following command:
sudo apt install build-essential binutils-arm-none-eabi gcc-arm-none-eabi libnewlib-arm-none-eabi git libpng-dev python3
NOTE: The project must be kept in a directory inside the Linux filesystem, for example under ~/Decomps/pokeemerald-expansion
Arch Linux instructions
Installing dependencies
Run the following command from the command line:
sudo pacman -S base-devel arm-none-eabi-binutils arm-none-eabi-gcc arm-none-eabi-newlib git libpng python
Debian instructions
Installing dependencies
Open a terminal and run the following command from the command line:
sudo apt install build-essential binutils-arm-none-eabi gcc-arm-none-eabi libnewlib-arm-none-eabi git libpng-dev python3
Fedora instructions
Installing dependencies
Open a terminal and run the following command from the command line:
sudo dnf install gcc g++ arm-none-eabi-binutils-cs arm-none-eabi-gcc-cs arm-none-eabi-newlib git libpng-devel python3
NixOS instructions
Run the following command to start an interactive shell with the necessary packages:
nix-shell -p pkgsCross.arm-embedded.stdenv.cc git pkg-config libpng
Instructions for other distributions
- Try to find the required software in its repositories:
gccg++arm-none-eabi-gccarm-none-eabi-binutilsarm-none-eabi-newlibmakegitlibpng-devpython3
Ubuntu instructions
Installing dependencies
Open a terminal and run the following command from the command line:
sudo apt install build-essential binutils-arm-none-eabi gcc-arm-none-eabi libnewlib-arm-none-eabi git libpng-dev python3
Instructions for macOS
-
If the Xcode Command Line Tools are not installed, download the tools here, open your Terminal, and run the following command:
xcode-select --install -
- If libpng is not installed, then go to Installing libpng (macOS).
- If pkg-config is not installed, then go to Installing pkg-config (macos).
- If devkitARM is not installed, then go to Installing devkitARM (macOS).
- Otherwise, open the Terminal and go to Choosing where to store pokeemerald-expansion (macOS)
-
Optional: To run tests, if the homebrew environment is not installed, install the package manager using this reference. Open your terminal and run the following commands:
/bin/bash -c "$(curl -fsSL https://raw.githubusercontent.com/Homebrew/install/HEAD/install.sh)" brew install coreutils -
Optional: To run tests via Rosetta
- You probably don’t want to do this as it’s much slower. Most users can use native tools, but some may have other reasons to use this setup such as working with Intel-only custom tooling.
- You will need an Intel-compatible homebrew installation. Understanding how to get one can be found here.
- Install
coreutilslike in step 3, but using your Intel-compatible installation of homebrew.
Installing libpng (macOS)
Note for advanced users...
This guide installs libpng via Homebrew as it is the easiest method, however advanced users can install libpng through other means if they so desire.
-
Open the Terminal.
-
If Homebrew is not installed, then install Homebrew by following the instructions on the website.
-
Run the following command to install libpng.
brew install libpnglibpng is now installed.
Continue to Installing pkg-config (macOS) if pkg-config is not installed. Otherwise, continue to Installing devkitARM (macOS) if devkitARM is not installed.
If both pkg-config and devkitARM are already installed, go to Choosing where to store pokeemerald-expansion (macOS).
Installing pkg-config (macOS)
Note for advanced users...
This guide installs pkg-config via Homebrew as it is the easiest method, however advanced users can install pkg-config through other means if they so desire.
-
Open the Terminal.
-
If Homebrew is not installed, then install Homebrew by following the instructions on the website.
-
Run the following command to install libpng.
brew install pkg-configpkg-config is now installed.
Continue to Installing devkitARM (macOS) if devkitARM is not installed, otherwise, go to Choosing where to store pokeemerald-expansion (macOS).
Installing devkitARM (macOS)
-
Download the
devkitpro-pacman-installer.pkgpackage from here. -
Open the package to install devkitPro pacman.
-
In the Terminal, run the following commands to install devkitARM:
sudo dkp-pacman -Sy
sudo dkp-pacman -S gba-dev
sudo dkp-pacman -S devkitarm-rules
The command with gba-dev will ask for the selection of packages to install. Just press Enter to install all of them, followed by entering Y to proceed with the installation.
-
After the tools are installed, devkitARM must now be made accessible from anywhere by the system. To do so, run the following commands:
export DEVKITPRO=/opt/devkitpro
echo "export DEVKITPRO=$DEVKITPRO" >> ~/.zshrc
export DEVKITARM=$DEVKITPRO/devkitARM
echo "export DEVKITARM=$DEVKITARM" >> ~/.zshrc

echo "if [ -f ~/.zshrc ]; then . ~/.zshrc; fi" >> ~/.zprofile
Note: Starting with macOS 10.15, the default Unix shell is now zsh. If you migrated from an older version of macOS, you might still be using bash. You can check my running
echo $0in the terminal.If your terminal is using bash instead of zsh...
export DEVKITPRO=/opt/devkitpro
echo "export DEVKITPRO=$DEVKITPRO" >> ~/.bashrc
export DEVKITARM=$DEVKITPRO/devkitARM
echo "export DEVKITARM=$DEVKITARM" >> ~/.bashrc

echo "if [ -f ~/.bashrc ]; then . ~/.bashrc; fi" >> ~/.bash_profile
Installing Python (macOS)
- Download the latest Python package from here.
- Open the package to install Python.
Python is now installed.
cygwin
Don’t, just don’t.
Currently doesn’t work on current Expansion versions.
This is a bug from upstream pret pokeemerald.
msys2
Don’t, just don’t.
Currently doesn’t work on current Expansion versions.
This is a bug from upstream pret pokeemerald.
Windows WSL instructions
Choosing WSL version
If you must store your project on the Windows file system (under /mnt/c/), you should use WSL1. If you want the best performance and least amount of issues with Windows interfering with compiling the project, use WSL2 and store the project on the Linux file system (under ~/).
Installing WSL
-
Open Windows Powershell as Administrator, and run the following commands (Right Click or Shift+Insert is paste in the Powershell).
wsl --install -d Ubuntu --enable-wsl1 -
Once the process finishes, restart your machine.
WSL1
-
Open Windows Powershell as Administrator again (after restarting), and run the following command to configure Ubuntu to use WSL1.
wsl --set-version Ubuntu 1
WSL2
-
Open Windows Powershell as Administrator again (after restarting), and run the following command to configure Ubuntu to use WSL2.
wsl --set-version Ubuntu 2Note...
WSL may open automatically after restarting, but you can ignore it for now.
Installing dependencies
Some tips before proceeding:
- In WSL, Copy and Paste is either done via
- right-click (selection + right click to Copy, right click with no selection to Paste)
- Ctrl+Shift+C/Ctrl+Shift+V (enabled by right-clicking the title bar, going to Properties, then checking the checkbox next to “Use Ctrl+Shift+C/V as Copy/Paste”).
- Some of the commands that you’ll run will ask for your WSL password and/or confirmation to perform the stated action. This is to be expected, just enter your WSL password and/or the yes action when necessary.
-
Open Ubuntu (e.g. using Search).
-
WSL/Ubuntu will set up its own installation when it runs for the first time. Once WSL/Ubuntu finishes installing, it will ask for a username and password (to be input in).
Note...
When typing in the password, there will be no visible response, but the terminal will still read in input.
-
Update WSL/Ubuntu before continuing. Do this by running the following command. These commands will likely take a long time to finish:
sudo apt update && sudo apt upgrade -
Certain packages are required to build pokeemerald Expansion. Install these packages by running the following command:
sudo apt install build-essential binutils-arm-none-eabi gcc-arm-none-eabi libnewlib-arm-none-eabi git libpng-dev python3
Choosing a location to store pokeemerald Expansion, WSL1
WSL has its own file system that’s not natively accessible from Windows, but Windows files are accessible from WSL. So you’re going to want to store pokeemerald Expansion within Windows.
For example, say you want to store pokeemerald Expansion in C:\Users\<user>\Desktop\decomps. First, ensure that the folder already exists. Then, enter this command to change directory to said folder, where <user> is your Windows username:
cd /mnt/c/Users/<user>/Desktop/decomps
Notes...
Note 1: The Windows C:\ drive is called /mnt/c/ in WSL. Note 2: If the path has spaces, then the path must be wrapped with quotations, e.g.
cd "/mnt/c/users/<user>/Desktop/decomp folder". Note 3: Windows path names are case-insensitive so adhering to capitalization isn’t needed
Choosing a location to store pokeemerald Expansion, WSL2
WSL has its own file system that’s not natively accessible from Windows, but Windows files are accessible from WSL. But accessing files on the Windows file system with WSL2 is very slow, so you’re going to want to store pokeemerald Expansion within WSL2. To access the files on the WSL filesystem from Windowsm, you have to open the WSL filesystem as a network attached storage in the file explorer, it should be at the bottom of the left sidebar as “Ubuntu”.
Thus you’re going to make sure that you’re in the WSL filesystem, then create the folder for decomps if it doesn’t already exist, then move into that folder.
cd ~/
mkdir decomps
cd decomps
Run documentation site locally
Running documentation website locally
Ubuntu WSL1/WSL2
Note: For further information beyond this very basic guide, please visit mdBook’s official documentation.
Running documentation website locally (Ubuntu WSL1/WSL2)
Previous Requirements:
- Option 1: Install via Rust toolchain
- Install Rust toolchain if you don’t have it via the
sudo apt install cargocommand. - Install mdBook via the
cargo install mdbookcommand. Once finished, this message will pop up, with {USER} being your Ubuntuwarning: be sure to add `/home/{USER}/.cargo/bin` to your PATH to be able to run the installed binaries - Add
/home/{USER}/.cargo/binto your PATH (with {USER} being the Ubuntu username.)- Run command
nano ~/.profileto edit the file. - Add the following lines, replacing {USER} with your Linux username.
# set PATH so it includes user's private bin if it exists if [ -d "$HOME/bin" ] ; then PATH="$HOME/bin:$PATH" fi # set PATH so it includes user's private bin if it exists if [ -d "$HOME/.local/bin" ] ; then PATH="$HOME/.local/bin:$PATH" fi +# set PATH so it includes cargo bin if it exists +if [ -d "/home/{USER}/.cargo/bin" ] ; then + PATH="/home/{USER}/.cargo/bin:$PATH" +fi - Run the
source ~/.profilecommand to refresh the path in the current session.
- Run command
- Install Rust toolchain if you don’t have it via the
- Option 2: Install downloaded binaries directly
- TODO: Add documentation of this process.
Running the website
- Navigate to the
docsfolder on the repository. - Run
mdbook serve. Once started, you may now open the website on your browser by going tohttp://127.0.0.1:3000. - Every change done to the
docsfolder will be reflected with an automatic refresh. - To stop the server and go back to the terminal, press
Ctrl + C.
Modifying the website
- The navigation menu on the left is handled by
docs/SUMMARY.md. Every file added needs to be added somewhere here in order to become visible, otherwise you’ll get a 404 error. - Any Markdown files (.md extension) added to the
docs/directory will automatically be read by mdBook. - To add Markdown files that are not in the
docs/directory, you may create an empty.mdfile and add the following without the “––”:
This will include the{{ ----#include ../INSTALL.md}}`INSTALL.mdMarkdown file from the root directory.
Once you’re set up, you can now check your changes before pushing them to your repo! :D
We hope that this will make it easier for users to contribute to the documentation :)
Contributing to pokeemerald-expansion
First off, thanks for helping improve pokeemerald-expansion! ❤️
All contributions are encouraged and valued. Please make sure to read the relevant section before making your contribution! It will make it a lot easier for you and the maintainers. We’re excited to see your contributions. 🎉
Bug Reports
We use GitHub issues to track bugs.
What should I do before making a bug report?
- Does your bug occur on the latest unmodified (clean) version of the
upcomingormasterbranch? If not, please do not submit a report - the issue is most likely one introduced by your game. - Has somebody else already found this issue? This is best done by searching the bug tracker to see if anybody else reported it. If there is already an issue, replying to the exsting issue with more information can help solve the problem.
How do I submit a bug report?
If you run into an issue with the project, open an issue.
The best bug reports have enough information that we won’t have to contact you for more information. We welcome all efforts to improve pokeemerald-expansion, but would be very grateful if you completed as much of the checklist as possible in your bug report. This will help other contributiors fix your issue.
What happens after I submit a bug report?
- A maintainer will label the bug report.
- A maintainer will try to reproduce the bug with your provided steps.
- If there are no reproduction steps or no obvious way to reproduce the issue, somebody will ask you for those steps. Until the bug can be reproduced, the bug will retain the
bug:unconfirmedlabel. Unconfirmed bugs are less likely to get fixed.
- If there are no reproduction steps or no obvious way to reproduce the issue, somebody will ask you for those steps. Until the bug can be reproduced, the bug will retain the
- If the team is able to reproduce the bug, it will be labeled
bug:confirmed, and the bug will be left to be fixed by someone.- If the issue is particularly game-breaking, a maintainer will add it to a future version’s milestone, meaning that version will not be released until the problem is solved.
Feature Requests
This section guides you through submitting a feature request for pokeemerald-expansion, including completely new features and minor improvements to existing functionality. Following these guidelines will help maintainers and the community to understand your suggestion and find related suggestions.
- We use GitHub issues to track feature requests.
What should I do before making a feature request?
- Make sure your request is in pokeemerald-expansion’s scope - if it is not clear if something is in scope, you can start a discussion thread in the #pr-discussions channel of the the RHH Discord Server.
What should I do before making a feature request?
- Read the documentation to find out if the functionality is already covered, maybe by an individual configuration.
- Perform a search to see if the feature has already been requested. If it has, add a comment to the existing issue instead of opening a new one.
How do I submit a feature request?
To request a feature to be added to the project, open a feature request.
What happens after I submit a feature request?
- A maintainer will label the issue.
- If the feature request is out of scope, it will be closed.
- if the request is in scope, any other contributor can volunteer to fufill it via a pull request. When the request is filled, the request will be closed.
Pull Requests
If you have read all of this and still need help, feel free to start a thread in #pr-discussions of the Discord server or ask questions in #expansion-dev.
What should I do before starting a pull request?
- If you’re new to git and GitHub, Team Aqua’s Asset Repo has a guide on forking and cloning the repository. Make sure you have a local copy of
pokeemerald-expansion. - Make sure your contribution is in scope - if it is not clear if something is in scope, you can start a discussion thread in the #pr-discussions channel of the the RHH Discord Server!.
- Choose a branch to contribute your PR to:
master: If your PR contains meets any of the following criteria, it should go tomaster:- Fixes for bugs that are currently present in the
masterbranch - PR is only documentation updates / changes
- PR is only tests
- Fixes for bugs that are currently present in the
upcoming: All other pull requests go toupcoming.
- Create a new branch from the most recent version of the branch you’ve chosen.
- If your contribution introduces, removes, or changes a lot of existing code, we reccomend getting a maintainer to agree to review it before you start on the work! We have a table that lists all current maintainers and their areas of expertise.
How do I submit a pull request?
1. Get a working local copy
If you haven’t already, follow INSTALL.md to get a working local copy of pokeemerald-expansion.
2. Set RHH as a remote
This will designate the main pokeemerald-expansion repository as a remote.
git remote add RHH https://github.com/rh-hideout/pokeemerald-expansion # You can replace RHH with anything you want. This tutorial assumes you used RHH.
3. Create a new branch
This will create a new branch and switch to it.
git switch -c newFeature # the name newFeature can be anything you want. This tutorial assumes you used newFeature.
4. Copy your target branch to your new branch
This will change your new branch to match the latest version of your chosen target branch.
git reset --hard upcoming # If your PR is going to target master, replace upcoming with master.
5. Implement your code
All of your work should go on this new, clean branch. If you already started work on a different branch, you can cherry-pick you old commits onto this new branch, or just copy and paste the changes from the original files.
Popular Features / Feature Branches
If you are implementing functionality from a known community feature branch, it is strongly recommended that you open a discussion thread before starting. There are some situations where maintainers would ask you to use the existing feature branch as a base, and others where maintainers would want a feature to be written from scratch.
This changes on a case by case basis.
6. Push your changes
When you push your first commit, you’ll need to push the new branch to the remote repo.
git push --set-upstream origin newFeature
7. Open Pull Request
Once your work is complete and pushed to the branch on Github, you can open a pull request from your branch, targeting the branch you’ve chosen from pokeemerald-expansion. Please fill out the pull request description as completely as possible.
What happens after I submit a pull request?
A maintainer will then assign themselves as a reviewer of your pull request, and may provide feedback in the form of a PR review.
Contributors are responsible for responding to and updating their branch by addressing the feedback in the review. Contributors are also responsible for making sure the branch passes the checklist at all times.
Once a maintainer has begun reviewing your PR, please do not force-push new changes - normal pushes are fine. Do not worry about git history - we squash most incoming changes.
Maintainers will measure the submitted pull request against a merge checklist.
Once all items on the merge checklist are true, the branch will be merged in.
Maintainers
This list was last updated 2026 May 2.
| Name | Discord | Currently Active | Areas of Expertise |
|---|---|---|---|
| Alex | rainonline | ✅ | Battle Engine, Battle AI |
| PhallenTree | phallentree | ✅ | Battle Engine |
| Jasper | bassoonian | ✅ | Berries, Day / Night System, Followers, Feature Branches |
| MGriffin | mgriffin | ✅ | Tests, Trainer Control |
| psf | pkmnsnfrn | ✅ | Rematches, Difficulty, Trainer Slides, Fake RTC, Fishing Minigames, Imperial / Metric, OW Item Balls, Sky Battles, Defog |
| Hedara | hedara | ✅ | Compression, Sprites |
| Pawkkie | pawkkie | ✅ | Battle AI |
| SBird | karathan | ✅ | Dynamic Multichoice, Damage Calculation, Animations, Trainer Control, Tests |
| Jamie | foster_harmony | ✅ | Overworld, Tests, Day / Night System, Dexnav, Battle Frontier, HGSS Dex, Pokerus, Learnsets, Mon Generation, Vs Seeker |
| grintoul | grintoul | ✅ | Tests, Battle AI, Battle Engine, Overworld, Trainer Slides, Follower NPCs, Multi Battles |
Attribution
This guide is based on the contributing.md!
Styleguide and Principles
Naming Conventions
Function names and struct names should be formatted in PascalCase.
void ThisIsCorrect(void);

struct MyStruct
{
    u8 firstField;
    u16 secondField;
    ...
};
Variables and struct fields should be formatted in camelCase.
int thisIsCorrect = 0;
Global variables should be prefixed with g, and static variables should be
prefixed with s.
extern s32 gMyGlobalVariable;

static u8 sMyStaticVariable = 0;
Macros and constants should use CAPS_WITH_UNDERSCORES.
#define MAX_LEVEL 100

enum
{
    COLOR_RED,
    COLOR_BLUE,
    COLOR_GREEN,
};

#define ADD_FIVE(x) ((x) + 5)
Coding Style
Comments
Ideally, contributions have descriptive variable, function and constant names so as to explain functionality without comments. When a comment is used, the content of the comment should explain WHY a specific system or component works the way it does.
When describing a system/component in-depth, use block comment syntax.
/*
 * This is an in-depth description of the save block format. Its format is as follows:
 *
 * Sectors  0 - 13: Save Slot 1
 * Sectors 14 - 27: Save Slot 2
 * ...
 */
When briefly describing a function or block of code, use a single-line comments
placed on its own line.
There should be a single space directly to the right of //.
// This is supplemental information for the function. If there is a bunch of info, it should
// carry on to the next line.
void ProcessSingleTask(void)
{
   // Short comment describing some noteworthy aspect of the code immediately following.
   ...
   // Comments should be capitalized and end in a period.
}
When tagging a data structure that corresponds to an enum or some noteworthy
value, place the comment on the same line as the code.
const u8 gPlantlikeMons[] =
{
    FALSE, // SPECIES_BULBASAUR
    FALSE, // SPECIES_IVYSAUR
    TRUE,  // SPECIES_VENUSAUR
    FALSE, // SPECIES_CHARMANDER
    ...
};
Whitespace
All .c and .h files should use 4 spaces–not tabs.
Assembler files (.s) use tabs.
Script files (.inc) use tabs.
Operators
Assignments and comparison operators should have one space on both sides of =.
int i = 0; // correct
int i=0;   // incorrect

a > b // correct
a>b   // incorrect
The incrementor and decrementor operators should NOT have a space.
i++;  // correct
i ++; // incorrect
A control statement should have a space between them and their expressions, and the opening bracket should be on the next line.
for (...)
{
    // correct
}

for(...) {
    // incorrect
}
A switch statement’s cases should left-align with the switch’s block.
switch (foo)
{
case 0: // correct
    ...
    break;
}

switch (foo)
{
    case 0: // incorrect
        ...
        break;
}
A single empty line should follow a block.
int MyFunction(int bar)
{
    int foo = 0;
    if (bar)
        foo++;

    return foo; // correct
}

int MyFunction(int bar)
{
    int foo = 0;
    if (bar)
        foo++;
    return foo; // incorrect
}
A chain of if-else statements in which any condition or block is more
than one line of code should use braces. If all blocks and conditions
are single-line, then no braces are necessary.
if (foo) // correct
    return 1;

if (foo
 && bar) // correct
{
    return 1;
}

if (foo) // correct
{
    return 1;
}
else
{
    MyFunction();
    return 0;
}

if (foo) // correct
{
    return 1;
}
else if (foo
      && bar)
{
    return 0;
}

if (foo) // incorrect
{
    return 1;
}

if (foo
 && bar) // incorrect
    return 1;

if (foo) // incorrect
    return 1;
else
{
    MyFunction();
    return 0;
}

if (foo) // incorrect
    return 1;
else if (foo
      && bar)
    return 0;
The exception is assertf which should always use braces if it has a recovery path, even for one line of conditions and one line of code.
assertf(true); // correct

assertf(true) // correct
{
    return NULL;
}

assertf(true) // incorrect
    return NULL;
Control Structures
When comparing whether or not a value equals 0, don’t be explicit unless the
situation calls for it.
if (runTasks) // correct
    RunTasks();

if (runTasks != 0) // incorrect
    RunTasks();

if (!PlayerIsOutside()) // correct
    RemoveSunglasses();

if (PlayerIsOutside() == 0) // incorrect
    RemoveSunglasses();
When writing a for or while loop with no body, use a semicolon ; on the
same line, rather than empty braces.
for (i = 0; gParty[i].species != SPECIES_NONE; i++); // correct

for (i = 0; gParty[i].species != SPECIES_NONE; i++) // incorrect
{ }
Inline Configs
When adding functionality that is controlled by a config, defines should be checked within the normal control flow of the function unless a data structure requires a change at runtime.
void SetCurrentDifficultyLevel(enum DifficultyLevel desiredDifficulty)
{
#ifdef B_VAR_DIFFICULTY
    return; // Incorrect
#endif

    if (desiredDifficulty > DIFFICULTY_MAX)
        desiredDifficulty = DIFFICULTY_MAX;

    VarSet(B_VAR_DIFFICULTY, desiredDifficulty);
}
void SetCurrentDifficultyLevel(enum DifficultyLevel desiredDifficulty)
{
    if (!B_VAR_DIFFICULTY) // Correct
        return;

    if (desiredDifficulty > DIFFICULTY_MAX)
        desiredDifficulty = DIFFICULTY_MAX;

    VarSet(B_VAR_DIFFICULTY, desiredDifficulty);
}
    [MOVE_VINE_WHIP] =
    {
        .name = COMPOUND_STRING("Vine Whip"),
        .description = COMPOUND_STRING(
            "Strikes the foe with\n"
            "slender, whiplike vines."),
        #if B_UPDATED_MOVE_DATA >= GEN_6 // Correct
            .pp = 25,
        #elif B_UPDATED_MOVE_DATA >= GEN_4
            .pp = 15,
        #else
            .pp = 10,
        #endif
        .effect = EFFECT_HIT,
        .power = B_UPDATED_MOVE_DATA >= GEN_6 ? 45 : 35,
    },
Variable Declarations
Loop iterators should be declared as part of the loop unless there’s a very good reason not to.
for (u32 i = 0; i < LOOP_ITERATIONS; i++)
{
    dst1[i] = i;
    dst2[i] = i;
}
Data Type Sizes
When a variable number is used, the data type should generally u32 (unsigned) or s32 (signed). There are a few exceptions to this rule, such as:
- Values stored in the saveblock should use the smallest data type possible.
EWRAMvariables should use the smallest data type possible.- Global variables / global struct members use the smallest data type possible.
Constants, Enums and Type Checking
Avoid using magic numbers when possible - constants help to make clear why a specific value is used.
// Incorrect
        if (gimmick == 5 && mon->teraType != 0)
            return TRUE;
        if (gimmick == 4 && mon->shouldUseDynamax)
            return TRUE;
// Correct
#define TYPE_NONE 0
#define GIMMICK_DYNAMAX 4
#define GIMMICK_TERA 5

        if (gimmick == GIMMICK_TERA && mon->teraType != TYPE_NONE)
            return TRUE;
        if (gimmick == GIMMICK_DYNAMAX && mon->shouldUseDynamax)
            return TRUE;
When several numbers in sequence are used AND those values are not utilized in the saveblock, an enum is used instead.
//Correct
enum Gimmick
{
    GIMMICK_NONE,
    GIMMICK_MEGA,
    GIMMICK_ULTRA_BURST,
    GIMMICK_Z_MOVE,
    GIMMICK_DYNAMAX,
    GIMMICK_TERA,
    GIMMICKS_COUNT,
};

        if (gimmick == GIMMICK_TERA && mon->teraType != TYPE_NONE)
            return TRUE;
        if (gimmick == GIMMICK_DYNAMAX && mon->shouldUseDynamax)
            return TRUE;
When an enum is used, the enum type is used instead of a regular number type to prevent incorrectly set values.
// Incorrect
bool32 CanActivateGimmick(u32 battler, u32 gimmick)
{
    return gGimmicksInfo[gimmick].CanActivate != NULL && gGimmicksInfo[gimmick].CanActivate(battler);
}

u32 GetCurrentDifficultyLevel(void)
{
    if (!B_VAR_DIFFICULTY)
        return DIFFICULTY_NORMAL;

    return VarGet(B_VAR_DIFFICULTY);
}
//Correct

bool32 CanActivateGimmick(u32 battler, enum Gimmick gimmick)
{
    return gGimmicksInfo[gimmick].CanActivate != NULL && gGimmicksInfo[gimmick].CanActivate(battler);
}

enum DifficultyLevel GetCurrentDifficultyLevel(void)
{
    if (!B_VAR_DIFFICULTY)
        return DIFFICULTY_NORMAL;

    return VarGet(B_VAR_DIFFICULTY);
}
Data file format
External data files should use JSON.
Principles
Minimally Invasive
New functionality must be as minimally invasive to existing files as possible. When a large amount of new code is introduced, it is best to isolate it in its own file.
The B_VAR_DIFFICULTY pull request is a good example of lots of new code being introduced in minimally invasive ways.
UNUSED
If a function or data is introduced but is never called, it is designated as UNUSED. UNUSED functions should not be introduced unless neccesary.
static void UNUSED PadString(const u8 *src, u8 *dst)
{
    u32 i;

    for (i = 0; i < 17 && src[i] != EOS; i++)
        dst[i] = src[i];

    for (; i < 17; i++)
        dst[i] = CHAR_SPACE;

    dst[i] = EOS;
}
Config Philosophy
If a branch can modifies saves, the functionality that does so must be gated behind a config, and off by default.
If a branch has a config that performs either of the following, it should be on by default:
- improves the backend / developer quality of life
- emulates present day, modern day Pokémon
The sole excpetion to this is content who’s sole source is Pokémon Champions. Champions content should use the GEN_CHAMPIONS config, but GEN_LATEST will remain GEN_9 unless explicitly stated otherwise by a maintainer.
If a branch’s behavior is one that Game Freak does not have a consistent stance on, the default behavior of the config should be disussed by the maintainers.
All other configs should be off.
Save Philosophy
Until save migration is implemented, branches will only merged in if they do not forcefully break existing game saves.
When pokemeerald-expansion gets to a point where new functionality will require that we break saves, we will merge as many save-breaking features together as possible, and increment the major version number of the project.
Attribution
- The majority of the styleguide was written by garakmon as part of their PR to pokefirered.
Credits
Credits ✨
Thanks goes to these wonderful people (emoji key):


This project follows the all-contributors specification. Contributions of any kind welcome!
Other Credits
Mega Evolution Overworld Sprite Credits:
Resources
- Sugimori Palettes and Sprites
- DS Style Gen VI Sprites
- Gen VII and Beyond Sprites
- Some icons ripped from Pokemon Gaia
- Data Files
- Complete FireRed Upgrade
- pokeemerald
What are AI Flags?
AI flags alter the behavior of AI controlled trainers. These flags affect what moves the AI chooses to use, what Pokémon the AI sends out and when they decide to switch, overarching strategic choices the AI prefers to make, and more.
The AI flags can be found in include/constants/battle_ai.h. Some flags have their own dedicated functions that affect how the AI scores its options when choosing what to do in battle, and those functions can be found in src/battle_ai_main.c. Other flags are used in conditional checks to gate certain behaviour behind certain flags, which you can typically find by searching the codebase for the flag name and browsing from there.
What flags should you use?
When adding new AI flags it is recommended to use AI_FLAG_CHECK_BAD_MOVE, AI_FLAG_CHECK_VIABILITY, AI_FLAG_TRY_TO_FAINT to make sure the AI makes good decisions. It is especially important to use AI_FLAG_CHECK_BAD_MOVE in combination with any added flags otherwise the AI will use moves that can fail.
Other flags should be used with consideration to the circumstances.
How do you use them?
Adding an AI flag to a trainer is straightforward, but the process is different depending on how trainers are being defined.
COMPETITIVE_PARTY_SYNTAX == TRUE
If you are using competitive syntax parties, navigate to the trainer data in src/data/trainers.party, find the trainer you’d like to change, and add flags like so:
AI: Check Bad Move / Try to Faint / Check Viability. The name of each flag is just the constant, but without AI_FLAG at the beginning. For example, to add AI_FLAG_SEQUENCE_SWITCHING, any of the following will work:
- AI_FLAG_SEQUENCE_SWITCHING
- SEQUENCE_SWITCHING
- SEQUENCE SWITCHING
- Sequence_Switching
- Sequence Switching
COMPETITIVE_PARTY_SYNTAX != TRUE / Not Found
If you are not using competitive syntax parties, instead access the trainer data directly in src/data/trainers.h, and add flags like so, typed exactly the same as the flag names themselves:
.aiFlags = AI_FLAG_CHECK_BAD_MOVE | AI_FLAG_TRY_TO_FAINT | AI_FLAG_CHECK_VIABILITY
What AI Flags does pokeemerald-expansion have?
This section lists all of expansion’s AI Flags and briefly describes the effect they have on the AI’s behaviour. In all cases, please check the corresponding function or surrounding code around their implementation for more details. Some of these functions are vanilla, some share a name with vanilla but have been modified to varying degrees, and some are completely new.
Composite AI Flags
Expansion has a few “composite” AI flags. This means that these flags have no unique functionality themselves, and can instead be thought of as groups of other flags that are all enabled when this flag is enabled. The idea behind these flags is that if you don’t care to manage the detailed behaviour of a particular trainer, you can use these as a baseline instead, and expansion will keep them updated for you.
AI_FLAG_BASIC_TRAINER is expansion’s version of generic, normal AI behaviour. It includes AI_FLAG_CHECK_BAD_MOVE (don’t use bad moves), AI_FLAG_TRY_TO_FAINT (faint the player where possible), and AI_FLAG_CHECK_VIABILITY (choose the most effective move to use in the current context). Trainers with this flag will still be smarter than they are in vanilla as there have been dramatic improvements made to move selection, but not incredibly so. Trainers with this flag should feel like normal trainers. In general we recommend these three flags be used in all cases, unless you specifically want a trainer who makes obvious mistakes in battle.
AI_FLAG_SMART_TRAINER is expansion’s version of a “smart AI”. It includes everything in AI_FLAG_BASIC_TRAINER along with AI_FLAG_SMART_SWITCHING (make smart decisions about when to switch), AI_FLAG_SMART_MON_CHOICES (make smart decisions about what mon to send in after a switch / KO), AI_FLAG_OMNISCIENT (awareness of what moves, items, and abilities the player’s mons have to better inform decisions), and AI_FLAG_SMART_TERA (make smart decisions about when to terastalize). Expansion will keep this updated to represent the most objectively intelligent behaviour our flags are capable of producing.
AI_FLAG_PREDICTION will enable all of the prediction flags at once, so the AI can perform as well as possible. It is best paired with the flags in AI_FLAG_SMART_TRAINER for optimal behaviour. This currently includes AI_FLAG_PREDICT_SWITCH and AI_FLAG_PREDICT_INCOMING_MON, but will likely be expanded in the future.
Expansion has LOADS of flags, which will be covered in the rest of this guide. If you don’t want to engage with detailed trainer AI tuning though, you can just use these two composite flags, and trust that expansion will keep their contents updated to always represent the most standard and the smartest behaviour we can.
AI_FLAG_CHECK_BAD_MOVE
The AI will avoid using moves that are likely to fail in the current situation. This flag helps prevent the AI from making ineffective choices, such as using moves into immunities, into invulnerable states, or when the moves are otherwise hindered by abilities, terrain, or status conditions.
AI_FLAG_TRY_TO_FAINT
AI will prioritize KOing the player if able rather than using status moves. Will prioritize using a move that can OHKO the player. If the player can KO the AI’s mon and the AI’s mon is slower, prioritize priority moves (this does not prevent the AI from switching out instead).
This flag handles scoring for OHKOs but does not handle 2HKOs at all, AI_FLAG_STRONGEST_MOVE should be used for 2HKO scoring.
AI_FLAG_CHECK_VIABILITY
This flag is divided into two components to calculate the best available move for the current context:
AI_CompareDamagingMoves: This function compares damaging moves against each other and picks the best one.AI_CalcMoveEffectScore: This function checks every move effect (status or damaging move effect) and increases the score accordingly.
This is different to AI_FLAG_CHECK_BAD_MOVE as it calculates how poor a move is and not whether it will fail or not.
AI_FLAG_ATTACKS_PARTNER
This flag is meant for double battles where both of the opponents hate each other. They prioritize damage to their ‘partner’ over the player.
AI_FLAG_FORCE_SETUP_FIRST_TURN
AI will prioritize using setup moves on the first turn at the expense of all else. These include stat buffs, field effects, status moves, etc. AI_FLAG_CHECK_VIABILITY will instead do this when the AI determines it makes sense.
This is just a flat increase without any consideration of whether it makes sense to use the move or not. For better move choice quality for those moves, AI_FLAG_CHECK_VIABILITY should be used.
AI_FLAG_RISKY
AI will generally behave more recklessly. This AI enables the following behaviour:
- Always assume the highest damage roll when scoring moves
- Blindly Mirror Coat / Counter based on the player mon’s species higher attacking stat
- Moves with Recoil if they miss are not treated differently even if accuracy is lowered
- Prioritize maximizing damage from moves at the cost of accuracy
- Prioritize moves with low change strong effects (Ancient Power etc., check
AI_Riskyfunction for full list) - Switch offensively mid battle rather than defensively (if using
AI_FLAG_SMART_MON_CHOICES) - Prioritize Explosion moves
AI_FLAG_TRY_TO_2HKO
Adds score bonus to any move the AI has that either OHKOs or 2HKOs the player.
Keep in mind that this is a weaker form of AI_FLAG_TRY_TO_FAINT at scoring OHKOs as it does not take into account who is attacking first, it does however handle 2HKOs.
AI_FLAG_PREFER_BATON_PASS
AI prefers raising its own stats if it has >= 60% HP, as well as Ingrain, Aqua Ring, and Protect. Prioritizes Baton Bass if the mon is rooted (Ingrain) or has the Aqua Ring effect, and doesn’t if it has been Leech Seeded.
AI_FLAG_DOUBLE_BATTLE
This flag is automatically set in double battles, and controls much of the doubles-specific scoring. I’ll summarize some of its scoring as follows:
- Don’t use Helping Hand if partner is, don’t Perish Trap your partner, don’t change the weather if they are, don’t buff stats if partner will trigger Anger Point for us
- Collaborate with partner to Perish Trap opponent, Magnet Rise to protect partner, Dragon Cheer partner if applicable
- Prioritize using weather move if it benefits partner
- Prioritize triggering partner’s good abilities if possible (Motor Drive, Storm Drain, Beat Up -> Justified, etc.)
- Handle Skill Swap smartly, both with the partner and against the player
AI_FLAG_HP_AWARE
Lets the AI make decisions based on how much remaining HP its mon(s) and the player’s mon(s) have.
With respect to the AI’s mons, in doubles:
- Allows the AI to attack its partner with a move it can absorb if its low on HP (ie. Electric move on partner with Volt Absorb)
- Prioritizes healing its partner if its HP is <= 50% if able
In both singles and doubles:
- Prioritizes not using moves that require the user fainting (Destiny Bond, Explosion etc.) and healing moves while on >= 70% HP.
- Prioritize not using moves that require the user fainting or losing significant HP (Belly Drum etc) while between 30% and 70% HP
- Prioritize not using setup moves (Light Screen etc.) and Bide while on <= 30% HP
With respect to the player’s mons:
- Prioritize not using many status moves (stat buffs, Poison, Pain Split) if the player has between 30% and 70% HP
- Prioritize not using any status moves if the player is has <= 30% HP
AI_FLAG_POWERFUL_STATUS
AI prioritizes setting up field effects (Trick Room, Rain Dance, etc.) and side statuses (Tailwind, Spikes, etc.), even if it could faint the target.
AI_FLAG_NEGATE_UNAWARE
AI does not understand ability suppression (Mold Breaker etc., weather suppression (Air Lock etc.), redirection abilities (Lightningrod etc.) being temporarily removed due to move effects (Sky Drop etc.), or item suppression (Magic Room etc.) and will ignore them. This is a handicap flag.
AI_FLAG_WILL_SUICIDE
AI prioritizes self destruction moves (Explosion, Memento).
AI_FLAG_PREFER_STATUS_MOVES
AI gets a score bonus for status moves. This should be combined with AI_FLAG_CHECK_BAD_MOVE to prevent using only status moves.
AI_FLAG_STALL
AI prefers simple classically “stalling” behaviour. It will prioritize:
- Mean Look, Fairy Lock, and Wrap for trapping
- Increasing its defense and special defense
- Moves that inflict Poison if it also has a Protect move
- Copying defense and special defense buffs
AI_FLAG_SMART_SWITCHING
Affects when the AI chooses to switch. AI will make smarter decisions about when to switch out mid-battle. Automatically enables AI_FLAG_SMART_MON_CHOICES, which is required as the vanilla mon selection AI is not smart enough to handle several switch-triggering situations appropriately, leading to bizarre behaviour. Many of these checks have intentional failure rates, so the AI won’t switch out 100% of the time in these cases to keep the player from being able to predict perfectly. Some of these also only apply to singles, and many of them are being simplified for the sake of brevity. This flag lets the AI trigger switches when:
- It can’t hit Wonder Guard and has another mon in the party that can (switch that mon in)
- It’s going to die to Perish Song, can’t KO the player and is affected by Yawn, is being severely affected by a status condition that switching helps (Curse, Toxic, Leech Seed)
- It has a mon that can trap the player’s mon and win the 1v1 (switch that mon in)
- It has a mon in the party that can absorb the player’s next expected attack (switch that mon in)
- It will not switch if the current mon will die to hazards on re-entry and it has no means of clearing them in its party
- All its moves are bad
- It can take advantage of Natural Cure or Regenerator
- Its Encore’d into something bad
- Its primary attacking stats are sufficiently lowered
- Its “odds are bad”, which is a generic “try to make smart, player-like decisions generally speaking” check. Switches can be triggered if the player has a good switchin candidate (
AI_FLAG_SMART_MON_CHOICES), and: - The current mon has a bad type matchup and doesn’t have a super effective move and has at least ½ HP, or ¼ HP and Regenerator, or
- The current mon loses the 1v1 quickly and has at least ½ HP, or ¼ and Regenerator
AI_FLAG_ACE_POKEMON
Marks the last Pokemon in the party as the Ace Pokemon. It will not be used unless it is the last one remaining, or is forced to be switched in (Roar, U-Turn with 1 mon remaining, etc.). If you are challenged by two different trainers at the same time, only the ones with this flag will have Ace Pokémon. For example vs one trainer with AI_FLAG_ACE_POKEMONand the other without, there will be a total of 1 Ace Pokémon.
AI_FLAG_DOUBLE_ACE_POKEMON
Marks the last two Pokémon in the party as Ace Pokémon, with the same behaviour as AI_FLAG_ACE_POKEMON. Intented for double battles where you battle one trainer id that represents two trainers, ie Twins, Couples. If you apply this flag to trainers outside of double battles or in cases where two trainers can challenge you at the same time, it has the same behaviour. For example vs two trainers with AI_FLAG_DOUBLE_ACE_POKEMON there will be a total of 4 Ace Pokémon.
AI_FLAG_OMNISCIENT
AI has full knowledge of player moves, abilities, and hold items, and can use this knowledge when making decisions.
AI_FLAG_KNOW_OPPONENT_PARTY
AI has full knowledge of the species in the player’s party, as well as their fainted status; no other omniscient knowledge is included. Functions similarly to a team preview.
AI_FLAG_ASSUME_STAB
A significantly more restricted version of AI_FLAG_OMNISCIENT, the AI only knows the player’s STAB moves, as their existence would be reasonable to assume in almost any case.
AI_FLAG_ASSUME_STATUS_MOVES
A more restricted version of AI_FLAG_OMNISCIENT. The AI has a chance to know what status moves the player has, plus additionally Fake Out and fixed percentage moves like Super Fang. The intention is so that if the AI has a counterplay implemented, it will seem to have guessed if the player’s pokemon has a move, without giving the AI perfect information. For example, with Omniscient set, the AI will not usually put a pokemon to sleep if it has Sleep Talk; with neither Assume Powerful Status nor Omniscient set, the AI will always assume the pokemon does not have Sleep Talk.
By default, there are three groups of higher likelihood status moves defined in include/config/ai.h under ASSUME_STATUS_HIGH_ODDS, ASSUME_STATUS_MEDIUM_ODDS, and ASSUME_STATUS_LOW_ODDS. Moves are sorted in src/battle_ai_util.c within ShouldRecordStatusMove().
Any move that is not special cased is then potentially caught by ASSUME_ALL_STATUS_ODDS.
AI_FLAG_SMART_MON_CHOICES
Affects what the AI chooses to send out after a switch. AI will make smarter decisions when choosing which mon to send out mid-battle and after a KO, which are handled separately. Automatically included when AI_FLAG_SMART_SWITCHING is enabled.
With this flag enabled, the AI will prioritize choosing mons after a KO prioritizing the following criteria:
- Trapper (can trap the player’s mon and win the 1v1)
- Revenge killer (outspeeds an OHKOs / is outsped and OHKOs, is not OHKOd/ outspeeds and 2HKOs, is not OHKOd / is outsped and 2HKOs, is not 2HKOd)
- Has good type matchup and a super effective move
- Has good type matchup and does not have a super effective move
- Has Baton Pass
- If no mons meet any of the above criteria, choose the one that does the most damage
And will choose mons after a mid-battle switch prioritizing the following criteria:
- Trapper (can trap the player’s mon and win the 1v1)
- Has good type matchup and a super effective move
- Has good type matchup and does not have a super effective move
- Is not 3HKO’d by the player
- Has Baton Pass
AI_FLAG_CONSERVATIVE
AI always assumes it will roll the lowest possible result when comparing damage in scoring.
AI_FLAG_SEQUENCE_SWITCHING
AI will always switch out after a KO in exactly party order as defined in the trainer data (ie. slot 1, then 2, then 3, etc.). The AI will never switch out mid-battle unless forced to (Roar etc.). If the AI uses a move that requires a switch where it makes a decision about what to send in (U-Turn etc.), it will always switch out into the lowest available party index.
AI_FLAG_WEIGH_ABILITY_PREDICTION
AI will predict the player’s ability based to its aiRating. Without this flag the AI randomly assumes an ability with an even distribution between all possible abilities until one is confirmed. With this flag, it instead guesses proportionally to each ability’s aiRating, making it far more likely to guess an ability like Water Absorb than Damp if both are options.
AI_FLAG_PREFER_HIGHEST_DAMAGE_MOVE
AI will add score to its highest damaging move, regardless of accuracy or secondary effects. Replaces deprecated AI_FLAG_PREFER_STRONGEST_MOVE.
AI_FLAG_PREDICT_SWITCH
AI will determine whether it would switch out in the player’s situation or not, and predict the player to switch accordingly. In any case where the AI would consider switching, it will assume the player will switch. This is modulated by a 50% failure rate, so the behaviour is non-deterministic and can change from turn to turn to emulate the inconsistency in human predictions. This behaviour is improved significantly by using AI_FLAG_SMART_SWITCHING and AI_FLAG_SMART_MON_CHOICES as they improve the AI’s ability to determine good situations to switch, and also by AI_FLAG_OMNISCIENT so the AI can use all its knowledge of the player’s team to make the decision.
AI_FLAG_PREDICT_INCOMING_MON
This flag requires AI_FLAG_PREDICT_SWITCH to function. If the AI predicts that the player will switch, this flag allows the AI to run its move scoring calculation against the Pokémon it expects the player to switch into, instead of the Pokémon that it expects to switch out.
AI_FLAG_SMART_TERA
AI will make smarter decisions about when to terastalize (over the default behaviour to always tera when available). This considers factors such as whether tera allows the AI to KO the opponent, whether it can save itself from a KO or a big hit, and how many remaining pokemon could terastalize. This behavior is not currently supported in double battles.
AI_FLAG_PREDICT_MOVE
AI will predict what move the player is going to use based on what move it would use in the same situation. Generally works best if also using AI_FLAG_OMNISCIENT.
AI_FLAG_PP_STALL_PREVENTION
This flag aims to prevent the player from PP stalling the AI by switching between immunities. The AI mon’s move scores will slowly decay for absorbed moves over time, eventually making its moves unpredictable. More detailed control for this behaviour can be customized in the ai.h config file.
AI_FLAG_RANDOMIZE_SWITCHIN
AI will randomly choose between eligible switchin candidates rather than always picking the last one in the party. For example, if the AI has two mons that can revenge kill the player’s mon after a KO, by default the AI will only track the most recent eligible candidate, and will always send in the last one in party order as a result. With this flag, it will instead track all of the eligible mons, and randomly choose between them when deciding which to send out.
AI_FLAG_RANDOMIZE_PARTY_INDICES
AI will randomize the order of the mons in their party before battle starts. This means that lead choice is randommized, but so is the last mon for things like Illusion or the Ace flag, so be mindful when using it.
How to add new AI Flags
The battle engine upgrade has rewritten the AI battle scripts to C functions to easily add new logic. This tutorial explains how to add a new AI logic flag.
1. Define your flag
Open include/constants/battle_ai.h. We have many unused flags, but you can add a new one after AI_FLAG_SMART_SWITCHING like so:
#define AI_FLAG_SUPPORT (1 << 16)
2. Make your new function
Open src/battle_ai_main.c. Search for the array static s16 (*const sBattleAiFuncTable[])(u8, u8, enum Move, s16). We want to add our new function to this table. Since we have defined our flag as (1 << 16), find the 16th entry in the table (identifiable by the initializer, [16]), and replace it with:
[16] = AI_Support, // AI_FLAG_SUPPORT
Define your function above the table as static s16 AI_Support(u8 battlerAtk, u8 battlerDef, enum Move move, s16 score);
Make your function do something
at the bottom of the file, add:
static s16 AI_Support(u8 battlerAtk, u8 battlerDef, enum Move move, s16 score)
{
    // Add your logic here!
}
Give your trainer the correct AI flag!
And that’s it!
What are Dynamic AI Functions?
Dynamic AI functions enable AI behaviour to be controlled on a per-battle basis by being set directly ahead of a particular battle when scripting. They allow for unique move scoring or switching decisions that are not applied at scale to multiple trainers or the entire AI as a whole.
As such they’re really useful for one-shot battle setups like boss fights or totem Pokemon or narrative tie-ins like switch happy Jugglers that would benefit from specialized AI that only applies during those specific fights.
There are currently two different types of dynamic AI functions, one that affects move scoring and one that affects switching.
How do I use the dynamic move scoring function?
There are a few steps involved:
- Be sure to set
AI_FLAG_DYNAMIC_FUNCon the trainer you’ll be using your unique behaviour for - Write your custom AI logic. Our example for this is
AI_TagBattlePreferFoe, and you should match its arguments and return structure in your own custom function. - In the script the triggers the battle, add a call to
setdynamicaifuncspecifying your function, as in:
setdynamicaifunc AI_TagBattlePreferFoe
multi_2_vs_2 TRAINER_SIRIUS_NOVA_HYPERION_TAG, Text_NovaInsurgence_Arrival_Hyperion_Loss, TRAINER_SIRIUS_NOVA_DEIMOS_RECRUIT_TAG, Text_NovaInsurgence_Arrival_DeimosRecruit_Loss, TRAINER_SIRIUS_WHARF_TRITON_PARTNER, TRAINER_PIC_BACK_TRITON
That’s it! The scoring function will be used in the battle immediately following it, and automatically cleared at the end of the battle. You can then use setdynamicaifunc with the same or a different AI scoring function as you see fit.
How do I use the dynamic switching function?
There are a few steps involved:
- Write your custom AI logic. Our example for this is
ShouldSwitchDynFuncExample, and you should match its arguments and return structure in your own custom function. - In the script that triggers the battle, add a call to
setdynamicswitchaifuncspecifying your function, as in:
setdynamicswitchaifunc ShouldSwitchDynFuncExample
trainerbattle_single TRAINER_TIANA, Route102_Text_TianaIntro, Route102_Text_TianaDefeated
That’s it! The switching function will be used in the battle immediately following it, and automatically cleared at the end of the battle. You can then use setdynamicswitchaifunc with the same or a different AI scoring function as you see fit.
How to add new battle script commands/macros
How to add new Battle Script Commands/Macros
To preface this tutorial, the battle engine upgrade has exhausted all battle script command IDs. Historically, we’ve used the various command to effectively add new commands. However, this has caused issues of maintainability and readability due to the massive switch needed for it. Thanks to the cleanup made by the team and contributors, we now are able to call an infinite amount of commands by using callnative. This is preferential to creating a secondary battle script command table like is done in the CFRU.
In general, gBattlescriptCurrInstr tracks the current battle script position as a ROM address. Fortunately, we don’t need to worry about ROM addresses when using the decomps, but it is important to understand because of how the callnative command is set up.
	.macro callnative func:req
	.byte 0xff
	.4byte \func
	.endm
callnative uses the last battle script command ID in order to pass a native function as an argument. Additional optional arguments are added recursively via a macro, so no need to worry about how they need to align to the amount of instructions to skip.
Now, how might we add a custom callnative command? Here are the steps. We will use BS_JumpIfTerrainAffected as an example.
1. Create a macro in asm/macros/battle_script.inc. For example:
	.macro jumpifterrainaffected battler:req, terrainFlags:req, jumpInstr:req
	callnative BS_JumpIfTerrainAffected
	.byte \battler
	.4byte \terrainFlags
	.4byte \jumpInstr
	.endm
2. Add your new callnative command ID to src/battle_script_commands.c. For example:
void BS_JumpIfTerrainAffected(void)
{
    NATIVE_ARGS(u8 battler, u32 flags, const u8 *jumpInstr);
    u32 battler = GetBattlerForBattleScript(cmd->battler);

    if (IsBattlerTerrainAffected(battler, cmd->flags))
        gBattlescriptCurrInstr = cmd->jumpInstr;
    else
        gBattlescriptCurrInstr = cmd->nextInstr;
}
Each of the arguments defined in the macro (battler, flags, failInstr) need to be called at the start of the command using NATIVE_ARGS.
The byte count in the macro should correspond to the type that will be used for the command (eg, u8 is byte, while the pointer are 4byte).
These arguments can then be accessed as cmd->battler, cmd->flags and cmd->failInstr.
Note that for cmd->battler we need to use GetBattlerForBattleScript to fetch the correct battler because with the macro we are accessing a scripting command that doesn’t corresponds to gBattlerTarget, gBattlerAttacker, etc.
For the battler argument specifically, most of the time the battler is accessed through gBattlerAttacker, gBattlerTarget and the battler argument left out.
In the majority of cases, this is fine since the script commands are mostly used for moves and the interaction is usually between an attacker and target.
A script command usually ends with either a jump or next instruction gBattlescriptCurrInstr = cmd->nextInstr / cmd->nextInstr; advancing to the next instruction.
How to add a new move
Full credits and thank you to CancerFairy for writing this guide!
Note: This guide was written for version 1.8.0. Most stuff still applies to 1.7.x versions and earlier, with the following exceptions:
- Battle and Contest move data are separated in
src/data/battle_moves.handsrc/data/contest_moves.h additionalEffectsdoesn’t exist, instead being handled by a combination ofsecondaryEffectChanceand uniqueEFFECT_xxxs.- There’s no
include/constants/battle_move_effects.h, so data specific to certain effects is handled in other places. - Move names are handled in
gMoveNames.
Adding/editing moves
This guide is here to give you a breakdown of how moves work, how to edit existing ones, and how to add your own.
Contents:
Key files and definitions
Before beginning the process, it’s important to familiarise yourself with the important files that control moves. There are three categories of files - header(.h) files, which contain static information about a move, .c files which contains functions in C that determine how the move behaves, and script files (.s or .inc) that actually “run” the move - i.e. determine the sequence of events you see on screen when you execute the move.
Header files
src/data/moves_info.h
This is the place where the bulk of move information is stored, including name, base power, typing, PP, contest information etc.
Let’s look at an example:
[MOVE_THUNDER_SHOCK] =
{
    .name = COMPOUND_STRING("Thunder Shock"),
    .description = COMPOUND_STRING(
        "An electrical attack that\n"
        "may paralyze the foe."),
    .effect = EFFECT_HIT,
    .power = 40,
    .type = TYPE_ELECTRIC,
    .accuracy = 100,
    .pp = 30,
    .target = TARGET_SELECTED,
    .priority = 0,
    .category = DAMAGE_CATEGORY_SPECIAL,
    .additionalEffects = ADDITIONAL_EFFECTS({
        .moveEffect = MOVE_EFFECT_PARALYSIS,
        .chance = 10,
    }),
    .contestEffect = CONTEST_EFFECT_HIGHLY_APPEALING,
    .contestCategory = CONTEST_CATEGORY_COOL,
    .contestComboStarterId = 0,
    .contestComboMoves = {COMBO_STARTER_CHARGE},
},
Most of the fields here are obvious, but the two important ones for determining what a move actually does are effect and additionalEffects.
The effect represents how the move actually works when called in battle - it can be a two turn move, or a move that only works if the target is holding an item, for example. How each effect works is pretty much unique, but the way a move of a particular effect is executed is defined by a script data/battle_scripts_1.s, and any variable characteristics such as typing or power are defined in either src/battle_script_commands.c or src/battle_util.c, depending on the effect. The vast majority of non-status moves are simply EFFECT_HIT, in that they deal damage and apply additionalEffects (if defined).
The additionalEffects field represents effects that are applied at the setadditionaleffects stage of the move script (for most moves, see BattleScript_Hit_RetFromAtkAnimation). These are effects that can be encapsulated by any of the MOVE_EFFECT_X defined in include/constants/battle.h and encoded under SetMoveEffect in src/battle_script_commands.c. These can vary from applying a status, such as MOVE_EFFECT_PARALYSIS, or lowering/raising stats etc. The move effect could target the user by setting self = TRUE, such as Overheat lowering the user’s own Sp. Atk. What’s more, definining a chance, such as for Thunder Shock, not only limits the effect to applying only chance% of the time, but it also turns it into a secondary effect. This difference is important because secondary effects are nullified by Sheer Force (which in turn will boost the move’s power) and they are blocked by Shield Dust. These two limitations do not apply to primary effects which do not a chance field defined and by definition will always happen when the move is executed.
src/data/battle_move_effects.h
Effects are listed here along with the battleScript that governs each one. Said scripts are defined in data/battle_scripts_1.s. The indices/names of the effects (e.g. EFFECT_FIRST_TURN_ONLY) are enums defined in include/constants/battle_move_effects.h.
include/battle_scripts.h
Contains references to scripts data/battle_scripts_1.s, allowing them to be referenced in C. Any new scripts must be added here.
include/constants/battle_move_effects.h
Simply an enum list of possible effects for moves. Any new effects would be added here, with a definition for them (including defining a script) would then also be added to src/data/battle_move_effects.h.
include/constants/battle_string_ids.h
All strings that can be printed in battle have an id that is defined here. The actual message itself would then be defined and assigned to this id in src/data/battle_message.c.
include/constants/battle.h
A whole range of constants defining battle variables, such as statuses, weather, and move effects.
include/constants/moves.h
Where moves are defined (and nothing else).
Note: When adding custom moves, you should add them between the moves from the latest generation and the z moves, then adjust MOVES_COUNT accordingly. Adding a move after MOVES_COUNT that is neither a Max Move or a Z Move will result in that move’s name not being printed when it is used, instead a generic message will be printed.
C files
src/battle_script_commands.c
This is where a lot of the commands referred to in scripts are defined. For example, the jumpifnotfirstturn command above is defined by the function Cmd_jumpifnotfirstturn and you can see how it works in C. It’s possible that any move editing or updating you have in mind can be done with existing commands, but if you wanted to add a new function that could be called in a script above, this is where you would define it.
src/battle_util.c
This contains a lot of the “utility” functions used to determine things like a move’s dynamic typing or power. It’s also where damage calculation takes place, and a lot of that will naturally take a move’s effect into account. For example, a move with the effect EFFECT_SOLAR_BEAM would have its damage halved in sandstorm. If you wanted to add a move with an effect which gave it variable BP or typing, this is the file you would encode that effect.
src/battle_message.c
Contains string defines and functions that print messages during the battle. If you wish to add or edit a move’s string, then this is where you would do so.
src/battle_main.c
Contains more fundamental functions that control the flow of the battle. Functions here determine move order, dynamic typing, animations, priority, speed calculations and more.
Script files
data/battle_scripts_1.s
Each move’s effect is governed by a script defined here. For a simple example, let’s look at the script for Fake Out/First Impression:
TODO: New Script
BattleScript_EffectTaunt::
	attackcanceler
	jumpifability BS_TARGET_SIDE, ABILITY_AROMA_VEIL, BattleScript_AromaVeilProtects
	accuracycheck BattleScript_ButItFailed, ACC_CURR_MOVE
	settaunt BattleScript_ButItFailed
	attackanimation
	waitanimation
	printstring STRINGID_PKMNFELLFORTAUNT
	waitmessage B_WAIT_TIME_LONG
	goto BattleScript_MoveEnd
attackcanceler is a command that covers all cases that could cause a move to fail before it’s even attempted (e.g. paralysis). The next command is a jump command. A jump command can check anything and usually comes with a jump instruction. Usually it jumps to a place from where the move should pick up because of certain conditions. The next one is an accuracy check. Accuracy checks happen after all prior move failure checks happened. The next set of commands are unique to a certain move, they are mostly the same for damaging moves but can widely differ for status moves. Lastly there is BattleScript_MoveEnd which the move after a succesful hit. An ability activation or specific move effect like Burn, Freeze, Absorb etc.
This is the most advanced part of the ROM. There are dozens upon dozens of commands and hundreds of scripts so this guide would go on forever if I were to go into more detail. To learn how these scripts work, it’s best to look at a few examples of moves you know.
asm/macros/battle_script.inc
The “link” between data/battle_scripts_1.s and src/battle_script_commands.c. Each command is represented by a hex byte which represents its index in the gBattleScriptingCommandsTable array at the top of src/battle_script_commands.c. However, this file also contains macros which perform combinations of other commands, or just calculations in assembly. In addition to commands, it is also possible to call functions in src/battle_script_commands.c using the various (now gradually being deprecated) and the callnative functionality. The various macros will point to a case under the Cmd_various function in src/battle_script_commands.c, whereas callnative will let you directly call a function in src/battle_script_commands.c by name.
data/battle_anim_scripts.s
This is the place where move animations are defined. The array at the top, gBattleAnims_Moves, is in move index order and determines which animation goes with which move.
Editing a move
Basic information
To edit a move’s basic information, you need only edit the relevant fields in src/data/battle_moves.h. This will let you change a move’s:
- name
- description
- power
- accuracy
- type
- category
- target
- pp
- recoil percentage
- flags
- Z-move effect (for status moves) or overwritting its calculated power (for damaging moves)
Changing a move’s main effect
To change the main effect of a move to an existing effect, you need only change its effect field to one of the options in src/data/battle_move_effects.h. If you wish to keep the effect but simply modify how it works, you can modify how it plays out on screen by editing its entry in data/battle_scripts_1.s and any relevant functions in src/battle_script_commands.c. To change how a move’s dynamic power, accuracy and are calculated, then you need to modify the following functions:
- For power:
CalcMoveBasePowerAfterModifiersinsrc/battle_util.c - For accuracy:
AccuracyCalcHelperinsrc/battle_script_commands.c - For type:
SetTypeBeforeUsingMoveinsrc/battle_main.c
Note: A generic function for calculating category does not currently exist - Photon Geyser’s script in data/battle_scripts_1.s uses a special callnative function BS_SetPhotonGeyserCategory.
Changing a move’s additional effects
If you look at the example here, you can see that Thunder Shock has an additional effects array that contains a single move effect MOVE_EFFECT_PARALYSIS with a 10% chance of applying. Thanks to this field, you can add and remove primary and secondary effects (so long as they are defined by a MOVE_EFFECT) to a move without having to change its effect or script. You can also make an effect apply to the attacker rather than the target (for, say, a stat boost) with .self = TRUE and you can set the probability to whatever you want with the chance field.
All additional effects with a defined chance (even 100%) are treated as “secondary effects”. This means that they are nullified by Sheer Force, blocked by Shield Dust or the Covert Cloak, and have their chance modified by Serene Grace. Additional effects without a chance field (effectively setting it to 0) are treated as “primary effects”, which means that they cannot be blocked by the aforementioned items and abilities and their chance to occur cannot be modified; they will always happen.
Depending on the move effect, it is possible to also set a multistring value. For example:
.additionalEffects = ADDITIONAL_EFFECTS({
    .moveEffect = MOVE_EFFECT_WRAP,
    .multistring = B_MSG_WRAPPED_MAGMA_STORM,
}),
For Magma Storm, we not only want the wrapping move effect, we want to give it a unique string when it activates. The index is an enum defined in battle_string_ids.h and it corresponds to an entry (for this move effect) in the gWrappedStringIds list in battle_message.c. For custom strings, you need to add an enum and an entry respectively. For new custom move effects, you will have to add a new set of enums and a new table of strings.
Each move can have up to 3 additional effects, allowing you to construct monstrosities like this:
[MOVE_POUND] =
{
    .name = COMPOUND_STRING("Pound"),
    .description = COMPOUND_STRING(
        "Pounds the foe with\n"
        "forelegs or tail."),
    .effect = EFFECT_HIT,
    .power = 40,
    .type = TYPE_NORMAL,
    .accuracy = 100,
    .pp = 35,
    .target = TARGET_SELECTED,
    .priority = 0,
    .category = DAMAGE_CATEGORY_PHYSICAL,
    .additionalEffects = ADDITIONAL_EFFECTS({
        .moveEffect = MOVE_EFFECT_PARALYSIS,
        .chance = 10,
    },{
        .moveEffect = MOVE_EFFECT_CONFUSION,
        .chance = 100,
    },{
        .moveEffect = MOVE_EFFECT_FLINCH,
        .chance = 30,
    }),
    .makesContact = TRUE,
    .ignoresKingsRock = B_UPDATED_MOVE_FLAGS == GEN_4,
    .contestEffect = CONTEST_EFFECT_HIGHLY_APPEALING,
    .contestCategory = CONTEST_CATEGORY_TOUGH,
    .contestComboStarterId = COMBO_STARTER_POUND,
    .contestComboMoves = {0}
},
Note: at the moment, additional effects can only be used by damaging moves, not by status moves.
Adding a new move
To add a new move, you need to create an entry in three locations:
- a define in
include/constants/moves.h - an info entry in
src/data/battle_moves.h - an animation entry in data/battle_anim_scripts.s
And that’s it! You can use an existing animation or effect for your move - or you can add your own, but I’ll leave figuring that out to you.
How to add a new trainer front pic
Content
Quick Summary
If you’ve done this before and just need a quick lookup, here’s what files you need:
- Place graphics into
graphics/trainers/front_pics. - Point game to where graphic files are found:
src/data/graphics/trainers. - Add trainer to
include/constants/trainers.h.
The Graphics
1. Edit the sprites
We will start with a graphic that we want to use for our new trainer pic. Unlike with adding Pokémon, the trainer sprites aren’t sorted in individual folders, but rather in one folder: graphics/trainers/front_pics. Trainers sprites cannot have more than 16 colors - this includes the color that will be transparent, which is the first slot of the palette.
2. Register the sprites
Sadly, just putting the image files into the graphics folder is not enough. To use the sprites we have to register them by linking the graphic files in src/data/graphics/trainers:
 const u16 gTrainerPalette_RubySapphireBrendan[] = INCGFX_U16("graphics/trainers/palettes/brendan_rs.pal", ".gbapal");

 const u32 gTrainerFrontPic_RubySapphireMay[] = INCGFX_U32("graphics/trainers/front_pics/may_rs.png", ".4bpp.smol");
 const u16 gTrainerPalette_RubySapphireMay[] = INCGFX_U16("graphics/trainers/palettes/may_rs.pal", ".gbapal");
+
+const u32 gTrainerFrontPic_NewOne[] = INCGFX_U32("graphics/trainers/front_pics/new_one.png", ".4bpp.smol");
+const u16 gTrainerPalette_NewOne[] = INCGFX_U16("graphics/trainers/front_pics/new_one.pal", ".gbapal");

 const u8 gTrainerBackPic_Brendan[] = INCGFX_U8("graphics/trainers/back_pics/brendan.png", ".4bpp");
3. Connecting the Pictures to the Data
The last few things we have to do is prepare the graphics for usage. In src/data/graphics/trainers.h you’ll find the gTrainerSprites struct, we need to add the trainer to this. You can just copy the last trainer type defined and edit it, but this is what it does: Connects the new trainer with the image we defined earlier.
So, finally, it needs to look like this:
 #define TRAINER_SPRITE(trainerPic, picFile, paletteFile, ...)                  \
     [trainerPic] =                                                             \
     {                                                                          \
         .frontPic = {picFile, TRAINER_PIC_SIZE, trainerPic},                   \
         .palette = {paletteFile, trainerPic},                                  \
         .mugshotCoords = {DEFAULT(0, __VA_ARGS__), DEFAULT_2(0, __VA_ARGS__)}, \
         .mugshotRotation = DEFAULT_3(0x200, __VA_ARGS__),                      \
     }

 const struct TrainerSprite gTrainerSprites[] =
 {
     TRAINER_SPRITE(TRAINER_PIC_FRONT_HIKER, gTrainerFrontPic_Hiker, gTrainerPalette_Hiker),
     TRAINER_SPRITE(TRAINER_PIC_FRONT_AQUA_GRUNT_M, gTrainerFrontPic_AquaGruntM, gTrainerPalette_AquaGruntM),
     ...
     TRAINER_SPRITE(TRAINER_PIC_FRONT_RS_MAY, gTrainerFrontPic_RubySapphireMay, gTrainerPalette_RubySapphireMay),
+    TRAINER_SPRITE(TRAINER_PIC_FRONT_NEW_ONE, gTrainerFrontPic_NewOne, gTrainerPalette_NewOne),
 };
The Data
4. Defining the trainer pic
Finally, let’s bring it all together by defining our new trainer pic in include/constants/trainers.h:
    TRAINER_PIC_FRONT_RS_MAY,
+   TRAINER_PIC_FRONT_NEW_ONE,
    TRAINER_PIC_FRONT_COUNT,
    TRAINER_PIC_BACK_BRENDAN = TRAINER_PIC_FRONT_COUNT, // The player back pics are assumed to alternate according to the gender values (MALE/FEMALE)
    TRAINER_PIC_BACK_MAY,
Remember to add new front pics before TRAINER_PIC_FRONT_COUNT!
Usage
You can test your trainer type by going to src/data/trainers.party and change the Pic field. The syntax should match the constant (TRAINER_PIC_FRONT_NEW_ONE) with the underscore replaced by spaces. For example:
 === TRAINER_BRENDAN_PLACEHOLDER ===
 Name: BRENDAN
 Class: RS Protag
-Pic: RS Brendan
+Pic: New One
 Gender: Male
 Music: Male
 Double Battle: No
Otherwise if you use src/data/trainers.h, change the .trainerPic field instead. For example:
     [DIFFICULTY_NORMAL][TRAINER_BRENDAN_PLACEHOLDER] =
     {
         .trainerName = _("BRENDAN"),
         .trainerClass = TRAINER_CLASS_RS_PROTAG,
-        .trainerPic = TRAINER_PIC_FRONT_RS_BRENDAN,
+        .trainerPic = TRAINER_PIC_FRONT_NEW_ONE,
         .encounterMusic_gender = TRAINER_ENCOUNTER_MUSIC_MALE,
         .doubleBattle = FALSE,
How to add a new trainer back pic
Content
Quick Summary
If you’ve done this before and just need a quick lookup, here’s what files you need:
- Place graphics in
graphics/trainers/back_pics. - Point game to where graphic files are found:
src/data/graphics/trainers. - Add trainer to
include/constants/trainers.h,
The Graphics
1. Add the sprites
We will start with a graphic that we want to use for our new trainer pic. Unlike with adding Pokémon, the trainer sprites aren’t sorted in individual folders, but rather in one folder: graphics/trainers/back_pics. Trainers sprites cannot be more than 16 - this includes the color that will be transparent, which is the first slot of the palette.
2. Register the sprites
Sadly, just putting the image files into the graphics folder is not enough. To use the sprites we have to register them by linking the graphic files in src/data/graphics/trainers.h:
 const u8 gTrainerBackPic_Wally[] = INCGFX_U8("graphics/trainers/back_pics/wally.png", ".4bpp");
 const u8 gTrainerBackPic_Steven[] = INCGFX_U8("graphics/trainers/back_pics/steven.png", ".4bpp");
+const u8 gTrainerBackPic_NewOne[] = INCGFX_U8("graphics/trainers/back_pics/new_one.png", ".4bpp");

 const u16 gTrainerBackPicPalette_Red[] = INCGFX_U16("graphics/trainers/back_pics/red.pal", ".gbapal");
 const u16 gTrainerBackPicPalette_Leaf[] = INCGFX_U16("graphics/trainers/back_pics/leaf.pal", ".gbapal");
+const u16 gTrainerBackPicPalette_NewOne[] = INCGFX_U16("graphics/trainers/back_pics/new_one.pal", ".gbapal");
3. Connecting the Pictures to the Data
The last few things we have to do is prepare the graphics for usage. In src/data/graphics/trainers.h you’ll find the gTrainerBacksprites struct, we need to add the trainer to this. You can just copy the last trainer type defined and edit it, but this is what it does: Connects the new trainer with the image we defined earlier.
So, finally, it needs to look like this:
 #define TRAINER_BACK_SPRITE(trainerPic, yOffset, sprite, pal, anim)                          \
     [trainerPic] =                                                                           \
     {                                                                                        \
         .coordinates = {.size = 8, .y_offset = yOffset},                                     \
         .backPic = {.data = sprite, .size = TRAINER_PIC_SIZE, .relativeFrames = TRUE},       \
         .palette = {.data = pal, .tag = trainerPic},                                         \
         .animation = anim,                                                                   \
     }

 const struct TrainerBacksprite gTrainerBacksprites[] =
 {
     TRAINER_BACK_SPRITE(TRAINER_PIC_BACK_BRENDAN, 4, gTrainerBackPic_Brendan, gTrainerPalette_Brendan, sBackAnims_Hoenn),
     ...
     TRAINER_BACK_SPRITE(TRAINER_PIC_BACK_STEVEN, 4, gTrainerBackPic_Steven, gTrainerPalette_Steven, sBackAnims_Hoenn),
+    TRAINER_BACK_SPRITE(TRAINER_PIC_BACK_NEW_ONE, 4, gTrainerBackPic_NewOne, gTrainerBackPicPalette_NewOne, sBackAnims_Hoenn),
};
Note: Trainer back pics can have 4 or 5 frames of animation. Trainers with 5 frames must have their yOffset set to 5, and their anim set to sBackAnims_Kanto.
The Data
4. Defining the trainer back pic
Finally, let’s bring it all together by defining our new trainer pic in include/constants/trainers.h:
    TRAINER_PIC_BACK_RUBY_SAPPHIRE_MAY,
    TRAINER_PIC_BACK_WALLY,
    TRAINER_PIC_BACK_STEVEN,
+   TRAINER_PIC_BACK_NEW_ONE,
    TRAINER_PIC_COUNT,
    TRAINER_PIC_BACK_COUNT = (TRAINER_PIC_COUNT - TRAINER_PIC_FRONT_COUNT),
Remember to add new back pics after TRAINER_PIC_FRONT_COUNT but before TRAINER_PIC_COUNT!
Usage
You can test your new trainer back pic by going to src/data/battle_partners.party and change the Pic field. The syntax should match the constant (TRAINER_PIC_BACK_NEW_ONE) with the underscore replaced by spaces. For example:
 === PARTNER_STEVEN ===
 Name: STEVEN
 Class: Rival
-Pic: Steven
+Pic: New One
 Gender: Male
 Music: Male
Otherwise if you use src/data/battle_partners.h, change the trainerPic field instead. For example:
     [DIFFICULTY_NORMAL][PARTNER_STEVEN] =
     {
         .trainerName = _("STEVEN"),
         .trainerClass = TRAINER_CLASS_RIVAL,
-        .trainerPic = TRAINER_PIC_BACK_STEVEN,
+        .trainerPic = TRAINER_PIC_BACK_NEW_ONE,
         .encounterMusic_gender = TRAINER_ENCOUNTER_MUSIC_MALE,
How to add a new Pokémon
This is a modified version of the original tutorial about adding new Pokémon species available in Pokeemerald’s wiki.
Despite the persistent rumors about an incredibly strong third form of Mew hiding somewhere, it actually wasn’t possible to catch it… OR WAS IT? In this tutorial, we will add a new Pokémon species to the game.
IMPORTANT: This tutorial applies to 1.7.x versions onward.
Changes compared to vanilla
The main things that the Expansion changes are listed here.
- Still Front Pics (
gMonStillFrontPic_YourPokemon) and by extensionsrc/anim_mon_front_pics.chave been removed. src/data/pokemon/cry_ids.hdoesn’t exist anymore.- You have 6 icon palettes available instead of the base 3.
- Most tables that use
SPECIES_xas indexes have been moved togSpeciesInfo.
Content
Useful resources
You can open a sprite debug menu by pressing Select in a Pokémon’s summary screen outside of battle.
The Data - Part 1
Our plan is as simple as it is brilliant: clone Mewtwo… and make it even stronger!
1. Declare a species constant
Our first step towards creating a new digital lifeform is to define its own species constant.
Edit include/constants/species.h:
 #define SPECIES_NONE                                    0
 #define SPECIES_BULBASAUR                               1
 ...
 #define SPECIES_MIMIKYU_BUSTED_TOTEM                    1523
 #define SPECIES_MIMIKYU_TOTEM_BUSTED                    SPECIES_MIMIKYU_BUSTED_TOTEM
+#define SPECIES_MEWTHREE                                1524

-#define SPECIES_EGG                                     (SPECIES_MIMIKYU_BUSTED_TOTEM + 1)
+#define SPECIES_EGG                                     (SPECIES_MEWTHREE + 1)

 #define NUM_SPECIES SPECIES_EGG
This number is stored in a Pokémon’s save structure. These should generally never change, otherwise your saved Pokémon species will change as well.
We add this at the end so that no existing species change Id and so that we don’t have to renumber everything after it.
Now, let’s see how it looks in-game!
Hmmm, something’s not right…
Oh, I know! We need to add the rest of the data! Normally, the vanilla game would crash if we try to look up anything about Mewthree in this state, but the expansion defaults all of its data to SPECIES_NONE.
Now, let’s see what needs to be done.
2. SpeciesInfo’s structure
Now, to better understand Mewthree, we also need to understand Mew. Let’s look at its data.
    [SPECIES_MEW] =
    {
        .baseHP        = 100,
        .baseAttack    = 100,
        .baseDefense   = 100,
        .baseSpeed     = 100,
        .baseSpAttack  = 100,
        .baseSpDefense = 100,
        .types = MON_TYPES(TYPE_PSYCHIC),
        .catchRate = 45,
    #if P_UPDATED_EXP_YIELDS >= GEN_8
        .expYield = 300,
    #elif P_UPDATED_EXP_YIELDS >= GEN_5
        .expYield = 270,
    #else
        .expYield = 64,
    #endif
        .evYield_HP = 3,
        .itemCommon = ITEM_LUM_BERRY,
        .itemRare = ITEM_LUM_BERRY,
        .genderRatio = MON_GENDERLESS,
        .eggCycles = 120,
        .friendship = 100,
        .growthRate = GROWTH_MEDIUM_SLOW,
        .eggGroups = MON_EGG_GROUPS(EGG_GROUP_NO_EGGS_DISCOVERED),
        .abilities = { ABILITY_SYNCHRONIZE, ABILITY_NONE, ABILITY_NONE },
        .bodyColor = BODY_COLOR_PINK,
        .speciesName = _("Mew"),
        .cryId = CRY_MEW,
        .natDexNum = NATIONAL_DEX_MEW,
        .categoryName = _("New Species"),
        .height = 4,
        .weight = 40,
        .description = COMPOUND_STRING(
            "A Mew is said to possess the genes of all\n"
            "Pokémon. It is capable of making itself\n"
            "invisible at will, so it entirely avoids\n"
            "notice even if it approaches people."),
        .pokemonScale = 457,
        .pokemonOffset = -2,
        .trainerScale = 256,
        .trainerOffset = 0,
        .frontPic = gMonFrontPic_Mew,
        .frontPicSize = P_GBA_STYLE_SPECIES_GFX ? MON_COORDS_SIZE(40, 40) : MON_COORDS_SIZE(64, 48),
        .frontPicYOffset = P_GBA_STYLE_SPECIES_GFX ? 13 : 9,
        .frontAnimFrames = ANIM_FRAMES(
            ANIMCMD_FRAME(1, 50),
            ANIMCMD_FRAME(1, 40),
            ANIMCMD_FRAME(0, 10),
        ),
        .frontAnimId = P_GBA_STYLE_SPECIES_GFX ? ANIM_SWING_CONVEX : ANIM_ZIGZAG_SLOW,
        .enemyMonElevation = P_GBA_STYLE_SPECIES_GFX ? 8 : 11,
        .backPic = gMonBackPic_Mew,
        .backPicSize = P_GBA_STYLE_SPECIES_GFX ? MON_COORDS_SIZE(48, 48) : MON_COORDS_SIZE(64, 64),
        .backPicYOffset = P_GBA_STYLE_SPECIES_GFX ? 8 : 0,
        .backAnimId = BACK_ANIM_CONCAVE_ARC_SMALL,
        .palette = gMonPalette_Mew,
        .shinyPalette = gMonShinyPalette_Mew,
        .iconSprite = gMonIcon_Mew,
        .iconPalIndex = 0,
        SHADOW(0, 13, SHADOW_SIZE_S)
        FOOTPRINT(Mew)
        OVERWORLD(
            sPicTable_Mew,
            SIZE_32x32,
            SHADOW_SIZE_M,
            TRACKS_NONE,
            sAnimTable_Following,
            gOverworldPalette_Mew,
            gShinyOverworldPalette_Mew
        )
        .isMythical = TRUE,
        .isFrontierBanned = TRUE,
        .perfectIVCount = LEGENDARY_PERFECT_IV_COUNT,
        .levelUpLearnset = sMewLevelUpLearnset,
        .teachableLearnset = sMewTeachableLearnset,
    },
That’s a lot of stuff! But don’t worry, we’ll go through it step by step throughout the tutorial (and it’s miles better than having this same data through 20+ files like it used to be).
Across the species files you’ll see preprocessor instructions such as #if/endif P_FAMILY_MEW. These are used by expansion in order to allow users to disable species via config. Since we’re making a new species from scratch, you DON’T need to add them as part of the process.
You can also ignore switch cases for P_GBA_STYLE_SPECIES_GFX, as those are only used to switching to GBA-styled sprites.
We’ll start by adding the self-explanatory data that’s also present in pret’s vanilla structure:
3. Define its basic species information
Edit src/data/pokemon/species_info.h:
 const struct SpeciesInfo gSpeciesInfo[] =
 {
     [SPECIES_NONE] = {0},
     ...

     [SPECIES_EGG] =
     {
         FRONT_PIC(Egg, 24, 24),
         .frontPicYOffset = 20,
         .backPic = gMonFrontPic_Egg,
         .backPicSize = MON_COORDS_SIZE(24, 24),
         .backPicYOffset = 20,
         .palette = gMonPalette_Egg,
         .shinyPalette = gMonPalette_Egg,
         ICON(Egg, 1),
     },

+    [SPECIES_MEWTHREE] =
+    {
+       .baseHP        = 106,
+       .baseAttack    = 150,
+       .baseDefense   = 70,
+       .baseSpeed     = 140,
+       .baseSpAttack  = 194,
+       .baseSpDefense = 120,
+       .types = MON_TYPES(TYPE_PSYCHIC),
+       .catchRate = 3,
+       .expYield = 255,
+       .evYield_SpAttack  = 3,
+       .genderRatio = MON_GENDERLESS,
+       .eggCycles = 120,
+       .friendship = 0,
+       .growthRate = GROWTH_SLOW,
+       .eggGroups = MON_EGG_GROUPS(EGG_GROUP_NO_EGGS_DISCOVERED),
+       .abilities = { ABILITY_INSOMNIA, ABILITY_NONE, ABILITY_NONE },
+       .bodyColor = BODY_COLOR_PURPLE,
+    },
 };
The . is the structure reference operator in C to refer to the member object of the structure SpeciesInfo.
baseHP,baseAttack,baseDefense,baseSpeed,baseSpAttackandbaseSpDefenseare the base stats. They can’t go higher than 255.typesis using the macroMON_TYPESas a helper function for formatting so that only one type has to be input for species with a single type.- To add a species with 2 types, use the format
MON_TYPES(TYPE_PSYCHIC, TYPE_NORMAL). - 1.9 and earlier: The format for setting types is the following:
// Mono-type
.types = { TYPE_PSYCHIC, TYPE_PSYCHIC },
// Dual-type
.types = { TYPE_PSYCHIC, TYPE_DARK },
- To add a species with 2 types, use the format
catchRateis how likely it is to catch a Pokémon, the lower the value, the harder it is to catch. Legendaries generally have a catch rate of 3, so we put that here.expYieldis the base amount of experience that a Pokémon gives when defeated/caught. In vanilla, this value caps at 255, but we’ve increased it to a maximum of 65535 accomodate later gen’s higher experience yields. (The highest official value is Blissey’s with 608, so going beyond this point may cause exponential gains that could break the system 😱)- If you noticed, Mew’s had some
#ifs,#elifs and#endifaround it. This is because its yield has changed over time, and we let you choose which ones you want. This is not relevant to our Mewthree however, so we can just put a single.expYield = 255,line here.
- If you noticed, Mew’s had some
evYield_HP,evYield_Attack,evYield_Defense,evYield_Speed,evYield_SpAttackandevYield_SpDefenseare how many EVs does the Pokémon give when they’re caught. Each of these fields can have a value of 3 at most. Officially, no Pokémon give out more than 3 EVs total, with them being determined by their evolution stage (eg, Pichu, Pikachu and Raichu give 1, 2 and 3 Speed EVs respectively), and they tend to be associated with its higher stats. Since our Mewthree is a Special Attack monster, we’ll be consistent and make it give out 3 Special Attack EVs, but you’re always free to assign whatever you feel like :)- Notice that the other
evYieldfields are not there. In C, numbers in a struct default to 0, so if we don’t specify them, they’ll be 0 all around! Less lines to worry about :D
- Notice that the other
itemCommonanditemRareare used to determine what items is the Pokémon holding when encountering it in the wild.- 50% for
itemCommonand 5% foritemRare(boosted to 60%/20% when the first mon in the party has Compound Eyes or Super Luck) - If they’re both set as the same item, the item has a 100% chance of appearing.
- 50% for
genderRatiois a fun one.- There are 4 ways of handling this
PERCENT_FEMALEis what most Pokémon use, where you define how likely it’s gonna be female. It supports decimals, so you can putPERCENT_FEMALE(12.5)to have a 1 in 8 chance of your mon to be female.MON_MALEguarantees that all mon of this species will be male (eg. Tauros)MON_FEMALEguarantees that all mon of this species will be female (eg. Miltank)MON_GENDERLESSmakes your species genderless, unable to breed with anything but Ditto to produce eggs. Most Legendaries are this, so we’ll be chosing this as Mewthree’s gender ratio.
- When working with evolution lines and don’t want their genders to change after evolving, be sure that their gender ratios match their stages and evolution methods. Azurill is the only case where there’s a mismatch, causing 1/3 of all Azurill to change from Female to Male.
- You might be wondering why some species have multiple defines for their genders, like
SPECIES_MEOWSTIC_(FE)MALE. This is because those species have different stats and data from each other, so they’re defined internally as different forms withMON_MALEandMON_FEMALEas gender ratios. If your species evolves depending on its gender and the evolutions have different stats, be sure to apply the correct evolution method!
- There are 4 ways of handling this
eggCyclesdetermines how fast an egg of this species will hatch. Doesn’t matter much for evolved species or those that can’t lay eggs, but we add the field here just in case.friendshipdetermines the amount of friendship of the mon when you catch it. Most Pokémon useSTANDARD_FRIENDSHIP, but this creature of chaos does not want to be your friend, starting with 0.growthRatedetermines the amounts of experience required to reach each level. Go here for more info.- This should be consistent across evolution lines, otherwise levels could change upon evolution.
eggGroupsare used for breed compatibility. Most Legendaries and Mythicals have theEGG_GROUP_NO_EGGS_DISCOVEREDgroup, and so does our Mewthree. Go here for more info.- This is using the helper macro
MON_EGG_GROUPS. - 1.9 and earlier: The format for setting egg groups is the following:
// Mono-group
.eggGroups = { EGG_GROUP_MONSTER, EGG_GROUP_MONSTER },
// Dual-group
.eggGroups = { EGG_GROUP_MONSTER, EGG_GROUP_MINERAL },
- This is using the helper macro
abilitiesdetermines the potential abilites of our species. Notice how I also set the ability toABILITY_INSOMNIA, so our little monster doesn’t even need to sleep anymore. You can find the abilities for example here include/constants/abilities.h.- When both slot 1 and 2 are defined as not being
ABILITY_NONE, their starting ability will be decided on a coin flip using their personality. They can later be changed using an Ability Capsule.- Certain Pokémon such as Zygarde and Rockruff have different forms to add additional abilities. As such, they cannot be changed using an Ability Capsule (though the Zygarde Cube can change Zygarde’s ability by changing them to their corresponding form)
- The 3rd slot is for Hidden Abilities. If defined as
ABILITY_NONE, it will default to Slot 1 (eg. Metapod doesn’t have a Hidden Ability, but Caterpie and Butterfree do). Go here and here for more info.- If the array is defined as
{ABILITY_1, ABILITY_2}, the Hidden Ability is set asABILITY_NONE.
- If the array is defined as
- When both slot 1 and 2 are defined as not being
bodyColoris used in the Pokédex as a search filter.noFlipis used in to prevent front sprites from being flipped horizontally and cause weird issues, like Clawitzer’s big claw changing sides.
That’s all the basic fields present in vanilla emerald, so now let’s take a look at the new fields added by the expansion.
4. Species Name
 const struct SpeciesInfo gSpeciesInfo[] =
 {
     ...
     [SPECIES_MEWTHREE] =
     {
        ...
        .bodyColor = BODY_COLOR_PURPLE,
+       .speciesName = _("Mewthree"),
    },
 };
The _() underscore function doesn’t really exist - it’s a convention borrowed from GNU gettext to let preproc know this is text to be converted to the custom encoding used by the Gen 3 Pokemon games.
5. Define its cry
Time for audio! We first need to convert an existing audio file to the format supported by the expansion.
Most formats are supported for conversion, but for simplicity’s sake, we’re gonna use an mp3 file.
Now, let’s copy the file to the sound/direct_sound_samples/cries folder.
Once that’s done, let’s run the following command:
ffmpeg -i sound/direct_sound_samples/cries/mewthree.mp3 -c:a pcm_s8 -ac 1 -ar 13379 sound/direct_sound_samples/cries/mewthree.aif
This will convert your audio file to .aif, which is what’s read by the compiler.
Let’s add the cry to the ROM via sound/direct_sound_data.inc.
.if P_FAMILY_PECHARUNT == TRUE
	.align 2
Cry_Pecharunt::
	.incbin "sound/direct_sound_samples/cries/pecharunt.bin"
.endif @ P_FAMILY_PECHARUNT

+	.align 2
+Cry_Mewthree::
+	.incbin "sound/direct_sound_samples/cries/mewthree.bin"
Then we add the cry ID to include/constants/cries.h:
enum PokemonCry
{
    CRY_NONE,
    ...
#if P_FAMILY_TERAPAGOS
    CRY_TERAPAGOS,
#endif //P_FAMILY_TERAPAGOS
#if P_FAMILY_PECHARUNT
    CRY_PECHARUNT,
#endif //P_FAMILY_PECHARUNT
+   CRY_MEWTHREE,
    CRY_COUNT,
};
And then link it in sound/cry_tables.inc. cry_reverse in particular is for reversed cries used by moves such as Growl. The order of these two tables should match the order of the cry IDs, otherwise they’ll be shifted.
	cry Cry_Terapagos
	cry Cry_Pecharunt
+	cry Cry_Mewthree
	cry_reverse Cry_Terapagos
	cry_reverse Cry_Pecharunt
+	cry_reverse Cry_Mewthree
Lastly, we add the cry to our species entry
 const struct SpeciesInfo gSpeciesInfo[] =
 {
     ...
     [SPECIES_MEWTHREE] =
     {
        ...
        .speciesName = _("Mewthree"),
+       .cryId = CRY_MEWTHREE,
    },
 };
And let’s see how it sounds in-game:
Good! Our monster now has a mighty roar!
You can now delete the mp3 from the cries folder now once you made sure that the cry sounds like how you want it to.
6. Define its Pokédex entry
First, we will need to add new index constants for its Pokédex entry. The index constants are divided into the Hoenn Pokédex, which contains all Pokémon native to the Hoenn region, and the National Pokédex containing all known Pokémon, which can be received after entering the hall of fame for the first time.
Edit include/constants/pokedex.h:
// National Pokedex order
enum NationalDexOrder
{
    NATIONAL_DEX_NONE,
    // Kanto
    NATIONAL_DEX_BULBASAUR,
...
    NATIONAL_DEX_PECHARUNT,
+   NATIONAL_DEX_MEWTHREE,
};
 #define KANTO_DEX_COUNT     NATIONAL_DEX_MEW
 #define JOHTO_DEX_COUNT     NATIONAL_DEX_CELEBI

#if P_GEN_9_POKEMON == TRUE
-   #define NATIONAL_DEX_COUNT  NATIONAL_DEX_PECHARUNT
+   #define NATIONAL_DEX_COUNT  NATIONAL_DEX_MEWTHREE
Do keep in mind that if you intend to add your new species to the Hoenn Dex, you’ll also want to add a HOENN_DEX constant for it and give it a HOENN_TO_NATIONAL member, like this:
// Hoenn Pokedex order
enum HoennDexOrder
{
    HOENN_DEX_NONE,
    HOENN_DEX_TREECKO,
...
    HOENN_DEX_DEOXYS,
+   HOENN_DEX_MEWTHREE,
};

- #define HOENN_DEX_COUNT (HOENN_DEX_DEOXYS + 1)
+ #define HOENN_DEX_COUNT (HOENN_DEX_MEWTHREE + 1)
Edit src/pokemon.c:
 const u16 sHoennToNationalOrder[NUM_SPECIES] = // Assigns Hoenn Dex Pokémon (Using National Dex Index)
 {
     HOENN_TO_NATIONAL(TREECKO),
     ...
     HOENN_TO_NATIONAL(DEOXYS),
+    HOENN_TO_NATIONAL(MEWTHREE),
 };
Now we can add the number and entry to our Mewthree:
 const struct SpeciesInfo gSpeciesInfo[] =
 {
     ...
     [SPECIES_MEWTHREE] =
     {
        ...
        .cryId = CRY_MEWTHREE,
+       .natDexNum = NATIONAL_DEX_MEWTHREE,
+       .categoryName = _("New Species"),
+       .height = 15,
+       .weight = 330,
+       .description = COMPOUND_STRING(
+           "The rumors became true.\n"
+           "This is Mew's final form.\n"
+           "Its power level is over 9000.\n"
+           "Has science gone too far?"),
+       .pokemonScale = 256,
+       .pokemonOffset = 0,
+       .trainerScale = 290,
+       .trainerOffset = 2,
    },
 };
The values pokemonScale, pokemonOffset, trainerScale and trainerOffset are used for the height comparison figure in the Pokédex.
height and weight are specified in decimeters and hectograms respectively (which are meters and kilograms multiplied by 10, so 2.5 meters are 25 decimeters).
In Pokémon Emerald, you can sort the Pokédex by name, height or weight. Apparently, the Pokémon order is hardcoded in the game files and not calculated from their data. Therefore we have to include our new Pokémon species at the right places. While the correct position for the alphabetical order is easy to find, it can become quite tedious for height and weight, so we added comments to the listings in order help out were they should fit.
Edit src/data/pokemon/pokedex_orders.h:
 const u16 gPokedexOrder_Alphabetical[] =
 {
     ...
     NATIONAL_DEX_MEW,
+    NATIONAL_DEX_MEWTHREE,
     NATIONAL_DEX_MEWTWO,
     ...
 };

 const u16 gPokedexOrder_Weight[] =
 {
     ...
     // 72.8 lbs / 33.0 kg
     //NATIONAL_DEX_MEWTWO_MEGA_Y,
     NATIONAL_DEX_ESCAVALIER,
     NATIONAL_DEX_FRILLISH,
     NATIONAL_DEX_DURANT,
     NATIONAL_DEX_CINDERACE,
+    NATIONAL_DEX_MEWTHREE,
     //NATIONAL_DEX_PERSIAN_ALOLAN,
     NATIONAL_DEX_TOEDSCOOL,
     // 73.4 lbs / 33.3 kg
     NATIONAL_DEX_DUGTRIO,
     ...
 };

 const u16 gPokedexOrder_Height[] =
 {
     ...
     // 4'11" / 1.5m
     ...
     NATIONAL_DEX_GLIMMORA,
     NATIONAL_DEX_WO_CHIEN,
     NATIONAL_DEX_IRON_LEAVES,
     NATIONAL_DEX_IRON_BOULDER,
+    NATIONAL_DEX_MEWTHREE,
    // 5'03" / 1.6m
     ...
 };
The Graphics
We will start by copying the following files for Mew (not Mewtwo) and rename it to mewthree.
cp -r graphics/pokemon/mew/. graphics/pokemon/mewthree
We aren’t copying Mewtwo’s folder because he has those pesky Mega Evolutions that will get in the way of what we’re doing, so our sample will need to be pure from the source.
1. Edit the sprites
Let’s edit the sprites. Start your favourite image editor (I recommend Aseprite or its free alternative, Libresprite) and change anim_front.png and back.png to meet your expectations.
Make sure that you are using the indexed mode and you have limited yourself to 15 colors!
Put the RGB values of your colors into normal.pal between the first and the last color and the RGB values for the shiny version into shiny.pal.
Edit footprint.png using two colors in indexed mode, black and white.
Finally, edit icon.png.
Note: the icon will use one of 6 predefined palettes instead of normal.pal.
Open an icon sprite and load one of the palettes to find out which palette suits your icon sprite best.
2. Add the sprites to the rom
Sadly, just putting the image files into the graphics folder is not enough. To use the sprites we have to register them, which is kind of tedious. First, create constants for the file paths. You’ll want to add the constants for your species after the constants for the last valid species.
Edit src/data/graphics/pokemon.h:
#if P_FAMILY_PECHARUNT
    const u32 gMonFrontPic_Pecharunt[] = INCGFX_U32("graphics/pokemon/pecharunt/front.png", ".4bpp.lz");
    const u16 gMonPalette_Pecharunt[] = INCGFX_U16("graphics/pokemon/pecharunt/normal.pal", ".gbapal");
    const u32 gMonBackPic_Pecharunt[] = INCGFX_U32("graphics/pokemon/pecharunt/back.png", ".4bpp.lz");
    const u16 gMonShinyPalette_Pecharunt[] = INCGFX_U16("graphics/pokemon/pecharunt/shiny.pal", ".gbapal");
    const u8 gMonIcon_Pecharunt[] = INCGFX_U8("graphics/pokemon/pecharunt/icon.png", ".4bpp");
#if P_FOOTPRINTS
    const u8 gMonFootprint_Pecharunt[] = INCGFX_U8("graphics/pokemon/pecharunt/footprint.png", ".1bpp");
#endif //P_FOOTPRINTS
#if OW_POKEMON_OBJECT_EVENTS
    const u32 gObjectEventPic_Pecharunt[] = INCGFX_COMP("graphics/pokemon/pecharunt/overworld.png", ".4bpp");
#if OW_PKMN_OBJECTS_SHARE_PALETTES == FALSE
    const u16 gOverworldPalette_Pecharunt[] = INCGFX_U16("graphics/pokemon/pecharunt/overworld_normal.pal", ".gbapal");
    const u16 gShinyOverworldPalette_Pecharunt[] = INCGFX_U16("graphics/pokemon/pecharunt/overworld_shiny.pal", ".gbapal");
#endif //OW_PKMN_OBJECTS_SHARE_PALETTES
#endif //OW_POKEMON_OBJECT_EVENTS
#endif //P_FAMILY_PECHARUNT

    const u32 gMonFrontPic_Egg[] = INCGFX_U32("graphics/pokemon/egg/anim_front.png", ".4bpp.lz");
    const u16 gMonPalette_Egg[] = INCGFX_U16("graphics/pokemon/egg/normal.pal", ".gbapal");
    const u8 gMonIcon_Egg[] = INCGFX_U8("graphics/pokemon/egg/icon.png", ".4bpp");

+   const u32 gMonFrontPic_Mewthree[] = INCGFX_U32("graphics/pokemon/mewthree/anim_front.png", ".4bpp.lz");
+   const u32 gMonBackPic_Mewthree[] = INCGFX_U32("graphics/pokemon/mewthree/back.png", ".4bpp.lz");
+   const u16 gMonPalette_Mewthree[] = INCGFX_U16("graphics/pokemon/mewthree/normal.pal", ".gbapal");
+   const u16 gMonShinyPalette_Mewthree[] = INCGFX_U16("graphics/pokemon/mewthree/shiny.pal", ".gbapal");
+   const u8 gMonIcon_Mewthree[] = INCGFX_U8("graphics/pokemon/mewthree/icon.png", ".4bpp");
+   const u8 gMonFootprint_Mewthree[] = INCGFX_U8("graphics/pokemon/mewthree/footprint.png", ".1bpp");
Please note that Pecharunt, the Pokémon that should be above your insertion for the time being, reads a front.png sprite instead of an anim_front.png sprite. This is because currently, Pecharunt lacks a 2nd frame. If the front sprite sheet of your species uses 2 frames, you should use anim_front.
3. Add the animations to the rom
You can define the animation order, in which the sprites will be shown. The first number is the sprite index (so 0 or 1) and the second number is the number of frames the sprite will be visible.
Version 1.11.0 or later
We add this data directly to the entry, so go to section 4.
Version 1.10.3 or earlier
Edit src/data/pokemon_graphics/front_pic_anims.h:
#if P_FAMILY_PECHARUNT
PLACEHOLDER_ANIM_SINGLE_FRAME(Pecharunt);
#endif //P_FAMILY_PECHARUNT

+static const union AnimCmd sAnim_Mewthree_1[] =
+{
+    ANIMCMD_FRAME(1, 30),
+    ANIMCMD_FRAME(0, 20),
+    ANIMCMD_END,
+};
#if P_FAMILY_PECHARUNT
SINGLE_ANIMATION(Pecharunt);
#endif //P_FAMILY_PECHARUNT
+SINGLE_ANIMATION(Mewthree);
SINGLE_ANIMATION(Egg);
You might be wondering what PLACEHOLDER_ANIM_SINGLE_FRAME is. Well, since Pecharun only has 1 frame, we use what’s called a preprocessor macro to have in a single line what otherwise would’ve been this in the C file:
static const union AnimCmd sAnim_Pecharunt_1[] =
{
    ANIMCMD_FRAME(0, 1),
    ANIMCMD_END,
}
Instead, we can use the already established macro that does the same thing, replacing the value in parenthesis with what we want (in this case, Pecharunt):
#define PLACEHOLDER_ANIM_SINGLE_FRAME(name)     \
static const union AnimCmd sAnim_##name##_1[] = \
{                                               \
    ANIMCMD_FRAME(0, 1),                        \
    ANIMCMD_END,                                \
}
4. Linking graphic information to our Pokémon
Now that we have all the external data ready, we just need to add it to gSpeciesInfo plus the rest of the animation and graphical data that we want to use:
 const struct SpeciesInfo gSpeciesInfo[] =
 {
     ...
     [SPECIES_MEWTHREE] =
     {
        ...
        .pokemonScale = 256,
        .pokemonOffset = 0,
        .trainerScale = 290,
        .trainerOffset = 2,
+       .frontPic = gMonFrontPic_Mewthree,
+       .frontPicSize = MON_COORDS_SIZE(64, 64),
+       .frontPicYOffset = 0,
+       .frontAnimFrames = ANIM_FRAMES(
+           ANIMCMD_FRAME(0, 1),
+       ),
+       .frontAnimId = ANIM_GROW_VIBRATE,
+       .frontAnimDelay = 15,
+       .enemyMonElevation = 6,
+       .backPic = gMonBackPic_Mewthree,
+       .backPicSize = MON_COORDS_SIZE(64, 64),
+       .backPicYOffset = 0,
+       .backAnimId = BACK_ANIM_CONCAVE_ARC_SMALL,
+       .palette = gMonPalette_Mewthree,
+       .shinyPalette = gMonShinyPalette_Mewthree,
        .iconSprite = gMonIcon_Mewthree,
        .iconPalIndex = 2,
+       FOOTPRINT(Mewthree)
    },
 };
Let’s explain each of these:
frontPic:- Used to reference the front sprite, so in this case, we call for
gMonFrontPic_Mewthree.
- Used to reference the front sprite, so in this case, we call for
frontPicSize:- The two values (
widthandheight) are used for defining the non-empty size of the front sprite, which is used in move animations. If you’re unsure of the values, you can leave them both as 64.
- The two values (
frontPicYOffset:- Used to define what Y position the sprite sits at. This is used to set where they’d be “grounded”. For the shadow, see
enemyMonElevation.
- Used to define what Y position the sprite sits at. This is used to set where they’d be “grounded”. For the shadow, see
frontAnimFrames:- We define our animation frame animations directly here. In version
1.10.3 and earlier, we add the reference to the table that we defined earlier here like this instead:+ .frontAnimFrames = sAnims_Mewthree,
- We define our animation frame animations directly here. In version
frontAnimId:- Because you are limited to two frames, there are already predefined front sprite animations, describing translations, rotations, scalings or color changes.
frontAnimDelay:- Sets a delay in frame count between when the Pokémon appears and when the animation starts.
enemyMonElevation:- Used to determine the altitude from the ground. Any value above 0 will show a shadow under the Pokémon, to signify that they’re floating.
backPic:- Used to reference the back sprite, so in this case, we call for
gMonBackPic_Mewthree.
- Used to reference the back sprite, so in this case, we call for
backPicSize:- The two values (
widthandheight) are used for defining the non-empty size of the back sprite, which is used in move animations. If you’re unsure of the values, you can leave them both as 64. - NOTE: Mew has a tarnary switch here in order to change values depending on if a config option is set for displaying th original Gen 3 sprites.
- The two values (
backPicYOffset:- Used to define what Y position of the back sprite. When working with the animation debug menu, we recommend aligning the back sprite to the white background, as it was designed to properyly align with the real battle layout.
backAnimId:- Like
frontAnimIdexcept for the back sprites and them being a single frame. The IDs listed here are used to represent 3 different animations that happen based on the the Pokémon’s nature.
- Like
palette:- Used to reference the non-shiny palette, so in this case, we call for
gMonPalette_Mewthree.
- Used to reference the non-shiny palette, so in this case, we call for
shinyPalette:- Used to reference the shiny palette, so in this case, we call for
gMonShinyPalette_Mewthree.
- Used to reference the shiny palette, so in this case, we call for
iconSprite:- Used to reference the icon sprite, so in this case, we call for
gMonIcon_Mewthree.
- Used to reference the icon sprite, so in this case, we call for
iconPalIndex:- Here, you can choose between the six icon palettes; 0, 1, 2, 3, 4 and 5. All of them located in
graphics/pokemon/icon_palettes.
- Here, you can choose between the six icon palettes; 0, 1, 2, 3, 4 and 5. All of them located in
FOOTPRINT- We made this single field into a macro so that they can be ignored when
P_FOOTPRINTSis set to false. It’s also why we don’t have an “,” after calling it like the other macros (we add it as part of the macro itself).#if P_FOOTPRINTS #define FOOTPRINT(sprite) .footprint = gMonFootprint_## sprite, #else #define FOOTPRINT(sprite) #endif
- We made this single field into a macro so that they can be ignored when
*NOTE: In v1.7.x only, there were macros that set multiple of these fields. However, they were considered clunky to use, so they were removed in v1.8.
- FRONT_PIC: For frontPic and frontPicSize.
- BACK_PIC: For backPic and backPicSize.
- PALETTES: For palette and shinyPalette.
- ICON: For iconSprite and iconPalIndex.
The Data - Part 2
We’re almost there just a bit left!
1. Species Flags
 const struct SpeciesInfo gSpeciesInfo[] =
 {
     ...
     [SPECIES_MEWTHREE] =
     {
        ...
        .abilities = { ABILITY_INSOMNIA, ABILITY_NONE, ABILITY_NONE },
        .bodyColor = BODY_COLOR_PURPLE,
+       .isRestrictedLegendary = TRUE,
+       .perfectIVCount = LEGENDARY_PERFECT_IV_COUNT,
    },
 };
Each species flag provides properties to the species:
perfectIVCount(1.10 onwards):- Guarantees that the number of IVs specified here will be perfect.
isRestrictedLegendary:- 1.14.3 onwards: Does nothing.
isSubLegendary:- 1.14.3 onwards: Does nothing.
isMythical:- Is skipped during Pokédex evaluations.
- Unless it also has the
dexForceRequiredflag.
- Unless it also has the
- Cannot obtain Gigantamax factor via
ToggleGigantamaxFactor. - 1.9 and earlier: Guaranteed 3 perfect IVs for the species.
- Is skipped during Pokédex evaluations.
isUltraBeast:- Beast Ball’s multiplier is set to x5 for this species.
- All other ball multipliers are set to x0.1.
- 1.9 and earlier: Guaranteed 3 perfect IVs for the species.
- Beast Ball’s multiplier is set to x5 for this species.
isParadox(isParadoxFormprevious to 1.9):- 1.10 onwards: Makes it so that Booster Energy cannot be knocked off.
- 1.9 and earlier: Does nothing.
isTotem:- 1.10 onwards: Does nothing.
- 1.9 and earlier: Guaranteed 3 perfect IVs for the species.
isMegaEvolution:- A Mega indicator is added to the battle box indicating that they’re Mega Evolved.
- The species doesn’t receive affection benefits.
- Required when adding new Mega Evolutions.
isPrimalReversion:- A Primal Reversion indicator (Alpha or Omega for Kyogre/Groudon respectively) is added to the battle box indicating that they’re Primal Reverted.
- Required when adding new Primal Reversions.
isUltraBurst:- Required when adding new Ultra Burst forms.
isGigantamax:- Used to determine if Gigantamax forms should have their GMax moves or not.
- Required when adding new Gigantamax forms.
isAlolanForm,isGalarianForm,isHisuianForm,isPaldeanForm:- 1.10.3 onwards: Used to determine breeding offspring from different parents based on their region.
- 1.10.2 and earlier: Does nothing.
cannotBeTraded:- This species cannot be traded away (like Black/White Kyurem).
tmIlliterate:- This species will be unable to learn the universal TM or Tutor moves.
isFrontierBanned(1.9 onwards):- This species will be unable to enter Battle Frontier facilities. Replaces
gFrontierBannedSpecies.
- This species will be unable to enter Battle Frontier facilities. Replaces
2. Delimit the moveset
Let’s begin with the moves that can be learned by leveling up.
Append to src/data/pokemon/level_up_learnsets/gen_9.h: NOTE: You can ignore the warning at the top of the file if you’re just adding moves to Pokemon.
#if P_FAMILY_PECHARUNT
static const struct LevelUpMove sPecharuntLevelUpLearnset[] = {
    LEVEL_UP_MOVE( 1, MOVE_SMOG),
    LEVEL_UP_MOVE( 1, MOVE_POISON_GAS),
    LEVEL_UP_MOVE( 1, MOVE_MEMENTO),
    LEVEL_UP_MOVE( 1, MOVE_ASTONISH),
    LEVEL_UP_MOVE( 8, MOVE_WITHDRAW),
    LEVEL_UP_MOVE(16, MOVE_DESTINY_BOND),
    LEVEL_UP_MOVE(24, MOVE_FAKE_TEARS),
    LEVEL_UP_MOVE(32, MOVE_PARTING_SHOT),
    LEVEL_UP_MOVE(40, MOVE_SHADOW_BALL),
    LEVEL_UP_MOVE(48, MOVE_MALIGNANT_CHAIN),
    LEVEL_UP_MOVE(56, MOVE_TOXIC),
    LEVEL_UP_MOVE(64, MOVE_NASTY_PLOT),
    LEVEL_UP_MOVE(72, MOVE_RECOVER),
    LEVEL_UP_END
};
#endif

+static const struct LevelUpMove sMewthreeLevelUpLearnset[] = {
+   LEVEL_UP_MOVE( 1, MOVE_CONFUSION),
+   LEVEL_UP_MOVE( 1, MOVE_DISABLE),
+   LEVEL_UP_MOVE(11, MOVE_BARRIER),
+   LEVEL_UP_MOVE(22, MOVE_SWIFT),
+   LEVEL_UP_MOVE(33, MOVE_PSYCH_UP),
+   LEVEL_UP_MOVE(44, MOVE_FUTURE_SIGHT),
+   LEVEL_UP_MOVE(55, MOVE_MIST),
+   LEVEL_UP_MOVE(66, MOVE_PSYCHIC),
+   LEVEL_UP_MOVE(77, MOVE_AMNESIA),
+   LEVEL_UP_MOVE(88, MOVE_RECOVER),
+   LEVEL_UP_MOVE(99, MOVE_SAFEGUARD),
+   LEVEL_UP_END
+};
NOTE: If P_LVL_UP_LEARNSETS is not set to something equal to GEN_9, the file to be edited will change to what’s specified.
Again, we need to register the learnset in gSpeciesInfo:
 const struct SpeciesInfo gSpeciesInfo[] =
 {
     ...
     [SPECIES_MEWTHREE] =
     {
        ...
        .palette = gMonPalette_Mewthree,
        .shinyPalette = gMonShinyPalette_Mewthree,
        .iconSprite = gMonIcon_Mewthree,
        .iconPalIndex = 2,
+       .levelUpLearnset = sMewthreeLevelUpLearnset,
    },
 };
Next we need to specify which moves can be taught via TM, HM, or Move Tutor.
Those are defined in src/data/pokemon/teachable_learnsets.h. This file is automatically generated by default and you can read the details of how this works in this doc but let’s go through the basics.
If you open src/data/pokemon/all_learnables.json, you will see list of moves associated with every species, the order doesn’t matter so let’s add Mewthree moves at the top.
{
+  "MEWTHREE": [
+    MOVE_FOCUS_PUNCH,
+    MOVE_WATER_PULSE,
+    MOVE_CALM_MIND,
+    MOVE_TOXIC
+  ],
  "PINCURCHIN": [
  ...
When compiling, the game will look at the moves and cross-references with the tutor and TM moves available in your game to generate the final list (so you don’t need to worry about putting a move there is no way to learn in your game).
While this is not recommended, you can also disable the learnset helper that generates src/data/pokemon/teachable_learnsets.h and edit the file yourself. First change the config in include/config/pokemon.h:
// Learnset helper toggles
#define P_LEARNSET_HELPER_TEACHABLE TRUE        // If TRUE, teachable_learnsets.h will be populated by tools/learnset_helpers/teachable.py using the included JSON files based on available TMs and tutors.
so that your manual changes are not overwritten then you can update the file
#if P_FAMILY_PECHARUNT
static const u16 sPecharuntTeachableLearnset[] = {
    ...
    MOVE_UNAVAILABLE,
};
#endif //P_FAMILY_PECHARUNT

+static const u16 sMewthreeTeachableLearnset[] = {
+   MOVE_FOCUS_PUNCH,
+   MOVE_WATER_PULSE,
+   MOVE_CALM_MIND,
+   MOVE_TOXIC,
+   MOVE_UNAVAILABLE, // This is required to determine where the array ends.
+};
Once more, we also need to register the learnset in gSpeciesInfo:
 const struct SpeciesInfo gSpeciesInfo[] =
 {
     ...
     [SPECIES_MEWTHREE] =
     {
        ...
        FOOTPRINT(Mewthree)
        .levelUpLearnset = sMewthreeLevelUpLearnset,
+       .teachableLearnset = sMewthreeTeachableLearnset,
    },
 };
If you want to create a Pokémon which can breed, you will need to edit src/data/pokemon/egg_moves.h.
3. Define the Evolutions
We want Mewthree to evolve from Mewtwo by reaching level 100.
Edit gSpeciesInfo:
 const struct SpeciesInfo gSpeciesInfo[] =
 {
     ...
     [SPECIES_MEWTWO] =
     {
        ...
        FOOTPRINT(Mewtwo)
        .isRestrictedLegendary = TRUE,
        .levelUpLearnset = sMewtwoLevelUpLearnset,
        .teachableLearnset = sMewtwoTeachableLearnset,
        .formSpeciesIdTable = sMewtwoFormSpeciesIdTable,
        .formChangeTable = sMewtwoFormChangeTable,
+       .evolutions = EVOLUTION({EVO_LEVEL, 100, SPECIES_MEWTHREE}),
    },
 };
4. Make it appear!
Now Mewthree really does slumber in the games code - but we won’t know until we make him appear somewhere! The legend tells that Mewthree is hiding somewhere in Petalburg Woods…
Edit src/data/wild_encounters.json:
         {
           "map": "MAP_PETALBURG_WOODS",
           "base_label": "gPetalburgWoods",
           "land_mons": {
             "encounter_rate": 20,
             "mons": [
               {
                 "min_level": 5,
                 "max_level": 5,
                 "species": "SPECIES_POOCHYENA"
               },
               {
                 "min_level": 5,
                 "max_level": 5,
                 "species": "SPECIES_WURMPLE"
               },
               {
                 "min_level": 5,
                 "max_level": 5,
                 "species": "SPECIES_SHROOMISH"
               },
               {
-                "min_level": 6,
-                "max_level": 6,
-                "species": "SPECIES_POOCHYENA"
+                "min_level": 5,
+                "max_level": 5,
+                "species": "SPECIES_MEWTHREE"
               },
               ...
        }
Congratulations, you have created your own personal pocket monster! You may call yourself a mad scientist now.
Optional data
Now that you now have all the essential pieces to create a base species, there are some aspects that you might want to know if you want to do other stuff with your custom Pokémon.
1. Form tables
Found in src/data/pokemon/form_species_tables.h.
These are introduced to have a reference of what forms correspond to what Species of Pokémon. For example, we have Pikachu’s table:
#if P_FAMILY_PIKACHU
static const u16 sPikachuFormSpeciesIdTable[] = {
    SPECIES_PIKACHU,
    SPECIES_PIKACHU_COSPLAY,
    SPECIES_PIKACHU_ROCK_STAR,
    SPECIES_PIKACHU_BELLE,
    SPECIES_PIKACHU_POP_STAR,
    SPECIES_PIKACHU_PH_D,
    SPECIES_PIKACHU_LIBRE,
    SPECIES_PIKACHU_ORIGINAL_CAP,
    SPECIES_PIKACHU_HOENN_CAP,
    SPECIES_PIKACHU_SINNOH_CAP,
    SPECIES_PIKACHU_UNOVA_CAP,
    SPECIES_PIKACHU_KALOS_CAP,
    SPECIES_PIKACHU_ALOLA_CAP,
    SPECIES_PIKACHU_PARTNER_CAP,
    SPECIES_PIKACHU_WORLD_CAP,
    FORM_SPECIES_END,
};
#endif //P_FAMILY_PIKACHU
We register the table for each form in gSpeciesInfo.
    [SPECIES_PIKACHU] =
    {
        ...
        .teachableLearnset = sPikachuTeachableLearnset,
+       .formSpeciesIdTable = sPikachuFormSpeciesIdTable,
        .evolutions = EVOLUTION({EVO_ITEM, ITEM_THUNDER_STONE, SPECIES_RAICHU},
                                {EVO_NONE, 0, SPECIES_RAICHU_ALOLAN}),
    },

    [SPECIES_PIKACHU_COSPLAY] =
    {
        ...
        .teachableLearnset = sPikachuTeachableLearnset,
+       .formSpeciesIdTable = sPikachuFormSpeciesIdTable,
    },
…and so on.
What this allows us to do is to be able to get all forms of a Pokémon in our code by using the GetSpeciesFormTable function.
For example, in the HGSS dex, it lets us browse between the entries of every form available.:
In addition, we have the GET_BASE_SPECIES_ID macro, which returns the first entry of the table (or return the species itself if it doesn’t have a table registered). With this, you can check if a Pokémon is any form of a species. For example, making it so that the Light Ball affects all Pikachu forms:
    case HOLD_EFFECT_LIGHT_BALL:
        if (GET_BASE_SPECIES_ID(gBattleMons[battlerAtk].species) == SPECIES_PIKACHU && IS_MOVE_SPECIAL(move))
            modifier = uq4_12_multiply_half_down(modifier, UQ_4_12(2.0));
        break;
2. Form change tables
Found in src/data/pokemon/form_species_tables.h.
These tables, unlike the regular form tables, registers how Pokémon can switch between forms.
#if P_FAMILY_GASTLY
static const struct FormChange sGengarFormChangeTable[] =
{
    {FORM_CHANGE_BATTLE_MEGA_EVOLUTION_ITEM, SPECIES_GENGAR_MEGA, ITEM_GENGARITE},
    {FORM_CHANGE_BATTLE_GIGANTAMAX,          SPECIES_GENGAR_GIGANTAMAX},
    {FORM_CHANGE_TERMINATOR},
};
#endif //P_FAMILY_GASTLY
The first value is the type of form change. In the case of Gengar, we have both Mega Evolution and Gigantamax form changes.
The second value is the target form, to which the Pokémon will change into.
Values after that are referred as arguments, and needs to be put there depends on the type of form change, detailed in include/constants/form_change_types.h.
3. Gender differences
You may have seen that there’s a couple of duplicate fields with a “Female” suffix.
    [SPECIES_FRILLISH] =
    {
        ...
        .frontPic = gMonFrontPic_Frillish,
        .frontPicSize = MON_COORDS_SIZE(56, 56),
        .frontPicYOffset = 5,
        .frontAnimFrames = ANIM_FRAMES(
            ANIMCMD_FRAME(1, 30),
            ANIMCMD_FRAME(0, 30),
            ANIMCMD_FRAME(1, 30),
            ANIMCMD_FRAME(0, 30),
        ),
        .frontAnimId = ANIM_RISING_WOBBLE,
        .backPic = gMonBackPic_Frillish,
        .backPicSize = MON_COORDS_SIZE(40, 56),
        .backPicYOffset = 7,
        .backAnimId = BACK_ANIM_CONVEX_DOUBLE_ARC,
        .palette = gMonPalette_Frillish,
        .shinyPalette = gMonShinyPalette_Frillish,
        .iconSprite = gMonIcon_Frillish,
        .iconPalIndex = 0,
+#if P_GENDER_DIFFERENCES
+       .frontPicFemale = gMonFrontPic_FrillishF,
+       .frontPicSizeFemale = MON_COORDS_SIZE(56, 56),
+       .backPicFemale = gMonBackPic_FrillishF,
+       .backPicSizeFemale = MON_COORDS_SIZE(40, 56),
+       .paletteFemale = gMonPalette_FrillishF,
+       .shinyPaletteFemale = gMonShinyPalette_FrillishF,
+       .iconSpriteFemale = gMonIcon_FrillishF,
+       .iconPalIndexFemale = 1,
+#endif //P_GENDER_DIFFERENCES
        FOOTPRINT(Frillish)
        .levelUpLearnset = sFrillishLevelUpLearnset,
        .teachableLearnset = sFrillishTeachableLearnset,
        .evolutions = EVOLUTION({EVO_LEVEL, 40, SPECIES_JELLICENT}),
    },
These are used to change the graphics of the Pokémon if they’re female. If they’re not registered, they default to the male values.
However, iconPalIndexFemale is a special case, where it’s doesn’t read the male icon palette if its iconSpriteFemale is set, so if you’re setting a female icon, be sure to set their palette index as well.
4. Overworld Data (v1.9 onwards)
If you have OW_POKEMON_OBJECT_EVENTS in your hack, you can add Overworld sprite data of your new species. Naturally, these can also be used for followers.
First, since you copied the contents from Mew’s folder previously, you should also have copied its overworld sprites. Edit those to your liking, as we have done before, making sure to update the palettes
Secondly, in src/data/graphics/pokemon.h, add the following:
    const u8 gMonIcon_Mewthree[] = INCGFX_U8("graphics/pokemon/mewthree/icon.png", ".4bpp");
    const u8 gMonFootprint_Mewthree[] = INCGFX_U8("graphics/pokemon/mewthree/footprint.png", ".1bpp");
+   const u32 gObjectEventPic_Mewthree[] = INCGFX_COMP("graphics/pokemon/mewthree/overworld.png", ".4bpp");
+   const u32 gOverworldPalette_Mewthree[] = INCGFX_U32("graphics/pokemon/mewthree/overworld_normal.pal", ".gbapal");
+   const u32 gShinyOverworldPalette_Mewthree[] = INCGFX_U32("graphics/pokemon/mewthree/overworld_shiny.pal", ".gbapal");
Thirdly, in src/data/object_events/object_event_pic_tables_followers.h:
#if P_FAMILY_PECHARUNT
/*static const struct SpriteFrameImage sPicTable_Pecharunt[] = {
    overworld_ascending_frames(gObjectEventPic_Pecharunt, 4, 4),
};*/
#endif //P_FAMILY_PECHARUNT

+static const struct SpriteFrameImage sPicTable_Mewthree[] = {
+    overworld_ascending_frames(gObjectEventPic_Mewthree, 4, 4),
+};
And finally, in gSpeciesInfo:
 const struct SpeciesInfo gSpeciesInfo[] =
 {
     ...
     [SPECIES_MEWTHREE] =
     {
        ...
        FOOTPRINT(Mewthree)
+       OVERWORLD(
+           sPicTable_Mewthree,
+           SIZE_32x32,
+           SHADOW_SIZE_M,
+           TRACKS_FOOT,
+           sAnimTable_Following,
+           gOverworldPalette_Mewthree,
+           gShinyOverworldPalette_Mewthree
+       )
        .levelUpLearnset = sMewthreeLevelUpLearnset,
        .teachableLearnset = sMewthreeTeachableLearnset,
    },
 };
Note: In versions previous to 1.11, sAnimTable_Following is not added here.
Sprite Size
Depending on your species, you might want to use different sizes for it. For example, certain species known for being big like Steelix use sprites that fit a 64x64 frame instead of 32x32, and as such have SIZE_64x64 in their data instead of SIZE_32x32 to accomodate for them.
Also, in spritesheet_rules.mk, -mwidth and -mheight need to be set to 8 instead of 4 for such cases.
Shadows
You have 4 options for their shadow, between Small, Medium, Large and None:
SHADOW_SIZE_NONESHADOW_SIZE_S
SHADOW_SIZE_M
SHADOW_SIZE_L
Tracks
You have 4 options for the tracks that your species will leave behind on sand.
TRACKS_NONETRACKS_FOOT
TRACKS_SLITHER
TRACKS_SPOT
TRACKS_BUG
…though technically you can also use TRACKS_BIKE_TIRE if you wish to.

Asymmetric sprites (Version 1.10.0 onwards)

You can set up an east-west asymetric overworld sprite by adding the East frames at the end of the sheet and changing the following:
Version 1.11.0 onwards
        OVERWORLD(
            sPicTable_Mewthree,
            SIZE_32x32,
            SHADOW_SIZE_M,
            TRACKS_FOOT,
-           sAnimTable_Following,
+           sAnimTable_Following_Asym,
            gOverworldPalette_Mewthree,
            gShinyOverworldPalette_Mewthree
        )
Version 1.10.x
-       OVERWORLD(
+       OVERWORLD_SET_ANIM(
            sPicTable_Mewthree,
            SIZE_32x32,
            SHADOW_SIZE_M,
            TRACKS_FOOT,
+           sAnimTable_Following_Asym,
            gOverworldPalette_Mewthree,
            gShinyOverworldPalette_Mewthree
        )
Either way, you may also create custom animation tables and use them here appropiately.
How to add the Pokémon Object Events to map
In Porymap, select the object you want to set the sprite to. Then, change the field “Sprite” to use OBJ_EVENT_GFX_SPECIES(SPECIES), replacing SPECIES with the name of the species you want to use. If you get a compiler error, it’s because it used the species define as part of the macro, so it needs to match how you defined it all the way back in Declare a species constant.
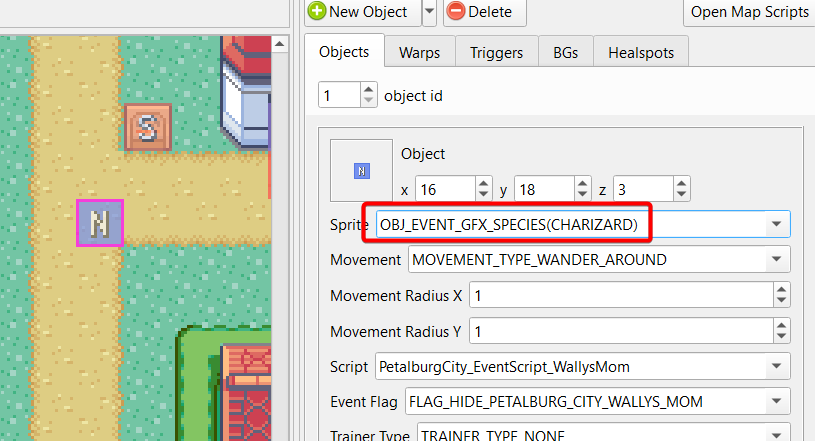
If you want to use their shiny and/or female versions, use one of the following macros:
OBJ_EVENT_GFX_SPECIES_SHINY(name)OBJ_EVENT_GFX_SPECIES_FEMALE(name)OBJ_EVENT_GFX_SPECIES_SHINY_FEMALE(name)
5. In-battle shadows (v1.10 onwards)
Gen 4-style shadows are defined by the SHADOW macro which takes the following arguments:
- X offset
- Y offset
- Shadow size: you have 4 options for their shadow, between Small, Medium, Large and Extra Large:
SHADOW_SIZE_SSHADOW_SIZE_MSHADOW_SIZE_LSHADOW_SIZE_XL_BATTLE_ONLY
To make the Pokémon have no shadow, use the NO_SHADOW macro instead of SHADOW.
6. Limiting species allowed as followers
You may use the following configs in include/config/overworld.h
#define OW_FOLLOWERS_ALLOWED_SPECIES (0)
#define OW_FOLLOWERS_ALLOWED_MET_LVL (0)
#define OW_FOLLOWERS_ALLOWED_MET_LOC (0)
Examples:
// Yellow Pikachu:
#define OW_FOLLOWERS_ALLOWED_SPECIES (SPECIES_PIKACHU)
#define OW_FOLLOWERS_ALLOWED_MET_LVL (0)
#define OW_FOLLOWERS_ALLOWED_MET_LOC (MAPSEC_PALLET_TOWN)
// Hoenn Starter:
#define OW_FOLLOWERS_ALLOWED_SPECIES (0)
#define OW_FOLLOWERS_ALLOWED_MET_LVL (5)
#define OW_FOLLOWERS_ALLOWED_MET_LOC (MAPSEC_ROUTE_101)
// Species set in VAR_XXXX:
#define OW_FOLLOWERS_ALLOWED_SPECIES (VAR_XXXX)
#define OW_FOLLOWERS_ALLOWED_MET_LVL (0)
#define OW_FOLLOWERS_ALLOWED_MET_LOC (0)
v1.6.x and earlier
This is a modified version of the original tutorial about adding new Pokémon species available in Pokeemerald’s wiki.
Despite the persistent rumors about an incredibly strong third form of Mew hiding somewhere, it actually wasn’t possible to catch it… OR WAS IT? In this tutorial, we will add a new Pokémon species to the game.
IMPORTANT: This tutorial applies to Version 1.6.2 and lower.
Changes compared to vanilla
The main things that the Expansion changes are listed here.
- Still Front Pics (
gMonStillFrontPic_YourPokemon) and by extensionsrc/anim_mon_front_pics.chave been removed. src/data/pokemon/cry_ids.hdoesn’t exist anymore.
Content
The Graphics
We will start by copying the folder containing the sprites for Mewtwo and rename it to mewthree (pretty meta huh?):
cp -r graphics/pokemon/mewtwo graphics/pokemon/mewthree
1. Edit the sprites
Let’s edit the sprites. Start your favourite image editor (I have used GIMP) and change anim_front.png, front.png and back.png to meet your expectations.
Make sure that you are using the indexed mode and you have limited yourself to 15 colors!
Put the RGB values of your colors into normal.pal between the first and the last color and the RGB values for the shiny version into shiny.pal.
Edit footprint.png using two colors in indexed mode, black and white.
Finally, edit icon.png. Notice, that the icon will use one of three predefined palettes instead of normal.pal.
2. Register the sprites
Sadly, just putting the image files into the graphics folder is not enough. To use the sprites we have to register them, which is kind of tedious. First, create constants for the file paths. You’ll want to add the constants for your species after the constants for the last valid species. Edit include/graphics.h:
 extern const u32 gMonFrontPic_Calyrex[];
+extern const u32 gMonFrontPic_Mewthree[];
 extern const u32 gMonBackPic_Calyrex[];
+extern const u32 gMonBackPic_Mewthree[];
 extern const u32 gMonPalette_Calyrex[];
+extern const u32 gMonPalette_Mewthree[];
 extern const u32 gMonShinyPalette_Calyrex[];
+extern const u32 gMonShinyPalette_Mewthree[];
 //extern const u8 gMonIcon_Calyrex[];
+extern const u8 gMonIcon_Mewthree[];
 extern const u8 gMonFootprint_Calyrex[];
+extern const u8 gMonFootprint_Mewthree[];
Now link the graphic files.
Edit src/data/graphics/pokemon.h:
 const u32 gMonFrontPic_Calyrex[] = INCBIN_U32("graphics/pokemon/calyrex/front.4bpp.lz");
+const u32 gMonFrontPic_Mewthree[] = INCBIN_U32("graphics/pokemon/mewthree/front.4bpp.lz");
 const u32 gMonBackPic_Calyrex[] = INCBIN_U32("graphics/pokemon/calyrex/back.4bpp.lz");
+const u32 gMonBackPic_Mewthree[] = INCBIN_U32("graphics/pokemon/mewthree/back.4bpp.lz");
 const u32 gMonPalette_Calyrex[] = INCBIN_U32("graphics/pokemon/calyrex/normal.gbapal.lz");
+const u32 gMonPalette_Mewthree[] = INCBIN_U32("graphics/pokemon/mewthree/normal.gbapal.lz");
 const u32 gMonShinyPalette_Calyrex[] = INCBIN_U32("graphics/pokemon/calyrex/shiny.gbapal.lz");
+const u32 gMonShinyPalette_Mewthree[] = INCBIN_U32("graphics/pokemon/mewthree/shiny.gbapal.lz");
 //const u8 gMonIcon_Calyrex[] = INCBIN_U8("graphics/pokemon/calyrex/icon.4bpp");
+const u8 gMonIcon_Mewthree[] = INCBIN_U8("graphics/pokemon/mewthree/icon.4bpp");
 const u8 gMonFootprint_Calyrex[] = INCBIN_U8("graphics/pokemon/calyrex/footprint.1bpp");
+const u8 gMonFootprint_Mewthree[] = INCBIN_U8("graphics/pokemon/mewthree/footprint.1bpp");
Please note that Calyrex, the Pokémon that should be above your insertion for the time being, reads a “front.png” sprite instead of an “anim_front.png” sprite. This is because currently, Calyrex lacks a 2nd frame. If the front sprite sheet of your species uses 2 frames, you should use “anim_front”.
It is also worth to mention that Calyrex’s icon sprite is commented out simply because it’s currently missing. If you do have an icon sprite sheet present inside your species’ folder at graphics/pokemon, by all means do not comment entries involving the gMonIcon constants.
3. Animate the sprites
You can define the animation order, in which the sprites will be shown. The first number is the sprite index (so 0 or 1) and the second number is the number of frames the sprite will be visible.
Edit src/data/pokemon_graphics/front_pic_anims.h:
static const union AnimCmd sAnim_Enamorus_1[] =
{
    ANIMCMD_FRAME(0, 1),
    ANIMCMD_END,
};

+static const union AnimCmd sAnim_Mewthree_1[] =
+{
+    ANIMCMD_FRAME(1, 30),
+    ANIMCMD_FRAME(0, 20),
+    ANIMCMD_END,
+};
#endif
SINGLE_ANIMATION(Enamorus);
+SINGLE_ANIMATION(Mewthree);
#endif
 const union AnimCmd *const *const gMonFrontAnimsPtrTable[] =
 {
    [SPECIES_NONE]        = sAnims_None,
    [SPECIES_BULBASAUR]   = sAnims_Bulbasaur,
     ...
    [SPECIES_ENAMORUS] = sAnims_Enamorus,
+   [SPECIES_MEWTHREE] = sAnims_Mewthree,
#endif
     ...
 };
Because you are limited to two frames, there are already predefined front sprite animations, describing translations, rotations, scalings or color changes.
Edit src/pokemon.c:
 static const u8 sMonFrontAnimIdsTable[] =
 {
     [SPECIES_BULBASAUR - 1]     = ANIM_V_JUMPS_H_JUMPS,
     ...
     [SPECIES_DEOXYS_SPEED - 1]           = ANIM_GROW_VIBRATE,
+    [SPECIES_MEWTHREE - 1]               = ANIM_GROW_VIBRATE,
 };
There are also predefined back sprite animations for the back sprites as well.
Edit src/pokemon_animation.c:
 static const u8 sSpeciesToBackAnimSet[] =
 {
     [SPECIES_BULBASAUR]                    = BACK_ANIM_DIP_RIGHT_SIDE,
     ...
     [SPECIES_CHIMECHO]                     = BACK_ANIM_CONVEX_DOUBLE_ARC,
+    [SPECIES_MEWTHREE]                     = BACK_ANIM_GROW_STUTTER,
 };
If you want to delay the time between when the Pokémon appears and when the animation starts, you can add an entry to sMonAnimationDelayTable
Edit src/pokemon.c:
 static const u8 sMonAnimationDelayTable[NUM_SPECIES - 1] =
 {
     [SPECIES_BLASTOISE - 1]  = 50,
     ...
    [SPECIES_KYOGRE - 1]     = 60,
    [SPECIES_RAYQUAZA - 1]   = 60,
+   [SPECIES_MEWTHREE - 1]   = 15,
 };
If you want your Pokémon to fly above the ground, you can add an entry to gEnemyMonElevation.
Edit src/data/pokemon_graphics/enemy_mon_elevation.h:
 const u8 gEnemyMonElevation[NUM_SPECIES] =
 {
     [SPECIES_BUTTERFREE] = 10,
     ...
     [SPECIES_REGIDRAGO] = 5,
+    [SPECIES_MEWTHREE] = 6,
 };
4. Update the tables
Edit src/data/pokemon_graphics/front_pic_table.h:
 const struct CompressedSpriteSheet gMonFrontPicTable[] =
 {
     SPECIES_SPRITE(NONE, gMonFrontPic_CircledQuestionMark),
     SPECIES_SPRITE(BULBASAUR, gMonFrontPic_Bulbasaur),
     ...
     SPECIES_SPRITE(ENAMORUS, gMonFrontPic_Enamorus),
+    SPECIES_SPRITE(MEWTHREE, gMonFrontPic_Mewthree),
#endif
     ...
};
Edit src/data/pokemon_graphics/front_pic_coordinates.h:
 const struct MonCoords gMonFrontPicCoords[] =
 {
     ...
    [SPECIES_ENAMORUS]                     = { .size = MON_COORDS_SIZE(64, 64), .y_offset =  0 },
+   [SPECIES_MEWTHREE]                     = { .size = MON_COORDS_SIZE(64, 64), .y_offset =  0 },
#endif
     ...
 };
Edit src/data/pokemon_graphics/back_pic_table.h:
 const struct CompressedSpriteSheet gMonBackPicTable[] =
 {
     SPECIES_SPRITE(NONE, gMonBackPic_CircledQuestionMark),
     SPECIES_SPRITE(BULBASAUR, gMonBackPic_Bulbasaur),
     ...
    SPECIES_SPRITE(ENAMORUS, gMonBackPic_Enamorus),
+   SPECIES_SPRITE(MEWTHREE, gMonBackPic_Mewthree),
#endif
     ...
 };
Edit src/data/pokemon_graphics/back_pic_coordinates.h:
 const struct MonCoords gMonBackPicCoords[] =
 {
     ...
    [SPECIES_ENAMORUS]                     = { .size = MON_COORDS_SIZE(64, 64), .y_offset =  0 },
+   [SPECIES_MEWTHREE]                     = { .size = MON_COORDS_SIZE(56, 64), .y_offset = 1  },
#endif
     ...
 };
Edit src/data/pokemon_graphics/footprint_table.h:
 const u8 *const gMonFootprintTable[] =
 {
     [SPECIES_NONE] = gMonFootprint_Bulbasaur,
     [SPECIES_BULBASAUR] = gMonFootprint_Bulbasaur,
     ...
     [SPECIES_CALYREX] = gMonFootprint_Calyrex,
+    [SPECIES_MEWTHREE] = gMonFootprint_Mewthree,
#endif
     [SPECIES_EGG] = gMonFootprint_Bulbasaur,
 };
Edit src/data/pokemon_graphics/palette_table.h:
 const struct CompressedSpritePalette gMonPaletteTable[] =
 {
    SPECIES_PAL(NONE, gMonPalette_CircledQuestionMark),
    SPECIES_PAL(BULBASAUR, gMonPalette_Bulbasaur),
    ...
    SPECIES_PAL(ENAMORUS, gMonPalette_Enamorus),
+   SPECIES_PAL(MEWTHREE, gMonPalette_Mewthree),
#endif
    ...
};
Edit src/data/pokemon_graphics/shiny_palette_table.h:
const struct CompressedSpritePalette gMonShinyPaletteTable[] =
{
     SPECIES_SHINY_PAL(NONE, gMonShinyPalette_CircledQuestionMark),
     SPECIES_SHINY_PAL(BULBASAUR, gMonShinyPalette_Bulbasaur),
     ...
    SPECIES_SHINY_PAL(ENAMORUS, gMonShinyPalette_Enamorus),
+   SPECIES_SHINY_PAL(MEWTHREE, gMonShinyPalette_Mewthree),
#endif
     ...
};
Edit src/pokemon_icon.c:
 const u8 *const gMonIconTable[] =
 {
     [SPECIES_NONE] = gMonIcon_Bulbasaur,
     ...
    [SPECIES_ENAMORUS] = gMonIcon_Enamorus,
+   [SPECIES_MEWTHREE] = gMonIcon_Mewthree,
#endif
     ...
 };
 const u8 gMonIconPaletteIndices[] =
 {
     [SPECIES_NONE] = 0,
     ...
    [SPECIES_ENAMORUS] = 1,
+   [SPECIES_MEWTHREE] = 2,
    [SPECIES_VENUSAUR_MEGA] = 1,
     ...
 };
Here, you can choose between the six icon palettes; 0, 1, 2, 3, 4 and 5. All of them located in graphics/pokemon/icon_palettes.
Open an icon sprite and load one of the palettes to find out which palette suits your icon sprite best.
The Data
Our plan is as simple as it is brilliant: clone Mewtwo… and make it even stronger!
1. Declare a species constant
Our first step towards creating a new digital lifeform is to define its own species constant.
Edit include/constants/species.h:
 #define SPECIES_NONE 0
 #define SPECIES_BULBASAUR 1
 ...
 #define SPECIES_ENAMORUS 905
+#define SPECIES_MEWTHREE 906

-#define FORMS_START SPECIES_ENAMORUS
+#define FORMS_START SPECIES_MEWTHREE
2. Devise a name
This name will be displayed in the game. It may be different than the identifier of the species constant, especially when there are special characters involved.
Edit src/data/text/species_names.h:
 const u8 gSpeciesNames[][POKEMON_NAME_LENGTH + 1] = {
     [SPECIES_NONE] = _("??????????"),
     [SPECIES_BULBASAUR] = _("Bulbasaur"),
     ...
     [SPECIES_ENAMORUS] = _("Enamorus"),
+    [SPECIES_MEWTHREE] = _("Mewthree"),
 };
The _() underscore function doesn’t really exist - it’s a convention borrowed from GNU gettext to let preproc know this is text to be converted to the custom encoding used by the Gen 3 Pokemon games.
3. Define its Pokédex entry
First, we will need to add new index constants for its Pokédex entry. The index constants are divided into the Hoenn Pokédex, which contains all Pokémon native to the Hoenn region, and the National Pokédex containing all known Pokémon, which can be received after entering the hall of fame for the first time.
Edit include/constants/pokedex.h:
// National Pokedex order
enum {
    NATIONAL_DEX_NONE,
    // Kanto
    NATIONAL_DEX_BULBASAUR,
...
    NATIONAL_DEX_ENAMORUS,
+   NATIONAL_DEX_MEWTHREE,
};
 #define KANTO_DEX_COUNT     NATIONAL_DEX_MEW
 #define JOHTO_DEX_COUNT     NATIONAL_DEX_CELEBI
#if P_GEN_8_POKEMON == TRUE
-   #define NATIONAL_DEX_COUNT  NATIONAL_DEX_ENAMORUS
+   #define NATIONAL_DEX_COUNT  NATIONAL_DEX_MEWTHREE
Do keep in mind that if you intend to add your new species to the Hoenn Dex, you’ll also want to add a HOENN_DEX constant for it, like this:
// Hoenn Pokedex order
enum {
    HOENN_DEX_NONE,
    HOENN_DEX_TREECKO,
...
    HOENN_DEX_DEOXYS,
+   HOENN_DEX_MEWTHREE,
...
};
- #define HOENN_DEX_COUNT (HOENN_DEX_DEOXYS + 1)
+ #define HOENN_DEX_COUNT (HOENN_DEX_MEWTHREE + 1)
Edit src/pokemon.c:
 // Assigns all species to the National Dex Index (Summary No. for National Dex)
 static const u16 sSpeciesToNationalPokedexNum[NUM_SPECIES - 1] =
 {
     SPECIES_TO_NATIONAL(ENAMORUS),
+    SPECIES_TO_NATIONAL(MEWTHREE),
 };
Just like before, if we want to insert our new species in the Hoenn Dex, we’ll have to do a few extra steps:
 // Assigns all species to the Hoenn Dex Index (Summary No. for Hoenn Dex)
 static const u16 sSpeciesToHoennPokedexNum[NUM_SPECIES - 1] =
 {
     SPECIES_TO_HOENN(TREECKO),
     ...
     SPECIES_TO_HOENN(DEOXYS),
+    SPECIES_TO_HOENN(MEWTHREE),
 };
 const u16 gHoennToNationalOrder[NUM_SPECIES] = // Assigns Hoenn Dex Pokémon (Using National Dex Index)
 {
     HOENN_TO_NATIONAL(TREECKO),
     ...
     HOENN_TO_NATIONAL(DEOXYS),
+    HOENN_TO_NATIONAL(MEWTHREE),
 };
Now we can define the actual text of the Pokédex entry.
Append to src/data/pokemon/pokedex_text.h:
 const u8 gEnamorusPokedexText[] = _(
     "Its arrival brings an end to the\n"
     "winter. According to legend, this\n"
     "Pokémon's love gives rise to the\n"
     "budding of fresh life across the land.");

+const u8 gMewthreePokedexText[] = _(
+    "The rumors became true.\n"
+    "This is Mews final form.\n"
+    "Its power level is over 9000.\n"
+    "Has science gone too far?");
Finally, we will add the Pokédex entry for Mewthree and link the text to it.
Edit src/data/pokemon/pokedex_entries.h:
 const struct PokedexEntry gPokedexEntries[] =
 {
     ...
     [NATIONAL_DEX_ENAMORUS] =
     {
         .categoryName = _("Love-Hate"),
         .height = 16,
         .weight = 480,
         .description = gEnamorusPokedexText,
         .pokemonScale = 259,
         .pokemonOffset = 1,
         .trainerScale = 296,
         .trainerOffset = 1,
     },

+    [NATIONAL_DEX_MEWTHREE] =
+    {
+        .categoryName = _("NEW SPECIES"),
+        .height = 15,
+        .weight = 330,
+        .description = gMewthreePokedexText,
+        .pokemonScale = 256,
+        .pokemonOffset = 0,
+        .trainerScale = 290,
+        .trainerOffset = 2,
+    },
 #endif
 };
The values pokemonScale, pokemonOffset, trainerScale and trainerOffset are used for the height comparison figure in the Pokédex. Height and weight are specified in meters and kilograms respectively, while the last digit is the first decimal place.
In Pokémon Emerald, you can sort the Pokédex by name, height or weight. Apparently, the Pokémon order is hardcoded in the game files and not calculated from their data. Therefore we have to include our new Pokémon species at the right places. While the correct position for the alphabetical order is easy to find, it can become quite tedious for height and weight. To find the right position for your Pokémon, you may look at the tables sorted by height and weight respectively in the appendix.
Edit src/data/pokemon/pokedex_orders.h:
 const u16 gPokedexOrder_Alphabetical[] =
 {
     ...
     NATIONAL_DEX_MEW,
+    NATIONAL_DEX_MEWTHREE,
     NATIONAL_DEX_MEWTWO,
     ...
 };

 const u16 gPokedexOrder_Weight[] =
 {
     ...
     NATIONAL_DEX_ESCAVALIER,
     NATIONAL_DEX_FRILLISH,
     NATIONAL_DEX_DURANT,
     NATIONAL_DEX_CINDERACE,
+    NATIONAL_DEX_MEWTHREE,
     //NATIONAL_DEX_PERSIAN, // Alolan Form
     NATIONAL_DEX_DUGTRIO,
     ...
 };

 const u16 gPokedexOrder_Height[] =
 {
     ...
     NATIONAL_DEX_ZERAORA,
     NATIONAL_DEX_GRIMMSNARL,
     NATIONAL_DEX_MR_RIME,
+    NATIONAL_DEX_MEWTHREE,
     // 5'03" / 1.6m
     ...
 };
4. Define its species information
Edit src/data/pokemon/species_info.h:
 const struct SpeciesInfo gSpeciesInfo[] =
 {
     [SPECIES_NONE] = {0},
     ...

      [SPECIES_ENAMORUS] =
      {
         .baseHP        = 74,
         .baseAttack    = 115,
         .baseDefense   = 70,
         .baseSpeed     = 106,
         .baseSpAttack  = 135,
         .baseSpDefense = 80,
         .types = { TYPE_FAIRY, TYPE_FLYING},
         .catchRate = 3,
         .expYield = 261,
         .evYield_SpAttack    = 3,
         .genderRatio = MON_FEMALE,
         .eggCycles = 120,
         .friendship = 90,
         .growthRate = GROWTH_SLOW,
         .eggGroups = { EGG_GROUP_UNDISCOVERED, EGG_GROUP_UNDISCOVERED},
         .abilities = {ABILITY_HEALER, ABILITY_NONE, ABILITY_CONTRARY},
         .bodyColor = BODY_COLOR_PINK,
         .noFlip = FALSE,
         .flags = SPECIES_FLAG_LEGENDARY,
     },

+     [SPECIES_MEWTHREE] =
+     {
+        .baseHP        = 106,
+        .baseAttack    = 150,
+        .baseDefense   = 70,
+        .baseSpeed     = 140,
+        .baseSpAttack  = 194,
+        .baseSpDefense = 120,
+        .types = { TYPE_PSYCHIC, TYPE_PSYCHIC},
+        .catchRate = 3,
+        .expYield = 255,
+        .evYield_SpAttack  = 3,
+        .genderRatio = MON_GENDERLESS,
+        .eggCycles = 120,
+        .friendship = 0,
+        .growthRate = GROWTH_SLOW,
+        .eggGroups = { EGG_GROUP_UNDISCOVERED, EGG_GROUP_UNDISCOVERED},
+        .abilities = {ABILITY_INSOMNIA, ABILITY_NONE},
+        .safariZoneFleeRate = 0,
+        .bodyColor = BODY_COLOR_PURPLE,
+        .noFlip = FALSE,
+     },
#endif
 };
The . is the structure reference operator in C to refer to the member object of the structure SpeciesInfo.
Notice how I also set the ability to ABILITY_INSOMNIA, so our little monster doesn’t even need to sleep anymore. You can find the abilities for example here include/constants/abilities.h and here src/data/text/abilities.h.
You can also incorporate a 3rd ability to your species, which is intended to be a Hidden Ability!
5. Delimit the moveset
Let’s begin with the moves that can be learned by leveling up.
Append to src/data/pokemon/level_up_learnsets.h:
static const struct LevelUpMove sEnamorusLevelUpLearnset[] = {
    LEVEL_UP_MOVE( 1, MOVE_TACKLE),
    LEVEL_UP_MOVE( 7, MOVE_BITE),
    LEVEL_UP_MOVE(11, MOVE_TWISTER),
    LEVEL_UP_MOVE(14, MOVE_DRAINING_KISS),
    LEVEL_UP_MOVE(22, MOVE_IRON_DEFENSE),
    LEVEL_UP_MOVE(31, MOVE_EXTRASENSORY),
    LEVEL_UP_MOVE(41, MOVE_CRUNCH),
    LEVEL_UP_MOVE(47, MOVE_MOONBLAST),
    LEVEL_UP_MOVE( 1, MOVE_SPRINGTIDE_STORM),
    LEVEL_UP_END
};

+static const struct LevelUpMove sMewthreeLevelUpLearnset[] = {
+   LEVEL_UP_MOVE( 1, MOVE_CONFUSION),
+   LEVEL_UP_MOVE( 1, MOVE_DISABLE),
+   LEVEL_UP_MOVE(11, MOVE_BARRIER),
+   LEVEL_UP_MOVE(22, MOVE_SWIFT),
+   LEVEL_UP_MOVE(33, MOVE_PSYCH_UP),
+   LEVEL_UP_MOVE(44, MOVE_FUTURE_SIGHT),
+   LEVEL_UP_MOVE(55, MOVE_MIST),
+   LEVEL_UP_MOVE(66, MOVE_PSYCHIC),
+   LEVEL_UP_MOVE(77, MOVE_AMNESIA),
+   LEVEL_UP_MOVE(88, MOVE_RECOVER),
+   LEVEL_UP_MOVE(99, MOVE_SAFEGUARD),
+   LEVEL_UP_END
+};
#endif
Again, we need to register the learnset.
Edit src/data/pokemon/level_up_learnset_pointers.h:
 const struct LevelUpMove *const gLevelUpLearnsets[NUM_SPECIES] =
 {
     [SPECIES_NONE] = sBulbasaurLevelUpLearnset,
     [SPECIES_BULBASAUR] = sBulbasaurLevelUpLearnset,
     ...
     [SPECIES_ENAMORUS] = sEnamorusLevelUpLearnset,
+    [SPECIES_MEWTHREE] = sMewthreeLevelUpLearnset,
 };
Next we need to specify which moves can be taught via TM, HM, or Move Tutor.
Append to src/data/pokemon/teachable_learnsets.h:
static const u16 sEnamorusTeachableLearnset[] = {
    MOVE_UNAVAILABLE,
};

+static const u16 sMewthreeTeachableLearnset[] = {
+   MOVE_FOCUS_PUNCH,
+   MOVE_WATER_PULSE,
+   MOVE_CALM_MIND,
+   MOVE_TOXIC,
+   MOVE_HAIL,
+   MOVE_BULK_UP,
+   MOVE_HIDDEN_POWER,
+   MOVE_SUNNY_DAY,
+   MOVE_TAUNT,
+   MOVE_ICE_BEAM,
+   MOVE_BLIZZARD,
+   MOVE_HYPER_BEAM,
+   MOVE_LIGHT_SCREEN,
+   MOVE_PROTECT,
+   MOVE_RAIN_DANCE,
+   MOVE_SAFEGUARD,
+   MOVE_FRUSTRATION,
+   MOVE_SOLAR_BEAM,
+   MOVE_IRON_TAIL,
+   MOVE_THUNDERBOLT,
+   MOVE_THUNDER,
+   MOVE_EARTHQUAKE,
+   MOVE_RETURN,
+   MOVE_PSYCHIC,
+   MOVE_SHADOW_BALL,
+   MOVE_BRICK_BREAK,
+   MOVE_DOUBLE_TEAM,
+   MOVE_REFLECT,
+   MOVE_SHOCK_WAVE,
+   MOVE_FLAMETHROWER,
+   MOVE_SANDSTORM,
+   MOVE_FIRE_BLAST,
+   MOVE_ROCK_TOMB,
+   MOVE_AERIAL_ACE,
+   MOVE_TORMENT,
+   MOVE_FACADE,
+   MOVE_SECRET_POWER,
+   MOVE_REST,
+   MOVE_SKILL_SWAP,
+   MOVE_SNATCH,
+   MOVE_STRENGTH,
+   MOVE_FLASH,
+   MOVE_ROCK_SMASH,
+   MOVE_MEGA_PUNCH,
+   MOVE_MEGA_KICK,
+   MOVE_BODY_SLAM,
+   MOVE_DOUBLE_EDGE,
+   MOVE_COUNTER,
+   MOVE_SEISMIC_TOSS,
+   MOVE_MIMIC,
+   MOVE_METRONOME,
+   MOVE_DREAM_EATER,
+   MOVE_THUNDER_WAVE,
+   MOVE_SUBSTITUTE,
+   MOVE_DYNAMIC_PUNCH,
+   MOVE_PSYCH_UP,
+   MOVE_SNORE,
+   MOVE_ICY_WIND,
+   MOVE_ENDURE,
+   MOVE_MUD_SLAP,
+   MOVE_ICE_PUNCH,
+   MOVE_SWAGGER,
+   MOVE_SLEEP_TALK,
+   MOVE_SWIFT,
+   MOVE_THUNDER_PUNCH,
+   MOVE_FIRE_PUNCH,
+   MOVE_UNAVAILABLE,
+};
#endif
Once more, we need to register the learnset.
Edit src/data/pokemon/teachable_learnset_pointers.h:
const u16 *const gTeachableLearnsets[NUM_SPECIES] =
 {
     [SPECIES_NONE] = sBulbasaurTeachableLearnset,
     [SPECIES_BULBASAUR] = sBulbasaurTeachableLearnset,
     ...
     [SPECIES_ENAMORUS] = sEnamorusTeachableLearnset,
+    [SPECIES_MEWTHREE] = sMewthreeTeachableLearnset,
 };
If you want to create a Pokémon which can breed, you will need to edit src/data/pokemon/egg_moves.h.
6. Define its cry
First run these command to copy the Mewtwo sound files:
cp -r sound/direct_sound_samples/cries/mewtwo.bin sound/direct_sound_samples/cries/mewthree.bin
cp -r sound/direct_sound_samples/cries/mewtwo.aif sound/direct_sound_samples/cries/mewthree.aif
In sound/direct_sound_data.inc.
    .align 2
Cry_Enamorus::
    .incbin "sound/direct_sound_samples/cries/enamorus.bin"

+   .align 2
+Cry_Mewthree::
+   .incbin "sound/direct_sound_samples/cries/mewthree.bin"

.endif
And linking it in sound/cry_tables.inc. cry_reverse in particular is for reversed cries used by moves such as Growl.
...
    cry Cry_Enamorus
+   cry Cry_Mewthree
.else
    cry_reverse Cry_Overqwil
+   cry_reverse Cry_Mewthree
.else
Mon cries are 10512Hz. Make sure to put the aif file in the directory sound/direct_sound_samples/cries
Higher frequencies may be ruined by compression. To have the cries uncompressed, follow this , then clear out the old sound bins
7. Define the Evolutions
We want Mewthree to evolve from Mewtwo by reaching level 100.
Edit src/data/pokemon/evolution.h:
    [SPECIES_SNEASEL_HISUIAN]       = {{EVO_ITEM_DAY, ITEM_RAZOR_CLAW, SPECIES_SNEASLER},
                                       {EVO_ITEM_HOLD_DAY, ITEM_RAZOR_CLAW, SPECIES_SNEASLER}},
+   [SPECIES_MEWTWO]                = {{EVO_LEVEL, 100, SPECIES_MEWTHREE}},
#endif
8. Easy Chat about your Pokémon
Edit src/data/easy_chat/easy_chat_words_by_letter.h:
 const u16 gEasyChatWordsByLetter_M[] = {
     EC_MOVE2(MACH_PUNCH),
     ...
     EC_POKEMON_NATIONAL(MEW),
+    EC_POKEMON_NATIONAL(MEWTHREE),
     EC_POKEMON_NATIONAL(MEWTWO),
     ...
     EC_WORD_MYSTERY,
 };
9. Make it appear!
Now Mewthree really does slumber in the games code - but we won’t know until we make him appear somewhere! The legend tells that Mewthree is hiding somewhere in Petalburg Woods…
Edit src/data/wild_encounters.json:
         {
           "map": "MAP_PETALBURG_WOODS",
           "base_label": "gPetalburgWoods",
           "land_mons": {
             "encounter_rate": 20,
             "mons": [
               {
                 "min_level": 5,
                 "max_level": 5,
                 "species": "SPECIES_POOCHYENA"
               },
               {
                 "min_level": 5,
                 "max_level": 5,
                 "species": "SPECIES_WURMPLE"
               },
               {
                 "min_level": 5,
                 "max_level": 5,
                 "species": "SPECIES_SHROOMISH"
               },
               {
-                "min_level": 6,
-                "max_level": 6,
-                "species": "SPECIES_POOCHYENA"
+                "min_level": 5,
+                "max_level": 5,
+                "species": "SPECIES_MEWTHREE"
               },
               ...
        }
Congratulations, you have created your own personal pocket monster! You may call yourself a mad scientist now.
Appendix
Available Front Animations
Only 65 are used in-game, but you can use any animation from this list.
- ANIM_V_SQUISH_AND_BOUNCE
- ANIM_CIRCULAR_STRETCH_TWICE
- ANIM_H_VIBRATE
- ANIM_H_SLIDE
- ANIM_V_SLIDE
- ANIM_BOUNCE_ROTATE_TO_SIDES
- ANIM_V_JUMPS_H_JUMPS
- ANIM_ROTATE_TO_SIDES
- ANIM_ROTATE_TO_SIDES_TWICE
- ANIM_GROW_VIBRATE
- ANIM_ZIGZAG_FAST
- ANIM_SWING_CONCAVE
- ANIM_SWING_CONCAVE_FAST
- ANIM_SWING_CONVEX
- ANIM_SWING_CONVEX_FAST
- ANIM_H_SHAKE
- ANIM_V_SHAKE
- ANIM_CIRCULAR_VIBRATE
- ANIM_TWIST
- ANIM_SHRINK_GROW
- ANIM_CIRCLE_C_CLOCKWISE
- ANIM_GLOW_BLACK
- ANIM_H_STRETCH
- ANIM_V_STRETCH
- ANIM_RISING_WOBBLE
- ANIM_V_SHAKE_TWICE
- ANIM_TIP_MOVE_FORWARD
- ANIM_H_PIVOT
- ANIM_V_SLIDE_WOBBLE
- ANIM_H_SLIDE_WOBBLE
- ANIM_V_JUMPS_BIG
- ANIM_SPIN_LONG
- ANIM_GLOW_ORANGE
- ANIM_GLOW_RED
- ANIM_GLOW_BLUE
- ANIM_GLOW_YELLOW
- ANIM_GLOW_PURPLE
- ANIM_BACK_AND_LUNGE
- ANIM_BACK_FLIP
- ANIM_FLICKER
- ANIM_BACK_FLIP_BIG
- ANIM_FRONT_FLIP
- ANIM_TUMBLING_FRONT_FLIP
- ANIM_FIGURE_8
- ANIM_FLASH_YELLOW
- ANIM_SWING_CONCAVE_FAST_SHORT
- ANIM_SWING_CONVEX_FAST_SHORT
- ANIM_ROTATE_UP_SLAM_DOWN
- ANIM_DEEP_V_SQUISH_AND_BOUNCE
- ANIM_H_JUMPS
- ANIM_H_JUMPS_V_STRETCH
- ANIM_ROTATE_TO_SIDES_FAST
- ANIM_ROTATE_UP_TO_SIDES
- ANIM_FLICKER_INCREASING
- ANIM_TIP_HOP_FORWARD
- ANIM_PIVOT_SHAKE
- ANIM_TIP_AND_SHAKE
- ANIM_VIBRATE_TO_CORNERS
- ANIM_GROW_IN_STAGES
- ANIM_V_SPRING
- ANIM_V_REPEATED_SPRING
- ANIM_SPRING_RISING
- ANIM_H_SPRING
- ANIM_H_REPEATED_SPRING_SLOW
- ANIM_H_SLIDE_SHRINK
- ANIM_LUNGE_GROW
- ANIM_CIRCLE_INTO_BG
- ANIM_RAPID_H_HOPS
- ANIM_FOUR_PETAL
- ANIM_V_SQUISH_AND_BOUNCE_SLOW
- ANIM_H_SLIDE_SLOW
- ANIM_V_SLIDE_SLOW
- ANIM_BOUNCE_ROTATE_TO_SIDES_SMALL
- ANIM_BOUNCE_ROTATE_TO_SIDES_SLOW
- ANIM_BOUNCE_ROTATE_TO_SIDES_SMALL_SLOW
- ANIM_ZIGZAG_SLOW
- ANIM_H_SHAKE_SLOW
- ANIM_V_SHAKE_SLOW
- ANIM_TWIST_TWICE
- ANIM_CIRCLE_C_CLOCKWISE_SLOW
- ANIM_V_SHAKE_TWICE_SLOW
- ANIM_V_SLIDE_WOBBLE_SMALL
- ANIM_V_JUMPS_SMALL
- ANIM_SPIN
- ANIM_TUMBLING_FRONT_FLIP_TWICE
- ANIM_DEEP_V_SQUISH_AND_BOUNCE_TWICE
- ANIM_H_JUMPS_V_STRETCH_TWICE
- ANIM_V_SHAKE_BACK
- ANIM_V_SHAKE_BACK_SLOW
- ANIM_V_SHAKE_H_SLIDE_SLOW
- ANIM_V_STRETCH_BOTH_ENDS_SLOW
- ANIM_H_STRETCH_FAR_SLOW
- ANIM_V_SHAKE_LOW_TWICE
- ANIM_H_SHAKE_FAST
- ANIM_H_SLIDE_FAST
- ANIM_H_VIBRATE_FAST
- ANIM_H_VIBRATE_FASTEST
- ANIM_V_SHAKE_BACK_FAST
- ANIM_V_SHAKE_LOW_TWICE_SLOW
- ANIM_V_SHAKE_LOW_TWICE_FAST
- ANIM_CIRCLE_C_CLOCKWISE_LONG
- ANIM_GROW_STUTTER_SLOW
- ANIM_V_SHAKE_H_SLIDE
- ANIM_V_SHAKE_H_SLIDE_FAST
- ANIM_TRIANGLE_DOWN_SLOW
- ANIM_TRIANGLE_DOWN
- ANIM_TRIANGLE_DOWN_TWICE
- ANIM_GROW
- ANIM_GROW_TWICE
- ANIM_H_SPRING_FAST
- ANIM_H_SPRING_SLOW
- ANIM_H_REPEATED_SPRING_FAST
- ANIM_H_REPEATED_SPRING
- ANIM_SHRINK_GROW_FAST
- ANIM_SHRINK_GROW_SLOW
- ANIM_V_STRETCH_BOTH_ENDS
- ANIM_V_STRETCH_BOTH_ENDS_TWICE
- ANIM_H_STRETCH_FAR_TWICE
- ANIM_H_STRETCH_FAR
- ANIM_GROW_STUTTER_TWICE
- ANIM_GROW_STUTTER
- ANIM_CONCAVE_ARC_LARGE_SLOW
- ANIM_CONCAVE_ARC_LARGE
- ANIM_CONCAVE_ARC_LARGE_TWICE
- ANIM_CONVEX_DOUBLE_ARC_SLOW
- ANIM_CONVEX_DOUBLE_ARC
- ANIM_CONVEX_DOUBLE_ARC_TWICE
- ANIM_CONCAVE_ARC_SMALL_SLOW
- ANIM_CONCAVE_ARC_SMALL
- ANIM_CONCAVE_ARC_SMALL_TWICE
- ANIM_H_DIP
- ANIM_H_DIP_FAST
- ANIM_H_DIP_TWICE
- ANIM_SHRINK_GROW_VIBRATE_FAST
- ANIM_SHRINK_GROW_VIBRATE
- ANIM_SHRINK_GROW_VIBRATE_SLOW
- ANIM_JOLT_RIGHT_FAST
- ANIM_JOLT_RIGHT
- ANIM_JOLT_RIGHT_SLOW
- ANIM_SHAKE_FLASH_YELLOW_FAST
- ANIM_SHAKE_FLASH_YELLOW
- ANIM_SHAKE_FLASH_YELLOW_SLOW
- ANIM_SHAKE_GLOW_RED_FAST
- ANIM_SHAKE_GLOW_RED
- ANIM_SHAKE_GLOW_RED_SLOW
- ANIM_SHAKE_GLOW_GREEN_FAST
- ANIM_SHAKE_GLOW_GREEN
- ANIM_SHAKE_GLOW_GREEN_SLOW
- ANIM_SHAKE_GLOW_BLUE_FAST
- ANIM_SHAKE_GLOW_BLUE
- ANIM_SHAKE_GLOW_BLUE_SLOW
Available Back Animations
- BACK_ANIM_NONE
- BACK_ANIM_H_VIBRATE
- BACK_ANIM_H_SLIDE
- BACK_ANIM_H_SPRING
- BACK_ANIM_H_SPRING_REPEATED
- BACK_ANIM_SHRINK_GROW
- BACK_ANIM_GROW
- BACK_ANIM_CIRCLE_COUNTERCLOCKWISE
- BACK_ANIM_H_SHAKE
- BACK_ANIM_V_SHAKE
- BACK_ANIM_V_SHAKE_H_SLIDE
- BACK_ANIM_V_STRETCH
- BACK_ANIM_H_STRETCH
- BACK_ANIM_GROW_STUTTER
- BACK_ANIM_V_SHAKE_LOW
- BACK_ANIM_TRIANGLE_DOWN
- BACK_ANIM_CONCAVE_ARC_LARGE
- BACK_ANIM_CONVEX_DOUBLE_ARC
- BACK_ANIM_CONCAVE_ARC_SMALL
- BACK_ANIM_DIP_RIGHT_SIDE
- BACK_ANIM_SHRINK_GROW_VIBRATE
- BACK_ANIM_JOLT_RIGHT
- BACK_ANIM_SHAKE_FLASH_YELLOW
- BACK_ANIM_SHAKE_GLOW_RED
- BACK_ANIM_SHAKE_GLOW_GREEN
- BACK_ANIM_SHAKE_GLOW_BLUE
Pokémon ordered by height
| Pokemon | height (m) |
|---|---|
| Diglett | 0.2 |
| Natu | 0.2 |
| Azurill | 0.2 |
| Caterpie | 0.3 |
| Weedle | 0.3 |
| Pidgey | 0.3 |
| Rattata | 0.3 |
| Spearow | 0.3 |
| Paras | 0.3 |
| Magnemite | 0.3 |
| Shellder | 0.3 |
| Ditto | 0.3 |
| Eevee | 0.3 |
| Pichu | 0.3 |
| Cleffa | 0.3 |
| Igglybuff | 0.3 |
| Togepi | 0.3 |
| Sunkern | 0.3 |
| Wurmple | 0.3 |
| Taillow | 0.3 |
| Roselia | 0.3 |
| Castform | 0.3 |
| Jirachi | 0.3 |
| Pikachu | 0.4 |
| Nidoran_f | 0.4 |
| Meowth | 0.4 |
| Geodude | 0.4 |
| Krabby | 0.4 |
| Exeggcute | 0.4 |
| Cubone | 0.4 |
| Horsea | 0.4 |
| Omanyte | 0.4 |
| Mew | 0.4 |
| Bellossom | 0.4 |
| Marill | 0.4 |
| Hoppip | 0.4 |
| Wooper | 0.4 |
| Swinub | 0.4 |
| Smoochum | 0.4 |
| Torchic | 0.4 |
| Mudkip | 0.4 |
| Zigzagoon | 0.4 |
| Ralts | 0.4 |
| Shroomish | 0.4 |
| Aron | 0.4 |
| Plusle | 0.4 |
| Minun | 0.4 |
| Gulpin | 0.4 |
| Cacnea | 0.4 |
| Swablu | 0.4 |
| Barboach | 0.4 |
| Clamperl | 0.4 |
| Squirtle | 0.5 |
| Nidoran_m | 0.5 |
| Jigglypuff | 0.5 |
| Oddish | 0.5 |
| Mankey | 0.5 |
| Voltorb | 0.5 |
| Kabuto | 0.5 |
| Cyndaquil | 0.5 |
| Spinarak | 0.5 |
| Chinchou | 0.5 |
| Murkrow | 0.5 |
| Unown | 0.5 |
| Qwilfish | 0.5 |
| Phanpy | 0.5 |
| Treecko | 0.5 |
| Poochyena | 0.5 |
| Linoone | 0.5 |
| Lotad | 0.5 |
| Seedot | 0.5 |
| Surskit | 0.5 |
| Nincada | 0.5 |
| Sableye | 0.5 |
| Torkoal | 0.5 |
| Baltoy | 0.5 |
| Charmander | 0.6 |
| Kakuna | 0.6 |
| Sandshrew | 0.6 |
| Clefairy | 0.6 |
| Vulpix | 0.6 |
| Poliwag | 0.6 |
| Koffing | 0.6 |
| Goldeen | 0.6 |
| Totodile | 0.6 |
| Togetic | 0.6 |
| Mareep | 0.6 |
| Skiploom | 0.6 |
| Pineco | 0.6 |
| Snubbull | 0.6 |
| Shuckle | 0.6 |
| Teddiursa | 0.6 |
| Corsola | 0.6 |
| Remoraid | 0.6 |
| Houndour | 0.6 |
| Porygon2 | 0.6 |
| Elekid | 0.6 |
| Larvitar | 0.6 |
| Celebi | 0.6 |
| Silcoon | 0.6 |
| Wingull | 0.6 |
| Whismur | 0.6 |
| Skitty | 0.6 |
| Mawile | 0.6 |
| Meditite | 0.6 |
| Electrike | 0.6 |
| Illumise | 0.6 |
| Corphish | 0.6 |
| Feebas | 0.6 |
| Shuppet | 0.6 |
| Chimecho | 0.6 |
| Wynaut | 0.6 |
| Luvdisc | 0.6 |
| Bagon | 0.6 |
| Beldum | 0.6 |
| Bulbasaur | 0.7 |
| Metapod | 0.7 |
| Raticate | 0.7 |
| Dugtrio | 0.7 |
| Growlithe | 0.7 |
| Bellsprout | 0.7 |
| Hoothoot | 0.7 |
| Misdreavus | 0.7 |
| Slugma | 0.7 |
| Tyrogue | 0.7 |
| Magby | 0.7 |
| Marshtomp | 0.7 |
| Cascoon | 0.7 |
| Swellow | 0.7 |
| Volbeat | 0.7 |
| Numel | 0.7 |
| Spoink | 0.7 |
| Trapinch | 0.7 |
| Anorith | 0.7 |
| Snorunt | 0.7 |
| Raichu | 0.8 |
| Nidorina | 0.8 |
| Zubat | 0.8 |
| Gloom | 0.8 |
| Psyduck | 0.8 |
| Machop | 0.8 |
| Farfetchd | 0.8 |
| Staryu | 0.8 |
| Jolteon | 0.8 |
| Porygon | 0.8 |
| Sentret | 0.8 |
| Flaaffy | 0.8 |
| Azumarill | 0.8 |
| Jumpluff | 0.8 |
| Aipom | 0.8 |
| Sunflora | 0.8 |
| Magcargo | 0.8 |
| Kirlia | 0.8 |
| Masquerain | 0.8 |
| Slakoth | 0.8 |
| Ninjask | 0.8 |
| Shedinja | 0.8 |
| Carvanha | 0.8 |
| Duskull | 0.8 |
| Spheal | 0.8 |
| Nidorino | 0.9 |
| Abra | 0.9 |
| Tentacool | 0.9 |
| Grimer | 0.9 |
| Magikarp | 0.9 |
| Flareon | 0.9 |
| Chikorita | 0.9 |
| Quilava | 0.9 |
| Espeon | 0.9 |
| Sneasel | 0.9 |
| Octillery | 0.9 |
| Delibird | 0.9 |
| Grovyle | 0.9 |
| Combusken | 0.9 |
| Lairon | 0.9 |
| Grumpig | 0.9 |
| Whiscash | 0.9 |
| Ivysaur | 1.0 |
| Wartortle | 1.0 |
| Beedrill | 1.0 |
| Sandslash | 1.0 |
| Wigglytuff | 1.0 |
| Parasect | 1.0 |
| Venonat | 1.0 |
| Persian | 1.0 |
| Primeape | 1.0 |
| Poliwhirl | 1.0 |
| Weepinbell | 1.0 |
| Graveler | 1.0 |
| Ponyta | 1.0 |
| Magneton | 1.0 |
| Drowzee | 1.0 |
| Marowak | 1.0 |
| Rhyhorn | 1.0 |
| Tangela | 1.0 |
| Vaporeon | 1.0 |
| Omastar | 1.0 |
| Ledyba | 1.0 |
| Umbreon | 1.0 |
| Mightyena | 1.0 |
| Beautifly | 1.0 |
| Nuzleaf | 1.0 |
| Loudred | 1.0 |
| Makuhita | 1.0 |
| Nosepass | 1.0 |
| Lunatone | 1.0 |
| Lileep | 1.0 |
| Kecleon | 1.0 |
| Relicanth | 1.0 |
| Charmeleon | 1.1 |
| Butterfree | 1.1 |
| Pidgeotto | 1.1 |
| Ninetales | 1.1 |
| Seel | 1.1 |
| Chansey | 1.1 |
| Starmie | 1.1 |
| Electabuzz | 1.1 |
| Croconaw | 1.1 |
| Ariados | 1.1 |
| Politoed | 1.1 |
| Gligar | 1.1 |
| Piloswine | 1.1 |
| Donphan | 1.1 |
| Delcatty | 1.1 |
| Spinda | 1.1 |
| Vibrava | 1.1 |
| Altaria | 1.1 |
| Crawdaunt | 1.1 |
| Banette | 1.1 |
| Sealeo | 1.1 |
| Shelgon | 1.1 |
| Fearow | 1.2 |
| Vileplume | 1.2 |
| Slowpoke | 1.2 |
| Muk | 1.2 |
| Electrode | 1.2 |
| Lickitung | 1.2 |
| Weezing | 1.2 |
| Seadra | 1.2 |
| Bayleef | 1.2 |
| Lanturn | 1.2 |
| Sudowoodo | 1.2 |
| Yanma | 1.2 |
| Forretress | 1.2 |
| Smeargle | 1.2 |
| Miltank | 1.2 |
| Pupitar | 1.2 |
| Dustox | 1.2 |
| Lombre | 1.2 |
| Pelipper | 1.2 |
| Breloom | 1.2 |
| Solrock | 1.2 |
| Absol | 1.2 |
| Metang | 1.2 |
| Nidoqueen | 1.3 |
| Clefable | 1.3 |
| Poliwrath | 1.3 |
| Kadabra | 1.3 |
| Gastly | 1.3 |
| Kingler | 1.3 |
| Seaking | 1.3 |
| Mr_mime | 1.3 |
| Magmar | 1.3 |
| Kabutops | 1.3 |
| Wobbuffet | 1.3 |
| Shiftry | 1.3 |
| Medicham | 1.3 |
| Cacturne | 1.3 |
| Zangoose | 1.3 |
| Nidoking | 1.4 |
| Golem | 1.4 |
| Doduo | 1.4 |
| Hitmonchan | 1.4 |
| Jynx | 1.4 |
| Tauros | 1.4 |
| Ledian | 1.4 |
| Ampharos | 1.4 |
| Quagsire | 1.4 |
| Granbull | 1.4 |
| Houndoom | 1.4 |
| Stantler | 1.4 |
| Hitmontop | 1.4 |
| Vigoroth | 1.4 |
| Walrein | 1.4 |
| Latias | 1.4 |
| Pidgeot | 1.5 |
| Venomoth | 1.5 |
| Alakazam | 1.5 |
| Machoke | 1.5 |
| Cloyster | 1.5 |
| Gengar | 1.5 |
| Hitmonlee | 1.5 |
| Scyther | 1.5 |
| Pinsir | 1.5 |
| Xatu | 1.5 |
| Girafarig | 1.5 |
| Dunsparce | 1.5 |
| Heracross | 1.5 |
| Blissey | 1.5 |
| Swampert | 1.5 |
| Ludicolo | 1.5 |
| Exploud | 1.5 |
| Manectric | 1.5 |
| Claydol | 1.5 |
| Cradily | 1.5 |
| Armaldo | 1.5 |
| Glalie | 1.5 |
| Salamence | 1.5 |
| Blastoise | 1.6 |
| Golbat | 1.6 |
| Machamp | 1.6 |
| Tentacruel | 1.6 |
| Slowbro | 1.6 |
| Haunter | 1.6 |
| Hypno | 1.6 |
| Zapdos | 1.6 |
| Noctowl | 1.6 |
| Gardevoir | 1.6 |
| Dusclops | 1.6 |
| Metagross | 1.6 |
| Charizard | 1.7 |
| Golduck | 1.7 |
| Victreebel | 1.7 |
| Rapidash | 1.7 |
| Dewgong | 1.7 |
| Articuno | 1.7 |
| Typhlosion | 1.7 |
| Skarmory | 1.7 |
| Sceptile | 1.7 |
| Swalot | 1.7 |
| Huntail | 1.7 |
| Regirock | 1.7 |
| Deoxys | 1.7 |
| Dodrio | 1.8 |
| Aerodactyl | 1.8 |
| Dratini | 1.8 |
| Meganium | 1.8 |
| Furret | 1.8 |
| Crobat | 1.8 |
| Scizor | 1.8 |
| Ursaring | 1.8 |
| Kingdra | 1.8 |
| Sharpedo | 1.8 |
| Gorebyss | 1.8 |
| Regice | 1.8 |
| Arcanine | 1.9 |
| Rhydon | 1.9 |
| Raikou | 1.9 |
| Blaziken | 1.9 |
| Camerupt | 1.9 |
| Registeel | 1.9 |
| Venusaur | 2.0 |
| Ekans | 2.0 |
| Exeggutor | 2.0 |
| Moltres | 2.0 |
| Mewtwo | 2.0 |
| Slowking | 2.0 |
| Suicune | 2.0 |
| Tyranitar | 2.0 |
| Slaking | 2.0 |
| Wailmer | 2.0 |
| Flygon | 2.0 |
| Tropius | 2.0 |
| Latios | 2.0 |
| Snorlax | 2.1 |
| Mantine | 2.1 |
| Entei | 2.1 |
| Aggron | 2.1 |
| Kangaskhan | 2.2 |
| Dragonite | 2.2 |
| Feraligatr | 2.3 |
| Hariyama | 2.3 |
| Lapras | 2.5 |
| Seviper | 2.7 |
| Arbok | 3.5 |
| Groudon | 3.5 |
| Ho_oh | 3.8 |
| Dragonair | 4.0 |
| Kyogre | 4.5 |
| Lugia | 5.2 |
| Milotic | 6.2 |
| Gyarados | 6.5 |
| Rayquaza | 7.0 |
| Onix | 8.8 |
| Steelix | 9.2 |
| Wailord | 14.5 |
Pokémon ordered by weight
| Pokemon | weight (kg) |
|---|---|
| Gastly | 0.1 |
| Haunter | 0.1 |
| Hoppip | 0.5 |
| Diglett | 0.8 |
| Castform | 0.8 |
| Igglybuff | 1.0 |
| Koffing | 1.0 |
| Skiploom | 1.0 |
| Chimecho | 1.0 |
| Misdreavus | 1.0 |
| Jirachi | 1.1 |
| Swablu | 1.2 |
| Shedinja | 1.2 |
| Togepi | 1.5 |
| Surskit | 1.7 |
| Pidgey | 1.8 |
| Sunkern | 1.8 |
| Barboach | 1.9 |
| Natu | 2.0 |
| Azurill | 2.0 |
| Spearow | 2.0 |
| Pichu | 2.0 |
| Roselia | 2.0 |
| Murkrow | 2.1 |
| Taillow | 2.3 |
| Shuppet | 2.3 |
| Exeggcute | 2.5 |
| Torchic | 2.5 |
| Lotad | 2.6 |
| Caterpie | 2.9 |
| Cleffa | 3.0 |
| Jumpluff | 3.0 |
| Weedle | 3.2 |
| Togetic | 3.2 |
| Dratini | 3.3 |
| Rattata | 3.5 |
| Wurmple | 3.6 |
| Masquerain | 3.6 |
| Qwilfish | 3.9 |
| Shellder | 4.0 |
| Ditto | 4.0 |
| Mew | 4.0 |
| Seedot | 4.0 |
| Bellsprout | 4.0 |
| Meowth | 4.2 |
| Plusle | 4.2 |
| Minun | 4.2 |
| Shroomish | 4.5 |
| Unown | 5.0 |
| Treecko | 5.0 |
| Corsola | 5.0 |
| Celebi | 5.0 |
| Spinda | 5.0 |
| Paras | 5.4 |
| Oddish | 5.4 |
| Jigglypuff | 5.5 |
| Nincada | 5.5 |
| Bellossom | 5.8 |
| Magnemite | 6.0 |
| Pikachu | 6.0 |
| Smoochum | 6.0 |
| Sentret | 6.0 |
| Chikorita | 6.4 |
| Weepinbell | 6.4 |
| Eevee | 6.5 |
| Krabby | 6.5 |
| Cubone | 6.5 |
| Swinub | 6.5 |
| Ralts | 6.6 |
| Bulbasaur | 6.9 |
| Ekans | 6.9 |
| Nidoran_f | 7.0 |
| Pineco | 7.2 |
| Feebas | 7.4 |
| Omanyte | 7.5 |
| Clefairy | 7.5 |
| Zubat | 7.5 |
| Mudkip | 7.6 |
| Mareep | 7.8 |
| Snubbull | 7.8 |
| Cyndaquil | 7.9 |
| Horsea | 8.0 |
| Marill | 8.5 |
| Wooper | 8.5 |
| Spinarak | 8.5 |
| Charmander | 8.5 |
| Sunflora | 8.5 |
| Gloom | 8.6 |
| Luvdisc | 8.7 |
| Teddiursa | 8.8 |
| Squirtle | 9.0 |
| Nidoran_m | 9.0 |
| Totodile | 9.5 |
| Wingull | 9.5 |
| Weezing | 9.5 |
| Vulpix | 9.9 |
| Metapod | 9.9 |
| Kakuna | 10.0 |
| Silcoon | 10.0 |
| Magikarp | 10.0 |
| Gulpin | 10.3 |
| Voltorb | 10.4 |
| Houndour | 10.8 |
| Ledyba | 10.8 |
| Sableye | 11.0 |
| Skitty | 11.0 |
| Meditite | 11.2 |
| Kabuto | 11.5 |
| Mawile | 11.5 |
| Corphish | 11.5 |
| Cascoon | 11.5 |
| Aipom | 11.5 |
| Chinchou | 12.0 |
| Sandshrew | 12.0 |
| Remoraid | 12.0 |
| Ninjask | 12.0 |
| Wigglytuff | 12.0 |
| Poliwag | 12.4 |
| Anorith | 12.5 |
| Banette | 12.5 |
| Venomoth | 12.5 |
| Ivysaur | 13.0 |
| Flaaffy | 13.3 |
| Poochyena | 13.6 |
| Wynaut | 14.0 |
| Dunsparce | 14.0 |
| Goldeen | 15.0 |
| Trapinch | 15.0 |
| Farfetchd | 15.0 |
| Duskull | 15.0 |
| Xatu | 15.0 |
| Electrike | 15.2 |
| Vibrava | 15.3 |
| Victreebel | 15.5 |
| Bayleef | 15.8 |
| Delibird | 16.0 |
| Whismur | 16.3 |
| Dragonair | 16.5 |
| Snorunt | 16.8 |
| Zigzagoon | 17.5 |
| Illumise | 17.7 |
| Volbeat | 17.7 |
| Raticate | 18.5 |
| Vileplume | 18.6 |
| Growlithe | 19.0 |
| Quilava | 19.0 |
| Charmeleon | 19.0 |
| Machop | 19.5 |
| Nidorino | 19.5 |
| Abra | 19.5 |
| Combusken | 19.5 |
| Psyduck | 19.6 |
| Swellow | 19.8 |
| Ninetales | 19.9 |
| Geodude | 20.0 |
| Nidorina | 20.0 |
| Poliwhirl | 20.0 |
| Kirlia | 20.2 |
| Shuckle | 20.5 |
| Altaria | 20.6 |
| Carvanha | 20.8 |
| Tyrogue | 21.0 |
| Hoothoot | 21.2 |
| Magby | 21.4 |
| Baltoy | 21.5 |
| Grovyle | 21.6 |
| Kecleon | 22.0 |
| Wartortle | 22.5 |
| Lanturn | 22.5 |
| Gorebyss | 22.6 |
| Relicanth | 23.4 |
| Elekid | 23.5 |
| Whiscash | 23.6 |
| Lileep | 23.8 |
| Numel | 24.0 |
| Slakoth | 24.0 |
| Jolteon | 24.5 |
| Flareon | 25.0 |
| Croconaw | 25.0 |
| Seadra | 25.0 |
| Espeon | 26.5 |
| Umbreon | 27.0 |
| Huntail | 27.0 |
| Mankey | 28.0 |
| Marshtomp | 28.0 |
| Sneasel | 28.0 |
| Nuzleaf | 28.0 |
| Pelipper | 28.0 |
| Beautifly | 28.4 |
| Azumarill | 28.5 |
| Octillery | 28.5 |
| Wobbuffet | 28.5 |
| Vaporeon | 29.0 |
| Beedrill | 29.5 |
| Sandslash | 29.5 |
| Parasect | 29.5 |
| Raichu | 30.0 |
| Grimer | 30.0 |
| Venonat | 30.0 |
| Ponyta | 30.0 |
| Pidgeotto | 30.0 |
| Electabuzz | 30.0 |
| Muk | 30.0 |
| Spoink | 30.6 |
| Dusclops | 30.6 |
| Medicham | 31.5 |
| Dustox | 31.6 |
| Persian | 32.0 |
| Primeape | 32.0 |
| Butterfree | 32.0 |
| Drowzee | 32.4 |
| Linoone | 32.5 |
| Porygon2 | 32.5 |
| Lombre | 32.5 |
| Furret | 32.5 |
| Delcatty | 32.6 |
| Crawdaunt | 32.8 |
| Dugtrio | 33.3 |
| Phanpy | 33.5 |
| Ariados | 33.5 |
| Politoed | 33.9 |
| Staryu | 34.5 |
| Chansey | 34.6 |
| Slugma | 35.0 |
| Tangela | 35.0 |
| Omastar | 35.0 |
| Houndoom | 35.0 |
| Ledian | 35.6 |
| Slowpoke | 36.0 |
| Porygon | 36.5 |
| Mightyena | 37.0 |
| Fearow | 38.0 |
| Sudowoodo | 38.0 |
| Yanma | 38.0 |
| Seaking | 39.0 |
| Breloom | 39.2 |
| Doduo | 39.2 |
| Spheal | 39.5 |
| Pidgeot | 39.5 |
| Clefable | 40.0 |
| Latias | 40.0 |
| Manectric | 40.2 |
| Zangoose | 40.3 |
| Loudred | 40.5 |
| Kabutops | 40.5 |
| Gengar | 40.5 |
| Jynx | 40.6 |
| Noctowl | 40.8 |
| Girafarig | 41.5 |
| Bagon | 42.1 |
| Magmar | 44.5 |
| Marowak | 45.0 |
| Tentacool | 45.5 |
| Vigoroth | 46.5 |
| Blissey | 46.8 |
| Absol | 47.0 |
| Hitmontop | 48.0 |
| Alakazam | 48.0 |
| Gardevoir | 48.4 |
| Granbull | 48.7 |
| Hitmonlee | 49.8 |
| Hitmonchan | 50.2 |
| Skarmory | 50.5 |
| Cacnea | 51.3 |
| Blaziken | 52.0 |
| Sceptile | 52.2 |
| Clamperl | 52.5 |
| Seviper | 52.5 |
| Zapdos | 52.6 |
| Poliwrath | 54.0 |
| Heracross | 54.0 |
| Mr_mime | 54.5 |
| Magcargo | 55.0 |
| Pinsir | 55.0 |
| Ludicolo | 55.0 |
| Golbat | 55.0 |
| Tentacruel | 55.0 |
| Articuno | 55.4 |
| Piloswine | 55.8 |
| Scyther | 56.0 |
| Kadabra | 56.5 |
| Smeargle | 58.0 |
| Aerodactyl | 59.0 |
| Shiftry | 59.6 |
| Aron | 60.0 |
| Magneton | 60.0 |
| Nidoqueen | 60.0 |
| Kingler | 60.0 |
| Moltres | 60.0 |
| Latios | 60.0 |
| Cradily | 60.4 |
| Deoxys | 60.8 |
| Ampharos | 61.5 |
| Nidoking | 62.0 |
| Gligar | 64.8 |
| Arbok | 65.0 |
| Lickitung | 65.5 |
| Electrode | 66.6 |
| Armaldo | 68.2 |
| Machoke | 70.5 |
| Stantler | 71.2 |
| Grumpig | 71.5 |
| Larvitar | 72.0 |
| Quagsire | 75.0 |
| Crobat | 75.0 |
| Miltank | 75.5 |
| Hypno | 75.6 |
| Golduck | 76.6 |
| Cacturne | 77.4 |
| Slowbro | 78.5 |
| Typhlosion | 79.5 |
| Slowking | 79.5 |
| Starmie | 80.0 |
| Swalot | 80.0 |
| Kangaskhan | 80.0 |
| Torkoal | 80.4 |
| Swampert | 81.9 |
| Flygon | 82.0 |
| Exploud | 84.0 |
| Dodrio | 85.2 |
| Blastoise | 85.5 |
| Makuhita | 86.4 |
| Sealeo | 87.6 |
| Tauros | 88.4 |
| Sharpedo | 88.8 |
| Feraligatr | 88.8 |
| Seel | 90.0 |
| Charizard | 90.5 |
| Rapidash | 95.0 |
| Beldum | 95.2 |
| Nosepass | 97.0 |
| Venusaur | 100.0 |
| Tropius | 100.0 |
| Meganium | 100.5 |
| Salamence | 102.6 |
| Graveler | 105.0 |
| Claydol | 108.0 |
| Shelgon | 110.5 |
| Rhyhorn | 115.0 |
| Scizor | 118.0 |
| Lairon | 120.0 |
| Donphan | 120.0 |
| Dewgong | 120.0 |
| Rhydon | 120.0 |
| Exeggutor | 120.0 |
| Mewtwo | 122.0 |
| Forretress | 125.8 |
| Ursaring | 125.8 |
| Machamp | 130.0 |
| Wailmer | 130.0 |
| Slaking | 130.5 |
| Cloyster | 132.5 |
| Walrein | 150.6 |
| Pupitar | 152.0 |
| Kingdra | 152.0 |
| Solrock | 154.0 |
| Arcanine | 155.0 |
| Milotic | 162.0 |
| Lunatone | 168.0 |
| Regice | 175.0 |
| Raikou | 178.0 |
| Suicune | 187.0 |
| Entei | 198.0 |
| Ho_oh | 199.0 |
| Tyranitar | 202.0 |
| Metang | 202.5 |
| Registeel | 205.0 |
| Rayquaza | 206.5 |
| Dragonite | 210.0 |
| Onix | 210.0 |
| Lugia | 216.0 |
| Camerupt | 220.0 |
| Mantine | 220.0 |
| Lapras | 220.0 |
| Regirock | 230.0 |
| Gyarados | 235.0 |
| Hariyama | 253.8 |
| Glalie | 256.5 |
| Golem | 300.0 |
| Kyogre | 352.0 |
| Aggron | 360.0 |
| Wailord | 398.0 |
| Steelix | 400.0 |
| Snorlax | 460.0 |
| Metagross | 550.0 |
| Groudon | 950.0 |
Making this easier
If you have multiple species that you want to add to pokeemerald but don’t want to copy and paste or type everything out multiple times, just use this handy program to generate text with the species name in there! https://github.com/smithk200/making-a-new-pokemon-species-in-pokeemerald
How to use the Testing System
Running Tests
To run all the tests use:
make check -j
To run specific tests, e.g. Spikes ones, use:
make check TESTS="Spikes"
To build a ROM (pokemerald-test.elf) that can be opened in mgba to view specific tests, e.g. Spikes ones, use:
make pokeemerald-test.elf TESTS="Spikes"
How to Write Tests
Manually testing a battle mechanic often follows this pattern:
- Create a party which can activate the mechanic.
- Start a battle and play a few turns which activate the mechanic.
- Look at the UI outputs to decide if the mechanic works.
Automated testing follows the same pattern:
- Initialize the party in
GIVEN. - Play the turns in
WHEN. - Check the UI outputs in
SCENE.
Example 1
As a concrete example, to manually test EFFECT_PARALYZE, e.g. the
effect of Stun Spore you might:
- Put a Wobbuffet that knows Stun Spore in your party.
- Battle a wild Wobbuffet.
- Use Stun Spore.
- Check that the Wobbuffet is paralyzed.
This can be translated to an automated test as follows:
ASSUMPTIONS
{
    ASSUME(GetMoveEffect(MOVE_STUN_SPORE) == EFFECT_PARALYZE);
}

SINGLE_BATTLE_TEST("Stun Spore inflicts paralysis")
{
    GIVEN {
        PLAYER(SPECIES_WOBBUFFET); // 1.
        OPPONENT(SPECIES_WOBBUFFET); // 2.
    } WHEN {
        TURN { MOVE(player, MOVE_STUN_SPORE); } // 3.
    } SCENE {
        ANIMATION(ANIM_TYPE_MOVE, MOVE_STUN_SPORE, player);
        MESSAGE("The opposing Wobbuffet is paralyzed, so it may be unable to move!"); // 4
        STATUS_ICON(opponent, paralysis: TRUE); // 4.
    }
}
The ASSUMPTIONS block documents that Stun Spore has EFFECT_PARALYZE.
If Stun Spore did not have that effect it would cause the tests in the file to be skipped. We write our tests like this so that hackers can change the effects of moves without causing tests to fail.
SINGLE_BATTLE_TEST defines the name of the test. Related tests should start with the same prefix, e.g. Stun Spore tests should start with “Stun Spore”, this allows just the Stun Spore-related tests to be run with:
make check TESTS="Stun Spore"
GIVEN initializes the parties, PLAYER and OPPONENT add a Pokémon to their respective parties. They can both accept a block which further customizes the Pokémon’s stats, moves, item, ability, etc.
WHEN describes the turns, and TURN describes the choices made in a single turn. MOVE causes the player to use Stun Spore and adds the move to the Pokémon’s moveset if an explicit Moves was not specified.
Pokémon that are not mentioned in a TURN use Celebrate.
The test runner rigs the RNG so that unless otherwise specified, moves always hit, never critical hit, always activate their secondary effects, and always roll the same damage modifier.
SCENE describes the player-visible output of the battle. In this case ANIMATION checks that the Stun Spore animation played, MESSAGE checks the paralysis message was shown, and STATUS_ICON checks that the opponent’s HP bar shows a PRZ icon.
Example 2
As a second example, to manually test that Stun Spore does not effect Grass-types you might:
- Put a Wobbuffet that knows Stun Spore in your party.
- Battle an opponent with Oddish.
- Use Stun Spore.
- Check that the move animation does not play.
- Check that a “It doesn’t affect the opposing Oddish…” message is shown.
This can again be translated as follows:
SINGLE_BATTLE_TEST("Stun Spore does not affect Grass-types")
{
    GIVEN {
        ASSUME(IsPowderMove(MOVE_STUN_SPORE));
        ASSUME(GetSpeciesType(SPECIES_ODDISH, 0) == TYPE_GRASS);
        PLAYER(SPECIES_WOBBUFFET); // 1.
        OPPONENT(SPECIES_ODDISH); // 2.
    } WHEN {
        TURN { MOVE(player, MOVE_STUN_SPORE); } // 3.
    } SCENE {
        NOT ANIMATION(ANIM_TYPE_MOVE, MOVE_STUN_SPORE, player); // 4.
        MESSAGE("It doesn't affect the opposing Oddish…"); // 5.
    }
}
The ASSUME commands are documenting the reasons why Stun Spore does not affect Oddish, namely that Stun Spore is a powder move, and Oddish is a Grass-type. These ASSUME statements function similarly to the ones in ASSUMPTIONS but apply only to the one test.
NOT inverts the meaning of a SCENE check, so applying it to ANIMATION requires that the Stun Spore animation does not play. MESSAGE checks that the message was shown.
The checks in SCENE are ordered, so together this says “The doesn’t affect message is shown, and the Stun Spore animation does not play at any time before that”. Normally you would only test one or the other, or even better, just NOT STATUS_ICON(opponent, paralysis: TRUE); to say that Oddish was not paralyzed without specifying the exact outputs which led to that.
Example 3
As a final example, to test that Meditate works you might:
- Put a Wobbuffet that knows Meditate and Tackle in your party.
- Battle a wild Wobbuffet.
- Use Tackle and note the amount the HP bar reduced.
- Battle a wild Wobbuffet.
- Use Meditate and that the stat change animation and message play.
- Use Tackle and check that the HP bar reduced by more than in 3.
This can be translated to an automated test as follows:
SINGLE_BATTLE_TEST("Meditate raises Attack", s16 damage)
{
    bool32 raiseAttack;
    PARAMETRIZE { raiseAttack = FALSE; }
    PARAMETRIZE { raiseAttack = TRUE; }
    GIVEN {
        ASSUME(GetMoveCategory(MOVE_TACKLE) == DAMAGE_CATEGORY_PHYSICAL);
        PLAYER(SPECIES_WOBBUFFET);
        OPPONENT(SPECIES_WOBBUFFET);
    } WHEN {
        if (raiseAttack) TURN { MOVE(player, MOVE_MEDITATE); } // 5.
        TURN { MOVE(player, MOVE_TACKLE); } // 3 & 6.
    } SCENE {
        if (raiseAttack) {
            ANIMATION(ANIM_TYPE_MOVE, MOVE_MEDITATE, player);
            ANIMATION(ANIM_TYPE_GENERAL, B_ANIM_STATS_CHANGE, player); // 5.
            MESSAGE("Wobbuffet's attack rose!"); // 5.
        }
        ANIMATION(ANIM_TYPE_MOVE, MOVE_TACKLE, player);
        HP_BAR(opponent, captureDamage: &results[i].damage); // 3 & 6.
    } FINALLY {
        EXPECT_MUL_EQ(results[0].damage, Q_4_12(1.5), results[1].damage); // 6.
    }
}
PARAMETRIZE causes a test to run multiple times, once per PARAMETRIZE block (e.g. once with raiseAttack = FALSE and once with raiseAttack = TRUE).
The HP_BAR command’s captureDamage causes the change in HP to be stored in a variable, and the variable chosen is results[i].damage.
results[i] contains all the variables defined at the end of SINGLE_BATTLE_TEST, i is the current PARAMETRIZE index.
FINALLY runs after the last parameter has finished, and uses EXPECT_MUL_EQ to check that the second battle deals 1.5× the damage of the first battle (with a small tolerance to account for rounding).
You might notice that all the tests check the outputs the player could see rather than the internal battle state. e.g. the Meditate test could have used gBattleMons[B_POSITION_OPPONENT_LEFT].hp instead of using HP_BAR to capture the damage. This is a deliberate choice, by checking what the player can observe the tests are more robust to refactoring, e.g. if gBattleMons got moved into gBattleStruct then any test that used it would need to be updated.
Note on Overworld Tests
The overworld is not available, so it is only possible to test commands which don’t affect the overworld itself, e.g. givemon can be tested because it only alters gParties[B_TRAINER_PLAYER], but addobject cannot because it affects object events (which aren’t loaded).
REFERENCE
ASSUME
ASSUME(cond)
Causes the test to be skipped if cond is false. Used to document any prerequisites of the test, e.g. to test Burn reducing the Attack of a Pokémon we can observe the damage of a physical attack with and without the burn. To document that this test assumes the attack is physical we can use:
ASSUME(GetMoveCategory(MOVE_WHATEVER) == DAMAGE_CATEGORY_PHYSICAL);
ASSUMPTIONS
ASSUMPTIONS
{
    ...
}
Should be placed immediately after any #includes and contain any ASSUME statements which should apply to the whole file, e.g. to test EFFECT_POISON_HIT we need to choose a move with that effect, if we chose to use Poison Sting in every test then the top of move_effect_poison_hit.c should be:
ASSUMPTIONS
{
    ASSUME(GetMoveEffect(MOVE_POISON_STING) == EFFECT_POISON_HIT);
}
SINGLE_BATTLE_TEST
SINGLE_BATTLE_TEST(name, results...), DOUBLE_BATTLE_TEST(name, results...), MULTI_BATTLE_TEST(name, results...), TWO_VS_ONE_BATTLE_TEST(name, results...), and ONE_VS_TWO_BATTLE_TEST(name, results...)
Define single-, double-, 2v2-multi-, 2v1-multi-, and 1v2- battles. The names should start with the name of the mechanic being tested so that it is easier to run all the related tests. results contains variable declarations to be placed into the results array which is available in tests using PARAMETRIZE commands.
The main differences for doubles, 2v2, 2v1, and 1v2 are:
- Move targets sometimes need to be explicit.
- Instead of
playerandopponentthere isplayerLeft,playerRight,opponentLeft, andopponentRight.
AI_SINGLE_BATTLE_TEST
AI_SINGLE_BATTLE_TEST(name, results...), AI_DOUBLE_BATTLE_TEST(name, results...), AI_MULTI_BATTLE_TEST(name, results...), AI_TWO_VS_ONE_BATTLE_TEST(name, results...), and AI_ONE_VS_TWO_BATTLE_TEST(name, results...)
Define battles where opponent mons are controlled by AI, the same that runs
when battling regular Trainers. The flags for AI should be specified by the AI_FLAGS command.
The rules remain the same as with the SINGLE, DOUBLE, MULTI, TWO_VS_ONE, and ONE_VS_TWO battle tests with some differences:
- opponent’s action is specified by the
EXPECT_MOVE/EXPECT_SEND_OUT/EXPECT_SWITCHcommands - we don’t control what opponent actually does, instead we make sure the opponent does what we expect it to do
- we still control the player’s action the same way
- apart from the
EXPECTEDcommands, there’s also a newSCORE_andSCORE__VALcommands
KNOWN_FAILING
KNOWN_FAILING;
Marks a test as not passing due to a bug. If there is an issue number associated with the bug it should be included in a comment. If the test passes the developer will be notified to remove KNOWN_FAILING.
For example:
SINGLE_BATTLE_TEST("Jump Kick has no recoil if no target")
{
    KNOWN_FAILING; // #2596.
    ...
}
PARAMETRIZE
PARAMETERIZE { parameter; }
Runs a test multiple times. i will be set to which parameter is running, and results will contain an entry for each parameter, e.g.:
SINGLE_BATTLE_TEST("Blaze boosts Fire-type moves in a pinch", s16 damage)
{
    u16 hp;
    PARAMETRIZE { hp = 99; }
    PARAMETRIZE { hp = 33; }
    GIVEN {
        ASSUME(GetMoveType(MOVE_EMBER) == TYPE_FIRE);
        PLAYER(SPECIES_CHARMANDER) { Ability(ABILITY_BLAZE); MaxHP(99); HP(hp); }
        OPPONENT(SPECIES_WOBBUFFET);
    } WHEN {
        TURN { MOVE(player, MOVE_EMBER); }
    } SCENE {
        HP_BAR(opponent, captureDamage: &results[i].damage);
    } FINALLY {
        EXPECT(results[1].damage > results[0].damage);
    }
}
PASSES_RANDOMLY
PASSES_RANDOMLY(successes, trials, [tag])
Checks that the test passes successes/trials. If tag is provided, the test is run for each value that the tag can produce. For example, to check that Paralysis causes the turn to be skipped 25/100 times, we can write the following test that passes only if the Pokémon is fully paralyzed and specify that we expect it to pass 25/100 times when RNG_PARALYSIS varies:
SINGLE_BATTLE_TEST("Paralysis has a 25% chance of skipping the turn")
{
    PASSES_RANDOMLY(25, 100, RNG_PARALYSIS);
    GIVEN {
        PLAYER(SPECIES_WOBBUFFET) { Status1(STATUS1_PARALYSIS); }
        OPPONENT(SPECIES_WOBBUFFET);
    } WHEN {
        TURN { MOVE(player, MOVE_CELEBRATE); }
    } SCENE {
        MESSAGE("Wobbuffet couldn't move because it's paralyzed!");
    }
}
All BattleRandom calls involving tag will return the same number, so this cannot be used to have two moves independently hit or miss, for example.
If the tag is not provided, runs the test 50 times and computes an approximate pass ratio.
PASSES_RANDOMLY(GetMoveAccuracy(move), 100);
Note that this mode of PASSES_RANDOMLY makes the tests run very slowly and should be avoided where possible. If the mechanic you are testing is missing its tag, you should add it.
GIVEN
Given {
    ...
}
Contains the initial state of the parties before the battle.
RNGSeed
RNGSeed(seed)
Explicitly sets the RNG seed. Try to avoid using this because it is a very fragile tool.
Example:
GIVEN {
    RNGSeed(0xC0DEIDEA);
    ...
}
FLAG_SET
FLAG_SET(flagId)
Sets the specified flag. Can currently only set one flag at a time.
Cleared between parameters and at the end of the test.
Example:
GIVEN {
    FLAG_SET(FLAG_SYS_EXAMPLE_FLAG);
    ...
}
PLAYER and OPPONENT
PLAYER(species) and OPPONENT(species)
Adds the species to the player’s or opponent’s party respectively.
The Pokémon can be further customized with the following functions:
Gender(MON_MALE | MON_FEMALE)Nature(nature)Ability(ability)Level(level)MaxHP(n),HP(n),Attack(n),Defense(n),SpAttack(n),SpDefense(n),Speed(n)Item(item)Moves(moves...)Friendship(friendship)Status1(status1)For example to create a level 42 Wobbuffet that is poisoned:PLAYER(SPECIES_WOBBUFFET) { Level(42); Status1(STATUS1_POISON); }Note if Speed is specified for any Pokémon then it must be specified for all Pokémon. Note if Moves is specified then MOVE will not automatically add moves to the moveset.
PARTNER, OPPONENT_A, and OPPONENT_B
For tests using MULTI_BATTLE_TEST, AI_MULTI_BATTLE_TEST, TWO_VS_ONE_BATTLE_TEST, AI_TWO_VS_ONE_BATTLE_TEST, ONE_VS_TWO_BATTLE_TEST, and AI_ONE_VS_TWO_BATTLE_TEST, the below must be used.
PLAYER(species), PARTNER(species), OPPONENT_A(species), and OPPONENT_B(species)
Adds the species to the player’s (B_TRAINER_PLAYER), player partner’s (B_TRAINER_PARTNER), opponent A’s (B_TRAINER_OPPONENT_A), or opponent B’s (B_TRAINER_OPPONENT_B), party, respectively.
Pokemon can be customised as per the guidance for PLAYER(species) and OPPONENT(species).
The functions assign the Pokémon to the party of the trainer at B_POSITION_PLAYER_LEFT, B_POSITION_PLAYER_RIGHT, B_POSITION_OPPONENT_LEFT, and B_POSITION_OPPONENT_RIGHT, respectively.
For ONE_VS_TWO tests, PLAYER(species) must be used for all player-side Pokémon, and for TWO_VS_ONE tests, OPPONENT_A(species) must be used for all opponent-side Pokémon.
AI_FLAGS
AI_FLAGS(flags)
Specifies which AI flags are run for all battlers during the test. Has use only for AI tests.
The most common combination is AI_FLAGS(AI_FLAG_CHECK_BAD_MOVE | AI_FLAG_CHECK_VIABILITY | AI_FLAG_TRY_TO_FAINT) which is the general ‘smart’ AI.
BATTLER_AI_FLAGS
BATTLER_AI_FLAGS(battler, flags)
Specifies additional AI flags to be applied to specific battlers (battler 0/1/2/3). Has use only for AI tests.
Must be used strictly after AI_FLAGS(flags), which overwrites all existing flags.
Example: BATTLER_AI_FLAGS(3, AI_FLAG_RISKY) used after AI_FLAGS(AI_FLAG_CHECK_BAD_MOVE | AI_FLAG_CHECK_VIABILITY | AI_FLAG_TRY_TO_FAINT)
will set AI_FLAG_RISKY to only battler3 (Opponent B), in addition to the flags set by AI_FLAGS.
WHEN
    ...
} WHEN {
    ...
}
Contains the choices that battlers make during the battle.
TURN
TURN { ... }
Groups the choices made by the battlers on a single turn. If Speeds have not been explicitly specified then the order of the MOVE commands in the TURN will be used to infer the Speeds of the Pokémon, e.g.:
     // player's speed will be greater than opponent's speed.
     TURN { MOVE(player, MOVE_SPLASH); MOVE(opponent, MOVE_SPLASH); }
     // opponent's speed will be greater than player's speed.
     TURN { MOVE(opponent, MOVE_SPLASH); MOVE(player, MOVE_SPLASH); }
The inference process is naive, if your test contains anything that modifies the speed of a battler you should specify them explicitly.
MOVE
MOVE(battler, move | moveSlot:, [megaEvolve:], [hit:], [criticalHit:], [target:], [allowed:], [WITH_RNG(tag, value])
Used when the battler chooses Fight. Either the move ID (e.g. MOVE_TACKLE or move slot must be specified.
megaEvolve: TRUEcauses the battler to Mega Evolve if ablehit: FALSEcauses the move to misscriticalHit: TRUEcauses the move to land a critical hittarget:is used in double battles to choose the target (when necessary)allowed: FALSEis used to reject an illegal move e.g. a Disabled oneWITH_RNGallows the move to specify an explicit outcome for an RNG tag
MOVE(playerLeft, MOVE_TACKLE, target: opponentRight);
If the battler does not have an explicit Moves specified the moveset will be populated based on the MOVEs it uses.
FORCED_MOVE
FORCED_MOVE(battler)
Used when the battler chooses Fight and then their move is chosen for them, e.g. when affected by Encore.
FORCED_MOVE(player);
SWITCH
SWITCH(battler, partyIndex)
Used when the battler chooses Switch.
SWITCH(player, 1);
SKIP_TURN
SKIP_TURN(battler)
Used when the battler cannot choose an action, e.g. when locked into Thrash.
SKIP_TURN(player);
SEND_OUT
SEND_OUT(battler, partyIndex)
Used when the battler chooses to switch to another Pokémon but not via Switch, e.g. after fainting or due to a U-turn.
SEND_OUT(player, 1);
USE_ITEM
USE_ITEM(battler, itemId, [partyIndex:], [move:])
Used when the battler chooses to use an item from the Bag. The item ID (e.g. ITEM_POTION) must be specified, and party index and move slot if applicable, e.g:
      USE_ITEM(player, ITEM_X_ATTACK);
      USE_ITEM(player, ITEM_POTION, partyIndex: 0);
      USE_ITEM(player, ITEM_LEPPA_BERRY, partyIndex: 0, move: MOVE_TACKLE);
SCENE
    ...
} SCENE {
    ...
}
Contains an abridged description of the UI during the THEN. The order of the description must match too, e.g.
} SCENE {
     // ABILITY_POPUP followed by a MESSAGE
     ABILITY_POPUP(player, ABILITY_STURDY);
     MESSAGE("Geodude was protected by Sturdy!");
}
ABILITY_POPUP
ABILITY_POPUP(battler, [ability])
Causes the test to fail if the battler’s ability pop-up is not shown.
If specified, ability is the ability shown in the pop-up.
ABILITY_POPUP(opponent, ABILITY_MOLD_BREAKER);
ANIMATION
ANIMATION(type, animId, [battler], [target:])
Causes the test to fail if the animation does not play. A common use of this command is to check if a move was successful, e.g.:
ANIMATION(ANIM_TYPE_MOVE, MOVE_TACKLE, player);
target can only be specified for ANIM_TYPE_MOVE.
EXPERIENCE_BAR
EXPERIENCE_BAR(battler, [exp: | captureGainedExp:])
If exp: is used, causes the test to fail if that amount of experience is not gained, e.g.:
EXPERIENCE_BAR(player, exp: 0);
If captureGainedExp: is used, causes the test to fail if the Experience bar does not change, and then writes that change to the pointer, e.g.:
     u32 exp;
     EXPERIENCE_BAR(player, captureGainedExp: &exp);
If none of the above are used, causes the test to fail if the Exp does not change at all.
Please note that due to nature of tests, this command is only usable in WILD_BATTLE_TEST and will fail elsewhere.
HP_BAR
HP_BAR(battler, [damage: | hp: | captureDamage: | captureHP:])
If hp: or damage: are used, causes the test to fail if that amount of damage is not dealt, e.g.:
HP_BAR(player, hp: 0);
If captureDamage: or captureHP: are used, causes the test to fail if the HP bar does not change, and then writes that change to the
pointer, e.g.:
     s16 damage;
     HP_BAR(player, captureDamage: &damage);
If none of the above are used, causes the test to fail if the HP does not change at all.
MESSAGE
MESSAGE(pattern)
Causes the test to fail if the message in pattern is not displayed.
Spaces in pattern match newlines (\n, \l, and \p) in the message.
Often used to check that a battler took its turn but it failed, e.g.:
     MESSAGE("Wobbuffet used Dream Eater!");
     MESSAGE("It doesn't affect the opposing Wobbuffet…");
STATUS_ICON
STATUS_ICON(battler, status1 | none: | sleep: | poison: | burn: | freeze: | paralysis:, badPoison:)
Causes the test to fail if the battler’s status is not changed to the specified status.
STATUS_ICON(player, badPoison: TRUE);
If the expected status icon is parametrized the corresponding STATUS1 constant can be provided, e.g.:
     u32 status1;
     PARAMETRIZE { status1 = STATUS1_NONE; }
     PARAMETRIZE { status1 = STATUS1_BURN; }
     ...
     STATUS_ICON(player, status1);
SUB_HIT
SUB_HIT(battler, captureDamage: | subBreak:)
Causes the test to fail the test to fail if a Substitute for the specified battler doesn’t take damage.
If captureDamage is used, the damage the substitute takes is written to the supplied pointer.
u16 damage;
...
SUB_HIT(player, captureDamage: &damage);
If subBreak is set to TRUE, the test will fail unless the substitute breaks. And if set to FALSE, the test will fail unless the substitute survives.
SUB_HIT(player, subBreak: TRUE);
CATCHING_CHANCE
CATCHING_CHANCE(address)
Causes the test to fail if no catching attempt is made and then writes the computed catch chance in the address pointer.
    u32 recordedCatchChance;
    CATCHING_CHANCE(&recordedCatchChance);
NOT
NOT sceneCommand
Causes the test to fail if the SCENE command succeeds before the following command succeeds.
     // Our Wobbuffet does not Celebrate before the foe's.
     NOT MESSAGE("Wobbuffet used Celebrate!");
     MESSAGE("The opposing Wobbuffet used Celebrate!");
NOTE: If this condition fails, the viewable ROM freezes at the NOT command.
WARNING: NOT is an alias of NONE_OF, so it behaves surprisingly when applied to multiple commands wrapped in braces.
ONE_OF
    ONE_OF {
        ...
    }
Causes the test to fail unless one of the SCENE commands succeeds.
    ONE_OF {
        MESSAGE("Wobbuffet used Celebrate!");
        MESSAGE("Wobbuffet couldn't move because it's paralyzed!");
    }
NONE_OF
    NONE_OF {
        ...
    }
Causes the test to fail if one of the SCENE commands succeeds before the command after the NONE_OF succeeds.
    // Our Wobbuffet does not move before the foe's.
    NONE_OF {
        MESSAGE("Wobbuffet used Celebrate!");
        MESSAGE("Wobbuffet couldn't move because it's paralyzed!");
    }
    MESSAGE("The opposing Wobbuffet used Celebrate!");
PLAYER_PARTY
Refer to the party members defined in GIVEN, e.g.:
     s32 maxHP = GetMonData(&PLAYER_PARTY[0], MON_DATA_MAX_HP);
     HP_BAR(player, damage: maxHP / 2);
OPPONENT_PARTY
Refer to the party members defined in GIVEN, e.g.:
     s32 maxHP = GetMonData(&OPPONENT_PARTY[0], MON_DATA_MAX_HP);
     HP_BAR(opponent, damage: maxHP / 2);
THEN
    ...
} THEN {
    ...
}
Contains code to run after the battle has finished. If the test is using PARAMETRIZE commands then EXPECT commands between the results should go here. Is also occasionally used to check the internal battle state when checking the behavior via a SCENE is too difficult, verbose, or error-prone.
FINALLY
    ...
} FINALLY {
    ...
}
Contains checks to run after all PARAMETERIZE commands have run. Prefer to write your checks in THEN where possible, because a failure in THEN will be tagged with which parameter it corresponds to.
EXPECT
EXPECT(cond)
Causes the test to fail if cond is false.
EXPECT_XX
EXPECT_EQ(a, b)
a == b
EXPECT_NE(a, b)
a != b
EXPECT_LT(a, b)
a < b
EXPECT_LE(a, b)
a <= b
EXPECT_GT(a, b)
a > b
EXPECT_GE(a, b)
a >= b
Causes the test to fail if a and b compare incorrectly, e.g.
EXPECT_EQ(results[0].damage, results[1].damage);
EXPECT_MUL_EQ
EXPECT_MUL_EQ(a, m, b)
Causes the test to fail if a*m != b (within a threshold), e.g.
     // Expect results[0].damage * 1.5 == results[1].damage.
     EXPECT_EQ(results[0].damage, Q_4_12(1.5), results[1].damage);
FORCE_MOVE_ANIM
FORCE_MOVE_ANIM(TRUE)
Forces the moves in the current test to do their animations in headless mode. Useful for debugging animations.
Overworld Command Reference
OVERWORLD_SCRIPT
OVERWORLD_SCRIPT(instructions...)
Returns a pointer to a compiled overworld script. Cannot be used to initialize global const data, although the pointer IS to const data.
Note that each script command must be followed by a ;, e.g.:
const u8 *myScript = OVERWORLD_SCRIPT(
    random 2;
    addvar VAR_RESULT, 1;
);
RUN_OVERWORLD_SCRIPT
RUN_OVERWORLD_SCRIPT(instructions...)
Runs an overworld script in the immediate script context, which means that commands like waitstate are not supported.
     RUN_OVERWORLD_SCRIPT(
         setvar VAR_RESULT, 3;
     );
     EXPECT_EQ(GetVar(VAR_RESULT), 3);
Adding New Trainer Slides
Define Slides Per Trainer
We are going to add a Trainer Slide to Wally’s first Victory Road battle, before he Mega Evolves his Gallade. This battle takes place outside a Battle Facility, so sTrainerSlides must be edited.
src/trainer_slide.c
+ const u8 gText_ThatsTheWay[] = _("That's the way, Gallade! Go!{PAUSE_UNTIL_PRESS}");

static const u8* const sTrainerSlides[DIFFICULTY_COUNT][TRAINERS_COUNT][TRAINER_SLIDE_COUNT] =
{
    [DIFFICULTY_NORMAL] =
    {
+        [TRAINER_WALLY_VR_1] = // use the Trainer's Id from include/constants/opponents.h
+        {
+            [TRAINER_SLIDE_MEGA_EVOLUTION] = COMPOUND_STRING("That's the way, Gallade! Go!{PAUSE_UNTIL_PRESS}"), // find the id for the slide to be used.
+            //[TRAINER_SLIDE_MEGA_EVOLUTION] = gText_ThatsTheWay, // You can use globals or COMPOUND_STRING to define text here.
+        }
    },
};
If we were to edit a Trainer that appears in a Battle Facility, sFrontierTrainerSlides would be edited instead. Here, we’ll give Anabel a line before she uses a Z-Move.
src/trainer_slide.c
static const u8* const sFrontierTrainerSlides[DIFFICULTY_COUNT][FRONTIER_TRAINERS_COUNT][TRAINER_SLIDE_COUNT] =
{
    [DIFFICULTY_NORMAL] =
    {
+        [TRAINER_ANABEL] =
+        {
+            [TRAINER_SLIDE_Z_MOVE] = COMPOUND_STRING("Victory...is ours!"), //{PAUSE_UNTIL_PRESS} is omitted, so the battle will continue as soon as the next is finished printing.
+        }
    },
};
Add New Slides
include/constants/trainer_slide.h
enum TrainerSlideType
{
    TRAINER_SLIDE_BEFORE_FIRST_TURN,
    TRAINER_SLIDE_PLAYER_LANDS_FIRST_CRITICAL_HIT,
+   TRAINER_SLIDE_ENEMY_LANDS_FIRST_CRITICAL_HIT, // Each Trainer Slide has a unqiue id.
    TRAINER_SLIDE_PLAYER_LANDS_FIRST_SUPER_EFFECTIVE_HIT,
    TRAINER_SLIDE_PLAYER_LANDS_FIRST_STAB_MOVE,
    TRAINER_SLIDE_PLAYER_LANDS_FIRST_DOWN,
    TRAINER_SLIDE_ENEMY_MON_UNAFFECTED,
    TRAINER_SLIDE_LAST_SWITCHIN,
    TRAINER_SLIDE_LAST_HALF_HP,
    TRAINER_SLIDE_LAST_LOW_HP,
    TRAINER_SLIDE_MEGA_EVOLUTION,
    TRAINER_SLIDE_Z_MOVE,
    TRAINER_SLIDE_DYNAMAX,
    TRAINER_SLIDE_COUNT,
};
Each Trainer Slide has a unique id and needs to be added to this list.
include/trainer_slide.h
If your new Trainer Slide needs to check for beforen initalized, a function is declared here to be used externally. Critical hits are used to initalize this Trainer Slide but the slide doesn’t play instantly, so we will create an function to initialize it.
void SetTrainerSlideMessage(enum DifficultyLevel, u32, u32);
void TryInitializeFirstSTABMoveTrainerSlide(u32, u32, u32);
void TryInitializeTrainerSlidePlayerLandsFirstCriticalHit(u32);
+ void TryInitializeTrainerSlideEnemyLandsFirstCriticalHit(u32);
void TryInitializeTrainerSlidePlayerLandsFirstSuperEffectiveHit(u32);
void TryInitializeTrainerSlideEnemyMonUnaffected(u32);
bool32 IsTrainerSlideInitialized(enum TrainerSlideType);
src/trainer_slide.c
     return IsTrainerSlideInitialized(slideId);
 }

+static bool32 ShouldRunTrainerSlideEnemyLandsFirstCriticalHit(enum TrainerSlideType slideId)
+{
+    return IsTrainerSlideInitialized(slideId);
+}
+
 static bool32 ShouldRunTrainerSlidePlayerLandsFirstSuperEffectiveHit(u32 battler, enum TrainerSlideType slideId)
 {
     if (!IsTrainerSlideInitialized(slideId))
         case TRAINER_SLIDE_PLAYER_LANDS_FIRST_CRITICAL_HIT:
             shouldRun = ShouldRunTrainerSlidePlayerLandsFirstCriticalHit(slideId);
             break;
+        case TRAINER_SLIDE_ENEMY_LANDS_FIRST_CRITICAL_HIT:
+            shouldRun = ShouldRunTrainerSlideEnemyLandsFirstCriticalHit(slideId);
+            break;
         case TRAINER_SLIDE_PLAYER_LANDS_FIRST_SUPER_EFFECTIVE_HIT:
             shouldRun = ShouldRunTrainerSlidePlayerLandsFirstSuperEffectiveHit(battler, slideId);
             break;
The function that determines if a Slide should play has different function for most Slides. We need to check if this Slide was initialized by a critical hit previously, so a function is created here. This function and the Id and then added to the switch statement in ShouldDoTrainerSlide.
     InitalizeTrainerSlide(slideId);
 }

+void TryInitializeTrainerSlideEnemyLandsFirstCriticalHit(u32 target)
+{
+    enum TrainerSlideType slideId = TRAINER_SLIDE_ENEMY_LANDS_FIRST_CRITICAL_HIT;
+
+    if (IsSlideInitalizedOrPlayed(slideId))
+        return;
+
+    if (!IsOnPlayerSide(target))
+        return;
+
+    InitalizeTrainerSlide(slideId);
+}
+
The function to check if this slide SHOULD be initalized is added to the bottom of this file.
src/battle_main.c
         BattleScriptExecute(i == 1 ? BattleScript_TrainerASlideMsgEnd2 : BattleScript_TrainerBSlideMsgEnd2);
     else if ((i = ShouldDoTrainerSlide(GetBattlerAtPosition(B_POSITION_OPPONENT_LEFT), TRAINER_SLIDE_PLAYER_LANDS_FIRST_CRITICAL_HIT)))
         BattleScriptExecute(i == 1 ? BattleScript_TrainerASlideMsgEnd2 : BattleScript_TrainerBSlideMsgEnd2);
+    else if ((i = ShouldDoTrainerSlide(GetBattlerAtPosition(B_POSITION_OPPONENT_LEFT), TRAINER_SLIDE_ENEMY_LANDS_FIRST_CRITICAL_HIT)))
+        BattleScriptExecute(i == 1 ? BattleScript_TrainerASlideMsgEnd2 : BattleScript_TrainerBSlideMsgEnd2);
     else if ((i = ShouldDoTrainerSlide(GetBattlerAtPosition(B_POSITION_OPPONENT_LEFT), TRAINER_SLIDE_PLAYER_LANDS_FIRST_SUPER_EFFECTIVE_HIT)))
         BattleScriptExecute(i == 1 ? BattleScript_TrainerASlideMsgEnd2 : BattleScript_TrainerBSlideMsgEnd2);
     else if ((i = ShouldDoTrainerSlide(GetBattlerAtPosition(B_POSITION_OPPONENT_LEFT), TRAINER_SLIDE_PLAYER_LANDS_FIRST_STAB_MOVE)))
diff --git a/src/battle_script_commands.c b/src/battle_script_commands.c
In BattleTurnPassed, most Trainer Slides are checked to see if they should run, so our new call is added here.
src/battle_script_commands.c
         {
             PrepareStringBattle(STRINGID_CRITICALHIT, gBattlerAttacker);

+            TryInitializeTrainerSlideEnemyLandsFirstCriticalHit(gBattlerTarget);
             TryInitializeTrainerSlidePlayerLandsFirstCriticalHit(gBattlerTarget);

             gBattleCommunication[MSG_DISPLAY] = 1;
The actual usage of TryInitializeTrainerSlideEnemyLandsFirstCriticalHit is added and is checked whenever a critical hit is scored.
test/battle/trainer_slides.c
     }
 }

+SINGLE_BATTLE_TEST("Trainer Slide: Enemy Lands First Critical Hit")
+{
+    gBattleTestRunnerState->data.recordedBattle.opponentA = TRAINER_SLIDE_ENEMY_LANDS_FIRST_CRITICAL_HIT;
+
+    GIVEN {
+        ASSUME(GetMoveEffect(MOVE_LASER_FOCUS) == EFFECT_LASER_FOCUS);
+        PLAYER(SPECIES_WOBBUFFET);
+        OPPONENT(SPECIES_WOBBUFFET);
+    } WHEN {
+        TURN { MOVE(opponent, MOVE_LASER_FOCUS); }
+        TURN { MOVE(opponent, MOVE_TACKLE); }
+    } SCENE {
+        ANIMATION(ANIM_TYPE_MOVE, MOVE_LASER_FOCUS, opponent);
+        ANIMATION(ANIM_TYPE_MOVE, MOVE_TACKLE, opponent);
+        MESSAGE("A critical hit!");
+        MESSAGE("This message plays after the enemy lands their first critical hit.{PAUSE_UNTIL_PRESS}");
+    }
+}
+
 SINGLE_BATTLE_TEST("Trainer Slide: Player Lands First STAB Hit")
 {
     gBattleTestRunnerState->data.recordedBattle.opponentA = TRAINER_SLIDE_PLAYER_LANDS_FIRST_STAB_MOVE;
diff --git a/test/battle/trainer_slides.h b/test/battle/trainer_slides.h
test/battle/trainer_slides.h
         [TRAINER_SLIDE_PLAYER_LANDS_FIRST_CRITICAL_HIT] = COMPOUND_STRING("This message plays after the player lands their first critical hit.{PAUSE_UNTIL_PRESS}"),
     },
+    [TRAINER_SLIDE_ENEMY_LANDS_FIRST_CRITICAL_HIT] =
+    {
+        [TRAINER_SLIDE_ENEMY_LANDS_FIRST_CRITICAL_HIT] = COMPOUND_STRING("This message plays after the enemy lands their first critical hit.{PAUSE_UNTIL_PRESS}"),
+    },
     [TRAINER_SLIDE_PLAYER_LANDS_FIRST_SUPER_EFFECTIVE_HIT] =
     {
         [TRAINER_SLIDE_PLAYER_LANDS_FIRST_SUPER_EFFECTIVE_HIT] = COMPOUND_STRING("This message plays after the player lands their first super effective hit.{PAUSE_UNTIL_PRESS}"),
Tests are added to make sure the new Trainer Slide works. A test is added to the c file, and the trainer to run the entry in the test is added to sTestTrainerSlides.
Day/Night System FAQ
Day/Night system FAQ
Q: How do I disable DNS?
A: Set OW_ENABLE_DNS to FALSE in include/config/overworld.h.
Q: What map changes should be made for DNS?
A: By default, the only Hoenn map changes that need to be made are to edit the Lavaridge Town map to change the metatiles the two old ladies are on in the hot springs to be the normal hot spring water tile. This is to avoid a visual bug from when OW_OBJECT_VANILLA_SHADOWS is FALSE.
However, by default no maps have lighting effects of any kind. The rest of this tutorial is to aid in adding lighting effects.
If you intend to use vanilla maps and have not already edited them, revert commit a5b079d833f18f66ebd53ac77f00227ae4a1f389. This commit includes a lot of tileset, metatile, and palette changes to accommodate light-blending, and applies OBJ_EVENT_GFX_LIGHT_SPRITE where they make sense.
If you have edited vanilla maps, the merge conflicts from reverting that commit will cause problems. If you are using vanilla maps, manually copy some of the tileset changes, .pal, and .pla files in your branch, and begin rebuilding your metatiles to have windows use the palettes that have a .pla for light blending the correct color slots. Triple-layer metatiles are highly recommended.
WARNING: As per issue #7034 if you follow this tutorial reverting the previously mentioned commit to use the updated palettes in the Hoenn maps and after that you try to follow the Triple-layer metatiles tutorial, you’ll encounter an issue when running the script to update old tilesets to support triple-layer metatiles. Follow the band-aid fix proposed in that issue after this tutorial but before following the triple-layer metatiles tutorial if you want everythign to work properly with light-blended palettes and triple-layer metatiles together.
You will also want to add the lighting object events from that commit.
If you are not using Hoenn maps, the primary concern is that you do not use the exact same palette indices for colors you want to be darkened during night time and colors you want to light up. Err towards not light blending a color if you aren’t sure how to avoid conflicts.
When writing scripts, it is important to use the correct fade macro to avoid odd behavior from the GBA with alpha blending. If the current area is outside (and/or impacted by DNS), use fadescreenswapbuffers to fade in and out. Otherwise, it is safe to use fadescreen.
Q: How do I make lightbulbs glow?

A: Making lamps glow is not part of the tileset itself. Instead, place certain object events on top of where you desire a glowing effect.
These object events should use OBJ_EVENT_GFX_LIGHT_SPRITE and then as their trainer_sight_or_berry_tree_id (called Sight Radius/Berry Tree ID in porymap), use LIGHT_TYPE_BALL for round lights (such as candles or gas lamps), LIGHT_TYPE_PKMN_CENTER_SIGN over a Pokémon Center sign, or LIGHT_TYPE_POKE_MART_SIGN over a Pokémart sign.
Q: How do I mark certain colors in a palette as light-blended?
A: Create a .pla file in the same folder as the .pal with the same name. This can be done on any kind of palette, except for palette 0, which is skipped over.
The commit to revert listed up above only applies it to tilesets, but you could easily do it for object events as well. Of note, there is a commit reverted for being out of scope to make a follower Ampharos’s tail glow. Do note that in order to light-blend the object, a proper .pal file is required. Generating a .gbapal directly from the image is not enough.
In this file you can enter color indices [0,15] on separate lines to mark those colors as being light-blended, i.e:
06.pla:
# A comment
0 # if color 0 is listed, uses it to blend with instead of the default!
1
9
10
During the day time, these color indices appear as normal, but will be blended with either yellow or the 0 index at night. These indices should only be used for things you expect to light up. If you are using porytiles, palette overrides and using slight alterations to a color will aid you in avoiding color conflicts where the wrong index is assigned.
The windows appear as normal during the day time (blue) and light up in the night. These use the default color.
Q: How do I return to using regular shadows?
A: Set OW_OBJECT_VANILLA_SHADOWS to TRUE in include/config/overworld.h.
Q: What graphical errors are likely to occur while using DNS?
A: If you have OW_POPUP_GENERATION set to GEN_5 and OW_POPUP_BW_ALPHA_BLEND set to TRUE, you may have color errors during map popups. This is due to the GBA being severely limited in use of color blending and having both the overworld blended and the popup blended is difficult.
If you have OW_OBJECT_VANILLA_SHADOWS set to TRUE, this will also cause visual errors.
Any other graphical error should be reported.
Q: How do I disable shadows for certain locations?
A: Shadows can be disabled for certain locations by modifying the CurrentMapHasShadows function in src/overworld.c.
Q: How do I change the default light-blend color?
A: The default color is handled by the #define DEFAULT_LIGHT_COLOR in src/palette.c.
Q. How do I use alternate nighttime palettes?
In addition to palette tinting, the DNS allows tilesets to define alternate nighttime palettes. These palettes are automatically blended with their corresponding daytime palettes with the passage of time.
Each tileset has 16 total palette slots. 3 of the BG palettes (13 - 15) are reserved for the UI leaving 13 (0-12) usable for tilesets. Because primary tilesets load 6 (NUM_PALS_IN_PRIMARY) palettes (0-5) and secondary Tilesets load 7 palettes (6-12), some slots are unused for each. DNS repurposes these unused slots to store alternate nighttime palettes.
To avoid overlap with active palettes, each nighttime palette is stored in a different slot determined by the formula: night_pal = (day_pal + 9) % 16
Day palette index vs. Night palette index
| Day | 0 | 1 | 2 | 3 | 4 | 5 | 6 | 7 | 8 | 9 | 10 | 11 | 12 | 13 | 14 | 15 |
|---|---|---|---|---|---|---|---|---|---|---|---|---|---|---|---|---|
| Night | 9 | 10 | 11 | 12 | 13 | 14 | 15 | 0 | 1 | 2 | 3 | 4 | 5 | 6 | 7 | 8 |
For instance, in a secondary Tileset (slots 6-12), the nighttime palettes for index 8 would be stored at index 1 (which is unused in a secondary tileset). Slots 0 and 13-15 are not used for blending so the corresponding slots 9 and 6-8 are never used for nighttime palettes.
Note that palette 0 is not used for blending.
Once the appropriate nighttime .pal file has been added, add a swapPalettes field to the tileset struct definition in src/data/tilesets/headers.h. The macro SWAP_PAL(x) is provided for this purpose.
swapPalettes is a bitmask so to use nighttime palettes for indices 7 and 9 in the Petalburg Tileset we add a swapPalettes with SWAP_PAL(7) | SWAP_PAL(9).
Note that the palette index to specify here is the palette index that you want to swap at night (NOT the corresponding nighttime palette).
const struct Tileset gTileset_Petalburg =
{
    .isCompressed = TRUE,
    .isSecondary = TRUE,
    .tiles = gTilesetTiles_Petalburg,
+   .swapPalettes = SWAP_PAL(7) | SWAP_PAL(9), // Enable nighttime variants for slots 7 and 9
    .palettes = gTilesetPalettes_Petalburg,
    .metatiles = gMetatiles_Petalburg,
    .metatileAttributes = gMetatileAttributes_Petalburg,
    .callback = InitTilesetAnim_Petalburg,
};
How to use the code entry system
How to use the code entry system
This system involves using the EnterCode special to prompt the player to enter a text string, and then the GetCodeFeedback special to perform some function based on the string entered. Using this system to make your own cheat codes or mystery gifts will involve both scripting and editing the GetCodeFeedback function itself to include your new functionality, and may involve further changes to the codebase if you want to implement something more far reaching (ie. a grindrunning mode).
This tutorial will use the example of entering the string “CaughtEmAll” to flag every Pokemon as caught
1. Choose where to initiaze your event scripting
This can be anywhere or anything, pre-existing or added by you in porymap. I usually like using signs for testing things but this can be anything. I’m going to give the main script a more generic name, and you can attach it to whatever object you like.
In that object’s event script, add the following:
EventScript_CodeEntry::
    special EnterCode
    waitstate
    special GetCodeFeedback
    end
This will prompt text entry from the object and prepare it to handle reading the entered text after it’s been entered, but it won’t do anything yet. Next we need to add our functionality to GetCodeFeedback.
2. Add code string and code function to GetCodeFeedback
You can find GetCodeFeedback in src/field_specials.c. Let’s start by taking a look at the function:
void GetCodeFeedback(void)
{
    static const u8 sText_SampleCode[] = _("SampleCode");
    if (!StringCompare(gStringVar2, sText_SampleCode))
        gSpecialVar_Result = 1;
    else
        gSpecialVar_Result = 0;
}
What this function does is compare the input string (gStringVar2) against a specified string (sText_SampleCode) and returns a value depending on whether the strings matched (gSpecialVar_Result). Note that due to the way StringCompare works, the comparison does need to be negated with !. By default, this sample setup returns 1 when the string “SampleCode” is entered by the player.
Let’s leave that functionality alone in case we ever want to reference it again, and just add a brand new code instead. We want to use the string “CaughtEmAll” as our code, so we’ll start by making a string for it, and a new conditional that checks if the entered string matches. We’ll also want to make sure we return a new unique number for gSpecialVar_Result so our event script knows what happened.
void GetCodeFeedback(void)
{
static const u8 sText_SampleCode[] = _("SampleCode");
+ static const u8 sText_CaughtEmAll_[] = _("CaughtEmAll"); // Mark entire Pokedex as caught
if (!StringCompare(gStringVar2, sText_SampleCode))
gSpecialVar_Result = 1;
+ else if (!StringCompare(gStringVar2, sText_CaughtEmAll))
+ {
+ // TODO
+ gSpecialVar_Result = 2;
+ }
else
gSpecialVar_Result = 0;
}
Great! Now we have a new case to handle our new code, but it still doesn’t do anything. This is the part that will change dramatically depending on what you want to do, and you can do anything you want, from setting flags to calling other functions or anything else! Just make sure you do it from within the conditional that matches your code. In our case we want to iterate through the Pokedex to mark everything as caught, which I’ll just do here for simplicity.
void GetCodeFeedback(void)
{
static const u8 sText_SampleCode[] = _("SampleCode");
static const u8 sText_CaughtEmAll_[] = _("CaughtEmAll"); // Mark entire Pokedex as caught
if (!StringCompare(gStringVar2, sText_SampleCode))
gSpecialVar_Result = 1;
else if (!StringCompare(gStringVar2, sText_CaughtEmAll))
{
+ u32 i;
+ for (i = 0; i < NATIONAL_DEX_COUNT; i++)
+ {
+ GetSetPokedexFlag(i + 1, FLAG_SET_CAUGHT);
+ }
gSpecialVar_Result = 2;
}
else
gSpecialVar_Result = 0;
}
Awesome! Now our GetCodeFeedback function performs the task we want it to, and returns a 2 to our event script so it can handle the situation appropriately. That’s our next and final step!
3. Handle new GetCodeFeedback case in event script
To clarify, this step is optional. You don’t need to do anything else after GetCodeFeedback has run if you don’t want to, as all the functionality is there; once that function finishes, everything in the Pokedex will be marked as caught.
The reason we might want to do this step, and the reason we pass results back to the event script in the first place, is so we can handle providing the player with some dialogue based on what they’re doing.
Let’s go back to our event script.
EventScript_CodeEntry::
special EnterCode
waitstate
special GetCodeFeedback
end
Maybe we first want to prompt the player with a message that says something like “Enter a code?”
EventScript_CodeEntry::
+ lockall
+ msgbox EnterCode_EnterCodeText, MSGBOX_YESNO
+ compare VAR_RESULT, 0
+ goto_if_eq CodeExit
special EnterCode
waitstate
special GetCodeFeedback
end
+CodeExit::
+ releaseall
+ end
+
+EnterCode_EnterCodeText:
+ .string "Enter a code?$"
This is all straightforward scripting stuff, the sign will first give the player a YES / NO box and ask whether they’d like to enter a code. Let’s now add some cases and messages that handle the different results of the code entry from GetCodeFeedback. Let’s look at the sign first:
EventScript_CodeEntry::
lockall
msgbox EnterCode_EnterCodeText, MSGBOX_YESNO
compare VAR_RESULT, 0
goto_if_eq CodeExit
special EnterCode
waitstate
special GetCodeFeedback
+ goto_if_eq VAR_RESULT, 0, CodeFailed
+ goto_if_eq VAR_RESULT, 1, CodeSampleCode
+ goto_if_eq VAR_RESULT, 2, CodeCaughtEmAll
end
Now we’re handling cases for each of the possible return values from GetCodeFeedback! except we don’t have any of those functions, so this will cause errors as the script has nothing to goto_if_eq. Let’s write those too:
CodeFailed::
msgbox EnterCode_FailedText, MSGBOX_DEFAULT
releaseall
end
CodeSampleString::
msgbox EnterCode_SucceededText, MSGBOX_DEFAULT
msgbox CodeSampleCode_Text, MSGBOX_DEFAULT
releaseall
end
CodeCaughtEmAll::
msgbox EnterCode_SucceededText, MSGBOX_DEFAULT
msgbox CodeCaughtEmAll_Text, MSGBOX_DEFAULT
releaseall
end
And lastly, we’ll need to add all of the strings we now need to reference:
EnterCode_FailedText:
.string "...nothing happened.$"
EnterCode_SucceededText:
.string "The code worked!$"
CodeSampleCode_Text
.string "You entered the sample code!$"
CodeCaughtEmAll_Text
.string "Encyclopedic knowledge fills your head.\n"
.string "It's like you've caught 'em all!$"
So to finish up, our event script file now looks like this, with all said and done:
EventScript_CodeEntry::
lockall
msgbox EnterCode_EnterCodeText, MSGBOX_YESNO
compare VAR_RESULT, 0
goto_if_eq CodeExit
special EnterCode
waitstate
special GetCodeFeedback
goto_if_eq VAR_RESULT, 0, CodeFailed
goto_if_eq VAR_RESULT, 1, CodeSampleCode
goto_if_eq VAR_RESULT, 2, CodeCaughtEmAll
end
CodeExit::
releaseall
end
CodeFailed::
msgbox EnterCode_FailedText, MSGBOX_DEFAULT
releaseall
end
CodeSampleString::
msgbox EnterCode_SucceededText, MSGBOX_DEFAULT
msgbox CodeSampleCode_Text, MSGBOX_DEFAULT
releaseall
end
CodeCaughtEmAll::
msgbox EnterCode_SucceededText, MSGBOX_DEFAULT
msgbox CodeCaughtEmAll_Text, MSGBOX_DEFAULT
releaseall
end
EnterCode_EnterCodeText:
.string "Enter a code?$"
EnterCode_FailedText:
.string "...nothing happened.$"
EnterCode_SucceededText:
.string "The code worked!$"
CodeSampleCode_Text
.string "You entered the sample code!$"
CodeCaughtEmAll_Text
.string "Encyclopedic knowledge fills your head.\n"
.string "It's like you've caught 'em all!$"
And that’s it! Feel free to expand this in whatever way you wish, the pattern can just be repeated as much as you like, and you can made the code called from GetCodeFeedback do whatever you like.
Can I change the icon on the name entry screen?
Absolutely! In naming_screen.c, look for the NamingScreen_CreateCodeIcon function. It’s very short. There’s one relevant line that needs to be changed:
spriteId = CreateObjectGraphicsSprite(OBJ_EVENT_GFX_MYSTERY_GIFT_MAN, SpriteCallbackDummy, 56, 37, 0);
Just swap out OBJ_EVENT_GFX_MYSTERY_GIFT_MAN for whatever event object sprite you’d like to use instead. You may need to adjust the position (the 56 and 37 in this example) depending on your sprite.
What about a mystery gift setup?
I’d like to cover this separately because it’s best handled via givemon script commands, which means we don’t do much in GetCodeFeedback other than return a unique identifier. I’m gonna reference @PCG06’s mystery gift implementation which is based on this code entry system for a clean and really thorough example.
3. Mystery Gift GetCodeFeedback
Let’s say you have two mystery gift mons and no other cases you want to handle, one for Celebi and one for Jirachi. Your GetCodeFeedback function will look something like this:
{
static const u8 sText_CodeCelebi[] = _("Celebi");
static const u8 sText_CodeJirachi[] = _("Jirachi");
if (!StringCompare(gStringVar2, sText_CodeCelebi))
gSpecialVar_Result = 1;
else if (!StringCompare(gStringVar2, sText_CodeJirachi))
gSpecialVar_Result = 2;
else
gSpecialVar_Result = 0;
}
and that’s it, super simple. All of the other handling will have to be done on the scripting end, as we’ll be leaning on givemon and its associated handling.
2. Mystery Gift Scripting
Let’s return back to our EventScript_CodeEntry pattern from before, but instead use our new codes.
EventScript_CodeEntry::
lockall
msgbox EnterCode_EnterCodeText, MSGBOX_YESNO
compare VAR_RESULT, 0
goto_if_eq CodeExit
special EnterCode
waitstate
special GetCodeFeedback
goto_if_eq VAR_RESULT, 0, CodeFailed
goto_if_eq VAR_RESULT, 1, MysteryGift_EventScript_Celebi
goto_if_eq VAR_RESULT, 2, MysteryGift_EventScript_Jirachi
end
Straightforward enough! The actual work is in writing MysteryGift_EventScript_Celebi and MysteryGift_EventScript_Jirachi to handle their givemons appropriately, prompt nicknaming, send them to the PC if the party is full, etc. We should also keep in mind that each Mystery Gift should only be entered once, so we’ll want to track that with a flag; conveniently, expansion already has 15 flags we can use for the purpose. Let’s do Celebi first.
MysteryGift_EventScript_Celebi::
goto_if_set FLAG_MYSTERY_GIFT_1, MysteryGift_EventScript_Redeemed
bufferspeciesname STR_VAR_1, SPECIES_CELEBI
setvar VAR_TEMP_TRANSFERRED_SPECIES, SPECIES_CELEBI
givemon SPECIES_CELEBI, 100, ITEM_LIFE_ORB, ITEM_CHERISH_BALL, NATURE_TIMID, 0, MON_GENDERLESS, 0, 0, 4, 252, 252, 0, 31, 31, 31, 30, 31, 31, MOVE_ENERGY_BALL, MOVE_PSYCHIC, MOVE_NASTY_PLOT, MOVE_CELEBRATE, TRUE, FALSE, TYPE_PSYCHIC
setflag FLAG_MYSTERY_GIFT_1
call MysteryGift_EventScript_ReceivedMon
releaseall
end
Walking through this, it’s clear we’ll need some more scripting. We first check if Celebi’s corresponding Mystery Gift flag has been set, and if it has, we need to tell the player they’ve already redeemed it and can’t again. If they haven’t though, we get ourselves setup for the givemon, do the givemon, and set the mystery gift flag. Then we need soem more generic handling to prompt nicknaming and some fanfare.
Two things, then; an event script to handle the case where a mystery gift mon has already been redeemed, and an event script to handle when a mystery gift mon has successfully been received.
Just for the sake of simplicity, I’m going to handle entering a used mystery gift code the same way I’d handle an incorrect code. You’re welcome to add more complex scripting if you prefer.
MysteryGift_EventScript_Redeemed::
msgbox EnterCode_FailedText, MSGBOX_DEFAULT
releaseall
end
And then the scripto handle the player having successfully received a mon:
MysteryGift_EventScript_ReceivedMon::
msgbox MysteryGift_Text_SucceededText, MSGBOX_DEFAULT
playfanfare MUS_OBTAIN_ITEM
message MysteryGift_Text_ReceivedGiftMon
waitfanfare
goto_if_eq VAR_RESULT, MON_GIVEN_TO_PARTY, MysteryGift_EventScript_NicknamePartyMon
goto_if_eq VAR_RESULT, MON_GIVEN_TO_PC, MysteryGift_EventScript_NicknamePCMon
goto Common_EventScript_NoMoreRoomForPokemon
msgbox MysteryGift_Text_PleaseVisitAgain, MSGBOX_DEFAULT
end
Almost done! Just need to handle the specific nicknaming scripts, and then add all of the text.
MysteryGift_EventScript_NicknamePartyMon::
msgbox gText_NicknameThisPokemon, MSGBOX_YESNO
goto_if_eq VAR_RESULT, NO, MysteryGift_EventScript_Exit
call Common_EventScript_GetGiftMonPartySlot
call Common_EventScript_NameReceivedPartyMon
goto MysteryGift_EventScript_Exit
end
MysteryGift_EventScript_NicknamePCMon::
msgbox gText_NicknameThisPokemon, MSGBOX_YESNO
goto_if_eq VAR_RESULT, NO, MysteryGift_EventScript_TransferredToPC
call Common_EventScript_NameReceivedBoxMon
call Common_EventScript_TransferredToPC
releaseall
end
MysteryGift_EventScript_TransferredToPC::
call Common_EventScript_TransferredToPC
releaseall
end
MysteryGift_Text_WelcomeToMysteryGiftSystem:
.string "Hello, {PLAYER}!\p"
.string "Welcome to the Mystery Gift System!\p"
.string "Would you like to enter a code?$"
MysteryGift_Text_CurrentlyUnavailable:
.string "I'm sorry, but the Mystery Gift System\n"
.string "is currently unavailable.\p"
.string "Please try again later.\p"
.string "Thank you!$"
MysteryGift_Text_PleaseVisitAgain:
.string "Please visit again!$"
MysteryGift_Text_EnterCode:
.string "Please enter the code.$"
MysteryGift_Text_SucceededText:
.string "The code was valid!\p"
.string "Enjoy your gift!$"
MysteryGift_Text_FailedText:
.string "The code was invalid!\p"
.string "Would you like to enter a new code?$"
MysteryGift_Text_RedeemedText:
.string "This code was already redeemed!\p"
.string "Would you like you enter a new code?$"
MysteryGift_Text_ReceivedGiftMon:
.string "{PLAYER} received a {STR_VAR_1}!$"
Goodness, so much infrastructure scripting! The nice thing is that now that all the infrastructure is set up, much like before, adding new cases becomes really straightforward. With Celebi and all of the skeleton scripting finished, let’s add Jirachi.
MysteryGift_EventScript_Jirachi::
goto_if_set FLAG_MYSTERY_GIFT_2, MysteryGift_EventScript_Redeemed
bufferspeciesname STR_VAR_1, SPECIES_JIRACHI
setvar VAR_TEMP_TRANSFERRED_SPECIES, SPECIES_JIRACHI
givemon SPECIES_JIRACHI, 100, ITEM_LIFE_ORB, ITEM_CHERISH_BALL, NATURE_ADAMANT, 0, MON_GENDERLESS, 0, 252, 4, 252, 0, 0, 31, 31, 31, 31, 31, 31, MOVE_IRON_HEAD, MOVE_ZEN_HEADBUTT, MOVE_PLAY_ROUGH, MOVE_CELEBRATE, TRUE, FALSE, TYPE_STEEL
setflag FLAG_MYSTERY_GIFT_2
call MysteryGift_EventScript_ReceivedMon
releaseall
end
And that’s it! Super straightforward from here, just make sure to iterate FLAG_MYSTERY_GIFT each time you add a new mon, and of course add their code to both GetCodeFeedback and the main script controlling code entry.
How to Use Follower NPCs
Written by Bivurnum gif by ghoulslash

Configs
The configs for follower NPCs can be found in include/config/follower_npc.h.
FNPC_ENABLE_NPC_FOLLOWERS: This must be set toTRUEin order to enable follower NPCs. It isFALSEby default as it adds some size to the save block.FNPC_FLAG_HEAL_AFTER_FOLLOWER_BATTLE: The player’s party can be automatically healed after every partner battle. Set it to a flag to toggle it on/off with scripts, or set it toFNPC_ALWAYSto have it happen every time.FNPC_FLAG_PARTNER_WILD_BATTLES: The battle partner can join the player for wild battles. Set it to a flag to toggle it on/off with scripts, or set it toFNPC_ALWAYSto have it happen every time.FNPC_NPC_FOLLOWER_WILD_BATTLE_VS_2: Wild battles with a battle partner default to two wild Pokémon appearing. You can set this toFALSEto make only one wild Pokémon appear.FNPC_NPC_FOLLOWER_PARTY_PREVIEW: By default, a preview of the player’s and partner’s teams will be shown at the start of every trainer battle. Set this toFALSEto disable this feature.FNPC_FACE_NPC_FOLLOWER_ON_DOOR_EXIT: IfTRUEthe player will turn to face the follower when they exit a doorway.FNPC_NPC_FOLLOWER_SHOW_AFTER_LEAVE_ROUTE: IfTRUEthe follower will walk out of the player automatically after using Fly, Teleport, or Escape Rope.
Set the Follower
The setfollowernpc macro will turn the specified object into an NPC follower. It requires the object id, the follower flags, and optionally a custom script and a battle partner. If you do not include a custom script name (or you set it to 0), the NPC follower will default to their normal interaction script. If there is a follower Pokémon present, it will be returned to its Pokeball until the NPC follower is destroyed.
Here’s an example:
setfollowernpc 3, FNPC_ALL, MyScript_Eventscript_CustomFollowerScript, PARTNER_STEVEN
This would turn object number 3 on the current map into an NPC follower, give them access to all following behaviors, run that custom script when the player interacts with them, and adds the Steven battle partner to the follower (more on this later).
The object MUST have an event flag or the NPC follower will not be created!
Create a Follower
The createfollowernpc macro will create a new follower without needing to convert an existing NPC. It works similarly to setfollowernpc, but instead of providing an object id, you give it a GFX id. For example, if you wanted to create a follower with the May sprite, you could do something like this:
createfollowernpc OBJ_EVENT_GFX_RIVAL_MAY_NORMAL, FNPC_ALL, EventScript_MayFollow
The created follower NPC will initially be invisible until the player takes a step.
Follower Flags
These are required to tell the game what behavior you want the NPC follower to have. They are defined in include/constants/follower_npc.h. The second list of flags is the same as the first, but with shortened names to make them easier to type when scripting. The first 7 flags in the list are individual behaviors, whereas the remaining three are bundles of flags. For example, if you use FNPC_SURF in setfollowernpc, the NPC follower will be able to Surf behind the player. If you use FNPC_ALL_WATER instead, the NPC follower will be able to Dive and go up Waterfalls in addition to being able to Surf. Feel free to add your own custom bundles of flags to the file to meet your needs.
To make sure the NPC follower uses the correct animation frames, you should add an entry to gFollowerAlternateSprites in include/follower_npc_alternate_sprites.h. Only do this if your object has distinct animation frames for different behaviors (running, biking, surfing, etc). Follow the templates for Rival May and Rival Brendan that already exist there.
Follower Movements
You can use the applymovement macro on an NPC follower by using OBJ_EVENT_ID_NPC_FOLLOWER for the object id. This is convenient for making the NPC follower walk off-screen before destroying them. If an NPC follower is not immediately next to the player while the controls aren’t locked, it will try to take steps to get back into position as the player moves, sometimes walking through impassable areas (like through the middle of buildings).
You can also use facefollowernpc to make both the player and the NPC follower face each other.
Note
The existing vanilla movement scripts do not take NPC followers into account. Other NPCs may walk into the follower or the follower may get left behind. If you want follower NPCs to work with these existing scripts, you will need to add your own handling for them. The
hidefollowernpcmacro can be particularly useful for this.
Check for Follower
You can use the checkfollowernpc macro to check whether or not an NPC follower currently exists. It will set VAR_RESULT to TRUE if an NPC follower exists, otherwise it will be set to FALSE.
Hide the Follower
The hidefollowernpc macro makes the NPC follower walk into the player and be hidden. The game will wait until the movement is finished before continuing with the script. There is an optional parameter that can be used to set the desired walk speed for the movement. It can be from 0 (slowest) to 3 (fastest). If a walk speed is not specified, it will default to the normal walk speed. The NPC follower will reappear the next time the player takes a step (outside of scripts).
Destroy the Follower
The destroyfollowernpc macro acts similarly to removeobject. It removes the NPC follower object instantly and sets their flag. If you have Pokémon followers enabled, the Pokémon will reappear the next time the player takes a step.
Battle Partner
If you assign a battle partner to the NPC follower, that partner will fight alongside the player in all trainer battles while the follower is present. This turns all battles into multi battles, whether against one opponent or two.
You can use any battle partner that has been defined in include/constants/battle_partner.h. The partners’ information and Pokémon teams can be set in src/data/battle_partners.party.
To change the battle partner of an existing NPC follower, you can use the changefollowerbattler macro with the desired partner ID. If you change the ID to 0, the NPC follower will not participate in any battles until you change it back to a valid partner ID.
Keep in mind that only the first 3 Pokémon in the player’s party will participate in multi battles. The other three party members are temporarily replaced with the partner’s Pokémon. This means the last three Pokémon in the player’s party will not receive any experience points (even from the EXP Share).
Time-Based Encounters Tutorial
Table of Contents:
What is the Time-Based Encounters feature?
Time-Based Encounters lets you pick which Pokémon appear based on the in-game clock, per route! Gen 2 had this feature, and Gen 4 brought it back- for instance, in Sinnoh’s Route 201 you have a higher chance of catching a Bidoof than a Starly at night.
Sounds rad, how do I add it to my romhack?
There are a couple of ways! The system is built to handle your unchanged wild_encounters.json file by default, so the most basic solution is to add an encounter group by editing that (by hand or with Porymap), and then add a supported suffix to the end of whatever name you give it.
NOTE: if you haven’t specified or added any encounters, or have the option turned off, Expansion puts them into the
TIME_MORNING(or whatever your first time enum is set to in theTimeOfDayenuminrtc.h) slot to keep vanilla behavior. This means any map"base_label"without a supported suffix is automatically set to the first time slot whenOW_TIME_OF_DAY_ENCOUNTERSisTRUE. WhenOW_TIME_OF_DAY_ENCOUNTERSisFALSE, everything regardless of any extant suffixes gets the first time slot suffix (ie_MorningforTIME_MORNING) so it matches with the 0th index of theencounterTypesarray instruct WildMonHeader.
I’ve never added one by hand, but I want to!
Great attitude bestie! It’s very simple- all you need is to find your wild_encounters.json file and open it up in your text/code editor of choice; I recommend VSCodium, but any will work.
To get started, we’ll use Route 101 as an example:
{
"map": "MAP_ROUTE101",
"base_label": "gRoute101",
"land_mons": {
"encounter_rate": 20,
"mons": [
{
"min_level": 2,
"max_level": 2,
"species": "SPECIES_WURMPLE"
},
{
"min_level": 2,
"max_level": 2,
"species": "SPECIES_POOCHYENA"
},
{
"min_level": 2,
"max_level": 2,
"species": "SPECIES_WURMPLE"
},
{
"min_level": 3,
"max_level": 3,
"species": "SPECIES_WURMPLE"
},
{
"min_level": 3,
"max_level": 3,
"species": "SPECIES_POOCHYENA"
},
{
"min_level": 3,
"max_level": 3,
"species": "SPECIES_POOCHYENA"
},
{
"min_level": 3,
"max_level": 3,
"species": "SPECIES_WURMPLE"
},
{
"min_level": 3,
"max_level": 3,
"species": "SPECIES_POOCHYENA"
},
{
"min_level": 2,
"max_level": 2,
"species": "SPECIES_ZIGZAGOON"
},
{
"min_level": 2,
"max_level": 2,
"species": "SPECIES_ZIGZAGOON"
},
{
"min_level": 3,
"max_level": 3,
"species": "SPECIES_ZIGZAGOON"
},
{
"min_level": 3,
"max_level": 3,
"species": "SPECIES_ZIGZAGOON"
}
]
}
},
That’s it! That’s the entire encounter group for Route 101. In other Routes or maps, you’ll likely see other encounters listed; here we have only have land_mons, but vanilla emerald supports three more types of encounters, for a total of four:
land_mons, your standard grass or cave or sand encounter.water_mons, used for surfingrock_smash_mons, for when you get jumpscared by a Geodude in Route 111 after using Rock Smash.fishing_mons, for fishing
NOTE: You can also have more of these encounter types- in fact, expansion has a fifth type of encounter for the Dexnav feature called
hidden_mons, and some people have entries forhoney_monsandheadbutt_monsin their personal hacks as well! This system supports those too, you just need to make sure to update yourWildEncountersstruct definition. You need to keep the order consistent, so as a standard, any custom encounter types should go beforehidden_monsbut afterfishing_mons. To use the earlier examples:
struct WildEncounterTypes
{
const struct WildPokemonInfo *landMonsInfo;
const struct WildPokemonInfo *waterMonsInfo;
const struct WildPokemonInfo *rockSmashMonsInfo;
const struct WildPokemonInfo *fishingMonsInfo;
const struct WildPokemonInfo *honeyMonsInfo;
const struct WildPokemonInfo *headbuttMonsInfo;
const struct WildPokemonInfo *hiddenMonsInfo;
};
You can see that the two new entries,
honeyMonsInfoandheadbuttMonsInfo(corresponding withhoney_monsandheadbutt_mons) are slotted in betweenfishingMonsInfoandhiddenMonsInfo. Structs in the C programming language rely on consistent placement with their members, so this is the order that every other instance of these encounter types should maintain. In myexpertopinion, the easiest way to add these is again with Porymap. Okay, take a breath, stretch, and we’ll get back to the tutorial!
For the sake of simplicity, I’ll show you how to add another encounter group here and pop a supported prefix on it. I want my new encounter group to:
- have a fishing table (I’m adding a fishin hole to Route 101)
- let you catch Spiky Eared Pichu, my favorite mon (not really)
- have some rock smash encounters to up the spook factor
- only occur at night
With all of these things in mind, let’s craft an encounter! We’ll start off by copying the one we have, called gRoute101.
{
"map": "MAP_ROUTE101",
"base_label": "gRoute101",
"land_mons": {
"encounter_rate": 20,
"mons": [
{
"min_level": 2,
"max_level": 2,
"species": "SPECIES_WURMPLE"
},
{
"min_level": 2,
"max_level": 2,
"species": "SPECIES_POOCHYENA"
},
{
"min_level": 2,
"max_level": 2,
"species": "SPECIES_WURMPLE"
},
{
"min_level": 3,
"max_level": 3,
"species": "SPECIES_WURMPLE"
},
{
"min_level": 3,
"max_level": 3,
"species": "SPECIES_POOCHYENA"
},
{
"min_level": 3,
"max_level": 3,
"species": "SPECIES_POOCHYENA"
},
{
"min_level": 3,
"max_level": 3,
"species": "SPECIES_WURMPLE"
},
{
"min_level": 3,
"max_level": 3,
"species": "SPECIES_POOCHYENA"
},
{
"min_level": 2,
"max_level": 2,
"species": "SPECIES_ZIGZAGOON"
},
{
"min_level": 2,
"max_level": 2,
"species": "SPECIES_ZIGZAGOON"
},
{
"min_level": 3,
"max_level": 3,
"species": "SPECIES_ZIGZAGOON"
},
{
"min_level": 3,
"max_level": 3,
"species": "SPECIES_ZIGZAGOON"
}
]
}
},
{
"map": "MAP_ROUTE101",
"base_label": "gRoute101_Night",
"land_mons": {
"encounter_rate": 20,
"mons": [
{
"min_level": 2,
"max_level": 2,
"species": "SPECIES_WURMPLE"
},
{
"min_level": 2,
"max_level": 2,
"species": "SPECIES_POOCHYENA"
},
{
"min_level": 2,
"max_level": 2,
"species": "SPECIES_WURMPLE"
},
{
"min_level": 3,
"max_level": 3,
"species": "SPECIES_WURMPLE"
},
{
"min_level": 3,
"max_level": 3,
"species": "SPECIES_POOCHYENA"
},
{
"min_level": 3,
"max_level": 3,
"species": "SPECIES_POOCHYENA"
},
{
"min_level": 3,
"max_level": 3,
"species": "SPECIES_WURMPLE"
},
{
"min_level": 3,
"max_level": 3,
"species": "SPECIES_POOCHYENA"
},
{
"min_level": 2,
"max_level": 2,
"species": "SPECIES_ZIGZAGOON"
},
{
"min_level": 2,
"max_level": 2,
"species": "SPECIES_ZIGZAGOON"
},
{
"min_level": 3,
"max_level": 3,
"species": "SPECIES_ZIGZAGOON"
},
{
"min_level": 3,
"max_level": 3,
"species": "SPECIES_ZIGZAGOON"
}
]
}
},
Okay, we have it duplicated. We leave the value for “map”: the same as the original so the game knows that both of these encounters are for Route 101. You can see I changed the name of the copy to gRoute101_Night; that’s one bullet point down! If we enable OW_TIME_BASED_ENCOUNTERS in overworld.h, the game will recognize this encounter group goes in the Night slot and will switch which group is used to generate the encounters when the in-game clock changes to TIME_NIGHT. Next, let’s add Spiky Eared Pichu and our two new encounter tables (fishing_mons and rock_smash_mons).
{
"map": "MAP_ROUTE101",
"base_label": "gRoute101_Night",
"land_mons": {
"encounter_rate": 20,
"mons": [
{
"min_level": 2,
"max_level": 2,
"species": "SPECIES_PICHU_SPIKY_EARED"
},
{
"min_level": 2,
"max_level": 2,
"species": "SPECIES_POOCHYENA"
},
{
"min_level": 2,
"max_level": 2,
"species": "SPECIES_WURMPLE"
},
{
"min_level": 3,
"max_level": 3,
"species": "SPECIES_WURMPLE"
},
{
"min_level": 3,
"max_level": 3,
"species": "SPECIES_POOCHYENA"
},
{
"min_level": 3,
"max_level": 3,
"species": "SPECIES_POOCHYENA"
},
{
"min_level": 3,
"max_level": 3,
"species": "SPECIES_WURMPLE"
},
{
"min_level": 3,
"max_level": 3,
"species": "SPECIES_POOCHYENA"
},
{
"min_level": 2,
"max_level": 2,
"species": "SPECIES_ZIGZAGOON"
},
{
"min_level": 2,
"max_level": 2,
"species": "SPECIES_ZIGZAGOON"
},
{
"min_level": 3,
"max_level": 3,
"species": "SPECIES_ZIGZAGOON"
},
{
"min_level": 3,
"max_level": 3,
"species": "SPECIES_ZIGZAGOON"
}
]
},
"fishing_mons": {
"encounter_rate": 30,
"mons": [
{
"min_level": 2,
"max_level": 2,
"species": "SPECIES_MAGIKARP"
},
{
"min_level": 2,
"max_level": 2,
"species": "SPECIES_MARILL"
}
]
},
"rock_smash_mons": {
"encounter_rate": 20,
"mons": [
{
"min_level": 2,
"max_level": 2,
"species": "SPECIES_GEODUDE"
}
]
}
},
And there we go! It has the _Night suffix, has Spiky Eared Pichu right up at the top of the list, has a couple of fishing encounters, and will jumpscare us with about a 20% chance every time we break a rock with rock smash. That’s what the encounter_rate line means, by the way- the overall percentage you have of encountering any of the Pokémon listed.
Congrats! You’ve just created a brand new encounter group, set its time, and adjusted the encounters! I’d highly recommend doing this with Porymap- the interface is very useful for editing maps, including wild encounters!
What are “supported suffixes?”
Vanilla Pokémon games usually work with 4 different times of day:
TIME_MORNINGTIME_DAYTIME_EVENINGTIME_NIGHT
So, the “supported suffixes” are just:
_Morning_Day_Evening_Night
NOTE: You can add more than just these by changing the
TimeOfDayenuminrtc.h. If you’d like to do this, I’d recommend making a backup of yourwild_encounters.jsonsomewhere outside your project folder, just so you can have a baseline to return to if something goes wrong. The migration script makes a backup of the file each time it runs, so it’s essentially a one step undo button- if you plan on or think you might make lots of edits towild_encounters.json, it is a very good idea to make a baseline backup.
That’s a lot of manual editing.
You’re so right bestie! Luckily for you, there’s a python script that can help you out!
The script is at migration_scripts/add_time_based_encounters.py. It, in order:
- Checks to make sure you’re running it from the root folder of your expansion project (specifically, wherever the project’s
Makefileis) - Makes a backup of your
wild_encounters.jsonfile calledwild_encounters.json.bak - Runs through
wild_encounters.jsonand adds dummy encounter groups for each time denomination to each group- ie,
gRoute101becomesgRoute101_Morning,gRoute101_Day,gRoute101_Evening, andgRoute101_Night
- ie,
This script works kind of like a “template” feature- when you open it up to edit either in Porymap or a text editor, you will see the encounter groups, but they won’t be filled out with encounters. This lets you add Pokémon with your own encounter rates however you want.
That’s still a lot of editing.
You’re still so right bestie! Luckily for you, there’s an optional argument you can add when you run the script: --copy.
This duplicates the encounter group’s encounters as well as their labels/map group values. When you open wild_encounters.json for editing either in Porymap or a text editor, you’ll notice that each group (gRoute101_Morning, gRoute101_Day, gRoute101_Evening, and gRoute101_Night) now all have the same encounters as gRoute101 did. If you only want to add a couple of Pokémon here and there for each time of day, this is probably the easier option.
NOTE: the
--copyoption will use up at least an additional 9kb of ROM space. Obviously that’s not much even for a GBA ROM, but it’s something to keep in mind.
So what are the #define options in overworld.h?
Great questie bestie!
Here’s a rundown, with more information than what’s in the comments at overworld.h and their default values:
OW_TIME_OF_DAY_ENCOUNTERS FALSE
- Acceptable values:
TRUEorFALSE - this option enables or disables the feature. You’ll notice your used ROM space changing when this is enabled or disabled, as the json->C header conversion file will generate the
encounterTypesarray inwild_encounter.hwith different sizes based on whether this value isTRUEorFALSE.
OW_TIME_OF_DAY_DISABLE_FALLBACK FALSE
- Acceptable values:
TRUEorFALSE - this option controls the behavior of the game when an encounter table isn’t populated. If this is set to
TRUE, whenever the game detects that you’re in a time of day (Morning/Day/Evening/Night) on a map without any encounters for that time, you won’t encounter any mons. If this is set toFALSE, the game will look for encounters at the time specified in theOW_TIME_OF_DAY_FALLBACKoption below.
OW_TIME_OF_DAY_FALLBACK TIME_MORNING
- Acceptable values: any value from the
TimesOfDayenum, so by defaultTIME_MORNING,TIME_DAY,TIME_EVENING, andTIME_NIGHT. - this option controls which time is used when
OW_TIME_OF_DAY_DISABLE_FALLBACKisFALSE. Keep in mind that if you enableOW_TIME_OF_DAY_ENCOUNTERSand set this to something other thanTIME_MORNING, you should make sure that time has encounters, or you won’t encounter anything.
Examples
Running the migration script without the --copy option
Make sure you run this from the root folder of your project!
python3 migration_scripts/add_time_based_encounters.py
Result:
"encounters": [
{
"map": "MAP_ROUTE101",
"base_label": "gRoute101_Morning",
"land_mons": {
"encounter_rate": 20,
"mons": [
{
"min_level": 2,
"max_level": 2,
"species": "SPECIES_WURMPLE"
},
{
"min_level": 2,
"max_level": 2,
"species": "SPECIES_POOCHYENA"
},
{
"min_level": 2,
"max_level": 2,
"species": "SPECIES_WURMPLE"
},
{
"min_level": 3,
"max_level": 3,
"species": "SPECIES_WURMPLE"
},
{
"min_level": 3,
"max_level": 3,
"species": "SPECIES_POOCHYENA"
},
{
"min_level": 3,
"max_level": 3,
"species": "SPECIES_POOCHYENA"
},
{
"min_level": 3,
"max_level": 3,
"species": "SPECIES_WURMPLE"
},
{
"min_level": 3,
"max_level": 3,
"species": "SPECIES_POOCHYENA"
},
{
"min_level": 2,
"max_level": 2,
"species": "SPECIES_ZIGZAGOON"
},
{
"min_level": 2,
"max_level": 2,
"species": "SPECIES_ZIGZAGOON"
},
{
"min_level": 3,
"max_level": 3,
"species": "SPECIES_ZIGZAGOON"
},
{
"min_level": 3,
"max_level": 3,
"species": "SPECIES_ZIGZAGOON"
}
]
}
},
{
"map": "MAP_ROUTE101",
"base_label": "gRoute101_Day"
},
{
"map": "MAP_ROUTE101",
"base_label": "gRoute101_Evening"
},
{
"map": "MAP_ROUTE101",
"base_label": "gRoute101_Night"
},
]
As you can see, the names change, but the encounters aren’t touched, so you’re free to add your own, piecemeal style. If you don’t have any encounters for a map and time, the game will use OW_TIME_OF_DAY_FALLBACK if OW_TIME_OF_DAY_DISABLE_FALLBACK is FALSE; otherwise, you won’t encounter anything.
Running the migration script with the --copy option
Make sure you run this from the root folder of your project!
python3 migration_scripts/add_time_based_encounters.py --copy
Result:
"encounters": [
{
"map": "MAP_ROUTE101",
"base_label": "gRoute101_Morning",
"land_mons": {
"encounter_rate": 20,
"mons": [
{
"min_level": 2,
"max_level": 2,
"species": "SPECIES_WURMPLE"
},
{
"min_level": 2,
"max_level": 2,
"species": "SPECIES_POOCHYENA"
},
{
"min_level": 2,
"max_level": 2,
"species": "SPECIES_WURMPLE"
},
{
"min_level": 3,
"max_level": 3,
"species": "SPECIES_WURMPLE"
},
{
"min_level": 3,
"max_level": 3,
"species": "SPECIES_POOCHYENA"
},
{
"min_level": 3,
"max_level": 3,
"species": "SPECIES_POOCHYENA"
},
{
"min_level": 3,
"max_level": 3,
"species": "SPECIES_WURMPLE"
},
{
"min_level": 3,
"max_level": 3,
"species": "SPECIES_POOCHYENA"
},
{
"min_level": 2,
"max_level": 2,
"species": "SPECIES_ZIGZAGOON"
},
{
"min_level": 2,
"max_level": 2,
"species": "SPECIES_ZIGZAGOON"
},
{
"min_level": 3,
"max_level": 3,
"species": "SPECIES_ZIGZAGOON"
},
{
"min_level": 3,
"max_level": 3,
"species": "SPECIES_ZIGZAGOON"
}
]
}
},
{
"map": "MAP_ROUTE101",
"base_label": "gRoute101_Day",
"land_mons": {
"encounter_rate": 20,
"mons": [
{
"min_level": 2,
"max_level": 2,
"species": "SPECIES_WURMPLE"
},
{
"min_level": 2,
"max_level": 2,
"species": "SPECIES_POOCHYENA"
},
{
"min_level": 2,
"max_level": 2,
"species": "SPECIES_WURMPLE"
},
{
"min_level": 3,
"max_level": 3,
"species": "SPECIES_WURMPLE"
},
{
"min_level": 3,
"max_level": 3,
"species": "SPECIES_POOCHYENA"
},
{
"min_level": 3,
"max_level": 3,
"species": "SPECIES_POOCHYENA"
},
{
"min_level": 3,
"max_level": 3,
"species": "SPECIES_WURMPLE"
},
{
"min_level": 3,
"max_level": 3,
"species": "SPECIES_POOCHYENA"
},
{
"min_level": 2,
"max_level": 2,
"species": "SPECIES_ZIGZAGOON"
},
{
"min_level": 2,
"max_level": 2,
"species": "SPECIES_ZIGZAGOON"
},
{
"min_level": 3,
"max_level": 3,
"species": "SPECIES_ZIGZAGOON"
},
{
"min_level": 3,
"max_level": 3,
"species": "SPECIES_ZIGZAGOON"
}
]
}
},
{
"map": "MAP_ROUTE101",
"base_label": "gRoute101_Evening",
"land_mons": {
"encounter_rate": 20,
"mons": [
{
"min_level": 2,
"max_level": 2,
"species": "SPECIES_WURMPLE"
},
{
"min_level": 2,
"max_level": 2,
"species": "SPECIES_POOCHYENA"
},
{
"min_level": 2,
"max_level": 2,
"species": "SPECIES_WURMPLE"
},
{
"min_level": 3,
"max_level": 3,
"species": "SPECIES_WURMPLE"
},
{
"min_level": 3,
"max_level": 3,
"species": "SPECIES_POOCHYENA"
},
{
"min_level": 3,
"max_level": 3,
"species": "SPECIES_POOCHYENA"
},
{
"min_level": 3,
"max_level": 3,
"species": "SPECIES_WURMPLE"
},
{
"min_level": 3,
"max_level": 3,
"species": "SPECIES_POOCHYENA"
},
{
"min_level": 2,
"max_level": 2,
"species": "SPECIES_ZIGZAGOON"
},
{
"min_level": 2,
"max_level": 2,
"species": "SPECIES_ZIGZAGOON"
},
{
"min_level": 3,
"max_level": 3,
"species": "SPECIES_ZIGZAGOON"
},
{
"min_level": 3,
"max_level": 3,
"species": "SPECIES_ZIGZAGOON"
}
]
}
},
{
"map": "MAP_ROUTE101",
"base_label": "gRoute101_Night",
"land_mons": {
"encounter_rate": 20,
"mons": [
{
"min_level": 2,
"max_level": 2,
"species": "SPECIES_WURMPLE"
},
{
"min_level": 2,
"max_level": 2,
"species": "SPECIES_POOCHYENA"
},
{
"min_level": 2,
"max_level": 2,
"species": "SPECIES_WURMPLE"
},
{
"min_level": 3,
"max_level": 3,
"species": "SPECIES_WURMPLE"
},
{
"min_level": 3,
"max_level": 3,
"species": "SPECIES_POOCHYENA"
},
{
"min_level": 3,
"max_level": 3,
"species": "SPECIES_POOCHYENA"
},
{
"min_level": 3,
"max_level": 3,
"species": "SPECIES_WURMPLE"
},
{
"min_level": 3,
"max_level": 3,
"species": "SPECIES_POOCHYENA"
},
{
"min_level": 2,
"max_level": 2,
"species": "SPECIES_ZIGZAGOON"
},
{
"min_level": 2,
"max_level": 2,
"species": "SPECIES_ZIGZAGOON"
},
{
"min_level": 3,
"max_level": 3,
"species": "SPECIES_ZIGZAGOON"
},
{
"min_level": 3,
"max_level": 3,
"species": "SPECIES_ZIGZAGOON"
}
]
}
},
]
As you can see, the group gRoute101 and all its encounters were copied into groups that correspond with the four vanilla times of day (Morning/Day/Evening/Night).
How to use Trainer Party Pools
Trainer Party Pools (TPP) is a way to introduce a bit of unpredictability to trainer battles by allowing trainer to generate parties from pools defined by the user.
The maximum number of mons that can be in a single trainer’s pool is 255.
Turning on TPP with trainers.party
To use TPP with trainers.party, all that’s needed is to define a Party Size that’s smaller than than the number of defined mons for the trainer.
Turning on TPP with trainers.h
To use TPP with trainers.h, the trainer need to have the .poolSize field set to a value that’s larger than the .partySize and equal to the number of mons defined in the trainer.
How the pool works
When generating a party for a trainer with a pool, the party is picked from the pool randomly according to rules set for the pool and tags assigned to individual mons in the pool.
Pool Rules
Pool rules are defined in src/data/battle_pool_rules.h. To begin with some default pools are defined, defaultPoolRules which any trainer that doesn’t otherwise have a specified pool ruleset uses, and some custom rules for common scenarios.
POOL_RULESET_BASIC, a ruleset that will pick a mon from the pool with the tagMON_POOL_TAG_LEADif possible to put in the first slot andMON_POOL_TAG_ACEin the last slot, and not pick mons with those tags for any other position.POOL_RULESET_DOUBLES, a ruleset that will pick up to two mons from the pool with the tagMON_POOL_TAG_LEADif possible to put in the first two slots andMON_POOL_TAG_ACEin the last two slots, and not pick mons with those tags for any other position.POOL_RULESET_WEATHER_SINGLES, a ruleset that will pick at most one mon with the tagMON_POOL_TAG_WEATHER_SETTERif possible, and at least one mon with the tagMON_POOL_TAG_WEATHER_ABUSERif possible, in addition to the same conditions asPOOL_RULESET_BASIC.POOL_RULESET_WEATHER_DOUBLES, a ruleset that will pick at most one mon with the tagMON_POOL_TAG_WEATHER_SETTERif possible, and at least one mon with the tagMON_POOL_TAG_WEATHER_ABUSERif possible, in addition to the same conditions asPOOL_RULESET_DOUBLES.POOL_RULESET_SUPPORT_DOUBLES, a ruleset that will pick at most one mon with the tagMON_POOL_TAG_SUPPORTif possible, in addition to the same conditions asPOOL_RULESET_DOUBLES.
All these pools also have the options .speciesClause, .excludeForms, .itemClause and .itemClauseExclusions set to the values defined in include/config/battle.h under B_POOL_RULE_<rule>.
.speciesClauseif set toTRUEmeans that the same exact species as defined by.speciescan’t be picked twice for the party from the pool..excludeFormsif set toFALSEmeans that the same exact species as defined by NetDex number can’t be picked twice for the party from the pool..itemClauseif set toTRUEmeans that pokemon with the same held item can’t be picked twice for the party from the pool..itemClauseExclusionsif set toTRUEmeans that multiple pokemon with the same item can be picked for the party if the item is listed inpoolItemClauseExclusions. By defaultITEM_ORAN_BERRYandITEM_SITRUS_BERRYare the only items in the list of exclusions.
Individual tags can have rules which change how they’re included.
By setting the .tagMaxMembers[POOL_TAG_<tag>] field to a number, only that many mons with that tag will at max be part of the party, or if set to POOL_MEMBER_COUNT_NONE no mons with this tag will be included, and if set to POOL_MEMBER_COUNT_UNLIMITED no restrictions on the number of mons with the tag will apply.
By setting .tagRequired[POOL_TAG_<tag>] option field to TRUE, this tag will be picked before any tags that are not required, after the tag has been picked for the pool it will be set to FALSE for that tag.
The tags Lead and Ace has special handling where they will be picked for the first or last party position respectively.
Tags
There are currently 8 tags specified in the TPP implementation, Lead, Ace, Weather Setter, Weather Abuser, Support, Tag 5, Tag 6 and Tag 7.
If using trainers.party, these tags are applied to mons with the field Tags: , separated by /. Example Tags: Lead / Weather Setter
If using trainers.h, these tags are applied to mons with the field .tags, separated by |. Example: .tags = MON_POOL_TAG_LEAD | MON_POOL_TAG_WEATHER_SETTER
Pokemon can have up to 32 different tags, but anything beyond the 8 initial tags has to be implemented. The numbered tags can be renamed too to better signify their purpose for developers.
Trainer options
A few more trainer options are introduced in order to further customize how the pool picking process works.
Pool Pick Functions(.poolPickIndex) controls which functons are used to pick mons from the pool, they’re split into Lead, Ace, and Other. By default, onlyDefault<position>PickFunctionandPickLowestare implemented. Must be anenumvalue inenum PoolPickFunctions.Pool Prune(.poolPruneIndex) controls if members in the pool should be removed before party members are picked from the pool. By default, onlyPOOL_PRUNE_NONE, which doesn’t remove anything from the pool, andPOOL_PRUNE_TEST, which removes Wobbuffet from the pool, are implemented. Must be anenumvalue inenum PoolPruneOptions.
Pool copy
The Copy Pool option can be used to have the trainer use the party or pool from a different trainer.
If you for example want some other trainer to have the same team/pool as Tiana, you’d use Copy Pool: TRAINER_TIANA.
If Party Size isn’t defined for the current trainer, it will inherit from the copied trainer.
Example pool
=== TRAINER_TIANA ===
Name: TIANA
Class: Lass
Pic: Lass
Gender: Female
Music: Female
Double Battle: Yes
AI: Check Bad Move
Party Size: 4
Pool Rules: Weather Doubles
Pool Pick Functions: Default
Zigzagoon
Level: 4
IVs: 0 HP / 0 Atk / 0 Def / 0 SpA / 0 SpD / 0 Spe
Shroomish
Level: 4
IVs: 0 HP / 0 Atk / 0 Def / 0 SpA / 0 SpD / 0 Spe
Psyduck
Level: 4
IVs: 0 HP / 0 Atk / 0 Def / 0 SpA / 0 SpD / 0 Spe
Shellder
Level: 4
IVs: 0 HP / 0 Atk / 0 Def / 0 SpA / 0 SpD / 0 Spe
Mew
Level: 4
IVs: 0 HP / 0 Atk / 0 Def / 0 SpA / 0 SpD / 0 Spe
Tags: Ace
Giratina
Level: 4
IVs: 0 HP / 0 Atk / 0 Def / 0 SpA / 0 SpD / 0 Spe
Tags: Ace
Vulpix
Ability: Drought
Level: 4
Tags: Lead / Weather Setter
Torkoal
Ability: Drought
Level: 4
Tags: Lead / Weather Setter
Bulbasaur
Ability: Chlorophyll
Level: 4
Tags: Lead / Weather Abuser
Cherrim
Level: 4
Tags: Lead / Weather Abuser
Here Tiana has been given a pool that’s set up for a double battle with weather. Using the default pool rule Weather Doubles it will only pick one of each of the weather setters and abusers which Tiana will lead with. Tiana will also pick either Mew or Giratina as her Ace mon, and the last slot will be filled with one of Zigzagoon, Shroomish, Psyduck or Shellder.
Pool settings
If no pool rule is specified in the trainer, the default rules will be used, which sets rules according to some defaults from include/config/battle.h.
This file also has settings for other pool options.
B_POOL_SETTING_CONSISTENT_RNG,TRUEorFALSE, the party generated will always be the same on a particular save (RNG dependant on trainerId and encountered trainer).B_POOL_SETTING_USE_FIXED_SEED,TRUEorFALSE, the party generated will always be the same on a particular compiled ROM (RNG dependant on a chosen seed and encountered trainer).B_POOL_SETTING_FIXED_SEED, seed to use for fixed seed, does nothing ifB_POOL_SETTING_USE_FIXED_SEEDisFALSE.
How to interact with Apricorn Trees

Adding a new apricorn tree
To add a new tree, first increase the tree count and expand the tree list in include/constants/apricorn_tree.h.
Note that each tree will take a bit in the savegame’s SaveBlock3 struct so increasing APRICORN_TREE_COUNT breaks the savegame.
Due to this, pokeemerald-expansion doesn’t have any trees set up by default to prevent breaking downstream savegames.
The trees support random yields and properly use plural case on plural yields.
#define APRICORN_TREE_NONE 0
-#define APRICORN_TREE_COUNT 0
+#define APRICORN_TREE_ROUTE101_RED_TREE 1
+
+#define APRICORN_TREE_COUNT 32
Then list its data in src/data/apricorns.h.
const struct ApricornTree gApricornTrees[APRICORN_TREE_COUNT] =
{
[APRICORN_TREE_NONE] =
{
.minimum = 1,
.maximum = 1,
.apricornType = APRICORN_RED,
},
+ [APRICORN_TREE_ROUTE101_RED_TREE] =
+ {
+ .minimum = 1,
+ .maximum = 1,
+ .apricornType = APRICORN_RED,
+ },
};
Finally, just place your new tree using Porymap. Similarly to berries, the Sight Radius / Berry Tree ID field is used for the tree’s ID.

Add a new apricorn type
After you created your new item, simply expand the ApricornType enum in include/constants/apricorn_tree.h.
enum ApricornType
{
[...]
APRICORN_BERRY_MARANGA = ITEM_MARANGA_BERRY,
+ APRICORN_BROWN = ITEM_BROWN_APRICORN,
};
How to Use Namebox
New implementation made by mudskipper13, originally made by Tustin2121.
Overview


This is a broad and self-contained implementation of Tustin2121’s namebox feature branch here, which includes the following:
- Cleaner implementation of namebox onto both the field message box and the field PokéNav textbox.
- New configs:
OW_NAME_BOX_USE_DYNAMIC_WIDTHlets the namebox use dynamic window width depending on the speaker’s string length.- When disabled and/or the speaker name is too long,
OW_NAME_BOX_DEFAULT_WIDTHwill be used as the maximum width.
- When disabled and/or the speaker name is too long,
OW_NAME_BOX_NPC_TRAINERlets any approaching NPC trainers shows a namebox in their dialogue automagically.OW_NAME_BOX_DEFAULT_WIDTHandOW_NAME_BOX_DEFAULT_HEIGHTsets the default width and height.OW_NAME_BOX_FOREGROUND_COLORandOW_NAME_BOX_SHADOW_COLORsets the default text colors, the background color is handled by the engine.OW_FLAG_SUPPRESS_NAME_BOXlets you enable/disable the namebox globally, assign a flag frominclude/constants/flags.honto this config to be able to use it.
- Added a Speaker Name table, frequently-used names can be stored into
gSpeakerNamesTableinsrc/data/speaker_names.hand they can accessed by using aSP_NAME_*constant defined ininclude/constants/speaker_names.h. - Added a new scripting macro
setspeaker ([textPointer]/[SP_NAME_*]).- Besides a text pointer, it is possible to use the Speaker Name table to set the textPointer with the
gSpeakerNamesTablearray instead. - Feed it either
NULLorSP_NAME_NONEwill remove the namebox instead. release,releaseall, andclosemessagewill automatically remove the namebox, together with the messagebox.
- Besides a text pointer, it is possible to use the Speaker Name table to set the textPointer with the
- Added a new text control code/inline text
{SPEAKER NAME_*}.- Unlike the
setspeakermacro, you can only use theSP_NAME_*constants for this. It is partly due to the text engine’s limitation itself. - You’ll need to add the constants into
charmap.txtto be able to use them for the same reason as above. - Feed it
SP_NAME_NONEto remove the namebox manually. - Similarly,
release,releaseall, andclosemessagewill automatically remove the namebox, together with the message box.
- Unlike the
Usage
setspeaker
Using a text pointer
First, define your speaker’s string.
Speaker_Jeremy:
.string "Jeremy$"
And then in your script, add the setspeaker with the speaker’s name earlier.
...
setspeaker Speaker_Jeremy
...
If you are using poryscript, you can also include the string right there with the setspeaker aka inline.
...
setspeaker("Jeremy")
...
Using a SP_NAME_* constant
Add the setspeaker with your constant.
setspeaker SP_NAME_JEREMY
For instruction on how to add a new Speaker Name, continue here.
SPEAKER inline
The usage is identical to using setspeaker with SP_NAME_* constant, but instead it’s within your text script and uses the constant you added to charmap.txt.
"{SPEAKER NAME_JEREMY}Yo wassup!"
For instruction on how to add a new Speaker Name, continue here.
Adding a new Speaker Name
- Add a new constant to
include/constants/speaker_names.hjust afterSP_NAME_NONEand beforeSP_NAME_COUNT.
enum SpeakerNames {
SP_NAME_NONE = 0,
SP_NAME_MOM,
SP_NAME_PLAYER,
+ SP_NAME_JEREMY,
SP_NAME_COUNT
};
- Add an entry to
gSpeakerNamesTableinsrc/data/speaker_names.hwith your newly added constant as the array index.
const u8 *const gSpeakerNamesTable[SP_NAME_COUNT] =
{
[SP_NAME_MOM] = COMPOUND_STRING("MOM"),
[SP_NAME_PLAYER] = COMPOUND_STRING("{PLAYER}"),
+ [SP_NAME_JEREMY] = COMPOUND_STRING("JEREMY"),
};
- In order for this constant to be usable for
{SPEAKER}inline, you’ll need to add your constant ontocharmap.txt. Do note that the order here MUST match with the one ininclude/constants/speaker_names.h!
@ Speaker names, the order must be matching with include/constants/speaker_names.h
NAME_NONE = 00
NAME_MOM = 01
NAME_PLAYER = 02
-NAME_COUNT = 03
+NAME_JEREMY = 03
+NAME_COUNT = 04
pokemerald-expansion Vs. Seeker
What is the Vs. Seeker?
The Vs. Seeker is a Key Item that is used to battle Trainers that the player has battled previously.
When used, the Vs. Seeker sends out a signal that allows the player to find other Trainers who want a rematch. This signal affects all Trainers that are on-screen. Once used on Trainers that can be rematched, the device cannot be used again until it is charged. The player does this by walking a specific number of steps. The effect on the Trainers wears off if they are battled, the player leaves the area, or the player walks a specific number of steps. If the player attempts to use the Vs. Seeker when it is not fully charged, the player will be told how many steps remain until it is. After the player uses the Vs. Seeker, some Trainers may have their team changed from their first battle.
How is the Vs. Seeker enabled?
Users
Vs. Seeker functionality is enabled by setting I_VS_SEEKER_CHARGING to TRUE.
Players
ITEM_VS_SEEKER can only be used outside of battle. It can be used from the bag or registered to be used from the field.
Usage of the Vs. Seeker will ALWAYS fail unless all of the conditions are met:
- Player has at least five badges
- There is an NPC on screen that has previously been defeated
- Player is not inside of a building
- The Vs. Seeker is fully recharged
Charge
If the player has ITEM_VS_SEEKER and at least five badges, the Vs. Seeker will be charged by walking steps. The Vs. Seeker is fully charged once the player has walked VSSEEKER_RECHARGE_STEPS, which is 100 by default. The Vs. Seeker’s charge is depleted if the player uses the item.
How does Match Call interact with the Vs. Seeker?
When I_VS_SEEKER_CHARGING is enabled, the Match Call does not function at all. Trainers will never be rematch eligible outside of the use of the Vs. Seeker.
How does the Vs. Seeker choose a Trainer?
When the Vs. Seeker is successfully used, every Trainer on screen is individually queried. There is a 31% chance that the Trainer will want a rematch.
Objects listed in regularTrainersOnLand or regularTrainersInWater are considered Land/Water objects.
| Status | Is Land/Water Object | Emote | New Movement Type |
|---|---|---|---|
| Wants Rematch | Yes | MOVEMENT_ACTION_EMOTE_DOUBLE_EXCL_MARK | MOVEMENT_TYPE_COUNTER_CLOCKWISE |
| Wants Rematch | No | MOVEMENT_ACTION_EMOTE_DOUBLE_EXCL_MARK | MOVEMENT_TYPE_FACE_DOWN |
| Does Not Want Rematch | - | MOVEMENT_ACTION_EMOTE_X | none |
| Has Not Been Fought | - | MOVEMENT_ACTION_EMOTE_EXCLAMATION_MARK | none |
Rematch Table
| Sequence | Trainer ID |
|---|---|
| 1st Battle | TRAINER_ROSE_1 |
| 2nd Battle | TRAINER_ROSE_2 |
| 3rd Battle | TRAINER_ROSE_3 |
| 4th Battle | TRAINER_ROSE_4 |
| 5th Battle | TRAINER_ROSE_5 |
The game determines which version of the Trainer you’ll fight next by following these rules:
- Start with the next Trainer in the sequence after the one that has been defeated. If there are no more, the battle is against the last listed Trainer.
- If that next Trainer hasn’t been unlocked yet, the battle is against the latest available unlocked version.
- If the next Trainer is unlocked but not yet defeated, the battle is against that version.
- If the next Trainer has already been defeated, check the next one in the sequence.
How do users implement rematches with the Vs. Seeker?
Existing pokemerald Trainers
No extra work is required. With the exception of Wally, Gym Leaders and Elite Four, all of the rematchable Trainers in Emerald will work with the Vs. Seeker without any changes.
New Trainers
Party / gRematchTable
Each of the rematches for the Trainer must be defined as seperate Trainers in src/data/trainers.party and include/constants/opponents. For example, TRAINER_CALVIN_1 also has TRAINER_CALVIN_2,TRAINER_CALVIN_3,TRAINER_CALVIN_4, and TRAINER_CALVIN_5.
Once all of those constants and parties are defined, a new row must be added to gRematchTable (located in in src/battle_setup.c). The row header should be a rematch ID, which can be added in include/constants/rematches.h. The row contents must be the five constants created for the new parties, with the lat argument being the constant of the map (include/constants/map_groups.h) where the Trainer is placed.
If a Trainer is intended to have less than five unique rematch parties, the extra slots can be filled with the last available Trainer ID.
// This Trainer only has two teams.
[REMATCH_ROSE] = REMATCH(TRAINER_ROSE_1, TRAINER_ROSE_2, TRAINER_ROSE_2, TRAINER_ROSE_2, TRAINER_ROSE_2, MAP_ROUTE118),
WARNING: Rematch IDs should be placed BEFORE REMATCH_WALLY_VR. Trainers below that are treated as “special Trainers” that are not triggered by the Vs. Seeker.
Scripts
The trainer’s object needs to have a script that begins with a method to signify what this object’s trainer ID is.
trainerbattle
Route103_EventScript_Daisy::
trainerbattle_single TRAINER_DAISY, Route103_Text_DaisyIntro, Route103_Text_DaisyDefeated
msgbox Route103_Text_DaisyPostBattle, MSGBOX_AUTOCLOSE
end
Daisy is using one of the trainerbattle macros, which has the trainer battle macro in the first command of the script. Most trainers in pokeemerald use this pattern.
vsseeker_rematchid
Route102_EventScript_Calvin::
vsseeker_rematchid TRAINER_CALVIN_1
applymovement LOCALID_CALVIN, CalvinMovementTest
waitmovement 0
trainerbattle_single TRAINER_CALVIN_1, Route102_Text_CalvinIntro, Route102_Text_CalvinDefeated, Route102_EventScript_CalvinRegisterMatchCallAfterBattle
specialvar VAR_RESULT, ShouldTryRematchBattle
goto_if_eq VAR_RESULT, TRUE, Route102_EventScript_CalvinRematch
setvar VAR_0x8004, TRAINER_CALVIN_1
specialvar VAR_RESULT, IsTrainerRegistered
goto_if_eq VAR_RESULT, FALSE, Route102_EventScript_CalvinTryRegister
msgbox Route102_Text_CalvinPostBattle, MSGBOX_DEFAULT
release
end
If the trainer has other script commands before the eventual trainerbattle macro, the first command in the script needs to be vsseeker_rematchid. This macro does nothing but takes a single argument, which should be the same as the first Trainer ID for this trainer.
MOVEMENT_TYPE_COUNTER_CLOCKWISE
If you want Trainers to spin once they are eligible for a rematch, their overworld graphics object ID (include/constants/event_objects.h) must be listed in either regularTrainersOnLand or regularTrainersInWater.Otherwise they will adopt the movement type MOVEMENT_TYPE_FACE_DOWN.
What can be customized about the Vs. Seeker?
- Unlock Conditions: The next “level” of rematches is unlocked when a specific flag is set. The flags that are currently used in
GetGameProgressFlagscan be changed to flags that better suit your game. - Recharge Steps:
VSSEEKER_RECHARGE_STEPSis initally set to 100, but this value can be changed to any number under 256. - Badge Requirement:
HasAtLeastFiveBadgesis used to check if the Vs. Seeker will successfully work. You can customize the number of badges by changingREMATCH_BADGE_COUNTor otherwise alterting the function.
How do gym leaders rematch work with Vs. Seeker?
They follow vanilla Emerald rules. You need to have set the flag FLAG_SYS_GAME_CLEAR by defeating Steven in Ever Grande City for the first rematch to be available. And then you need to have beaten every Gym Leader in a rematch once the second rematch is available. Then you need to beat every Gym Leader in a second rematch for the third rematch to be available, etc, etc …
Teachable Learnsets Explanations
Note: This guide was written for version 1.14.0, it doesn’t apply to earlier versions of expansions. This guide also assumes you are using the default P_LEARNSET_HELPER_TEACHABLE config (TRUE)
Generating and editing teachable learnsets
Basics:
When you make, a file will be generated in src/data/pokemon/teachable_learnsets.h containing the learnsets of your Pokemon. The generated learnset of a pokemon is based on 3 things, its potential moveset defined in src/data/pokemon/all_learnables.json, the teaching type of the species defined in the species data files, and the TMs and tutors available in your game. We will explain each of these one by one.
Table of Contents:
- [Potential Teachables]
- [Teaching Types]
- [Default Learnset]
- [TM Illiterate]
- [All Teachables]
- [Available Moves]
- [TMs/Hms]
- [Tutors from scripts]
- [Extra Tutors]
Potential Teachables
The potential moveset of each pokemon is defined in src/data/pokemon/all_learnables.json. If you don’t have the file yet, a version will be generated automatically after you run make.
On its first creation, the file is based on the list of moves a pokemon can learn in official Pokemon games. Those lists are found in tools/learnset_helpers/porymoves_files, if a Pokemon learned a move in any way in the game (from level-up, egg move, tm or tutor), it will be added to its teachable learnset. You can delete some of the files mix-and-match from different games list. This is justa tool to help you quickly generate a vanilla-ish etachable learnset.
After src/data/pokemon/all_learnables.json has been created, this file will NEVER be modified by running make so you don’t have to worry abour your changes being reverted. However you can choose to remake the file by using a different set of game move list by running make clean-teachables and then running make again.
Teaching Types
In addition to their teachable learnset described in src/data/pokemon/all_learnables.json, Pokemon will be able to learn additional moves based on their teaching types defined in their species data (found in species/data/pokemon/species_info/gen_X_families.h for vanilla Pokemon and species/data/pokemon/species_info.h for fakemons). There are currently three teaching types in Expansion: Default Learning, TM Illiterate and All Teahcables
Default Learning
This is the default one, so if a species don’t have a teaching type defined in its species data, it will will default to this. If you want to explicitly make a species this way, then add .teachingType = DEFAULT_LEARNING to the species data.
Default Learning mean in addtion to the moves described in its additional moveset, the Pokemon will be able to learn the universal moves (like Tera Blast or Hidden Power). Universal moves are listed in src/data/pokemon/special_movesets.json (there are multiple lists in the file, make sure to edit the one named “universalMoves”)
TM Illiterate
.teachingType = TM_ILLITERATE
TM Illiterate mean a pokemon will only learn move from its potential moveset and not any universal moves. If the config P_TM_LITERACY is set to GEN_5 or lower. Universal moves will be removed from the pokemon potential learnset.
All Teachables
.teachingType = ALL_TEACHABLES
All Teachables mean a pokemon will be able to learn every teachable move that are present in your game whether tutor or TM similarly to Mew in official games. If you want a TM or a Tutor move to not be accesible to All Teachables pokemon, you can add it to the signature teachables list in src/data/pokemon/special_movesets.json (there are multiple lists in the file, make sure to edit the one named “signatureTeachables”)
So, for example, if you a remove a TM from your game, the move associated with that TM will be removed from the teachable elarnset of your pokemon.
Available Moves
The teachable learnset is based on the potential moveset and the universal moves as described in the sections above but it will only be conposed of moves that are available in your game. Let’s see how the code detects the moves that are available.
TMs/Hms
The script detects the TMs and HMs available in your game based on the list in include/constants/tms_hms.h. If you add a new TM, the pokemon with that move in their potential moveset will receive that move in their teachable learnset. And if you remove a TM, the move will be deleted from your pokemon’s teachable learnsets.
Tutors from scripts
The script look for tutors moves in your script files, wether map scripts /data/maps/*/scripts.inc or other function scripts /data/scripts/*.inc. It looks for the pattern used for move tutors in vanilla emerald setvar VAR_0x8005, MOVE_*. So try to add move tutors this way if you want them to be properl detected.
Extra Tutors
If you somehow add a move that can be learned in new custom ways that don’t fit with the previous patterns, you can add the move to the extra tutors list in src/data/pokemon/special_movesets.json (there are multiple lists in the file, make sure to edit the one named “extraTutors”). This shouldn’t be necessary for most users and if you use this list, remember you will need to add/remove moves from this list and the code that teaches moves.
Generation of struct Pokemon instances
This document describes the ways you generate an instance of struct Pokemon through script or through code.
These Pokemon can be given to your players, be used as enemy trainer Pokemon or as static wild Pokemon.
Through script (givemon and createmon)
createmon
createmon is a script command that allows you to generate a Pokemon with any of the properties you might want. It has a lot of arguments in order to offer this flexibility.
Required Arguments
side, slot, species, level are the required arguments.
-
side determines if the Pokemon will be created as a player Pokemon or an enemy Pokemon:
0will put the Pokemon in the player party1in the enemy party
-
slot determines the slot in the player or enemy party the Pokemon will occupy.
slotgoes from0to5- If
sideis0(player Pokemon), setting the slot to6will instead give the Pokemon to player automatically putting it in the first empty slot or sending it to the PC when the party is the full. - Setting
slotto6when trying to create an enemy Pokemon will result in thecreatemoncommand being ignored.
-
species and level refer to the species id and the level of the Pokemon you want to generate.
Optional Arguments
item,ball,nature,abilityNum,gender,hpEv,atkEv,defEv,speedEv,spAtkEv,spDefEv,hpIv,atkIv,defIv,speedIv,spAtkIv,spDefIv,move1,move2,move3,move4,shinyMode,gmaxFactor,teraType,dmaxLevel.
The purpose of these arguments is largely self-explanatory but we will briefly discuss what they default to when nothing is explicitly specified.
-
item refers to the item the Pokemon is holding. If the argument is missing, the Pokemon won’t be holding anything.
-
ball refers to the type of ball the Pokemon comes out of. The expected type is
enum Pokeballdefaults to aBALL_POKE. If the Pokemon being generated is a Wild Pokemon this will be overwritten if the Pokemon is captured. -
nature and gender will default to random values.
-
abilityNum will default to the value corresponding to the personality rolled (This is essentially random but it will be have correlations to the other parameters of the Pokemon).
-
EVs
hpEv, atkEv, defEv, speedEv, spAtkEv, spDefEvwill default to0. -
IVs
hpIv, atkIv, defIv, speedIv, spAtkIv, spDefIvwill default toUSE_RANDOM_IVSwhich tell the game to roll a random IV value (between0and31). If the generated species has aperfectIVCount, only the random values will be eligible to be perfected. -
moves
move1, move2, move3, move4will default toMOVE_DEFAULTwhich tells the game to fill the slot with the last level up move available. -
shinyMode will default to
SHINY_MODE_RANDOMdoing random roll(s) to check if the Pokemon is shiny.SHINY_MODE_ALWAYSforces the Pokemon to be shinySHINY_MODE_NEVERforces the Pokemon to not be shiny
-
gmaxFactor defaults to
FALSE. -
teraType will default to the value corresponding to the personality they will roll (in practice, it’s random but it will have correlations with other if the Pokemon parameters).
-
dmaxLevel will default to
0.
givemon
givemon uses the same arguments as createmon minus side and slot.
This is because givemon is almost equivalent to createmon 0 6 ... and just gives the Pokemon to the player after generating it.
The exception being that givemon interacts with the abilities Synchronize and Cute Charm somewhat differently than createmon when nature or gender are not explicitly set.
setwildbattle
Arguments
species:req,level:req,item=ITEM_NONE,species2=SPECIES_NONE,level2=0,item2=ITEM_NONE
setwildbattle is a much simpler way to generate a Wild Pokemon ready for the player to fight.
It only takes 3 arguments (or 6 if you want to make it a double wild battle)
speciesandlevelrefer to thespeciesand thelevelof the Pokemon you want to generate.itemrefers to the item the Pokemon is holding. If no argument is provided the Pokemon will not be holding an item.species2,level2, anditem2determine thespecies,levelandheld itemrespectively of the second Pokemon generated in case you want to make a double wild battle- The other properties like IVs and personality will be set randomly the same way as they are set in regular wild battles.
Pokemon generated with setwildbattle will always be considered static encounters (STATIC_WILDMON_ORIGIN) and will thus be eligible to be affected by Synchronize and Cute Charm
Synchronize and Cute Charm
nature and gender also accept NATURE_MAY_SYNCHRONIZE and MON_GENDER_MAY_CUTE_CHARM respectively as arguments.
NATURE_RANDOM and MON_GENDER_RANDOM always return a random nature/gender and never check for Synchronize or Cute Charm. If you want the generated Pokemon to have a chance to receive the effects of Synchronize or Cute Charm, you need to use NATURE_MAY_SYNCHRONIZE and MON_GENDER_MAY_CUTE_CHARM respectively for nature and gender.
When you use NATURE_MAY_SYNCHRONIZE or MON_GENDER_MAY_CUTE_CHARM, you are telling the game can check if the player has a Pokemon with Synchronize or Cute Charm in the first slot of its party and roll a die to see if the nature or gender should be fixed based on the ability or rolled normally.
The Pokemon generated also need to be of the right “origin” to be eligible for Synchronize or Cute Charm. We don’t want to “synchronize” a Pokemon belonging to a trainer or change the gender of a gift Pokemon with Cute Charm. So if a Pokemon is generated for the player side, it will be considered a “gift Pokemon” (GIFTMON_ORIGIN) and if a Pokemon is generated on the enemy side, it will be considered a static wild encounter (STATIC_WILDMON_ORIGIN).
givemon will default to use NATURE_MAY_SYNCHRONIZE and MON_GENDER_MAY_CUTE_CHARM because we assume you will use givemon to create “gift Pokemon” but if you don’t want it to apply in a specific script, you can explicitly use NATURE_RANDOM and MON_GENDER_RANDOM instead
createmon on the other hand default to NATURE_RANDOM and MON_GENDER_RANDOM so you need to explicitly use NATURE_MAY_SYNCHRONIZE or MON_GENDER_MAY_CUTE_CHARM for the generated Pokemon to be considered a gift Pokemon or a static wild encounter
Static encounters and Gift Pokemon eligibility to Synchronize vary through generations in the official games so you can use the config OW_SYNCHRONIZE_NATURE to match your preference or you can check the src/ow_abilities.c to modify the Synchronize and Cute Charm eligibility of different origins however you like
Through Code
There are several instances of Pokemon generation throughout the game:
- When you start a wild encounter,
- When a trainer generates its party from the data in
trainers.party, - Or when you call one of the scripts described in the previous section.
In this section we will go through some of the most common functions.
NOTE: None of the functions described here allocate memory for the Pokemon struct, they all expect a pointer they will fill the data with.
It means they are usually called with &gParties[B_TRAINER_PLAYER][index] or &gParties[B_TRAINER_OPPONENT_A][index] because these are places in memory reserved for Pokemon struct.
The Basics
To generate a Pokemon ready for battle, you usually need to go through the following steps:
- Generate a personality value
- Fill the generic mon structure based on
species,levelandpersonality. - Set IVs and EVs.
- (Re-)Compute stats (this step does not happen if you are generating a
struct BoxPokemoninstead ofstruct Pokemon). - set the moves.
GetMonPersonality
GetMonPersonality is the easiest way to make a personality value. It takes 4 arguments species, gender, nature and unownLetter then it rolls random personality values until it finds one that match all the selected criteria.
For example, if you want a personality for Wally’s male Ralts, you would write:
personality = GetMonPersonality(SPECIES_RALTS, MON_MALE, NATURE_RANDOM, RANDOM_UNOWN_LETTER);
And if you want a personality for a brave J Unown, you would write:
personality = GetMonPersonality(SPECIES_UNOWN, MON_GENDER_RANDOM, NATURE_BRAVE, 9);
// J is the 10th letter of alphabet but for Unown A starts at 0 so B is 1 and J is 9
As you can see, you can use either a specific value or a special value MON_GENDER_RANDOM, NATURE_RANDOM or RANDOM_UNOWN_LETTER to tell the function to return any Pokemon matching the other properties. This means, writing:
personality = GetMonPersonality(SPECIES_X, MON_GENDER_RANDOM, NATURE_RANDOM, RANDOM_UNOWN_LETTER);
is equivalent to personality = Random32(); which is why Random32() is used throughout the codebase to generate fully random personality values.
CreateMon and CreateBoxMon
CreateMon is the most basic function to create a generic Pokemon struct. It takes 5 arguments:
-
monis a pointer to the Pokemon struct you want to set the data for -
speciesandlevelare self-explanatory. -
personalityis the personality value you want to use to create your Pokemon, it will determine a lot of your Pokemon properties and will usually be a number that you generated by following the instructions from the previous section. -
trainerIDis a special type of struct that explain how the function should set up theotIdof the Pokemon. Usually you will want to use one of these 3 macros for the argument:-
OTID_STRUCT_PLAYER_IDwhich means the Pokemon will use the playerotId(used by Wild Pokemon so they the get the player id when captured) -
OTID_STRUCT_PRESET(value)which set a specificotIdthat you pick/write yourself -
OTID_STRUCT_RANDOM_NO_SHINYwhich picks a randomotIdand forces the Pokemon to not be shiny even if the randomotIdand chosenpersonalitywould have made the Pokemon shiny. It is used by NPC trainers.
-
-
Both
CreateMonandCreateBoxMonerase the Pokemon data in the pointer before they add the new data so every value they don’t set will be zero-ed in some way. This is why they are considered “base” functions.
The values set by CreateMon and CreateBoxMon are the gender, ability num, tera type and nature (based on personality); the met info (location, level and game), the OT name , gender and language (always set to the player even for enemy trainer Pokemon), the starting xp (based on the xp required to reach the level the Pokemon is at), the starting friendship (based on the species info) and the shinyness.
CreateMon and CreateBoxMon are very similar. In fact, the CreateMon function calls CreateBoxMon to generate the BoxPokemon part of its structure but it also sets the level and a mail object (to an empty value)
Setting IVs and EVs
IVs
Usually, you will want to use SetBoxMonIVs(mon->box, ivs) to set the IVs of the Pokemon being generated. The reason is that not only can you quickly set all ivs of your Pokemon to a single value.
For instance SetBoxMonIVs(mon->box, 15) will set all IVs to 15.
You can also use the special argument USE_RANDOM_IVS. When used with USE_RANDOM_IVS, SetBoxMonIvs will not only pick a random value between 0 and 31 for each stat, it will also allocate some perfect iv if the species of the Pokemon has a perfectIvCount set in the species data.
For example if you are generating a legendary with a perfectIvCount of 3, using SetBoxMonIVs(mon->box, USE_RANDOM_IVS) will guarantee that at least 3 IVs are set to 31. This is done using the function SetBoxMonPerfectIVs, which can also be used elsewhere to assign a number of random perfect IVs.
The other way to assign IV is to use SetMonData, for example:
SetMonData(mon, MON_DATA_HP_IV, 15)
with the stats being in the order MON_DATA_HP_IV, MON_DATA_ATK_IV, MON_DATA_DEF_IV, MON_DATA_SPEED_IV, MON_DATA_SPATK_IV and MON_DATA_SPDEF_IV
You can also use a loop like this:
for (i = 0; i < NUM_STATS; i++)
SetMonData(mon, MON_DATA_HP_IV + i, iv_array[i])
if you happen to have an array containing the values you want. However, you must be careful about the order of the stats if you use this method.
EVs
EVs default to 0 when a Pokemon is generated with CreateMon or CreateBoxMon. You will not need to anything if you want to keep it that way.
If you want to change them, there are currently no utilities to set EVs. Thus you will need to use the SetMonData method:
SetMonData(mon, MON_DATA_HP_EV, 252)
The stats have the same names as the IVs with I change into an E : MON_DATA_HP_EV, MON_DATA_ATK_EV, MON_DATA_DEF_EV, MON_DATA_SPEED_EV, MON_DATA_SPATK_EV and MON_DATA_SPDEF_EV so the loop method works here as well.
for (i = 0; i < NUM_STATS; i++)
SetMonData(mon, MON_DATA_HP_EV + i, ev_array[i])
Just be careful when setting IVs and EVs with SetMonData because there is no check to make sure the IV and EV values you are setting are valid and this may cause some issues.
CalculateMonStats
After all the IVs and EVs have been set for your Pokemon, it’s important to run CalculateMonStats(mon). The function only has one argument so it’s pretty simple but don’t forget this step or you may have some issues.
Setting moves
To set a move in slot slot, you would need to write:
enum Move move = MOVE_X;
u32 pp = GetMovePP(move);
SetMonData(mon, MON_DATA_MOVE1 + slot, &move);
SetMonData(mon, MON_DATA_PP1 + slot, &spp);
where slot can be between 0 and 3 to represent the 1st to 4th move
You can also call the function GiveMonInitialMoveset(mon) that will give your Pokemon its last 4 level-up moves available similarly to the wild Pokemon you might encounter.
Going from 1.14 to 1.15
When going from 1.14 to 1.15, Expansion deleted multiple functions related to Pokemon generation that were not used in Expansion anymore. The following functions were deleted
void CreateMonWithNature(struct Pokemon *mon, u16 species, u8 level, u8 fixedIV, u8 nature);
void CreateMonWithGenderNatureLetter(struct Pokemon *mon, u16 species, u8 level, u8 fixedIV, u8 gender, u8 nature, u8 unownLetter);
void CreateMonWithIVsOTID(struct Pokemon *mon, u16 species, u8 level, u8 *ivs, u32 otId);
void CreateMonWithEVSpread(struct Pokemon *mon, u16 species, u8 level, u8 fixedIV, u8 evSpread);
void CreateMonWithEVSpreadNatureOTID(struct Pokemon *mon, u16 species, u8 level, u8 nature, u8 fixedIV, u8 evSpread, u32 otId);
If you add custom code relying on those functions, I would advise to simple recode them using the methods described in the previous section. If you follow the steps, you should be able to rewrite a function with the same effect easily.
However the move to 1.15 also completely rewrote these two functions:
void CreateMon(struct Pokemon *mon, u16 species, u8 level, u8 fixedIV, u8 hasFixedPersonality, u32 fixedPersonality, u8 otIdType, u32 fixedOtId);
void CreateBoxMon(struct BoxPokemon *boxMon, u16 species, u8 level, u8 fixedIV, u8 hasFixedPersonality, u32 fixedPersonality, u8 otIdType, u32 fixedOtId);
CreateMon and CreateBoxMon now have different arguments and do less things than their 1.14 counterparts. If you have code that used those functions, we recommend you use these legacy version of CreateMon and CreateBoxMon:
void CreateMonLegacy(struct Pokemon *mon, u16 species, u8 level, u8 fixedIV, u8 hasFixedPersonality, u32 fixedPersonality, u8 otIdType, u32 fixedOtId)
{
u32 personality = hasFixedPersonality ? fixedPersonality : Random32();
struct OriginalTrainerId otId = {otIdType, fixedOtId};
CreateMonWithIVs(mon, species, level, personality, otId, fixedIV);
GiveMonInitialMoveset(mon);
}
void CreateBoxMonLegacy(struct BoxPokemon *boxMon, u16 species, u8 level, u8 fixedIV, u8 hasFixedPersonality, u32 fixedPersonality, u8 otIdType, u32 fixedOtId)
{
u32 personality = hasFixedPersonality ? fixedPersonality : Random32();
struct OriginalTrainerId otId = {otIdType, fixedOtId};
CreateBoxMon(boxMon, species, level, personality, otId);
SetBoxMonIVs(boxMon, fixedIV);
GiveBoxMonInitialMoveset(boxMon);
}
These two legacy functions use the 1.15 functions to recreate the 1.14 versions of CreateMon and CreateBoxMon with the same arguments and the same effects. Add these two legacy functions to your code then change your custom code that was relying on 1.14 CreateMon or CreateBoxMon to use CreateMonLegacy or CreateBoxMonLegacy instead and everything should work the same as before
How to use FireRed/LeafGreen
How to compile
make firered -j<output of nproc>
or
make leafgreen -j<output of nproc>
Note: If you switch between building emerald and FRLG, make clean is required at the moment.
Porymap adjustments
For Porymap to work with FRLG maps you need to adjust a few settings (Options > Project Settings):
- in the
Generaltab change the base game version topokefirered
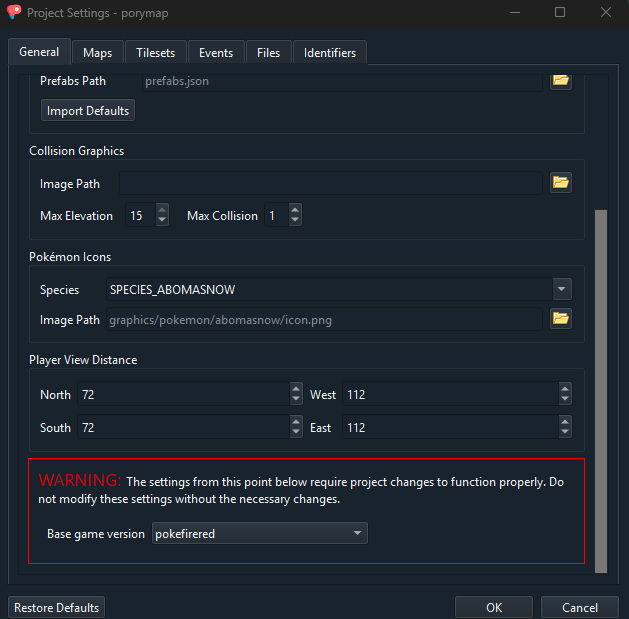
- in the
Identifierstab change the following attributes:- define_tiles_primary:
NUM_TILES_IN_PRIMARY_FRLG - define_metatiles_primary:
NUM_METATILES_IN_PRIMARY_FRLG - define_pals_primary:
NUM_PALS_IN_PRIMARY_FRLG - define_mask_behavior:
METATILE_ATTR_BEHAVIOR_MASK_FRLG - define_mask_layer:
METATILE_ATTR_LAYER_MASK_FRLG
- define_tiles_primary:
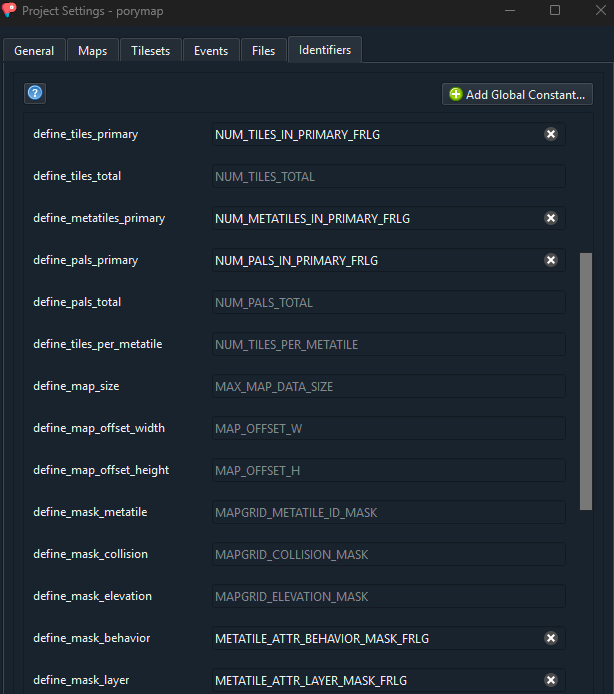
How to add maps
For maps to be included in the build process they need to have a custom attribute region with the value REGION_KANTO or REGION_HOENN for their respective games.
If you create a new map, the region will not be there, and must be added manually in the map.json or through Porymap.
Examples:
map.json:
{
"id": "MAP_PALLET_TOWN",
"name": "PalletTown_Frlg",
"layout": "LAYOUT_PALLET_TOWN",
"music": "MUS_RG_PALLET",
"region": "REGION_KANTO",
...
Porymap:
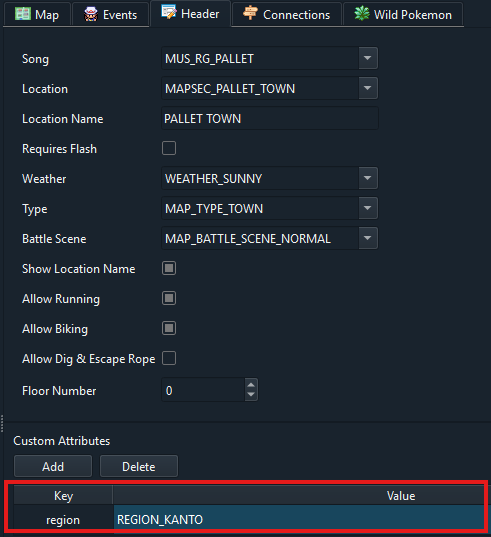
If a map does not have the region attribute, the compiler will default to what game you compile, and the map you created gets included in that game.
Additionally, maps must have a layout_version that you manually include in layouts.json.
{
"id": "LAYOUT_ONE_ISLAND_KINDLE_ROAD_EMBER_SPA",
"name": "OneIsland_KindleRoad_EmberSpa_Layout",
"width": 27,
"height": 39,
"primary_tileset": "gTileset_General_Frlg",
"secondary_tileset": "gTileset_MtEmber",
"border_filepath": "data/layouts/OneIsland_KindleRoad_EmberSpa_Frlg/border.bin",
"blockdata_filepath": "data/layouts/OneIsland_KindleRoad_EmberSpa_Frlg/map.bin",
"border_height": 2,
"border_width": 2,
"layout_version": "frlg"
},
Similarly to the region attribute, if a map in layouts.json does not have a layout_version, it will default to the game being compiled.
Lastly, you cannot properly access map inside a vanilla map group from a different game. If you create a new map in a Fire Red map group (such as gMapGroup_TownsAndRoutes_Frlg), you cannot warp or connect to it from an Emerald map in game, and vice versa. It is recommended to either put them in existing, fitting map groups, or create a new map group.
Migrating FRLG tilesets
To migrate tilesets that have been previously created for pokefirered you can use this script.
Instructions are in the script.
Disclaimer: The changes below aren’t the permanent solution for the problems, A better build system is being worked on so these solutions might cause merge conflicts down the line
Build FRLG by default
If you want that running make -j<output of nproc> to directly compile one of firered or leafgreen instead of emerald make the following changes to the makefile
(Here I have set the default version to be leafgreen and you can still compile emerald or firered using make emerald or make firered)
-GAME_VERSION ?= EMERALD
-TITLE ?= POKEMON EMER
-GAME_CODE ?= BPEE
-BUILD_NAME ?= emerald
-MAP_VERSION ?= emerald
+GAME_VERSION ?= LEAFGREEN
+TITLE ?= POKEMON LEAF
+GAME_CODE ?= BPGE
+BUILD_NAME ?= leafgreen
+MAP_VERSION ?= firered
ifeq (firered,$(MAKECMDGOALS))
GAME_VERSION := FIRERED
TITLE := POKEMON FIRE
GAME_CODE := BPRE
BUILD_NAME := firered
MAP_VERSION := firered
else
-ifeq (leafgreen,$(MAKECMDGOALS))
- GAME_VERSION := LEAFGREEN
- TITLE := POKEMON LEAF
- GAME_CODE := BPGE
- BUILD_NAME := leafgreen
- MAP_VERSION := firered
+ifeq (emerald,$(MAKECMDGOALS))
+ GAME_VERSION := EMERALD
+ TITLE := POKEMON EMER
+ GAME_CODE := BPEE
+ BUILD_NAME := emerald
+ MAP_VERSION := emerald
endif
endif
Make empty region attibutes defaults to REGION_KANTO
Another issue is that you need to add REGION_KANTO attribute to every new map you create
Make the following changes to your tools/mapjson/mapjson.cpp so the new maps you add without the REGION_KANTO also work fine
string region = json_to_string(map_data, "region", true);
if (region.empty()) {
- region = "REGION_HOENN";
+ region = "REGION_KANTO";
}
string map_name = json_to_string(map_data, "name");
if ((version == "emerald" && region != "REGION_HOENN")
|| (version == "firered" && region != "REGION_KANTO")) {
invalid_maps.push_back(map_name);
}
Then run this script to set REGION_KANTO as the region attribute for all the Hoenn Maps
Make sure you run this from the root folder of your project!
python3 migration_scripts/add_region_hoenn_attribute_to_hoenn_maps.py
Make sure to run make clean after running this script
Fix CI if you are building FRLG by default
If you make these I would also reccomend fixing your CI too to match these changes
Make the following changes to your .github/workflows/build.yml
# build-essential and git are already installed
- - name: ROM (Emerald)
+ - name: ROM (Leafgreen)
env:
COMPARE: 0
- GAME_VERSION: EMERALD
+ GAME_VERSION: LEAFGREEN
run: make -j${nproc} -O all
- name: Release
env:
- GAME_VERSION: EMERALD
+ GAME_VERSION: LEAFGREEN
run: |
make tidy
make -j${nproc} release
# make tidy to purge previous build
- name: Test
env:
- GAME_VERSION: EMERALD
+ GAME_VERSION: LEAFGREEN
TEST: 1
run: |
make -j${nproc} check
- name: ROM (Firered)
env:
COMPARE: 0
run: |
make clean
make firered -j${nproc} -O
- - name: ROM (Leafgreen)
+ - name: ROM (Emerald)
env:
COMPARE: 0
run: |
- make leafgreen -j${nproc} -O
+ make emerald -j${nproc} -O
Deleting all FRLG maps
A command was added to delete all FRLG maps at once. This doesn’t save space in the ROM because the maps are not compiled in the ROM if you are compiling in “emerald mode”. This solely exists for users that want to clean up their repo. The command is
python dev_scripts/delete_frlg_maps.py
It will take care of all the map constants in the c files but you will need to fix mention the to fuschia city entrance in the safari_zone.inc script.
Disclaimer: The following is a work-in-progess and the processes described here are not fully tested and will likely break your game! Use at your own risk.
Deleting vanilla maps
Separately, if you want to delete a singular map, you will need to remove 4 things:
- the map folder in
data/maps/ - the map folder in
data/layouts - the include of the mapscript in
data/event_scripts.s - the name of the map in
data/maps/map_groups.json
After deleting the layout folder, you will need to run
touch data/layouts/layouts.json
in order for some things to update properly during compilation
Because vanilla maps are referenced all over the C code, deleting references to them can prevent the project to compile. To avoid this, mapjson will check if vanilla maps are missing and create dummy values for them.
NOTE:
mapjsonwill not function correctly unless all four of the aforementioned are edited.mapjsonwill also modifyheal_locations.jsonif one of the deleted map contained a heal_location.- when creating connections between maps,
mapjsonwill check if the connected map exist and will not add a connection for a missing map.
Known issues
- Some maps may still be referenced in ways that cause compilation issues. Usually, it will be scripts that directly reference the old map names.
- If you try to enter a map that used to be connected to a deleted map, the game will freeze.
Map Preview Screen: How To
written by Bivurnum

Click Here for a Guide to Creating a New Map Preview
Using the Map Previews
I’ll be using an example of adding a map preview to Petalburg Woods for this section.
You will need to define a new map preview screen in include/map_preview_screen.h. Just add your new entry in the list in MapPreviewScreenId, leaving MPS_COUNT at the very end. Like so:
enum MapPreviewScreenId
{
MPS_VIRIDIAN_FOREST = 0u,
MPS_MT_MOON,
MPS_DIGLETTS_CAVE,
MPS_ROCK_TUNNEL,
MPS_POKEMON_TOWER,
MPS_SAFARI_ZONE,
MPS_SEAFOAM_ISLANDS,
MPS_POKEMON_MANSION,
MPS_ROCKET_HIDEOUT,
MPS_SILPH_CO,
MPS_VICTORY_ROAD,
MPS_CERULEAN_CAVE,
MPS_POWER_PLANT,
MPS_MT_EMBER,
MPS_ROCKET_WAREHOUSE,
MPS_MONEAN_CHAMBER,
MPS_DOTTED_HOLE,
MPS_BERRY_FOREST,
MPS_ICEFALL_CAVE,
MPS_LOST_CAVE,
MPS_ALTERING_CAVE,
MPS_PATTERN_BUSH,
MPS_LIPTOO_CHAMBER,
MPS_WEEPTH_CHAMBER,
MPS_TDILFORD_CHAMBER,
MPS_SCUFIB_CHAMBER,
MPS_RIXY_CHAMBER,
MPS_VIAPOIS_CHAMBER,
+ MPS_PETALBURG_WOODS,
MPS_COUNT
};
Then, you will go to src/map_preview_screen.c and add a new section in the sMapPreviewScreenData list for the map preview you just defined.
static const struct MapPreviewScreen sMapPreviewScreenData[MPS_COUNT] = {
[MPS_VIRIDIAN_FOREST] = {
.mapsec = MAPSEC_VIRIDIAN_FOREST,
.type = MPS_TYPE_FADE_IN,
.flagId = FLAG_WORLD_MAP_VIRIDIAN_FOREST,
.tilesptr = sViridianForestMapPreviewTiles,
.tilemapptr = sViridianForestMapPreviewTilemap,
.palptr = sViridianForestMapPreviewPalette
},
+ [MPS_PETALBURG_WOODS] = {
+ .mapsec = MAPSEC_PETALBURG_WOODS,
+ .type = MPS_TYPE_FADE_IN,
+ .flagId = FLAG_VISITED_PETALBURG_WOODS,
+ .tilesptr = sViridianForestMapPreviewTiles,
+ .tilemapptr = sViridianForestMapPreviewTilemap,
+ .palptr = sViridianForestMapPreviewPalette
+ },
[MPS_MT_MOON] = {
.mapsec = MAPSEC_MT_MOON,
...
mapsecis just the name of the map section your map is in. This map preview will apply to all maps within this map section (but not when traveling between maps within the same map section, similarly to the map name popups). If it doesn’t have one already, the mapsec will need an entry in src/data/region_map/region_map_sections.json for the map name to show up in the map preview.typewill be eitherMPS_TYPE_BASIC,MPS_TYPE_FADE_INorMPS_TYPE_CAVE.MPS_TYPE_BASICwill show the map preview, then fade to black before loading into the new map.MPS_TYPE_FADE_INwill fade the map preview into the new map (see the gif at the top of this page for example).MPS_TYPE_CAVEwill perform the warp animation for entering a cave at the end of the map preview, before the map is loaded in.
MPS_TYPE_BASIC example

MPS_TYPE_FADE_IN example

MPS_TYPE_CAVE example

flagIdis just the name of the flag you want to set when visiting this map for the first time. The flag state determines how long the map preview will last on screen; it gets a shorter duration if the player has been to that map before. A lot of Emerald maps already have associated flags, but Petalburg Woods does not have one by default, so I repurposed one of the unused flags for use in this example. If you don’t want to use a flag, you can enterMPS_FLAG_NULLhere and the duration will have its own custom value (this can be adjusted in the configs in include/map_preview_screen.h).tilesptr,tilemapptr, andpalptrare the image, tiles, and palette that you want to use for this preview. I’m just using the existing image from Viridian Forest here.- If the image will load more than 3 16-color palettes, you should add
.usesAllPalettes = TRUEto the entry. Otherwise the palettes won’t be loaded properly. (None of the vanilla FRLG images need this.)
That’s all there is to it!
Scripting
mappreviewfades the screen to black, runs a map preview for the current map for the specified number of frames, then fades back from black before continuing the script. This uses the behavior ofMPS_TYPE_BASIC, regardless of the designated type of the map.
Configs
In the include/config/map_preview_screen.h file, there are a few configs you can customize for the map previews.
MPS_ENABLE_MAP_PREVIEWSenables map previews for FRLG by default. To enable them for Emerald, change this value toTRUE. To disable map previews entirely, change this value toFALSE.MPS_DURATION_LONGdetermines how many frames the map preview lasts on screen the first time the player enters that map.MPS_DURATION_SHORTdetermines how many frames the map preview lasts on screen after the map’s flag has been set.MPS_DURATION_NO_FLAGdetermines how many frames the map preview lasts if the flag has been set toMPS_FLAG_NULL.MPS_BASIC_FADE_SPEEDdetermines how quickly the fade to black animation plays at the end ofMPS_TYPE_BASIC. A larger value makes it fade out slower. A smaller value (even a negative number) makes it fade out faster.
Notes
- If
FLAG_HIDE_MAP_NAME_POPUPis set, it will prevent map previews from showing. - Due to it needing the only blend register,
MPS_TYPE_FADE_INcauses NPC shadows (OW_OBJECT_VANILLA_SHADOWS == FALSE) to lose their transparency while the map preview is running. MPS_TYPE_FADE_INdoes not work properly if the map has any of the following weather types. (You can useMPS_TYPE_BASICfor the map preview instead.)WEATHER_SUNNY_CLOUDSWEATHER_FOG_HORIZONTALWEATHER_FOG_DIAGONALWEATHER_UNDERWATERWEATHER_UNDERWATER_BUBBLES
Creating a New Map Preview Image
This guide will show you how to take a custom image and turn it into a map preview image. I’ll be as comprehensive as I can with the relevant mechanics. I also provide example images from both Aseprite and Graphics Gale for the convenience of more users.
Contents
The Image
I’m not much of an artist myself, so I will leave the design of the image to you. For this demonstration, I have picked out a lovely preview image from the HGSS games:

The GBA display is exactly 240x160 pixels, so if your base image is larger than that you will have to crop it to fit. My image is a little too wide, so I’ll have to trim it down. I also want to incorporate the cinematic black bars, like they used in the FRLG games, so I’ll have to trim quite a bit off of the top and bottom as well.
I have created a template image that is an exact copy of the FRLG map preview, including the black bars and text box. You can find the image in the docs/tutorials/img/map_preview_screen/templates folder. Feel free to use it for your own previews:

Now I have my map preview exactly how I want it to look in game:

You’re probably wondering why there is a big yellow bar along the right side of the image. Those extra tiles are needed because the game will load some tiles off screen. Without the yellow bar taking up that space, some of our map preview tiles would load there instead, screwing up the image. So while the GBA display is only 240x160, all map preview images must be 256x160 pixels in size. Don’t worry. Those extra tiles won’t show up in the game. (So you can make them whatever color you want. They don’t have to be yellow.)
Finally, you need to make sure that the image is properly indexed.
How to index an image in Aseprite:
You just need to click
Sprite, thenColor Mode, then make sure theIndexedoption is checked.
Make sure to save the image when you are done.

How to index an image in Graphics Gale:
You need to click
All Frames, thenColor Depth....
Because map preview images use more than one 16-color palette, you should select the
8bppoption. Then clickOK.
Make sure to save the image when you are done.


The Tilemap
Now that we have our image, we need to covert it into a tile sheet and generate a tilemap using Tilemap Studio.
In Tilemap Studio, we want to use the Image to Tiles feature.
Click on Tools, then Image to Tiles.... Alternatively, you could also click on the little orange portrait icon on the far right, shown in the image below.

This window will pop up:

For the Input and Output options, click where it says No file selected and select the proper files.
- The
Inputshould be the png image you just created. - The
Outputshould be the location you want the tile sheet and tilemap files to be generated. I recommend making a new folder for your map inside of the graphics/map_preview folder and setting theOutputthere. The name of the new files can be whatever you want, but if you want to match what is used for the vanilla map previews, I recommend setting the name to “tiles”.
If you want, you can check the box that says Avoid extra blank tiles at the end. That will make the tile sheet only contain tiles that are used in the image, saving a tiny bit of space. However, it is not strictly necessary and I will not be using it in this example. Just keep in mind that it might alter the dimensions of the tiles image to be different than my example, but it will still work properly. Leaving it unchecked might just include a handful of blank tiles at the bottom of the image. No big deal.
The Tilemap Format should be set to GBA tiles + 4bpp palettes.
Check the box for Blank tiles use ID and set its value to 000.
The Palette Format should be set to Indexed in tileset image.
Check the box for Color 0 and choose what color you want to use for transparency in all of the palettes. The transparent color won’t be used in the visible part of the image, so it doesn’t really matter. I like to use the color of the tiles that will be off screen in order to minimize the number of unique colors required in the palettes. (The yellow color is FFFF00)
My Image to Tiles window looks like this now:

Now click OK. You should get a little alert telling you it was a success. If you get an error about too many palettes, you may have to edit your initial image to remove some unique colors or redraw parts of the image so the multiple palettes have to share less colors between them in order to transition smoothly from one palette to another.
Now it will display your new tile sheet and tilemap:

The Palettes
You may have noticed that the colors of some of the tiles are not correct. This is FINE. The current version of Tilemap Studio (4.0.1) sets all of the pixels in the tiles.png file to use the first palette for whatever reason. However, as long as you retain the order of the colors in each palette in the png, the game will assign them the correct palette and the map preview will show up with the proper colors in-game.
If you use MPS_TYPE_FADE_IN as the map preview behavior, only three palettes can be loaded into the game for the tiles.png image to utilize. Otherwise, the map preview can take advantage of all 16 palette slots.
This is where the instructions diverge based on how many palettes your new tiles image has.
- If your map preview has 2 or fewer palettes, follow the instructions in the Two Palette Image section.
- If your map preview has more than 2 palettes, skip to the Fifteen Palette Image section and follow the instructions there instead.
Two Palette Image
This is the only method that supports MPS_TYPE_FADE_IN. If you have more than 2 palettes, you may need to reduce the number of colors used in your initial image and try the whole process again.
The map preview palettes will be loaded into palette slots that don’t interfere with the overworld palettes. Specifically, they will be loaded into slots D, E, and F. So, we need to change the palettes in the tilemap to match. If you open the new tiles.png file in your image editor, you can see how many palettes the map preview ended up with:
Aseprite:

Graphics Gale:

My image ended up with exactly two palettes, which is an ideal situation. I’m going to move the palettes around so none of them get loaded into palette slot E. Palette slot E is reserved specifically for the colors used for the text that displays the map name.
For now, we just want to leave the second palette empty, like so:
Aseprite:

Graphics Gale:

Remember that you can move whole 16-color palettes to different positions in the png, but you should not rearrange the order of the colors within any individual 16-color palette. The Image to Tiles function sets the colors to very specific positions and you don’t want to mess around with that unless you really know what you are doing. As long as you follow what I do in my screenshots, you should be fine.
~ ~ ~
Now go back to Tilemap Studio and click on the Palettes tab.
Here you can see what tiles will use which palettes:

We need to change the palette numbers in the tilemap to match the palette slots they will be loaded into. The tiles marked 0 should be changed to D. The ones marked 1 should be changed to F. Shift clicking acts as a fill tool.
Here is what my tilemap looks like after the change:

If your tiles.png file only has one palette, just change the whole tilemap to the D palette.
If your tiles.png file ended up with more than two palettes, you may have to edit your initial image to remove some unique colors or redraw parts of the image so that multiple palettes have to share fewer colors between them in order to transition smoothly from one palette to another. If you are skilled enough (or masochistic enough) you can try to rearrange some colors so they can be included in the E palette. I’ll go over the E palette in more detail in the Map Name Text section later.
If your tiles.png file ended up with A LOT more than two palettes, you should use the instructions here to go to the Fifteen Palette Image section instead.
Make sure to save your changes.
The following Fifteen Palette Image section should be skipped if your map preview uses two or less palettes. CLICK HERE to go to the next relevant section.
Fifteen Palette Image
If you open the new tiles.png file in your image editor, you can see how many palettes the map preview ended up with:
Aseprite:
Graphics Gale:
If your image has 14 palettes or less, you can CLICK HERE to move to the next section. My image ended up with two palettes, which is a small enough number that I wouldn’t have to do anything else in this section.
If your image has 15 or 16 palettes, continue with this section.
~ ~ ~
I’m going to show you a different example that ended up with 15 palettes:
Aseprite:

Graphics Gale:

I’m going to move the palettes around so none of them get loaded into palette slot E. Palette slot E is reserved specifically for the colors used for the text that displays the map name. For now, we just want to leave the 15th palette empty, like so:
Aseprite:

Graphics Gale:

Remember that you can move whole 16-color palettes to different positions in the png, but you should not rearrange the order of the colors within any individual 16-color palette. The Image to Tiles function sets the colors to very specific positions and you don’t want to mess around with that unless you really know what you are doing. It’s a pain in the butt!
As long as you follow what I do in my screenshots, you should be fine.
If your tiles.png file ended up with 16 palettes, you may have to edit your initial image to remove some unique colors or redraw parts of the image so that multiple palettes have to share fewer colors between them in order to transition smoothly from one palette to another. If you are skilled enough (or masochistic enough) you can try to rearrange some colors so they can be included in the E palette. I’ll go over the E palette in more detail in the Map Name Text section next.
Make sure to save your changes.
~ ~ ~
Now go back to Tilemap Studio and click on the Palettes tab. Here you can see what tiles will use which palettes:

We need to change the palette numbers in the tilemap to match where we moved them to in the png. Since we moved a palette from the 15th position to the 16th position, the tiles marked E should be changed to F. Shift clicking acts as a fill tool. CTRL clicking a tile will replace every tile of that palette with the selected palette.
Here is what my tilemap looks like after the change:

Make sure to save your changes.
Map Name Text
The current map’s name will be printed in a text box in the upper left corner of the screen. The FRLG template I used earlier shows the exact area of the image that the text box will take up (104x24 pixels, directly in the corner).
If the map’s name is longer than the standard text box size, the text box’s width will automatically be extended by an extra 72 pixels. I have another FRLG template image that conforms to this larger size. You can find it in the docs/tutorials/img/map_preview_screen/templates folder.

The map name being loaded in separately from the image allows you to use the same map preview image for multiple different maps.
~ ~ ~
Palette E, the one that is loaded into the second to last palette slot, is the one that the game uses for text and text boxes (not to be confused with the borders around the text boxes). While the palette is comprised of 16 colors, we are only concerned with 3 of them:

- Color
1(Red): Used for the text box itself. This is what the text gets printed on top of. - Color
3(Green): Used for the shadow of the characters of text. - Color
4(Blue): Used for the text itself.
The positions of these colors in the palette are specific to these functions and cannot be changed.
To demonstrate this in action, here is what the map name text looks like with the colors used in FRLG. The yellow colors in the palettes are filler:


And here is the same map name text, but with the colors drastically changed:


The rest of the colors in this palette can be used like normal (other than the transparent color 0). This means you can utilize the unused portion as a sort of partial 16th palette for your map preview image. This takes further skill and knowledge than I will be covering in this guide, but if you can get the colors to line up with the pixels properly, you’ll have that much more versatility with the image.
Keep in mind that this palette needs to be in the 15th slot of tiles.png, unless your image has 2 palettes or less. In that case, you should put it in the second slot instead.
Here is what the final palettes will look like in my Ruins of Alph tiles.png image (2 palettes):
Aseprite:

Graphics Gale:

Once again, make sure to save your changes.
The Code
Now that we have our files all sorted, it is time to incorporate our new map preview into the code.
First, if you want to adhere to the naming conventions of the other map previews, you can rename the tiles.bin file to tilemap.bin. This isn’t strictly necessary, but I find it convenient to keep all of the file names consistent.
Go to src/map_preview_screen.c and add filepaths to your new files. You’ll need to add three new lines. One for the palette, one for the tiles image, and one for the tilemap. The palette file does not exist yet, but this line of code will tell the compiler to generate a gbapal file from the tiles image. You’ll also need to add .4bpp.smol and .bin.smolTM suffixes to the tiles and tilemap filepaths respectively. That tells the compiler to generate compressed versions of those files that the GBA can read.
Here’s how I did mine:
static const u8 sIcefallCaveMapPreviewPalette[] = INCBIN_U8("graphics/map_preview/icefall_cave/tiles.gbapal");
static const u8 sIcefallCaveMapPreviewTiles[] = INCBIN_U8("graphics/map_preview/icefall_cave/tiles.4bpp.smol");
static const u8 sIcefallCaveMapPreviewTilemap[] = INCBIN_U8("graphics/map_preview/icefall_cave/tilemap.bin.smolTM");
static const u8 sAlteringCaveMapPreviewPalette[] = INCBIN_U8("graphics/map_preview/altering_cave/tiles.gbapal");
static const u8 sAlteringCaveMapPreviewTiles[] = INCBIN_U8("graphics/map_preview/altering_cave/tiles.4bpp.smol");
static const u8 sAlteringCaveMapPreviewTilemap[] = INCBIN_U8("graphics/map_preview/altering_cave/tilemap.bin.smolTM");
+static const u8 sRuinsOfAlphMapPreviewPalette[] = INCBIN_U8("graphics/map_preview/ruins_of_alph/tiles.gbapal");
+static const u8 sRuinsOfAlphMapPreviewTiles[] = INCBIN_U8("graphics/map_preview/ruins_of_alph/tiles.4bpp.smol");
+static const u8 sRuinsOfAlphMapPreviewTilemap[] = INCBIN_U8("graphics/map_preview/ruins_of_alph/tilemap.bin.smolTM");
Again, the names of things can be whatever you want, but keeping with the existing name convention can help you stay organized and informed. For example, I could replace sRuinsOfAlphMapPreviewTilemap with SmittyWerbenJaegerManJensen and it would still work just fine. But sRuinsOfAlphMapPreviewTilemap is so much more descriptive, I never run the risk of forgetting what its intended use is. Do what feels right to you.
That’s it! Now your new map preview has been added to the game!
Follow the instructions HERE to link the map preview to a map.
Quickstart
Quickstart is a developer convenience feature that allows the user to start a new game from the title screen, skipping the Main Menu and the Birch/Oak intros. In Emerald the player is immediately dropped into the opening truck sequence while in FRLG the player is warped straight into their room.
NOTE: Quickstart is a development only feature and is therefore automatically disabled on release builds.
Details
Quickstart is enabled by default. It can be turned off using the provided configuration option. It is automatically disabled in release builds.
To use Quickstart press SELECT from the title screen to immediately start a new game. The player’s name is set to the English canon name (and in FRLG the rival as well). The player’s gender is chosen randomly (this can be configured).
Player Names
| Game | Male | Female |
|---|---|---|
| Emerald | BRENDAN | MAY |
| FRLG | RED | LEAF |
The FRLG Rival is named BLUE.
Hud Element
When Quickstart is enabled a small HUD element is shown on the title screen (this can be disabled). This is displayed as a 64x32 sprite at the top-right corner of the screen. The image dimensions are only 64x16 however but the GBA does not support sprites of those dimensions.
Source File : graphics/quickstart/quickstart_hud.png

The same sprite is used for Fire Red, Leaf Green and Emerald. Each game has it’s own palette in the graphics/quickstart/ directory.
Configuration
The configuration options are briefly covered below.
| Option | Values | Usage |
|---|---|---|
ENABLE_QUICKSTART | TRUE / FALSE | Enables quickstart in dev builds. Always disabled in release builds. |
QUICKSTART_HUD | TRUE / FALSE | Shows a small HUD when quickstart is enabled. No effect otherwise. |
QUICKSTART_GENDER | GENDER_MALE, GENDER_FEMALE, GENDER_RANDOM | Sets player gender for quickstart.RANDOM = 50% chance for MALE/FEMALE. |
QUICKSTART_HUD_XQUICKSTART_HUD_Y | s16 Coordinates | X & Y Coordinate for the HUD element sprite |
Public Functions
The interface of the Quickstart feature has been kept minimal. It exposes only two functions.
CreateQuickstartHud
void CreateQuickstartHud(void);
Initializes and places a small HUD element on screen. Coordinates specifed in config
Only has an effect when quickstart is enabled.
Quickstart
void Quickstart(void);
Starts a new game from the title screen when called.
Integration
The aforementioned functions may be of use for integrating this feature into custom title screens. Adding calls to the appropriate function gated with a check should suffice.
// For the HUD
if (QUICKSTART && QUICKSTART_HUD)
CreateQuickstartHud();
// To trigger Quickstart
if (QUICKSTART && JOY_NEW(SELECT_BUTTON))
Quickstart();
How to add new spotted species
PR #9594 refactored the original code for Spinda spots to make it usable for any Pokemon. This tutorial will briefly cover the process of creating new spotted species. The details of the implementation have been documented fairly well in the code itself.
Spot graphics
Before you can create spotted species you will need graphics for the spots themselves. This is beyond the scope of this tutorial. Each spot is a 1bpp image that draws the shape of the spot like this.
The spot images are added to the code like so:
//NOTE: Gyarados spots are 32x32 so use SpotImage32
static const SpotImage32 sGyaradosSpotImages[4] = {
INCBIN_U32("graphics/pokemon/gyarados/spots/spot_0.1bpp"),
INCBIN_U32("graphics/pokemon/gyarados/spots/spot_1.1bpp"),
INCBIN_U32("graphics/pokemon/gyarados/spots/spot_2.1bpp"),
INCBIN_U32("graphics/pokemon/gyarados/spots/spot_3.1bpp"),
};
The Spinda spots that already exist are 16x16 so they use SpotImage16.
We will also need to add these files to graphics_file_rules.mk:
diff --git a/graphics_file_rules.mk b/graphics_file_rules.mk
index 4398a629af..6f7600e9da 100644
--- a/graphics_file_rules.mk
+++ b/graphics_file_rules.mk
@@ -21,6 +21,7 @@ POKEDEXGFXDIR := graphics/pokedex
STARTERGFXDIR := graphics/starter_choose
NAMINGGFXDIR := graphics/naming_screen
SPINDAGFXDIR := graphics/pokemon/spinda/spots
+GYARADOSGFXDIR := graphics/pokemon/gyarados/spots
TITLESCREENGFXDIR := graphics/title_screen
types := none normal fight flying poison ground rock bug ghost steel mystery fire water grass electric psychic ice dragon dark fairy stellar
@@ -678,3 +679,15 @@ $(SPINDAGFXDIR)/spot_2.1bpp: %.1bpp: %.png
$(SPINDAGFXDIR)/spot_3.1bpp: %.1bpp: %.png
$(GFX) $< $@ -plain -data_width 2
+
+$(GYARADOSGFXDIR)/spot_0.1bpp: %.1bpp: %.png
+ $(GFX) $< $@ -plain -data_width 4
+
+$(GYARADOSGFXDIR)/spot_1.1bpp: %.1bpp: %.png
+ $(GFX) $< $@ -plain -data_width 4
+
+$(GYARADOSGFXDIR)/spot_2.1bpp: %.1bpp: %.png
+ $(GFX) $< $@ -plain -data_width 4
+
+$(GYARADOSGFXDIR)/spot_3.1bpp: %.1bpp: %.png
+ $(GFX) $< $@ -plain -data_width 4
The data width for Gyarados spots is 4 because each spot is 32 pixels wide. A tile is 8 pixels so each row has 4 tiles.
Adding spots
To add spots to a Pokemon first we must define where the spots go on the Pokemon.
Spots can be of sizes 8x8, 16x16 or 32x32
A species can have up to 4 spots.
static const struct MonSpot sGyaradosSpots[] = {
{.x = 16, .y = 32, .image = sGyaradosSpotImages[0]},
{.x = 32, .y = 8, .image = sGyaradosSpotImages[1]},
{.x = 54, .y = 40, .image = sGyaradosSpotImages[2]},
{.x = 26, .y = 26, .image = sGyaradosSpotImages[3]},
};
Now we define the spot template. This struct contains the spots for the Pokemon and the information needed to draw them.
const struct MonSpotTemplate gGyaradosSpotTemplate = {
.spots = sGyaradosSpots,
.count = ARRAY_COUNT(sGyaradosSpots),
.scale = SCALE_2,
.xOffsetFrame2 = 4,
.yOffsetFrame2 = 8,
.firstColor = 6,
.lastColor = 8,
.colorAdjust = 6,
};
-
Here
scaleis the size of the spot divided by 8 (we only expect square spots). So for Spinda the scale is 2 and for Gyarados it is 4. -
The two frame offsets are used to adjust the spot position when the Pokemon does it’s animation.
-
firstColorandlastColorare used to limit the colors on the Pokemon’s sprite palette where spots can be drawn. This is used to limit Spinda spots to Spinda’s body.colorAdjustis determines how much the color is incremented to draw a spot.
For example, if a spot is being drawn on a Gyarados’ body which uses color index 6 and the adjust is 6 the spot’s color would be 12.
Making the spots appear
Now finally, to make the spots actually appear we have to mark this Pokemon as a spotted species. We do this by adding it to the switch statement in GetSpeciesSpots:
diff --git a/src/pokemon_spots.c b/src/pokemon_spots.c
index 166d601f1e..1d2ced034e 100644
--- a/src/pokemon_spots.c
+++ b/src/pokemon_spots.c
static const struct MonSpotTemplate* GetSpeciesSpots(enum Species species)
@@ -113,6 +138,8 @@ static const struct MonSpotTemplate* GetSpeciesSpots(enum Species species)
{
case SPECIES_SPINDA:
return &gSpindaSpotTemplate;
+ case SPECIES_GYARADOS:
+ return &gGyaradosSpotTemplate;
default:
return NULL;
}
And that’s it. Your new spotted Pokemon is ready!
How to Use Dynamic Shop
Overview

This is a feature for the Shop Menu to allow developers to have a shop with automagically added items based off a certain Criteria. In the core series games, items are gated behind badge progression - this feature allows for that an further expands it to gate items based on any criteria the developer wants.
Usage
To use this feature, simply use pokemart as you normally do. The real Sauce will be the Criterias that the items would get filtered on, as all items are added by Expansion’s default.
MartScript::
lock
faceplayer
message gText_HowMayIServeYou
waitmessage
pokemart
msgbox gText_PleaseComeAgain, MSGBOX_DEFAULT
release
end
You can also use it without any arguments to instead use Pokemart_DefaultItemList in data/scripts/mart_clerk.inc, useful for general pokemart shops.
What is a Criteria?
Criteria is the meat that helps the code automagically add items based on your feeded items list. By default, all items are added regardless to not break existing shops. This prevents unintended items from appearing.
Internally, a Criteria is actually a function that returns either TRUE or FALSE depending if a criteria is fulfilled.
Adding Criteria to an Item
Adding a Criteria to an Item is simple enough, you’d just add the fields at the bottom of an item’s data:
[ITEM_POKE_BALL] =
{
.name = ITEM_NAME("Poké Ball"),
.price = 200,
.description = COMPOUND_STRING(
"A tool used for\n"
"catching wild\n"
"Pokémon."),
.pocket = POCKET_POKE_BALLS,
.type = ITEM_USE_BAG_MENU,
.battleUsage = EFFECT_ITEM_THROW_BALL,
.secondaryId = BALL_POKE,
.iconPic = gItemIcon_PokeBall,
.iconPalette = gItemIconPalette_PokeBall,
+ .shopCriteriaFunc = <func>,
},
Below are extra helper functions for the average usecases. They’re not meant to be directly used as the Criteria function itself, only for the actual Criteria function you’re making. Be sure to remove the UNUSED label from the function you’re using after.
ShopCriteriaByBadgeCount
This function is what you’ll probably be using the most. You must provide one argument containing a number of total badges the player must own. Example:
bool32 ShopCriteriaByTwoBadges(enum Item item)
{
return ShopCriteriaByBadgeCount(2);
}
ShopCriteriaByFlag
This function is basically what BadgeCount partially do, but you’d explicitly use one flag instead. Useful if you need a certain badge flag instead of just the total amount of badges, or a quest-only item. You must provide one argument for the flag id you want, the flag ids found in include/constants/flags.h, like FLAG_BADGE07_GET. This function will returns TRUE/FALSE depending on if the flag is set or not.
Example:
bool32 ShopCriteriaByChampionFlag(enum Item item)
{
return ShopCriteriaByFlag(FLAG_IS_CHAMPION);
}
ShopCriteriaByVar
This function is basically the Flag function but with variables instead. You must provide both the variable id found in include/constants/vars.h and a value to compare with said variable id as the arguments.
Example:
bool32 ShopCriteriaBySpecificValueInSpecificVar(enum Item item)
{
return ShopCriteriaByVar(VAR_ASH_GATHER_COUNT, 20);
}
Create a Custom Criteria
First, add a new function for your criteria in src/shop_criteria.c, preferably after the // Add new Criterias below! comment, like so:
// Add new Criterias below!
+bool32 ShopCriteriaByMyNeed(enum Item item)
+{
+ // add your stuff here, be sure to handle both `TRUE`/`FALSE` return values!
+}
Then, you’ll need to add a declaration for your custom function so that it can be used by your items.
// Add new Criterias below!
+bool32 ShopCriteriaByMyNeed(enum Item item);
#endif // GUARD_SHOP_CRITERIA_H
And that’s it! You should now be good to go and can immediately use that function for your items.
[ITEM_POKE_BALL] =
{
.name = ITEM_NAME("Poké Ball"),
.price = 200,
.description = COMPOUND_STRING(
"A tool used for\n"
"catching wild\n"
"Pokémon."),
.pocket = POCKET_POKE_BALLS,
.type = ITEM_USE_BAG_MENU,
.battleUsage = EFFECT_ITEM_THROW_BALL,
.secondaryId = BALL_POKE,
.iconPic = gItemIcon_PokeBall,
.iconPalette = gItemIconPalette_PokeBall,
+ .shopCriteriaFunc = ShopCriteriaByMyNeed,
},
Specific Example
We want to allow the player to purchase the Light Ball, but only after they have already captured Pikachu and defeated Wattson’s final rematch.
src/shop_criteria.c
// Add new Criterias below!
+bool32 ShopCriteriaHasPikachu(enum Item item)
+{
+ if (FlagGet(TRAINER_FLAGS_START + WATTSON_5) == FALSE)
+ return FALSE;
+
+ return (GetSetPokedexFlag(SpeciesToNationalPokedexNum(SPECIES_PIKACHU), FLAG_GET_CAUGHT));
+}
include/shop_criteria.h
// Add new Criterias below!
+bool32 ShopCriteriaHasPikachu(enum Item item);
src/data/items
[ITEM_LIGHT_BALL] =
{
.name = ITEM_NAME("Light Ball"),
.price = (I_PRICE >= GEN_7) ? 1000 : 100,
.holdEffect = HOLD_EFFECT_LIGHT_BALL,
.description = COMPOUND_STRING(
"A hold item that\n"
"raises the Atk and\n"
"Sp. Atk of Pikachu."),
.pocket = POCKET_ITEMS,
.sortType = ITEM_TYPE_HELD_ITEM,
.type = ITEM_USE_BAG_MENU,
.fieldUseFunc = ItemUseOutOfBattle_CannotUse,
.flingPower = 30,
.iconPic = gItemIcon_LightBall,
.iconPalette = gItemIconPalette_LightBall,
+ .shopCriteriaFunc = ShopCriteriaHasPikachu,
},
Overworld Wild Encounters Tutorial
OWE Spawning
Overworld Wild Encounters (OWEs), refer to the wild encounters that can be seen as object events in the overworld, prior to engaging in battle with them. They use either the WILD_AREA_LAND or WILD_AREA_WATER encounter tables by default. OWEs come in two types, Generated or Manual.
Generated OWEs
Generated OWEs are spawned automatically when WE_OW_ENCOUNTERS is set to TRUE, being spawned on a random encounter tile near the player, with the encounter table used dependant on it. These are considered low priority OWEs, and automatically populate a level, species, gender and shinyness exactly how a vanilla wild encounter would, or can even be a special spawn, but more on those later.
Setting
OW_GFX_COMPRESStoFALSEwill free more space in VRAM, allowing for more large OWEs to spawn, and reducing the chance of running into a tiles error when trying to spawn Generated OWEs.
Manual OWEs
Manual OWEs are created by the developer as any other object event would be and are defined by having the .trainerType set to TRAINER_TYPE_OW_WILD_ENCOUNTER. These can be fully customised by the developer, with the level, species, gender and shinyness all able to be specified. The level can be set by filling the desired value in the trainerRange_berryTreeId. The latter three are specified by the graphicsId of the object, for example;
OBJ_EVENT_GFX_SPECIES(BULBASAUR)will produce a male, non-shiny Bulbasaur.OBJ_EVENT_GFX_SPECIES_SHINY(CHARMANDER)will produce a male, shiny Charmander.OBJ_EVENT_GFX_SPECIES_FEMALE(SQUIRTLE)will produce a female, non-shiny Squirtle.OBJ_EVENT_GFX_SPECIES_SHINY_FEMALE(PIKACHU)will produce a female, shiny Pikachu.
However, Manual OWEs do not have to be defined fully, leaving any of the level, species, gender, shinyness or script unspecified will revert to default behaviours. If left blank, the level or species will be generated from the relevant encounter table. Leaving the shinyness blank will revert to default shiny odds, although this can still be affected by P_FLAG_FORCE_SHINY and P_FLAG_FORCE_NO_SHINY. Setting the OBJ_EVENT_MON bit of the graphicsId, but not the OBJ_EVENT_MON_FEMALE will result in a male encounter, setting both will result in a female encounter, as seen above, but setting neither will randomise the gender based on species. A species can be defined with a random gender by just using the species define. A specific script can be specified, but if not the default OWE encounter script will be used.
Assuming the following graphicsId have .trainerType set to TRAINER_TYPE_OW_WILD_ENCOUNTER;
SPECIES_EEVEEwill result in an Eevee with a randomised level, gender and shinyness, using the default encounter script.OBJ_EVENT_GFX_SPECIES(NONE)will result in a male randomised species of randomised level, gender and shinyness, using the default encounter script.OBJ_EVENT_GFX_SPECIES_SHINY_FEMALE(NONE)will result in a female, shiny randomised species with randomised level and gender, using the default encounter script.
As level and species are potentially taken from the Wild Encounter Header, there is an assertf to let developers know when an invalid value is used. If the resultant level is invalid, it will be set to MIN_LEVEL (1). If the species is invalid, a replacement object will be created using OBJ_EVENT_GFX_BOY_1, this will not be an OWE of any kind.
No matter how much of a Manual OWE is defined, it is considered a high priority OWE, and treated as a regular object event in all ways other than ones outlined above. They will always spawn, regardless of level or abilties of player Pokémon. However, they cannot be special spawns.
When a manual OWE is removed, for whatever reason, it’s flag is also set. Because of this, we recommend giving them temporary flags so they can be reset on leaving the map.
Special Spawns Categories
Special spawns can be one of three types, in decreasing priority: A Roamer, Feebas, or Mass Outbreak Encounter. Generated OWEs can be in any of these categories, however, Manual OWEs cannot. These work exactly as they would normally;
- If a Roamer is on the route and is able to spawn, then it may appear where a Generated OWE would.
- If any OWE spawns on a tile where a Feebas special fishing spot is, it may appear is a Feebas (only if
WE_OWE_FEEBAS_SPOTSis TRUE). - If an OWE spawns on a route that has a mass outbreak occuring, it may spawn as an encounter from that mass outbreak.
OWE_MAX_ROAMERSlimits the max number of total roamers to 252 in order to fit the relevant info within theObjectEventstruct.
WE_OWE_SPECIAL_ONLYcan be used to restrict generated overworld wild encounters to only spawn, if they are within these special categories.
Restricted Despawning
There are three configs that can be used to restrict the despawning of Generated OWEs.
- If
WE_OWE_PREVENT_SHINY_DESPAWNis set toTRUE, any Generated OWE that spawns as shiny will not be despawned if they go outside of the viewable area. They can still be despawned off-screen if the player goes to another map. This config also ensures that shiny Generated OWEs will never be despawned and replaced ifWE_OWE_SPAWN_REPLACEMENTisTRUE. - If
WE_OWE_PREVENT_FEEBAS_DESPAWNis set toTRUE, any Generated OWE that is a Feebas spawned from a Feebas fishing spot will follow the same rules asWE_OWE_PREVENT_SHINY_DESPAWNabove. - If
WE_OWE_DESPAWN_ON_ENTER_TOWNis set toTRUE, all Generated OWEs will be instantly despawned upon the player crossing a map connection into a map with a map type of eitherMAP_TYPE_TOWNorMAP_TYPE_CITY, like what happens in Scarlet/Violet.
None of these three configs can prevent the forceful despawning of OWEs to free up limited resources, as is explained in the next section.
High Priority and Low Priority OWEs
Low Priority OWEs may not be spawned or even be destroyed in certain situations. There are checks to prevent these from spawning if it would fail, including for the number of event objects, palettes and object tiles. There are also similar checks, when spawning object events other than Low Priotity OWEs. These checks will despawn the oldest of Low Priority OWEs when other objects event are attempting to be spawned and Low Priority OWEs are using these resources. Low Priority OWEs may also be destroyed by NPC object events colliding with them due to their movements or the OWE being in the way of a trainer interaction. High priority OWEs are treated as regular objects and will not be destroyed in the ways outlined above, but may cause the destruction of Generated OWEs and will not face spawning restrictions. These despawn conditions will overwrite the restrictive despawns mentioned above.
Encountering an OWE
Any collision between the player and the OWE will start an encounter. An encounter will also start if the player interacts with the OWE with the A button.
If the WE_OWE_APPROACH_FOR_BATTLE config is TRUE, the OWE will take steps to be right next to the player before the battle begins. Otherwise, the objects will be frozen and the battle will start immediately.
The default encounter script is InteractWithOverworldWildEncounter, but can be customised to effect all uses of it. For example, the following change will prevent the encountered species cry from playing before the battle starts.
InteractWithOverworldWildEncounter::
lock
overworldwildencounterapproach
applymovement VAR_LAST_TALKED, Common_Movement_ExclamationMark
facetogether
- getoverworldwildencounterspecies VAR_0x8005
- playmoncry VAR_0x8005, CRY_MODE_DOUBLES
- waitmoncry
tryoverworldwildencounter
waitstate
end
Repel and Lure Behaviours
Repels will prevent the spawning of generated OWEs that are a lower level than the player’s lead Pokemon. Lower level generated OWEs that have already been spawned will be immediately despawned when a repel is used. Existing generated OWEs can also be despawned if the player switches a higher level Pokemon to the front of the party if a repel is already active.
Lures increasse the frequency of generated OWE spawning.
OWE Behaviour Types
The behaviors that these OWEs have is set up to be customizable for each individual species. By default, every species is set to OWE_IGNORE_PLAYER. To add a different behavior to a species, find their species struct in their gen_X_families.h file in the src/data/pokemon/species_info folder and add a .overworldEncounterBehavior = <BEHAVIOR> to it. <BEHAVIOR> should be replaced with the behavior you want them to use. For example, if I wanted to add the OWE_FLEE_PLAYER_NORMAL behavior to Mudkip I would open gen_3_families.h, find the struct for SPECIES_MUDKIP, and add .overworldEncounterBehavior = OWE_FLEE_PLAYER_NORMAL to the end of it like so:
.eggMoveLearnset = sMudkipEggMoveLearnset,
.evolutions = EVOLUTION({EVO_LEVEL, 16, SPECIES_MARSHTOMP}),
+ .overworldEncounterBehavior = OWE_FLEE_PLAYER_NORMAL
},
[SPECIES_MARSHTOMP] =
{
.baseHP = 70,
The behaviors themselves are defined in src/data/pokemon/wild_encounter_overworld_behavior.h. These are the customizable parameters:
movementTypeis the movement type you want the object event to have. More on these in the next section.viewDistanceis the number of tiles away the mon is able to notice the player in the cardinal directions (similar to the sight distance of trainers).viewWidthis the total width of the area in which the mon will notice the player. For example, ifviewWidthis set to3, the mon will be able to detect the player if they are within 1 tile of either side of the line of sight.activeDistanceis the max distance away from the mon that the player can be before the mon loses track of them and goes back to wandering.idleSpeedis the speed at which the mon will take a step while wandering (player is not noticed). This must be one of the values inenum SpeedOWE.activeSpeedis the speed at which the mon will take a step while active (player has been noticed). This must be one of the values inenum SpeedOWE.returnToIdleis the condition under which the mon (while active) will go back to idly wandering. The three possible parameters arePLAYER_OUTSIDE_ACTIVE_RANGE,PLAYER_CANT_BE_SEEN, andNEVER_RETURN.
If any of these parameters are not defined, they will be automatically assigned the value of 0.
A small number of premade behaviors have been provided and are ready to use. You can add as many new custom behaviors as you like, but make sure to add each behavior to enum OverworldWildEncounterBehaviors, making sure that OWE_SPECIES_BEHAVIOR_COUNT is always at the end.
The same behavior can be used for multiple different species.
OWE Movements
While OWE objects can be given any movement type, there are several different custom movement types that were made specifically for OWEs:
- The basic one is
MOVEMENT_TYPE_WANDER_AROUND_OWE. All of the other OWE movement types start with this behavior and differentiate into other behavior when they notice the player. Similar toMOVEMENT_TYPE_WANDER_AROUND, the object will take steps in random directions at random intervals. The main difference here is that the object will never turn more than 90 degrees from their current facing direction when taking a step. OWEs with this movement type will completely ignore the player until they are directly collided/interacted with. MOVEMENT_TYPE_CHASE_PLAYER_OWEwill switch the OWE to chasing down the player when it notices the player. The OWE is still blocked by collision, but does have the intelligence to walk around small obstacles. They will go back to wandering if the player goes outside of their sight radius.MOVEMENT_TYPE_FLEE_PLAYER_OWEwill switch the OWE to fleeing from the player when it notices the player. They use the same pathfinding logic asMOVEMENT_TYPE_CHASE_PLAYER_OWE, but in the opposite direction from the player. They will go back to wandering if the player goes outside of their sight radius. IfWE_OWE_FLEE_DESPAWNis set toTRUE, the fleeing OWE will despawn if it is unable to take a step for a short amount of time (ie, if they are cornered).MOVEMENT_TYPE_WATCH_PLAYER_OWEwill switch the OWE to stand in place and always face in the direction of the player’s location when the player is noticed by it. They will go back to wandering if the player goes outside of their sight radius.MOVEMENT_TYPE_APPROACH_PLAYER_OWEwill switch the OWE to approach the player as if curious when it notices the player. The OWE will try to keep a one tile gap between itself and the player. They may also occasionally do an excited hop. They will go back to wandering if the player goes outside of their sight radius.MOVEMENT_TYPE_DESPAWN_OWEwill make the OWE do a very brief animation of surprise and then instantly despawn when it notices the player.
Restricted Movements
There are two configs that can restrict the movement of OWEs. Both are TRUE by default.
WE_OWE_RESTRICT_METATILEwill restrict OWE movement to the metatile type they spawned on. For example, if an OWE spawns in a grass patch they will not be able to leave that grass patch.WE_OWE_RESTRICT_MAPwill prevent OWEs from leaving the map that they were spawned in.
Regardless of configs, OWEs cannot move from water onto land, or vice versa.
How Data is Saved
Some existing members of the ObjectEvent struct have been repurposed for OWEs. This has no effect on the existing functionality outside of OWEs.
struct ObjectEvent
{
…
u8 warpArrowSpriteId; // Stores encounter category for Overworld Encounters, as well as some bit flags.
…
u8 trainerRange_berryTreeId; // Stores the level for Overworld Encounters.
…
u8 playerCopyableMovement; // Stores the age for Overworld Encounters.
…
}
How to Use Dynamic Weather
Written by Jordan/harbingerofruination
What Is Dynamic Weather?
WEATHER_DYNAMIC applies random daily weather to any map that uses it in its header, updating the weather any time the daily seed resets.
How Do I Use Dynamic Weather?
Using dynamic weather was made to be as simple as possible, while still allowing for some customization. It’s only a two-step process.
Step 1: Set Map to Use Dynamic Weather
In either porymap or the map json, change the weather header for the map that you want to have dynamic weather to WEATHER_DYNAMIC.
Step 2: Define Chooseable Weathers
By default, using WEATHER_DYNAMIC will randomly select from sDefaultDynamicWeathers[] in src/field_weather_effect.c, which contains sun, rain, snow, sandstorm, volcanic ash, thunderstorm, and drought as possible weathers. However, this may not be ideal for some locations. Let’s say, for example, you want Dewford town to have dynamic weather. You’ll need to define an array containing the possible weathers that you want. There is currently one commented out you can use as a template, sDynamicWeathers_DewfordTown[]. Let’s take a look:
static const u8 sDynamicWeathers_DewfordTown[] =
{
WEATHER_SUNNY,
WEATHER_RAIN,
WEATHER_RAIN_THUNDERSTORM,
};
With this, we can make Dewford feel more tropical, without the sandstorm, volcanic ash, and snow. We will also need to make entry in sDynamicWeatherPools, such that any maps in MAPSEC_DEWFORD_TOWN share that dynamic weather pool as well as the specific daily weather. That’ll look like this:
static const struct DynamicWeatherPool sDynamicWeatherPools[] =
{
{ MAPSEC_DEWFORD_TOWN, DYNAMIC_WEATHER_POOL(sDynamicWeathers_DewfordTown) },
};
Now, any maps in MAPSEC_DEWFORD_TOWN with WEATHER_DYNAMIC in their header will select from sDynamicWeathers_DewfordTown[] instead of the default sDefaultDynamicWeathers[] array.
How to Use the Random Mon Generator
Written by Jordan/harbingerofruination
What is the random mon generator?
The random mon generator is a script-based command that can be used to set up in-game trades, events, or other scenarios where you would need a random mon. It is only entirely random if you want it to be, and has a wide range of customization and feature options. The purpose of this document is to explain and show you how to set it up for your own use case.
Step 1: Setting Up Your Rules
So you want to make a custom ruleset for a possible random pokemon you’d like to use or distribute. Well, naturally, if you’re giving something to the player early, it’s unlikely you’re going to want to have them receive a legendary or mythical pokemon, or a pokemon holding the choice specs or assault vest. Let’s look at how to set it up such that you have the perfect pool of pokemon for your script to fetch from.
Species Generation Options
Setting Up Our Random Species
First thing’s first, we need a way for the logic to read that we want a specific kind of random mon. Add your named species generator options in include/constants/random_mon_generation.h, configure their rules in src/data/random_mon_generator.h, then pass those names to getrandomspecies in scripts.
The Random Species Struct
struct RandomSpeciesGeneratorOptions
{
const enum Species *bannedSpecies;
const enum Species *speciesPool;
bool32 (*filterFunc)(enum Species species, const struct FilterFuncArgs *filterFuncArgs);
u32 speciesPoolCount:11;
u32 bannedSpeciesCount:11;
u32 banLegendary:1;
u32 banMythical:1;
u32 banSubLegendary:1;
u32 banUltraBeast:1;
u32 banParadox:1;
u32 randomizeForms:1;
enum RandomSpeciesDexMode dexMode:1;
u32 padding:3;
};
These are the options you can toggle and change to select the ideal possible species. Let’s go over the options one-by-one.
enum RandomSpeciesDexMode dexMode: With values of eitherRANDOM_MON_DEX_NATIONALorRANDOM_MON_DEX_HOENN, allows you to select whether you want to choose from your National Dex or the Hoenn Dex. If you’ve replaced the hoenn dex but want to use that functionality, be sure that you investigate that path and substitute any references or functions specific to the hoenn dex to parallel ones for your custom dex.const enum Species *speciesPool: A pointer to the specific species pool you want to use, if any. Leave it NULL or create one in src/data/random_mon_generator.h. Examples of this will come later. You can repeat values in this pool to create pseudo weights; for example,{SPECIES_BULBASAUR, SPECIES_BULBASAUR, SPECIES_BULBASAUR, SPECIES_SQUIRTLE}gives a 75% chance of Bulbasaur and a 25% chance of Squirtle.u32 speciesPoolCount: The total number of species in your pool, if any.const enum Species *bannedSpecies: A pointer to the a pool containing any species of pokemon you want banned from selection. Leave it NULL or create one in src/data/random_mon_generator.h. You shouldn’t use this in combination with the speciesPool, as that doesn’t really make sense. Leave this one NULL if you have a specific pool of species you want to pick from, or use it if you want more randomness but with some specific banning restrictions that the other options below don’t allow.u32 bannedSpeciesCount: The total number of banned species in the above pool, if any.u32 banLegendary: Whether to ban restricted legendary pokemon from selection.u32 banMythical: Whether to ban mythical pokemon from selection.u32 banSubLegendary: Whether to ban sub-legendary pokemon (Regi trio, genies, etc) from selection.u32 banUltraBeast: Whether to ban ultra beast pokemon from selection.u32 banParadox: Whether to ban paradox pokemon from selection.u32 randomizeForms: Whether to randomize forms of pokemon. By default, megas, fusions, and in-battle transformations are disallowed. To add exceptions, see and modifyIsRandomSpeciesFormTableExceptionin src/random_mon_generation.c.
Filter Functions
Now you may notice that we didn’t discuss bool32 (*filterFunc)(enum Species species, const struct FilterFuncArgs *filterFuncArgs), and for good reason, as that element is more complicated than the others. This is a pointer to an additional filter you can mess with or add to select for specific traits or features.
For example, one of the default options uses .filterFunc = IsInBstRangeFilterFunc. When you call getrandomspecies, the optional arg1 and arg2 values are forwarded to the filter function. IsInBstRangeFilterFunc treats arg1 as the BST target and arg2 as the leniency, so arg1=300, arg2=100 allows pokemon with BST 200 through 400.
If a species option has a filterFunc, pass any args that function requires. Omitted args default to 0xFFFF, and each filter function decides how to handle omitted args. For example, IsInBstRangeFilterFunc requires both args and asserts if either one is omitted, but a custom filter function can ignore the args entirely.
You could also, using similar logic, create a function that treats arg1 as a type value, and then filter only for pokemon of that type if possible. If you do not pass a filter function, then no filter beyond the other elements is applied.
Example Setup
For a named random mon option, define the script-facing value in include/constants/random_mon_generation.h, then use that same enum value as the array index in src/data/random_mon_generator.h. With separate species and/or ban pools, your setup would look like this:
enum
{
SPECIES_GENERATOR_NO_SUPERMONS,
SPECIES_GENERATOR_LIMITED_POOL,
SPECIES_GENERATOR_BST_RESTRICTED,
RANDOM_SPECIES_OPTIONS_COUNT,
};
static const enum Species sRandomSpeciesOption0SpeciesPool[] =
{
SPECIES_TREECKO,
SPECIES_TORCHIC,
SPECIES_MUDKIP,
SPECIES_RALTS,
SPECIES_ARON,
SPECIES_TRAPINCH,
SPECIES_BAGON,
SPECIES_BELDUM,
};
static const enum Species sRandomSpeciesOption0BannedSpecies[] =
{
SPECIES_BELDUM,
};
static const struct RandomSpeciesGeneratorOptions sRandomSpeciesGeneratorOptions[] =
{
[SPECIES_GENERATOR_LIMITED_POOL] =
{
.speciesPool = sRandomSpeciesOption0SpeciesPool,
.speciesPoolCount = ARRAY_COUNT(sRandomSpeciesOption0SpeciesPool),
.bannedSpecies = sRandomSpeciesOption0BannedSpecies,
.bannedSpeciesCount = ARRAY_COUNT(sRandomSpeciesOption0BannedSpecies),
.banLegendary = TRUE,
.banMythical = TRUE,
.banSubLegendary = TRUE,
.banUltraBeast = TRUE,
.banParadox = TRUE,
.randomizeForms = TRUE,
},
[SPECIES_GENERATOR_BST_RESTRICTED] =
{
.dexMode = RANDOM_MON_DEX_HOENN,
.filterFunc = IsInBstRangeFilterFunc,
.banLegendary = TRUE,
.banMythical = TRUE,
.banSubLegendary = TRUE,
.banUltraBeast = TRUE,
.banParadox = TRUE,
.randomizeForms = TRUE,
},
}
Note
You really don’t need to use a choosable species pool and a banned species pool in the same ruleset, it just doesn’t make sense and may end up causing more trouble than anything. Additionally, you should never include SPECIES_NONE in either of these kinds of pools, only actual, defined species.
Small explicit species pools are checked exhaustively before choosing, which gives clear errors if every entry is filtered out. Larger explicit pools and full dex searches use repeated random attempts. If the filters are too restrictive or an invalid option is requested, the command resolves to SPECIES_NONE.
Item Generator Options
Item randomization is handled separately from pokemon randomization, meaning that you could always give a charmander but it could always hold a random or semi-random item. Compared to the species generation options, here we have far fewer to discuss.
Setting Up Our Random Items
As we did for our random species, we need to also do for our random items. Add your named item generator options in include/constants/random_mon_generation.h, configure their rules in src/data/random_mon_generator.h, then pass those names to getrandomitem in scripts.
The Random Item Struct
struct RandomItemGeneratorOptions
{
const enum Item *heldItemPool;
const enum HoldEffect *bannedHoldEffects;
bool32 (*filterFunc)(enum Item item, const struct FilterFuncArgs *filterFuncArgs);
u16 heldItemPoolCount;
u16 bannedHoldEffectsCount;
};
const enum Item *heldItemPool: A pointer to the specific item pool you want to use, if any. Leave it NULL or create one in src/data/random_mon_generator.h. You can repeat values in this pool to create pseudo weights; for example,{ITEM_NONE, ITEM_NONE, ITEM_NONE, ITEM_LUM_BERRY}gives a 75% chance of no item and a 25% chance of Lum Berry.u16 heldItemPoolCount: The number of items in your held item pool, if any.const enum HoldEffect *bannedHoldEffects: A pointer to the specific list of banned hold effects you want to use, if any. Leave it NULL or create one in src/data/random_mon_generator.h.u16 bannedHoldEffectsCount: The number of banned hold effects in your pool, if any.bool32 (*filterFunc)(enum Item item, const struct FilterFuncArgs *filterFuncArgs): An optional item filter function. The built-inIsHeldItemFilterFunconly allows items with a non-HOLD_EFFECT_NONEhold effect.getrandomitemcurrently passes a zeroedFilterFuncArgsvalue, so custom item filters can accept the same argument struct as species filters even if the script command does not expose item filter arguments yet.
Key items are always blocked from random item generation, even if they are included in an explicit pool. TM/HM-pocket items with a sell price of 0 are also blocked to protect against obvious sequence breaks.
Example Setup
For a named random item option, define the script-facing value in include/constants/random_mon_generation.h, then use that same enum value as the array index in src/data/random_mon_generator.h. With separate held item pools and/or hold effect ban pools, your setup would look like this:
enum
{
ITEM_GENERATOR_STANDARD,
ITEM_GENERATOR_LIMITED_POOL,
RANDOM_ITEM_OPTIONS_COUNT,
};
static const enum HoldEffect sRandomItemOption0BannedHoldEffects[] =
{
HOLD_EFFECT_NONE,
HOLD_EFFECT_REPEL,
HOLD_EFFECT_SOUL_DEW,
HOLD_EFFECT_DEEP_SEA_TOOTH,
HOLD_EFFECT_DEEP_SEA_SCALE,
HOLD_EFFECT_LIGHT_BALL,
HOLD_EFFECT_THICK_CLUB,
HOLD_EFFECT_LEEK,
HOLD_EFFECT_ADAMANT_ORB,
HOLD_EFFECT_LUSTROUS_ORB,
HOLD_EFFECT_GRISEOUS_ORB,
HOLD_EFFECT_ENIGMA_BERRY,
HOLD_EFFECT_PLATE,
HOLD_EFFECT_DRIVE,
HOLD_EFFECT_GEMS,
HOLD_EFFECT_MEGA_STONE,
HOLD_EFFECT_PRIMAL_ORB,
HOLD_EFFECT_MEMORY,
HOLD_EFFECT_Z_CRYSTAL,
HOLD_EFFECT_BOOSTER_ENERGY,
HOLD_EFFECT_OGERPON_MASK,
};
static const enum Item sRandomItemOption0HeldItemPool[] =
{
ITEM_LEFTOVERS,
ITEM_SITRUS_BERRY,
ITEM_LUM_BERRY,
ITEM_CHOICE_BAND,
ITEM_CHOICE_SCARF,
ITEM_CHOICE_SPECS,
};
static const struct RandomItemGeneratorOptions sRandomItemGeneratorOptions[] =
{
[ITEM_GENERATOR_STANDARD] =
{
.bannedHoldEffects = sRandomItemOption0BannedHoldEffects,
.bannedHoldEffectsCount = ARRAY_COUNT(sRandomItemOption0BannedHoldEffects),
.filterFunc = IsHeldItemFilterFunc,
},
[ITEM_GENERATOR_LIMITED_POOL] =
{
.heldItemPool = sRandomItemOption0HeldItemPool,
.heldItemPoolCount = ARRAY_COUNT(sRandomItemOption0HeldItemPool),
.bannedHoldEffects = sRandomItemOption0BannedHoldEffects,
.bannedHoldEffectsCount = ARRAY_COUNT(sRandomItemOption0BannedHoldEffects),
.filterFunc = IsHeldItemFilterFunc,
},
};
Note
ITEM_NONEis never selected during full item randomization, but it can be included in an explicit held item pool if you want that option to sometimes produce no held item. Small explicit item pools are checked exhaustively before choosing, while larger explicit pools and full item searches use repeated random attempts.
Step 2: Other options to be aware of
Random Species and Item Commands
Random species and random items are generated before calling givemon or createmon. Use getrandomspecies to write a generated species into a var, and getrandomitem to write a generated item into a var. Then pass those vars into givemon, createmon, or another script command.
getrandomspecies VAR_0x8000, SPECIES_GENERATOR_LIMITED_POOL
getrandomitem VAR_0x8001, ITEM_GENERATOR_LIMITED_POOL
givemon VAR_0x8000, 50, item=VAR_0x8001
If your species option uses a filterFunc, you can pass up to two optional arguments. If you omit them, they default to 0xFFFF; the filter function itself decides whether omitted args are valid.
getrandomspecies VAR_0x8000, SPECIES_GENERATOR_BST_RESTRICTED, arg1=300, arg2=100
Random Ball Generation
This feature also includes random ball generation. When doing givemon or createmon, just use ball=BALL_RANDOM as an argument.
Random Move Generation
This feature also includes random teachable move generation. When doing givemon or createmon, for move slot x, just use movex=MOVE_RANDOM_TEACHABLE as an argument.
Step 3: Putting it all together
Here’s an example of how you’d call it in a script when it all comes together:
EventScript_GiveFilteredRandomMon::
// BST target = 300, leniency = 100, so valid BST range is 200-400.
// SPECIES_GENERATOR_BST_RESTRICTED uses IsInBstRangeFilterFunc as a filterFunc.
getrandomspecies VAR_0x8000, SPECIES_GENERATOR_BST_RESTRICTED, arg1=300, arg2=100
getrandomitem VAR_0x8001, ITEM_GENERATOR_LIMITED_POOL
givemon VAR_0x8000, 50,
item=VAR_0x8001,
ball=BALL_RANDOM,
move1=MOVE_RANDOM_TEACHABLE,
move2=MOVE_RANDOM_TEACHABLE,
move3=MOVE_RANDOM_TEACHABLE,
move4=MOVE_DEFAULT;
end
This will produce a random mon from the BST-restricted species option with between 200 and 400 BST, a random item from the limited item pool, a random ball, 3 random teachable moves, and one move it’d normally have at that level (MOVE_DEFAULT).
Appendix: Example Randomizer Data
The default src/data/random_mon_generator.h file intentionally leaves the option arrays empty. If you want a quick starting point, copy and adapt this into that file, then add matching enum names to include/constants/random_mon_generation.h.
static const enum Species sRandomSpeciesOption1SpeciesPool[] =
{
SPECIES_TREECKO,
SPECIES_TORCHIC,
SPECIES_MUDKIP,
SPECIES_RALTS,
SPECIES_ARON,
SPECIES_TRAPINCH,
SPECIES_BAGON,
SPECIES_BELDUM,
};
static const enum Species sRandomSpeciesOption1BannedSpecies[] =
{
SPECIES_BELDUM,
};
static const enum HoldEffect sRandomItemStandardBannedHoldEffects[] =
{
HOLD_EFFECT_NONE,
HOLD_EFFECT_REPEL,
HOLD_EFFECT_SOUL_DEW,
HOLD_EFFECT_DEEP_SEA_TOOTH,
HOLD_EFFECT_DEEP_SEA_SCALE,
HOLD_EFFECT_LIGHT_BALL,
HOLD_EFFECT_THICK_CLUB,
HOLD_EFFECT_LEEK,
HOLD_EFFECT_ADAMANT_ORB,
HOLD_EFFECT_LUSTROUS_ORB,
HOLD_EFFECT_GRISEOUS_ORB,
HOLD_EFFECT_ENIGMA_BERRY,
HOLD_EFFECT_PLATE,
HOLD_EFFECT_DRIVE,
HOLD_EFFECT_GEMS,
HOLD_EFFECT_MEGA_STONE,
HOLD_EFFECT_PRIMAL_ORB,
HOLD_EFFECT_MEMORY,
HOLD_EFFECT_Z_CRYSTAL,
HOLD_EFFECT_BOOSTER_ENERGY,
HOLD_EFFECT_OGERPON_MASK,
};
static const enum Item sRandomItemOption1HeldItemPool[] =
{
ITEM_LEFTOVERS,
ITEM_SITRUS_BERRY,
ITEM_LUM_BERRY,
ITEM_CHOICE_BAND,
ITEM_CHOICE_SCARF,
ITEM_CHOICE_SPECS,
};
static const struct RandomSpeciesGeneratorOptions sRandomSpeciesGeneratorOptions[RANDOM_SPECIES_OPTIONS_COUNT] =
{
[SPECIES_GENERATOR_NO_SUPERMONS] =
{
.dexMode = RANDOM_MON_DEX_NATIONAL,
.banLegendary = TRUE,
.banMythical = TRUE,
.banSubLegendary = TRUE,
.banUltraBeast = TRUE,
.banParadox = TRUE,
.randomizeForms = TRUE,
},
[SPECIES_GENERATOR_LIMITED_POOL] =
{
.speciesPool = sRandomSpeciesOption1SpeciesPool,
.speciesPoolCount = ARRAY_COUNT(sRandomSpeciesOption1SpeciesPool),
.bannedSpecies = sRandomSpeciesOption1BannedSpecies,
.bannedSpeciesCount = ARRAY_COUNT(sRandomSpeciesOption1BannedSpecies),
.banLegendary = TRUE,
.banMythical = TRUE,
.banSubLegendary = TRUE,
.banUltraBeast = TRUE,
.banParadox = TRUE,
.randomizeForms = TRUE,
},
[SPECIES_GENERATOR_BST_RESTRICTED] =
{
.dexMode = RANDOM_MON_DEX_HOENN,
.filterFunc = IsInBstRangeFilterFunc,
.banLegendary = TRUE,
.banMythical = TRUE,
.banSubLegendary = TRUE,
.banUltraBeast = TRUE,
.banParadox = TRUE,
.randomizeForms = TRUE,
},
};
static const struct RandomItemGeneratorOptions sRandomItemGeneratorOptions[RANDOM_ITEM_OPTIONS_COUNT] =
{
[ITEM_GENERATOR_STANDARD] =
{
.bannedHoldEffects = sRandomItemStandardBannedHoldEffects,
.bannedHoldEffectsCount = ARRAY_COUNT(sRandomItemStandardBannedHoldEffects),
.filterFunc = IsHeldItemFilterFunc,
},
[ITEM_GENERATOR_LIMITED_POOL] =
{
.heldItemPool = sRandomItemOption1HeldItemPool,
.heldItemPoolCount = ARRAY_COUNT(sRandomItemOption1HeldItemPool),
.bannedHoldEffects = sRandomItemStandardBannedHoldEffects,
.bannedHoldEffectsCount = ARRAY_COUNT(sRandomItemStandardBannedHoldEffects),
.filterFunc = IsHeldItemFilterFunc,
},
};
Changelog
{{#include ../CHANGELOG.md}}
Version 1.16.1
## How to update
- If you haven't set up a remote, run the command `git remote add RHH https://github.com/rh-hideout/pokeemerald-expansion`.
- Once you have your remote set up, run the command `git pull RHH expansion/1.16.1
`.
🧬 General 🧬
Added
- Add
if_comptimeby @mrgriffin in #10130
Changed
- Cleanup ‘message 0x0’ by @mrgriffin in #10110
- Fix Trainer Party Pool documentation by @RubyRaven6 in #10122
- Remove deprecated
HQ_RANDOMconfig by @Bassoonian in #10131
Fixed
- chore(credits): change kildemal to miriam in credits by @miriamlefae in #10123
- Misc Fixes/Cleanups by @mrgriffin in #9892
- Fix HGSS Dex Form Strings by @HashtagMarky in #10147
🗺️ Overworld 🗺️
Changed
- assertf for NULL goto/call by @mrgriffin in #10111
Fixed
- Fix colosseum warps frlg by @Viperio19 in #10100
🐉 Pokémon 🐉
Changed
- Fix missing incgfx for Mega Garchomp Z by @hedara90 in #10116
⚔️ Battle General ⚔️
Changed
- feat (battle): improve gimmick triggers’ graphics by @mudskipper13 in #10129
Fixed
- Fixes stat change queue having erroneous stats stored by @AlexOn1ine in #10088
- Fixes Acupressure timeout in doubles by @AlexOn1ine in #10091
- Fixes Random Move from disobedience by @AlexOn1ine in #10093
- Fix link singles and doubles using incorrect parties by @Viperio19 in #10102
- Fix player’s hp display showing 0 max hp for p2 in link battles after taking damage by @Viperio19 in #10105
- Fix generic ability ineffective battle message misuse by @Cle-bit in #10149
🧶 Items 🧶
Changed
- Add missing item sort types by @Cle-bit in #10104
- SanitizeBagItemId, TryTakeMonItemResult by @mrgriffin in #10109
Fixed
- Use values from
enum PokeBallfor Poké Balls by @PCG06 in #10106
🤖 Battle AI 🤖
Fixed
- Prevent AI illegally targeting itself in doubles by @grintoul1 in #10139
🧹 Other Cleanup 🧹
- Add missing item sort types by @Cle-bit in #10104
- Cleanup ‘message 0x0’ by @mrgriffin in #10110
- SanitizeBagItemId, TryTakeMonItemResult by @mrgriffin in #10109
- feat (battle): improve gimmick triggers’ graphics by @mudskipper13 in #10129
- assertf for NULL goto/call by @mrgriffin in #10111
- Remove deprecated
HQ_RANDOMconfig by @Bassoonian in #10131 - Fix Beat Up typeless damage test effectiveness check by @Cle-bit in #10103
🧪 Test Runner 🧪
Changed
- Fix Beat Up typeless damage test effectiveness check by @Cle-bit in #10103
Fixed
- Prevent AI illegally targeting itself in doubles by @grintoul1 in #10139
📚 Documentation 📚
- Fix Trainer Party Pool documentation by @RubyRaven6 in #10122
- Fix broken/old links in CREDITS.md by @ThePeeps191 in #10120
📦 Branch Synchronisation 📦
pret
New Contributors
- @Viperio19 made their first contribution in #10100
Full Changelog: https://github.com/rh-hideout/pokeemerald-expansion/compare/expansion/1.16.0...expansion/1.16.1
Version 1.16.0
## How to update
- If you haven't set up a remote, run the command `git remote add RHH https://github.com/rh-hideout/pokeemerald-expansion`.
- Once you have your remote set up, run the command `git pull RHH expansion/1.16.0
`.
🌋 REFACTORS 🌋
📜 = Uses a migration script.
- Fling Refactor by @AlexOn1ine in #9176
- Refactor synchronize and cure berry timing by @AlexOn1ine in #9446
- Refactor Sky Drop and rampage confusion by @AlexOn1ine in #9249
- 📜 Remove loadspritegfx by @hedara90 in #8497
- Instead of having to load assets used in move animations manually, they’re loaded by the commands that use them instead.
loadspritegfxhad an implicitdelay 1in it, if downstream animations depended on that, an explicitdelay 1needs to be added manually.- Has migration script, run
python migration_scripts/1.15/remove_loadspritegfx.py
- Minor IsBattlerWeatherAffected refactor by @AlexOn1ine in #9510
- gBerries refactor + untangling berry indices from item IDs by @cfmnephrite in #7305
- Makes Poltergeist and Fling messages into a pre attack effect by @PhallenTree in #9610
- Rework special trainer IDs by @FosterProgramming in #9269
- Adds queued switches for Move End switches by @PhallenTree in #9494
- Non-forced switches in Move End are now queued, like in-game.
- Refactor Battle Messages by @LinathanZel in #9655
- Refactor/trainer pic info by @cawtds in #9475
- Magic Bounce / Magic Coat/ Snatch refactor by @AlexOn1ine in #9674
- Unify AI prediction handling by @Pawkkie in #9575
- Make End Turn events use BattleScriptCall (return instead of end2) by @PhallenTree in #9680
- Changed end of turn scripts to use
returninstead ofend2. end2scripts may still be used, but it’s recommended to switch them toreturnscripts
- Changed end of turn scripts to use
- Move relearner refactor by @FosterProgramming in #9006
- Calling the move relearner from a script ignores config
- Move Relearner warns you if a TM will be used
- When the move relearner is called from a menu, it doesn’t quit the move relearner automatically, you can learn as many moves as you want before leaving
- The function
RedrawListMenunow properly calls themoveCursorFunccallback the same way it is done when the list is drawn for the first time
- Automate regional Pokedex orders by @fdeblasio in #8930
- Adds queued switches for EndTurn switches by @PhallenTree in #9717
- End of turn switches are now queued.
- Emergency Exit and Wimp Out now activate at the end of the turn after an event left the ability user under 50% HP if it wasn’t healed by a healing item in that event.
- Adds AreMultiPartiesFullTeams and Test_BattlersShareParty handling to tests by @grintoul1 in #9751
- Shouldswitch refactor to use
SwitchContextby @Pawkkie in #9847 - Adds CalcValue struct to MoveEnd by @AlexOn1ine in #9859
- Stat Change Refactor by @AlexOn1ine in #9730
- Customizeable Pledge Moves by @AlexOn1ine in #9918
🧬 General 🧬
Added
- feat(debug): add quickstart from titlescreen by @miriamlefae in #9641
Changed
- Remove unnecessary EWRAM allocation for cable car animation by @hedara90 in #9207
- Cleaned up Match Call by @fdeblasio in #8816
- Add Instructions on how to build FRLG by default by @HunarPG in #9415
- Random EWRAM and IWRAM savings by @estellarc in #9231
- Typeless enums for OBJ_EVENT_GFX, Multichoice Ids, and Facility Classes by @grintoul1 in #9066
- preproc: (shared) COMPOUND_STRING by @mrgriffin in #9086
- Removes unused files by @FosterProgramming in #9420
- pr adding telekinesis ban list to species data by @Meister-anon in #9410
- Change
TrainersMon’s ball fromu8toenum PokeBallby @estellarc in #9467 - Converted script_menu.h strings to COMPOUND_STRINGs by @fdeblasio in #9051
- Clean up boolean comparisons by @Bassoonian in #9376
- Fix enum usage by @Bassoonian in #9466
- Master merge 2026-03-14 by @AsparagusEduardo in #9522
- Some bool cleanup by @FosterProgramming in #9539
- Replace MAX_GIFT_RIBBONS with NUM_GIFT_RIBBONS by @FosterProgramming in #9542
- Remove PARTNER_DUMMY need by adding additional difficulty when TESTING by @grintoul1 in #9562
GenConfignaming cleanup by @Pawkkie in #9529- fix(pokedex_plus_hgss): revert incorrect usage of species enum by @miriamlefae in #9570
- Remove leftover DebugPrintfs by @mrgriffin in #8213
- Fix Kanto object event graphic names by @fdeblasio in #9537
- Consolidated Battle Tower classes and object events by @fdeblasio in #9241
- Rework special trainer IDs by @FosterProgramming in #9269
- identified deprecated values by @Meister-anon in #9578
- Removed STRINGID_PKMNISGLOWING by @fdeblasio in #9634
- 📜 Consolidate decoration values by @fdeblasio in #9624
- Process for running migrations script
- Keep your modified
src/data/decorations/description.handsrc/data/decorations/icon.hwhen resolving conflicts - Run migration script
- Remove
src/data/decorations/description.handsrc/data/decorations/icon.h
- Convert move description variables into COMPOUND_STRINGs by @fdeblasio in #9667
- Converted move animation magic numbers to defines by @fdeblasio in #9677
- Move relearner refactor by @FosterProgramming in #9006
- Calling the move relearner from a script ignores config
- Move Relearner warns you if a TM will be used
- When the move relearner is called from a menu, it doesn’t quit the move relearner automatically, you can learn as many moves as you want before leaving
- The function
RedrawListMenunow properly calls themoveCursorFunccallback the same way it is done when the list is drawn for the first time
- Remove hex values from BattlePokemon by @AlexOn1ine in #9711
- Support non-contiguous SE/MUS IDs in debug menu by @mrgriffin in #9713
- Fix multi_do multiple-definition error by @mrgriffin in #9725
- Automate regional Pokedex orders by @fdeblasio in #8930
- Learnset Helper: Remove unnecessary order-only dependencies by @mrgriffin in #9721
- Fix spaces, spelling, and grammar by @fdeblasio in #9761
- Revert an overzealous find-replace by @rayrobdod in #9780
- Improve
FillSpriteRectperformance by @estellarc in #9813 - Move wild encounter related config to
wild_encounterconfig file by @FosterProgramming in #9879- The following configs have been moved to
include/config/wild_encounter.h:B_FLAG_FORCE_DOUBLE_WILD,B_SMART_WILD_AI_FLAG,B_FLAG_NO_CATCHING,B_FLAG_NO_RUNNING,B_DOUBLE_WILD_CHANCE,B_DOUBLE_WILD_REQUIRE_2_MONS,B_WILD_NATURAL_ENEMIES,OW_FLAG_NO_ENCOUNTER - Their prefix has been changed from
B_orOW_toWE_
- The following configs have been moved to
- Fix stray tab in C file by @hedara90 in #9914
- Remove two unused functions from src/event_object_movement.c by @FosterProgramming in #9911
- Reduce battle heap usge outside main battle screen by @FosterProgramming in #9906
- chore: removed old changelog file by @pkmnsnfrn in #9915
- 📜 Adds migration script for trainer pic refactor by @AlexOn1ine in #9788
- Refactor a more generic way to handle complex debug menu actions by @FosterProgramming in #9890
- config/wild_encounter.h cleanup by @FosterProgramming in #9965
- Various Follower Sprite Fixes from issue #5135 by @Liamjd14 in #9990
- Give enum BattleTrainer more user friendly entry names by @grintoul1 in #10051
- Key renames:
- (1)
gEnemyPartyCount->gPartiesCount[B_TRAINER_OPPONENT_A]; - (2)
gPlayerPartyCount->gPartiesCount[B_TRAINER_PLAYER]; - (3)
gEnemyParty->gParties[B_TRAINER_OPPONENT_A]; - (4)
gPlayerParty->gParties[B_TRAINER_PLAYER]; - NEW:
- Second trainer party count is now
gPartiesCount[B_TRAINER_OPPONENT_B]; - Second trainer party is now
gParties[B_TRAINER_OPPONENT_B]; - Multi partner party count is now
gPartiesCount[B_TRAINER_PARTNER]; - Multi partner party is now
gParties[B_TRAINER_PARTNER];
- Adds deprecation warnings to old party and party count globals by @grintoul1 in #9885
gEnemyPartyandgEnemyPartyCountwill be removed in 1.17.0
- Describe compressed tilemaps with INCGFX by @FosterProgramming in #10036
- most incbin of compressed tilemap replaced with incgfx that make the compression process more explicit
- 28//05/26 Master to upcoming merge by @AlexOn1ine in #10070
- chore(credits): change kildemal to miriam in credits by @miriamlefae in #10078
Fixed
- Use PRIu64 to print appropriate variable length in preproc by @FosterProgramming in #9463
- fix: battle message assert no longer calls for gText_Blank by @pkmnsnfrn in #9505
- Fix upcoming compile by @AlexOn1ine in #9579
- Removes DecompressTrainerBackPic fixing multibattles with 5-frame partner back sprites by @grintoul1 in #9608
- Fix spritesheet_rules.mk for renamed FRLG objects by @hedara90 in #9668
- fix meganium abilities by @cawtds in #9767
- Fix declaration after label by @FosterProgramming in #9835
- fix(debug_menu): fix flicker when used when map pop-up active by @miriamlefae in #9872
- Cleanup of Dexnav checks by @hedara90 in #9913
- Fix font shadow not being cleared in safari healthbox by @FosterProgramming in #9912
- Fix trainer defines by @FosterProgramming in #9964
- Fixes double battle rematches being single battles by @luuma in #9963
- Fix
FillSpriteRectwrongly triggering an assert by @estellarc in #9973 - Prevent error in title screen cinematic if Kyogre/Groudon are disabled by @fisham33 in #9995
- Fix Dynamic Summary Screen Type by @AlexOn1ine in #9861
- Fix battle debug not properly freeing some tilemaps by @FosterProgramming in #10014
- Fix incorrect action handler being set after rearranging moves in Emerald tutorial battle by @hedara90 in #10015
- mapjson assume undefined layout and maps match the compiled version by @FosterProgramming in #9949
- Set daily seed on new game by @FosterProgramming in #10050
- 📜 Migration script for pret#2200 by @mrgriffin in #10061
🗺️ Overworld 🗺️
Added
- Improved FRLG Map Previews by @Bivurnum in #9557
- Implemented and improved FRLG Map Previews
- feat (shopMenu): conditional item appearances by @mudskipper13 in #9425
- added a default shop list in
data/scripts/mart_clerk.incthat is used ifpokemartis called without arguments - you can enabled a criteria function in the item definition to prevent the item from appearing in shop if the condition is not met, more details here
- added a default shop list in
- Reworked event evolution
tryspecialevoby @FosterProgramming in #7573tryspecialevonow takes a argument describing what type of evo occurs so if a pokemon like kubfu has multiple trigger evo, it can properly choose between them- if used with tryMultiple=FALSE, it applies to the first eligible Pokemon in party, if TRUE, it applies to all eligible pokemon in party
- the command now also fills VAR_SPECIAL_RESULT when used, when tryMultiple is TRUE, it will contain the number of pokemon that finished their evolution. When used with FALSE, it will contain EVO_EVENT_IMPOSSIBLE (0) if it didn’t find an eligible pokemon, EVO_EVENT_INTERRUPTED (1) if the player stopped the evo and EVO_EVENT_SUCCESSFUL (2) if the evo finished
- Show floor number in map popup by @FosterProgramming in #9461
- The floor number feature from FRLG is now available in Emerald and working in FireRed. You can add a “floor_number” argument to you map json and when a popup for the map will appear, it will add 1F, 2F, B1. You can also use the value “FLOOR_ROOFTOP” (or 127) to show “ROOFTOP” like in the celadon mall
- Add setmetatileinrange Script Command by @ghoulslash in #8628
- Basic daily seed by @FosterProgramming in #9920
- Adds a new config OW_USE_DAILY_SEED that stores a random number in save file updated every day
- Add Dynamic Weather Option by @jtebbe in #9877
- Added dynamic weather as a weather option for map headers for random or semi-random weather. See docs/tutorials/how_to_dynamic_weather for more information.
- Random Mon Generation by @jtebbe in #9896
- Added random species, item, ball, and move generation. For information on how to use this feature, check out the docs
Changed
- Remove template abstraction for pokedex area map by @FosterProgramming in #9765
- Clean mail-related duplicate code by @FosterProgramming in #9762
- Remove relearner from party menu by @FosterProgramming in #9693
- The P_PARTY_MOVE_RELEARNER config is not supported anymore, use
P_SUMMARY_SCREEN_MOVE_RELEARNERfor that functionality instead
- The P_PARTY_MOVE_RELEARNER config is not supported anymore, use
- Refactor rock climb and defog to be defined at all times by @BluSunrize in #9819
- Cleanup and tests for ow_abilities.c by @FosterProgramming in #9850
- Overworld Encounters by @Bivurnum in #8434
Fixed
- Fade background and sprites simulatneously by @FosterProgramming in #9407
- Fix blend-immune sprite not fading properly by @FosterProgramming in #9549
- Reset objPaletteToggle after Software Fade by @HashtagMarky in #9707
- Properly cancel move relearner NPC after refusing to learn a move by @FosterProgramming in #9774
- fix (namebox): back 2 back namebox no longer flickers by @mudskipper13 in #9905
- Fix move relearner from summary screen from pc by @FosterProgramming in #9903
- Prevent reflection tag palette collisions by @moostoet in #9925
- Fixed incorrect overworld reflection palettes when shiny and non-shiny Pokemon object events are loaded near water at the same time.
- Modify GetAvailableObjectEventId to return objectEventId by value instead of by reference by @FosterProgramming in #9910
- Fix FRLG player sprite glitch when fishing after surfing by @moostoet in #9930
- Fixed player overworld sprite tile corruption when switching between graphics with the same OAM size enum but different frame byte sizes, such as Surfing to Fishing in FireRed.
- Bugfix: OWEs set not to despawn can now be set not to despawn as a result of movement type by @Bivurnum in #9968
- Bug fix: On-step scripts now only happen once the FNPC out of door task is complete by @Bivurnum in #9991
- Re-add
DetermineFollowerNPCDirectionsame coord check by @HashtagMarky in #10020 - Fix Generated OWEs Accessing Garbage Data by @HashtagMarky in #10066
🐉 Pokémon 🐉
Added
- refactor(graphics): make spinda spots generic by @miriamlefae in #9594
Changed
- Separate Perfect IV Logic Into New Function by @HashtagMarky in #9173
- Allow other species to have Shedinja HP handling by @AsparagusEduardo in #9135
- Add Species enum by @Bassoonian in #9507
- feat: Add some constants nudging users where to put their custom species by @lhearachel in #9558
- Overworld Encounters by @Bivurnum in #8434
- Garchomp Mega Z Sprites by @Liamjd14 in #9945
- Updated Gen VII animations by @Tacobell24 in #9974
- BoxPokemon: Less error-prone “static asserts” by @mrgriffin in #10071
Fixed
- fix: Modernize the conversion formula for imperial weights by @lhearachel in #9690
- Add Spot Coord Limits by @HashtagMarky in #9796
- Fix reverse-cry off-by-one if Porygon disabled by @hedara90 in #10004
⚔️ Battle General ⚔️
Added
- Add Gen 2-3 and Gen 4 Encore timers by @Cle-bit in #9429
- Gen 5+ Uproar with config by @PhallenTree in #9616
- Gen 5+ Uproar was implemented. Uproar’s implementation is split between the configs
B_UPROAR,B_UPROAR_IGNORE_SOUNDPROOFandB_UPROAR_TURNS.
- Gen 5+ Uproar was implemented. Uproar’s implementation is split between the configs
- 12v12 capability by @grintoul1 in #8943
- Key renames:
- (1) gEnemyPartyCount ->
gPartiesCount[B_TRAINER_1]; Later becomesgPartiesCount[B_TRAINER_OPPONENT_A] - (2) gPlayerPartyCount ->
gPartiesCount[B_TRAINER_0]; Later becomesgPartiesCount[B_TRAINER_PLAYER] - (3) gEnemyParty ->
gParties[B_TRAINER_1]; Later becomesgParties[B_TRAINER_OPPONENT_A] - (4) gPlayerParty ->
gParties[B_TRAINER_0]; Later becomesgParties[B_TRAINER_PLAYER] - Temporary defines for
gEnemyPartyandgEnemyPartyCountwill remain for one release cycle to allow downstream to integrate changes at their own pace. These come with deprecation messages. - Defines for
gPlayerPartyandgPlayerPartyCountwill remain in place for the forseeable future, with deprecation warnings. These can continue to be used at users’ own risk. - Changes to
struct TrainerreducingencounterMusicfrom 7 bits to 4, andmugshotsfrom 6 bits to 3. Combined two separateu8bitfields to a singleu16with 2 bits of padding available if needed by users struct RecordedBattlehas reducedplayerGenderto a 4-bit u8 to offset some space taken up by 4 parties. For developers using more than 2 player genders, this will require either adjusting or reverting to its previous form, which will require a reduction of theBATTLER_RECORD_SIZEdefine located above the struct.- Other restructuring of
struct RecordedBattleundertaken to absorb some of the hit fromBATTLER_RECORD_SIZE
- Add Held Berry Animation by @LinathanZel in #9168
Changed
- Simplify Scale Shot effect activation by @PhallenTree in #9408
- Fling Refactor by @AlexOn1ine in #9176
- Reduce heap usage in battle by @hedara90 in #9121
- update poparraywithBattlers Arg to prevent warning by @Meister-anon in #9388
- Minor dancer clean up/consolidation by @AlexOn1ine in #9417
- Refactor synchronize and cure berry timing by @AlexOn1ine in #9446
- Minor IsBattlerWeatherAffected refactor by @AlexOn1ine in #9510
- SetMoveEffect cleanup by @PhallenTree in #9514
- Move Effects are now (mostly) not hardcoded to only work on the attacker/target.
- Fill out missing type info by @kevinvanrijn in #9525
- Makes Poltergeist and Fling messages into a pre attack effect by @PhallenTree in #9610
- Adds queued switches for Move End switches by @PhallenTree in #9494
- Non-forced switches in Move End are now queued, like in-game.
- BattleCalcValues usage and rename BattleContext back to DamageContext by @AlexOn1ine in #9657
- Refactor Battle Messages by @LinathanZel in #9655
- Refactor/trainer pic info by @cawtds in #9475
- Magic Bounce / Magic Coat/ Snatch refactor by @AlexOn1ine in #9674
- Make End Turn events use BattleScriptCall (return instead of end2) by @PhallenTree in #9680
- Changed end of turn scripts to use
returninstead ofend2. end2scripts may still be used, but it’s recommended to switch them toreturnscripts
- Changed end of turn scripts to use
- Slight restructure for Defog and Tidy Up by @AlexOn1ine in #9714
- Mega Sol and Dragonize by @luuma in #9735
- Adds queued switches for EndTurn switches by @PhallenTree in #9717
- End of turn switches are now queued.
- Emergency Exit and Wimp Out now activate at the end of the turn after an event left the ability user under 50% HP if it wasn’t healed by a healing item in that event.
- Clarify isFirstTurn usage with wrappers by @AlexOn1ine in #9786
- Add Spicy Spray by @LinathanZel in #9769
- Clean up for eject item changes by @AlexOn1ine in #9832
- Adds CalcValue struct to MoveEnd by @AlexOn1ine in #9859
- IsAnyTargetAffected and GetDynamicMoveType changes by @AlexOn1ine in #9898
- Stat Change Refactor by @AlexOn1ine in #9730
- Rename follow up for Stat Change Refactor by @AlexOn1ine in #9928
- Minor Battle Struct clean up and script clean up by @AlexOn1ine in #9916
- Customizeable Pledge Moves by @AlexOn1ine in #9918
- Integrate accuracy check into canceler by @AlexOn1ine in #9939
- Small Dome updates by @AsparagusEduardo in #9989
- Align outdated move descriptions with current mechanics by @Cle-bit in #10011
- Further stat change refactor clean up by @AlexOn1ine in #10057
- Align wind move flags with current mechanics by @Cle-bit in #10016
Fixed
- Refactor Sky Drop and rampage confusion by @AlexOn1ine in #9249
- Bide Refactor by @AlexOn1ine in #9532
- Fix wild doubles only having 1 mon by @grintoul1 in #9729
- Use GetBattlerTrainer instead of GetBattlerSide in GetBattlerPartyState by @Nopinou in #9811
- Adjustments for Eject Items / Mirror Herb / White Herb by @AlexOn1ine in #9784
- Adds tests for switch battle messages and switch AI bugfix by @grintoul1 in #9799
- Fix contact damage message printing by @Kasenn in #9856
- Make healthbox invisible for previous mon after opening party screen by @PhallenTree in #9864
- Fix Ruin abilities respecting each other even if deactivated by @AlexOn1ine in #9901
- Fix Aroma Veil not blocking Destiny Knot infatuation by @Cle-bit in #9921
- Fix incorrect ability battle history recording by @Cle-bit in #9917
- Fix in-battle summary preserving battle party order by @moostoet in #9843
- Correct status move miss messaging by @moostoet in #9929
- Fixed status moves using
accuracycheck BattleScript_ButItFailedso visible-target accuracy misses print the avoided-attack message instead ofBut it failed!.
- Fixed status moves using
- Fix Air Balloon not popping when damaging moves hit a Substitute by @Cle-bit in #9943
- Fix Eject Pack switch when the holder is trapped by @moostoet in #9946
- Fix Fling Berry effects not being blocked by Covert Cloak and Shield Dust by @Cle-bit in #9951
- Fix Air Balloon not popping when holder faints from a damaging hit by @Cle-bit in #9952
- Fix stale hit state after multihit moves miss mid-sequence by @Cle-bit in #9937
- Future Sight fixes and tests by @AlexOn1ine in #9942
- Preserve Encore target last move after flinch by @moostoet in #9940
- Fixes Guard Dog by @AlexOn1ine in #9957
- Fix geomancy being a two turn move by @AlexOn1ine in #9972
- Fix Guard Dog activating when Intimidate is blocked or cannot lower Attack by @Cle-bit in #9954
- Fix Cute Charm infatuation message by @PhallenTree in #9982
- Fix Red Card activating when attacker faints by @Cle-bit in #9976
- Fix Utility Umbrella interactions with Weather Ball in sun/rain by @Cle-bit in #9975
- Fix multi hit result message by @AlexOn1ine in #9983
- Dancer activation order config + upcoming bugfixes by @PhallenTree in #9988
- Fix Toxic Debris checking Toxic Spikes cap on the wrong side by @Cle-bit in #10002
- Fix Infiltrator bypassing ally Safeguard for confusion effects by @Cle-bit in #10007
- Fixes Trace not activating when reobtained after activation by @PhallenTree in #10024
- Fix King’s Rock flinch chance with Serene Grace and rainbow by @Cle-bit in #10028
- Fixes Swagger into Own Tempo target softlock by @PhallenTree in #10032
- Fix incorrect Loaded Dice priority over Skill Link for Population Bomb by @Cle-bit in #10003
- Fix gLastMoves and where it’s set by @LinathanZel in #9999
- Fix Strength Sap activation on miss by @AlexOn1ine in #10035
- Fix Strength Sap activation on miss and buffer correct stat by @AlexOn1ine in #10034
- Fix Poison Puppeteer target tracking by @Cle-bit in #10047
- Fix Teraform activations timing by @AlexOn1ine in #10040
- Fix Syrup Bomb end-turn stat drop source for Defiant and Competitive by @Cle-bit in #10042
- Fix Symbiosis triggering after Eject items consumed by @Cle-bit in #10038
- Fix Illusion reveal on fainting without attack damage by @Cle-bit in #10030
- Fix end-turn form changes for fainted battlers by @Cle-bit in #10029
- Fix already-status messages using the wrong battler by @Cle-bit in #10064
- Fix 12v12 partner party menu slot ptr by @grintoul1 in #10059
- Fixed NoAliveMonsForPlayer for multibattles by @grintoul1 in #10039
- Fix Spicy Spray triggering on party future sight attacker by @AlexOn1ine in #10072
- Fix erroneous failure message for stat change moves by @AlexOn1ine in #10074
- Fix Competetive, Defiant and Adrenaline Orb triggering when at min stat by @hedara90 in #10077
- Fix Mega Sol weather interactions and Piercing Drill AI checks by @Cle-bit in #10079
🤹 Moves 🤹
Changed
- Made moves’ animation’s AbsorbEffects more consistent by @fdeblasio in #9063
- Create functions for repeated move animations by @fdeblasio in #9142
- Move animation call depth increase by @hedara90 in #9473
- 📜 Remove loadspritegfx by @hedara90 in #8497
- Instead of having to load assets used in move animations manually, they’re loaded by the commands that use them instead.
loadspritegfxhad an implicitdelay 1in it, if downstream animations depended on that, an explicitdelay 1needs to be added manually.- Has migration script, run
python migration_scripts/1.15/remove_loadspritegfx.py
- Converts move animation hex numbers to decimal by @fdeblasio in #9172
- Created macros for fist and foot animations by @fdeblasio in #9676
Fixed
- Fix Substitute breaking when used by opponentRight in double battles by @hedara90 in #9474
- Fixed Stuff Cheeks animation by @fdeblasio in #9564
- Fix move anim pal blending being discarded by @hedara90 in #9595
- Fix move anim migration script by @hedara90 in #9511
🎭 Abilities 🎭
Changed
- Add basic Z-A Mega ability data (from Champions Regulation M-A) by @kittenchilly in #9678
- ABILITY_PIERCING_DRILL by @kittenchilly in #9740
- Mega Sol and Dragonize by @luuma in #9735
- Add Spicy Spray by @LinathanZel in #9769
🧶 Items 🧶
Changed
- gBerries refactor + untangling berry indices from item IDs by @cfmnephrite in #7305
Fixed
- Fix Competetive, Defiant and Adrenaline Orb triggering when at min stat by @hedara90 in #10077
🤖 Battle AI 🤖
Added
- AI considers Defense‑boosting moves before using Body Press by @Cle-bit in #9360
- AI uses Beat Up on allies to power up Rage Fist in doubles by @Cle-bit in #9359
- AI avoids bad moves when a faster foe is predicted to go semi-invulnerable by @Cle-bit in #9358
- Improve Rest sleep AI logic with cleanup and tests by @Cle-bit in #9349
- Smarter Doubles Fake Out AI + EFFECT_FIRST_TURN_ONLY tests by @grintoul1 in #8664
- Allow both AI opponents in doubles to switch out on the same turn by @Pawkkie in #9451
- Add AI internal config support by @Pawkkie in #9460
- Switch AI sees stat, volatile, status, and HP changes on switchin in calcs by @Pawkkie in #9124
- Adds ai calcs for Bolt Beak, Payback and Analytic by @AlexOn1ine in #9548
- Add AI contextual damage roll configs by @Pawkkie in #9568
- Add Intimidate cycling logic for ai switching by @Cle-bit in #9551
- Config to randomize the order AI mons compute logic in double battles by @Pawkkie in #9462
- Implement Wish Passing in ShouldSwitch by @moostoet in #8472
- AI trainers with
AI_FLAG_SMART_SWITCHINGwill now consider switching to pass Wish to an injured teammate when they have a bad matchup and a better switch-in candidate exists.
- AI trainers with
Changed
- Adds bridge between battle engine and ai calcs by @AlexOn1ine in #9116
- AI scores Order Up stat boosts under Commander by @Cle-bit in #9107
- Use precalculated speedStats for AI speed comparison by @AlexOn1ine in #9587
- Damage roll speed wizardry by @Pawkkie in #9630
- Unify AI prediction handling by @Pawkkie in #9575
- Improve AI calc speed with affection hearts by @Pawkkie in #9709
- Remove reundant weather check in IsDamageMoveUnusable by @AlexOn1ine in #9755
- Remove redundant SetBattlerAiData call in GetMostSuitableMonToSwitchInto by @AlexOn1ine in #9757
- Isolate AI thinking time tests by @Pawkkie in #9779
- Shouldswitch refactor to use
SwitchContextby @Pawkkie in #9847 - Incoming and predicted move function cleanup by @Pawkkie in #9857
Fixed
- Fix frame counter in multi battles by @AlexOn1ine in #9596
- Use
ctxinGetDefenderPartnerAbilitiesModifierby @Pawkkie in #9710 - Adds AreMultiPartiesFullTeams and Test_BattlersShareParty handling to tests by @grintoul1 in #9751
- Adds tests for switch battle messages and switch AI bugfix by @grintoul1 in #9799
- Remove Defiant and Competitive from Partner Ability check in Doubles by @grintoul1 in #9985
- Fix AI partner incorrectly having flags set to Battler1 instead of Battler2 by @grintoul1 in #10006
🧹 Other Cleanup 🧹
- Remove unnecessary EWRAM allocation for cable car animation by @hedara90 in #9207
- Adds bridge between battle engine and ai calcs by @AlexOn1ine in #9116
- Made moves’ animation’s AbsorbEffects more consistent by @fdeblasio in #9063
- Simplify Scale Shot effect activation by @PhallenTree in #9408
- Cleaned up Match Call by @fdeblasio in #8816
- Random EWRAM and IWRAM savings by @estellarc in #9231
- Separate Perfect IV Logic Into New Function by @HashtagMarky in #9173
- Typeless enums for OBJ_EVENT_GFX, Multichoice Ids, and Facility Classes by @grintoul1 in #9066
- Removes unused files by @FosterProgramming in #9420
- pr adding telekinesis ban list to species data by @Meister-anon in #9410
- update poparraywithBattlers Arg to prevent warning by @Meister-anon in #9388
- Minor dancer clean up/consolidation by @AlexOn1ine in #9417
- Converted script_menu.h strings to COMPOUND_STRINGs by @fdeblasio in #9051
- fix: battle message assert no longer calls for gText_Blank by @pkmnsnfrn in #9505
- Clean up boolean comparisons by @Bassoonian in #9376
- Fix enum usage by @Bassoonian in #9466
- SetMoveEffect cleanup by @PhallenTree in #9514
- Move Effects are now (mostly) not hardcoded to only work on the attacker/target.
- Some bool cleanup by @FosterProgramming in #9539
- Replace MAX_GIFT_RIBBONS with NUM_GIFT_RIBBONS by @FosterProgramming in #9542
- Remove PARTNER_DUMMY need by adding additional difficulty when TESTING by @grintoul1 in #9562
GenConfignaming cleanup by @Pawkkie in #9529- fix(pokedex_plus_hgss): revert incorrect usage of species enum by @miriamlefae in #9570
- Converts move animation hex numbers to decimal by @fdeblasio in #9172
- Remove leftover DebugPrintfs by @mrgriffin in #8213
- identified deprecated values by @Meister-anon in #9578
- Damage roll speed wizardry by @Pawkkie in #9630
- Removed STRINGID_PKMNISGLOWING by @fdeblasio in #9634
- BattleCalcValues usage and rename BattleContext back to DamageContext by @AlexOn1ine in #9657
- Convert move description variables into COMPOUND_STRINGs by @fdeblasio in #9667
- Improve AI calc speed with affection hearts by @Pawkkie in #9709
- Remove hex values from BattlePokemon by @AlexOn1ine in #9711
- Slight restructure for Defog and Tidy Up by @AlexOn1ine in #9714
- Learnset Helper: Remove unnecessary order-only dependencies by @mrgriffin in #9721
- Fix spaces, spelling, and grammar by @fdeblasio in #9761
- Remove reundant weather check in IsDamageMoveUnusable by @AlexOn1ine in #9755
- Remove redundant SetBattlerAiData call in GetMostSuitableMonToSwitchInto by @AlexOn1ine in #9757
- Use
ctxinGetDefenderPartnerAbilitiesModifierby @Pawkkie in #9710 - Isolate AI thinking time tests by @Pawkkie in #9779
- Remove template abstraction for pokedex area map by @FosterProgramming in #9765
- Clarify isFirstTurn usage with wrappers by @AlexOn1ine in #9786
- Created macros for fist and foot animations by @fdeblasio in #9676
- Clean mail-related duplicate code by @FosterProgramming in #9762
- Remove relearner from party menu by @FosterProgramming in #9693
- The P_PARTY_MOVE_RELEARNER config is not supported anymore, use
P_SUMMARY_SCREEN_MOVE_RELEARNERfor that functionality instead
- The P_PARTY_MOVE_RELEARNER config is not supported anymore, use
- Refactor rock climb and defog to be defined at all times by @BluSunrize in #9819
- Clean up for eject item changes by @AlexOn1ine in #9832
- Remove known failing for Blunder Policy/Darts interaction by @AlexOn1ine in #9841
- Cleanup and tests for ow_abilities.c by @FosterProgramming in #9850
- IsAnyTargetAffected and GetDynamicMoveType changes by @AlexOn1ine in #9898
- Move wild encounter related config to
wild_encounterconfig file by @FosterProgramming in #9879- The following configs have been moved to
include/config/wild_encounter.h:B_FLAG_FORCE_DOUBLE_WILD,B_SMART_WILD_AI_FLAG,B_FLAG_NO_CATCHING,B_FLAG_NO_RUNNING,B_DOUBLE_WILD_CHANCE,B_DOUBLE_WILD_REQUIRE_2_MONS,B_WILD_NATURAL_ENEMIES,OW_FLAG_NO_ENCOUNTER - Their prefix has been changed from
B_orOW_toWE_
- The following configs have been moved to
- Update maintainer list by @pkmnsnfrn in #9909
- Fix stray tab in C file by @hedara90 in #9914
- Remove two unused functions from src/event_object_movement.c by @FosterProgramming in #9911
- Reduce battle heap usge outside main battle screen by @FosterProgramming in #9906
- chore: removed old changelog file by @pkmnsnfrn in #9915
- Mega Sol test adjustments by @AlexOn1ine in #9865
- Rename follow up for Stat Change Refactor by @AlexOn1ine in #9928
- Incoming and predicted move function cleanup by @Pawkkie in #9857
- Minor Battle Struct clean up and script clean up by @AlexOn1ine in #9916
- Refactor a more generic way to handle complex debug menu actions by @FosterProgramming in #9890
- Integrate accuracy check into canceler by @AlexOn1ine in #9939
- config/wild_encounter.h cleanup by @FosterProgramming in #9965
- Small Dome updates by @AsparagusEduardo in #9989
- Align outdated move descriptions with current mechanics by @Cle-bit in #10011
- Further stat change refactor clean up by @AlexOn1ine in #10057
- Give enum BattleTrainer more user friendly entry names by @grintoul1 in #10051
- Key renames:
- (1)
gEnemyPartyCount->gPartiesCount[B_TRAINER_OPPONENT_A]; - (2)
gPlayerPartyCount->gPartiesCount[B_TRAINER_PLAYER]; - (3)
gEnemyParty->gParties[B_TRAINER_OPPONENT_A]; - (4)
gPlayerParty->gParties[B_TRAINER_PLAYER]; - NEW:
- Second trainer party count is now
gPartiesCount[B_TRAINER_OPPONENT_B]; - Second trainer party is now
gParties[B_TRAINER_OPPONENT_B]; - Multi partner party count is now
gPartiesCount[B_TRAINER_PARTNER]; - Multi partner party is now
gParties[B_TRAINER_PARTNER];
- Adds deprecation warnings to old party and party count globals by @grintoul1 in #9885
gEnemyPartyandgEnemyPartyCountwill be removed in 1.17.0
- Align wind move flags with current mechanics by @Cle-bit in #10016
- Describe compressed tilemaps with INCGFX by @FosterProgramming in #10036
- most incbin of compressed tilemap replaced with incgfx that make the compression process more explicit
- BoxPokemon: Less error-prone “static asserts” by @mrgriffin in #10071
🧪 Test Runner 🧪
Added
- Smarter Doubles Fake Out AI + EFFECT_FIRST_TURN_ONLY tests by @grintoul1 in #8664
- Add AI internal config support by @Pawkkie in #9460
- Add Gen 2-3 and Gen 4 Encore timers by @Cle-bit in #9429
- Adds ai calcs for Bolt Beak, Payback and Analytic by @AlexOn1ine in #9548
- 12v12 capability by @grintoul1 in #8943
- Key renames:
- (1) gEnemyPartyCount ->
gPartiesCount[B_TRAINER_1]; Later becomesgPartiesCount[B_TRAINER_OPPONENT_A] - (2) gPlayerPartyCount ->
gPartiesCount[B_TRAINER_0]; Later becomesgPartiesCount[B_TRAINER_PLAYER] - (3) gEnemyParty ->
gParties[B_TRAINER_1]; Later becomesgParties[B_TRAINER_OPPONENT_A] - (4) gPlayerParty ->
gParties[B_TRAINER_0]; Later becomesgParties[B_TRAINER_PLAYER] - Temporary defines for
gEnemyPartyandgEnemyPartyCountwill remain for one release cycle to allow downstream to integrate changes at their own pace. These come with deprecation messages. - Defines for
gPlayerPartyandgPlayerPartyCountwill remain in place for the forseeable future, with deprecation warnings. These can continue to be used at users’ own risk. - Changes to
struct TrainerreducingencounterMusicfrom 7 bits to 4, andmugshotsfrom 6 bits to 3. Combined two separateu8bitfields to a singleu16with 2 bits of padding available if needed by users struct RecordedBattlehas reducedplayerGenderto a 4-bit u8 to offset some space taken up by 4 parties. For developers using more than 2 player genders, this will require either adjusting or reverting to its previous form, which will require a reduction of theBATTLER_RECORD_SIZEdefine located above the struct.- Other restructuring of
struct RecordedBattleundertaken to absorb some of the hit fromBATTLER_RECORD_SIZE
- Adds Ghost battle tests by @grintoul1 in #9805
Changed
- AI scores Order Up stat boosts under Commander by @Cle-bit in #9107
- Isolate AI thinking time tests by @Pawkkie in #9779
- Remove known failing for Blunder Policy/Darts interaction by @AlexOn1ine in #9841
- Mega Sol test adjustments by @AlexOn1ine in #9865
- Add EFFECTIVENESS_SE for tests by @ghoulslash in #7360
- Add test for Curse + Baton Pass interaction by @hedara90 in #10000
- Set higher HP in Gem Damage calculation test fixing gen5 config result by @grintoul1 in #10017
Fixed
- Adds tests for switch battle messages and switch AI bugfix by @grintoul1 in #9799
- Fix failing Dream Eater test when target is behind Substitute (Gen 5+) by @Cle-bit in #9977
- Fix AI partner incorrectly having flags set to Battler1 instead of Battler2 by @grintoul1 in #10006
- Fix Electrify status move test expectations by @Cle-bit in #10021
- Fix 12v12 partner party menu slot ptr by @grintoul1 in #10059
- Fixed NoAliveMonsForPlayer for multibattles by @grintoul1 in #10039
📚 Documentation 📚
- Add Instructions on how to build FRLG by default by @HunarPG in #9415
- Add Species enum by @Bassoonian in #9507
- Update maintainer list by @pkmnsnfrn in #9909
- chore: removed old changelog file by @pkmnsnfrn in #9915
- Updated expansion scope to include Champions by @pkmnsnfrn in #10054
- updated DNS tutorial to be more clear by @pkmnsnfrn in #10067
👻 Sprites 👻
Changed
- Various Follower Sprite Fixes from issue #5135 by @Liamjd14 in #9990
Fixed
- Prevent reflection tag palette collisions by @moostoet in #9925
- Fixed incorrect overworld reflection palettes when shiny and non-shiny Pokemon object events are loaded near water at the same time.
📦 Branch Synchronisation 📦
pret
- 15th of May, 2026 in #9986
- Add smol artifacts and tools to .gitignore by @AsparagusEduardo in pret#2236
- Name values used by CompareMonSize by @rayrobdod in pret#2241
- Extract GiveGiftRibbonToParty from file about size records by @rayrobdod in pret#2240
- Implicit waitstate for special/specialvars by @mrgriffin in pret#2200
- Added enum for IsMonDisobedient by @Mitsunee in pret#2212
- Document gym leader match call texts by @GriffinRichards in pret#2231
BtlController_EmitTwoReturnValuescleanup by @AsparagusEduardo in pret#2140- Fix fakematch in DynamicPlaceholderTextUtil_Reset by @mike-goutokuji in pret#2258
- Fix fakematch in AllocateBattleResources by @mike-goutokuji in pret#2261
- Fix fakematchings regarding modulo by @mike-goutokuji in pret#2264
- Remove stray dereference in union room chat by @mike-goutokuji in pret#2277
- Add gBattleOutcome == B_OUTCOME_DREW to bugfix by @mike-goutokuji in pret#2238
- INCGFX performance - define individual Make variables instead of appending to list by @ravepossum in pret#2291
- Added more move animation macros by @fdeblasio in pret#2290
- Fix line numbers in preproc diagnostics by @mrgriffin in pret#2294
- Remove incorrectly added expansion tooling by @hedara90 in pret#2295
New Contributors
- @HunarPG made their first contribution in #9415
- @kevinvanrijn made their first contribution in #9525
- @fisham33 made their first contribution in #9995
- @Tacobell24 made their first contribution in #9974
Full Changelog: https://github.com/rh-hideout/pokeemerald-expansion/compare/expansion/1.15.2...expansion/1.16.0
Version 1.15.3
## How to update
- If you haven't set up a remote, run the command `git remote add RHH https://github.com/rh-hideout/pokeemerald-expansion`.
- Once you have your remote set up, run the command `git pull RHH expansion/1.15.3
`.
🧬 General 🧬
Changed
- Expansion 1.15.2 release by @hedara90 in #9900
- chore: removed old changelog file by @pkmnsnfrn in #9915
- Various Follower Sprite Fixes from issue #5135 by @Liamjd14 in #9990
- chore(credits): change kildemal to miriam in credits by @miriamlefae in #10078
Fixed
- fix(debug_menu): fix flicker when used when map pop-up active by @miriamlefae in #9872
- Cleanup of Dexnav checks by @hedara90 in #9913
- Fix font shadow not being cleared in safari healthbox by @FosterProgramming in #9912
- Fixes double battle rematches being single battles by @luuma in #9963
- Fix
FillSpriteRectwrongly triggering an assert by @estellarc in #9973 - Prevent error in title screen cinematic if Kyogre/Groudon are disabled by @fisham33 in #9995
- Fix incorrect action handler being set after rearranging moves in Emerald tutorial battle by @hedara90 in #10015
- mapjson assume undefined layout and maps match the compiled version by @FosterProgramming in #9949
- 📜 Migration script for pret#2200 by @mrgriffin in #10061
🗺️ Overworld 🗺️
Fixed
- fix (namebox): back 2 back namebox no longer flickers by @mudskipper13 in #9905
- Fix move relearner from summary screen from pc by @FosterProgramming in #9903
- Prevent reflection tag palette collisions by @moostoet in #9925
- Fixed incorrect overworld reflection palettes when shiny and non-shiny Pokemon object events are loaded near water at the same time.
- Fix FRLG player sprite glitch when fishing after surfing by @moostoet in #9930
- Bug fix: On-step scripts now only happen once the FNPC out of door task is complete by @Bivurnum in #9991
🐉 Pokémon 🐉
Changed
- Garchomp Mega Z Sprites by @Liamjd14 in #9945
- Updated Gen VII animations by @Tacobell24 in #9974
- BoxPokemon: Less error-prone “static asserts” by @mrgriffin in #10071
Fixed
- Fix reverse-cry off-by-one if Porygon disabled by @hedara90 in #10004
⚔️ Battle General ⚔️
Changed
- Align outdated move descriptions with current mechanics by @Cle-bit in #10011
- Align wind move flags with current mechanics by @Cle-bit in #10016
Fixed
- Fix Ruin abilities respecting each other even if deactivated by @AlexOn1ine in #9901
- Fix Aroma Veil not blocking Destiny Knot infatuation by @Cle-bit in #9921
- Fix incorrect ability battle history recording by @Cle-bit in #9917
- Correct status move miss messaging by @moostoet in #9929
- Fix Air Balloon not popping when damaging moves hit a Substitute by @Cle-bit in #9943
- Fix Eject Pack switch when the holder is trapped by @moostoet in #9946
- Fix Fling Berry effects not being blocked by Covert Cloak and Shield Dust by @Cle-bit in #9951
- Fix Air Balloon not popping when holder faints from a damaging hit by @Cle-bit in #9952
- Fix stale hit state after multihit moves miss mid-sequence by @Cle-bit in #9937
- Future Sight fixes and tests by @AlexOn1ine in #9942
- Preserve Encore target last move after flinch by @moostoet in #9940
- Fix Guard Dog activating when Intimidate is blocked or cannot lower Attack by @Cle-bit in #9954
- Fix Red Card activating when attacker faints by @Cle-bit in #9976
- Fix Utility Umbrella interactions with Weather Ball in sun/rain by @Cle-bit in #9975
- Fix Toxic Debris checking Toxic Spikes cap on the wrong side by @Cle-bit in #10002
- Fix Infiltrator bypassing ally Safeguard for confusion effects by @Cle-bit in #10007
- Fix King’s Rock flinch chance with Serene Grace and rainbow by @Cle-bit in #10028
- Fix incorrect Loaded Dice priority over Skill Link for Population Bomb by @Cle-bit in #10003
- Fix gLastMoves and where it’s set by @LinathanZel in #9999
- Fix Strength Sap activation on miss by @AlexOn1ine in #10035
- Fix Poison Puppeteer target tracking by @Cle-bit in #10047
- Fix Teraform activations timing by @AlexOn1ine in #10040
- Fix Syrup Bomb end-turn stat drop source for Defiant and Competitive by @Cle-bit in #10042
- Fix Symbiosis triggering after Eject items consumed by @Cle-bit in #10038
- Fix Illusion reveal on fainting without attack damage by @Cle-bit in #10030
- Fix end-turn form changes for fainted battlers by @Cle-bit in #10029
🤖 Battle AI 🤖
Fixed
- Fix AI partner incorrectly having flags set to Battler1 instead of Battler2 by @grintoul1 in #10006
🧹 Other Cleanup 🧹
- Update maintainer list by @pkmnsnfrn in #9909
- chore: removed old changelog file by @pkmnsnfrn in #9915
- Align outdated move descriptions with current mechanics by @Cle-bit in #10011
- Align wind move flags with current mechanics by @Cle-bit in #10016
- BoxPokemon: Less error-prone “static asserts” by @mrgriffin in #10071
🧪 Test Runner 🧪
Changed
- Add EFFECTIVENESS_SE for tests by @ghoulslash in #7360
- Add test for Curse + Baton Pass interaction by @hedara90 in #10000
- Set higher HP in Gem Damage calculation test fixing gen5 config result by @grintoul1 in #10017
Fixed
- Fix failing Dream Eater test when target is behind Substitute (Gen 5+) by @Cle-bit in #9977
- Fix AI partner incorrectly having flags set to Battler1 instead of Battler2 by @grintoul1 in #10006
- Fix Electrify status move test expectations by @Cle-bit in #10021
📚 Documentation 📚
- Update maintainer list by @pkmnsnfrn in #9909
- chore: removed old changelog file by @pkmnsnfrn in #9915
- Updated expansion scope to include Champions by @pkmnsnfrn in #10054
- updated DNS tutorial to be more clear by @pkmnsnfrn in #10067
👻 Sprites 👻
Changed
- Various Follower Sprite Fixes from issue #5135 by @Liamjd14 in #9990
Fixed
- Prevent reflection tag palette collisions by @moostoet in #9925
- Fixed incorrect overworld reflection palettes when shiny and non-shiny Pokemon object events are loaded near water at the same time.
📦 Branch Synchronisation 📦
pret
- 15th of May, 2026 in #9986
- Add smol artifacts and tools to .gitignore by @AsparagusEduardo in pret#2236
- Name values used by CompareMonSize by @rayrobdod in pret#2241
- Extract GiveGiftRibbonToParty from file about size records by @rayrobdod in pret#2240
- Implicit waitstate for special/specialvars by @mrgriffin in pret#2200
- Added enum for IsMonDisobedient by @Mitsunee in pret#2212
- Document gym leader match call texts by @GriffinRichards in pret#2231
BtlController_EmitTwoReturnValuescleanup by @AsparagusEduardo in pret#2140- Fix fakematch in DynamicPlaceholderTextUtil_Reset by @mike-goutokuji in pret#2258
- Fix fakematch in AllocateBattleResources by @mike-goutokuji in pret#2261
- Fix fakematchings regarding modulo by @mike-goutokuji in pret#2264
- Remove stray dereference in union room chat by @mike-goutokuji in pret#2277
- Add gBattleOutcome == B_OUTCOME_DREW to bugfix by @mike-goutokuji in pret#2238
- INCGFX performance - define individual Make variables instead of appending to list by @ravepossum in pret#2291
- Added more move animation macros by @fdeblasio in pret#2290
- Fix line numbers in preproc diagnostics by @mrgriffin in pret#2294
- Remove incorrectly added expansion tooling by @hedara90 in pret#2295
New Contributors
Full Changelog: https://github.com/rh-hideout/pokeemerald-expansion/compare/expansion/1.15.2...expansion/1.15.3
Version 1.15.2
## How to update
- If you haven't set up a remote, run the command `git remote add RHH https://github.com/rh-hideout/pokeemerald-expansion`.
- Once you have your remote set up, run the command `git pull RHH expansion/1.15.2
`.
🧬 General 🧬
Changed
- docs: codify position on LLM usage by @pkmnsnfrn in #9672
- ci: Do not install recommended packages by @lhearachel in #9679
- Pret merge (8th of April, 2026) by @mrgriffin in #9724
- Change gBattlerCount assertion to MAX_BATTLERS_COUNT by @AlexOn1ine in #9409
- Allow STR_VAR_# arguments in
bufferlivemonnicknameby @HashtagMarky in #9752 - Missing enums in inline battler, side, and move functions by @grintoul1 in #9743
- Add errorf to sprite creation when at MAX_SPRITES by @hedara90 in #9766
- Add helper function to find what function a reported address from assertf corresponds to by @hedara90 in #9823
- Use with
python tools/find_func/find_func.py pokeemerald.elf 0x08YYYYYYwhere0x08YYYYYYis the address reported by theassertfblue-screen
- Use with
- Merge pret#2283 by @mrgriffin in #9881
- Migration script for
INCGFXavailable inmigration_scripts/1.15/migrate_incgfx.py. Run it from clean (e.g.make clean && git ls-files | grep 'src/.*\.[ch]$' | xargs grep -l INCBIN | xargs python3 migration_scripts/1.15/migrate_incgfx.py). - Expansion was migrated to
INCGFXexplicitly in 9f23b87 rather than as part of the merge. This should allow downstreams to revert just that change. - See pret#2283 for more details.
- Migration script for
Fixed
- Fix issue when looking at invalid value for no bag var in debug menu by @FosterProgramming in #9666
- Fixed debug warping allowing player movement in the middle of warp by @LinathanZel in #9653
- fix(makefile): use correct OBJ_DIR_NAME for tidydebug by @kildemal in #9702
- Remove test-specific CFLAGS by @mrgriffin in #9723
- Revert erroneous changes to trainer pic handling in historical migration scripts by @grintoul1 in #9749
- Fix frlg intro trying to create too many sprites by @hedara90 in #9822
- Fix fishing chain behaviour on shiny encounter by @hedara90 in #9845
- Improve error handling of smol compressor by @hedara90 in #9870
- Move animation fixes by @hedara90 in #9855
- Fix compiling with -O0 by @cawtds in #9888
- Safari fixes by @FosterProgramming in #9882
🗺️ Overworld 🗺️
Changed
- Allow STR_VAR_# arguments in
bufferlivemonnicknameby @HashtagMarky in #9752 - Add every missing asymmetrical overworld sprite for gens 1 - 7 by @kittenchilly in #9792
- Fix area screen data having dependence on player’s current location, rather than the map header by @luuma in #9727
Fixed
- Fix player gain control during warp by @FosterProgramming in #9673
- Fix Bead and Dream Mail by @luuma in #9760
- Fix Dexnav
assertfs by @HashtagMarky in #9775 - Fix missing string buffer in the ingame_trade macro by @FosterProgramming in #9803
- Fix forced shiny eggs losing shininess on hatch by @moostoet in #9842
- Fix egg from daycare not receiving default moveset by @FosterProgramming in #9844
- Fix wrong param getting passed by @cawtds in #9848
- Move follower check before trainer hill check whene selecting script by @FosterProgramming in #9883
🐉 Pokémon 🐉
Changed
- resample, add, and fix cries by @amiosi in #8919
- PokeCommunity sprites batch (April 2026) by @kittenchilly in #9705
- Add every missing asymmetrical overworld sprite for gens 1 - 7 by @kittenchilly in #9792
⚔️ Battle General ⚔️
Changed
- Align Rock Blast Bulletproof ballistic flag threshold to Gen 7 by @Cle-bit in #9669
- Change gBattlerCount assertion to MAX_BATTLERS_COUNT by @AlexOn1ine in #9409
Fixed
- Fix Rest failing behavior under Sweet Veil by @Cle-bit in #9670
- Fix weight modifier order by @Cle-bit in #9684
- Fix Parental Bond handling for OHKO moves and Uproar by @Cle-bit in #9685
- Fix Slow Start applying to special moves by @Cle-bit in #9683
- Fix Disguise HP bar desync on double spread moves by @Cle-bit in #9691
- Fix Neutralizing Gas exit reactivating abilities for fainted battlers by @Cle-bit in #9699
- Fix Power Herb semi-invulnerable moves remaining untargetable by @Cle-bit in #9698
- Fix Seed Sower not activating when the user faints from an attack by @Cle-bit in #9701
- Fix Unburden activation and reset when items are recycled by @Cle-bit in #9726
- Fix Sturdy incorrectly taking priority over OHKO level check in Gen 5+ by @Cle-bit in #9750
- Fix Defiant/Competitive forcing positive stat changes to use single stat anims by @PhallenTree in #9758
- Fix gBattlerAttacker usage by @AlexOn1ine in #9778
- Fix Ring Target interactions with Ground immunity and grounded status by @Cle-bit in #9772
- Fix Sand Spit falling under B_ABILITY_WEATHER by @AlexOn1ine in #9776
- Fix Fling using White Herb or Mental Herb incorrectly removing the target’s held item by @Cle-bit in #9782
- Fix Zoom Lens and Core Enforcer affecting switch-in targets by @Cle-bit in #9783
- Fix Synchronize status immunity ability check by @Cle-bit in #9756
- Fix Blunder Policy activation for OHKO and multi-hit moves by @Cle-bit in #9790
- Fix Effect Spore RNG trigger order for non-contact turns by @Cle-bit in #9791
- Fix Toxic Spikes falsely applying Corrosion during switch-in poison checks by @Cle-bit in #9802
- Fix Sheer Force incorrectly suppressing recoil damage by @Cle-bit in #9682
- Fix Embody Aspect incorrectly reactivating after Neutralizing Gas ends by @Cle-bit in #9773
- Fix Shield Dust/Covert Cloak interactions for Poison Touch, Toxic Chain, and Stench by @Cle-bit in #9715
- Fix action order when Stall and Lagging Tail both apply by @Cle-bit in #9817
- Fix Synchronize incorrectly activating when the holder inflicts status with its own move by @Cle-bit in #9828
- Fix Lucky Chant side status lookup in
IsCriticalHitby @Cle-bit in #9849 - Fix Neutralizing Gas end-of-effect handling for Core Enforcer and Baton Pass Gastro Acid transfer by @Cle-bit in #9829
- Fix Magician target selection priority for spread moves by @Cle-bit in #9818
- Fix Moody not activating on the switch-in turn end by @Cle-bit in #9798
- Change order of enduring damage effects by @PhallenTree in #9854
- Fix Innards Out multihit damage basis and Core Enforcer suppression on fainted targets by @Cle-bit in #9858
- Fixes Ruin abilities / gastro acid interaction by @AlexOn1ine in #9880
🎭 Abilities 🎭
Fixed
- Update and fix Ability flags by @amiosi in #8842
- Honor forced illegal bench abilities during AI switch evaluation by @moostoet in #9754
- Fixed AI switch-evaluation test simulation so benched mons with forced illegal abilities are evaluated consistently with active battlers under
TESTING.
- Fixed AI switch-evaluation test simulation so benched mons with forced illegal abilities are evaluated consistently with active battlers under
🤖 Battle AI 🤖
Changed
- AI frame count tests by @Pawkkie in #9592
Fixed
- Fix AI weather evaluation and switch in logic by @Cle-bit in #9718
- Fix erroneous fall-through in CanLowerStat and Teleport by @Cle-bit in #9763
🧹 Other Cleanup 🧹
- Align Rock Blast Bulletproof ballistic flag threshold to Gen 7 by @Cle-bit in #9669
- ci: Do not install recommended packages by @lhearachel in #9679
- Missing enums in inline battler, side, and move functions by @grintoul1 in #9743
- how_to_testing_system.html: Change player species from Oddish to Wobbuffet by @shachar700 in #9728
- Fix area screen data having dependence on player’s current location, rather than the map header by @luuma in #9727
🧪 Test Runner 🧪
Changed
- AI frame count tests by @Pawkkie in #9592
Fixed
- Zigzagoon is not an ability by @Pawkkie in #9719
- Allow no explicit target setting in AI multi tests by @grintoul1 in #9567
- Remove test-specific CFLAGS by @mrgriffin in #9723
- Honor forced illegal bench abilities during AI switch evaluation by @moostoet in #9754
- Fixed AI switch-evaluation test simulation so benched mons with forced illegal abilities are evaluated consistently with active battlers under
TESTING.
- Fixed AI switch-evaluation test simulation so benched mons with forced illegal abilities are evaluated consistently with active battlers under
- Fix rare labelling issues with RUN_OVERWORLD_SCRIPT by @FosterProgramming in #9869
📚 Documentation 📚
- docs: codify position on LLM usage by @pkmnsnfrn in #9672
- Adjust documentation for poke balls in trainer parties by @BluSunrize in #9831
- how_to_testing_system.html: Change player species from Oddish to Wobbuffet by @shachar700 in #9728
Full Changelog: https://github.com/rh-hideout/pokeemerald-expansion/compare/expansion/1.15.1...expansion/1.15.2
Version 1.15.1
## How to update
- If you haven't set up a remote, run the command `git remote add RHH https://github.com/rh-hideout/pokeemerald-expansion`.
- Once you have your remote set up, run the command `git pull RHH expansion/1.15.1
`.
🧬 General 🧬
Changed
- Make trainerproc-generated files depend on trainerproc by @rayrobdod in #9414
- Update event_objects.h hex values by @shachar700 in #9418
- Remove need to run make clean when switching between frlg and emerald by @grintoul1 in #9406
- Parallelize CI jobs and cache build tools by @TrevorEdris in #9528
- fix(preproc): Remove unused private field m_scriptData by @lhearachel in #9581
- fix(learnset_helpers): Harden regex-patterns for preproc directives by @lhearachel in #9582
- Silence Makefile map_version message by @grintoul1 in #9590
- docs: added note about BoxPokemon encryption works test by @pkmnsnfrn in #9619
- Pret merge (29th of March, 2026) by @hedara90 in #9658
Fixed
- Fix FRLG party menu Oak support message window by @montmoguri in #9412
- Fix free match call compile fail by @FosterProgramming in #9416
- Fix GetSpeciesPreEvolution triggering assertf with disabled species by @hedara90 in #9455
- Adds missing include in intro_frlg.c by @grintoul1 in #9483
- Fix battle type doubles for debug battle by @FosterProgramming in #9486
- Fix trailing newline failing tests by @cawtds in #9495
- Fix newlines not working with sprite printing by @hedara90 in #9502
- Fix money amount printed on whiteout by @FosterProgramming in #9517
- Fix assert hits when species are disabled by @cawtds in #9520
- Fix Some HGSS Dex Visuals by @HashtagMarky in #9534
- Fix assert failure on disabled species in Sprite Visualizer by @hedara90 in #9422
- Fix FREE_ENIGMA_BERRY breaking GF Rom Header by @AsparagusEduardo in #9599
- Fix tile allocation for unique egg and species sprite in PC by @hedara90 in #9613
- Split region map layouts by map by @AsparagusEduardo in #9580
- Fix flipped FakeRTC check by @hedara90 in #9597
- Allow make release and check for FRLG by using the BUILD variable by @FosterProgramming in #9465
- Fix dex absences for cross gen configs by @luuma in #9337
- fix: set printer type for AddTextPrinterParameterized6 by @mudskipper13 in #9628
- Fix all-contributors by @hedara90 in #9659
🗺️ Overworld 🗺️
Fixed
- Fix tutor_moves.h files containing duplicates by @FosterProgramming in #9423
- Version specific tweaks of post whiteout script by @FosterProgramming in #9521
- Fix Berry Mutation Chance by @ghoulslash in #9530
- Fixes debug menu Fly Flags toggle by @grintoul1 in #9607
- Corrects music for FRLG maps and some functions by @grintoul1 in #9606
- Fix fateful encounter starting battle with 0 hp by @FosterProgramming in #9621
- Fix timing and structure of Apricorn Tree messages by @BluSunrize in #9650
🐉 Pokémon 🐉
Changed
- Adds Cherrim Overworld sprite by @luuma in #9442
Fixed
- Fix custom eggs displaying as regular eggs on Storage System by @AsparagusEduardo in #9603
- Fix shininess of form changed battle mon after reshowing battle screen by @cawtds in #9524
- Fixed Kanto dex cross-gen evolutions by @fdeblasio in #9617
- Fix disabled species appearing in evolution struct by @hedara90 in #9574
⚔️ Battle General ⚔️
Changed
- Clean unused function from header by @AsparagusEduardo in #9541
- Fallthrough instead break after ordering by speed by @AlexOn1ine in #9633
Fixed
- Fix ability reference in Steadfast message by @PhallenTree in #9389
- Fixes U-turn not reseting targetsDone flag by @AlexOn1ine in #9411
- Fix Unseen Fist triggering protection move side effects by @Cle-bit in #9428
- Partial fix to incorrect Throat Spray behaviour, with a fix to summary_screen config that no longer works by @luuma in #9426
- Fix ally targeting moves crashing in single battles by @PhallenTree in #9433
- Fix weatherform change when primal weather leaves the field by @AlexOn1ine in #9424
- Fixes Trump Card’s power calculation using its own PP when called by another move by @PhallenTree in #9445
- Missing shouldAbilityTrigger by @AlexOn1ine in #9447
- Fix Lightning Rod activation on fainted mon by @AlexOn1ine in #9434
- Fixes abilities that grant type immunities not outputting battle messages by @LinathanZel in #9470
- Fix order of failure for spread moves by @AlexOn1ine in #9472
- Fixes Knock Off / Ogerpon behavior by @AlexOn1ine in #9478
- Fixes Critical Hit message being printed on fixed damage moves by @AlexOn1ine in #9489
- Fixes Secret Power Terrain effects not being applied by @PhallenTree in #9492
- Fix various stuff not working when hitting substitutes by @hedara90 in #9487
- Fix Magic Bounce reflecting Hazards from a semi-invulnerable position by @AlexOn1ine in #9501
- Fixes Lock On by @AlexOn1ine in #9496
- Fix Magic Coat activation if in Semi-Invulnerable state by @AlexOn1ine in #9503
- Fixes Dancer original attacker/target being overwritten by @PhallenTree in #9515
- Fix Magic Guard activation against Rough Skin by @AlexOn1ine in #9516
- Fix visual glicth during critical capture by @FosterProgramming in #9538
- Fix SafeguardProtected script by @AlexOn1ine in #9559
- Fix duplicate Trick Room end message when used again by @Cle-bit in #9546
- Fix Commander cleanup to only clear STATE_COMMANDER semi-invulnerability for partners by @Cle-bit in #9598
- Fix Commander forced-switch blocking after swallowed Tatsugiri faints, plus Commander tests cleanup by @Cle-bit in #9609
- Fix Mirror Move failing when the target is immune to the copied move by @Cle-bit in #9604
- Fix Wind Power and Electromorphosis triggering before fainting and Tailwind absent-battler ability activation by @Cle-bit in #9635
- Fixed Meteor Beam and Electro Shot being callable via Sleep Talk and Instruct by @LinathanZel in #9631
- Fix ability history recording ownership for Infiltrator, Punk Rock, and Ice Scales by @Cle-bit in #9639
- Fix Ability Shield interaction for Receiver and Power of Alchemy by @Cle-bit in #9649
- Fix Gorilla Tactics Dynamax behavior by @Cle-bit in #9643
🧶 Items 🧶
Changed
- Add better Strange Ball sprite by @kittenchilly in #9556
Fixed
- Fix negative friendship modifiers not working properly by @FosterProgramming in #9622
🤖 Battle AI 🤖
Fixed
- Fix missing AI handling for partnerProtecting and Well-Baked Body by @Cle-bit in #9385
- Fix AI’s inability to use Acupressure on its ally by @Pawkkie in #9437
- Fixes Bide’s AI scoring being boosted by being able to boost offensive stats by @PhallenTree in #9435
- Fix for trap effect groundedness being seen incorrectly by @Meister-anon in #9396
- Fix
AI_CompareDamagingMovesreading incorrect move indexes by @Pawkkie in #9454 - Rage fist fix by @MaximeGr00 in #9405
- Rage Fist now sees stacks properly for switch logic.
- Retaliate post ko bug fix by @MaximeGr00 in #9561
- Retaliate damage is now seen correctly for both post-ko and on field damage calculations.
- Fix AI debug timers by @Pawkkie in #9585
- Fix AI using Yawn into Flame/Toxic Orb self-status targets by @Cle-bit in #9626
🧹 Other Cleanup 🧹
- Update event_objects.h hex values by @shachar700 in #9418
- Remove need to run make clean when switching between frlg and emerald by @grintoul1 in #9406
- Clean unused function from header by @AsparagusEduardo in #9541
- docs(tutorials): clean up mon_generation tutorial for readability by @kildemal in #9531
- fix(preproc): Remove unused private field m_scriptData by @lhearachel in #9581
- fix(learnset_helpers): Harden regex-patterns for preproc directives by @lhearachel in #9582
- Silence Makefile map_version message by @grintoul1 in #9590
- Fallthrough instead break after ordering by speed by @AlexOn1ine in #9633
🧪 Test Runner 🧪
Changed
- Add tests for Taunt by @Cle-bit in #9386
PARAMETRIZE_LABELnow supports multiple args by @AsparagusEduardo in #9206- Parallelize CI jobs and cache build tools by @TrevorEdris in #9528
- preproc: generate .size in script_data sections by @mrgriffin in #9233
Fixed
- Fix partner difficulty and rework tests by @FosterProgramming in #9419
- Fix Magic Guard activation against Rough Skin by @AlexOn1ine in #9516
- Fix test ROM running out of space at 90%+ usage by @hedara90 in #9623
- All mon cries in tests now use a single shared cry
📚 Documentation 📚
- docs(tutorials): clean up mon_generation tutorial for readability by @kildemal in #9531
- docs: added note about BoxPokemon encryption works test by @pkmnsnfrn in #9619
New Contributors
- @TrevorEdris made their first contribution in #9528
- @BluSunrize made their first contribution in #9650
Full Changelog: https://github.com/rh-hideout/pokeemerald-expansion/compare/expansion/1.15.0...expansion/1.15.1
Version 1.15.0
## How to update
- If you haven't set up a remote, run the command `git remote add RHH https://github.com/rh-hideout/pokeemerald-expansion`.
- Once you have your remote set up, run the command `git pull RHH expansion/1.15.0
`.
🌋 REFACTORS 🌋
📜 = Uses a migration script.
- Switch-in Events Refactor by @AlexOn1ine in #8128
- Updated Focus Punch failure check and moved to attackcanceler by @PhallenTree in #8360
- Move crit calculation into the damage calc by @AlexOn1ine in #8365
- Trainerbattle Type Differentiation by @u8-Salem in #6424
- for multi battles:
partnerIdis no longer set inmulti_*macros but instead bysetmultitrainerbattle
- for multi battles:
- Make Glaive Rush a MOVE_EFFECT_GLAIVE_RUSH by @AlexOn1ine in #8351
- Refactor Fury Cutter and Rollout by @AlexOn1ine in #8375
- Refactor Multi Hit moves to use a flag instead of effect by @AlexOn1ine in #8379
- Decouples BattlerHasAi from battle positions to instead be determined by battler Battle Controller by @grintoul1 in #8247
- Allow Starting Statuses beyond 15 by @AsparagusEduardo in #8485
- You may now define if a Trainer’s starting status is temporary or not, by adding “Temporary” at the end (eg. “Electric Terrain Temporary”)
B_VAR_STARTING_STATUSandB_VAR_STARTING_STATUS_TIMERhave been replaced withsetstartingstatusand the timer functionality has been removed in favor of defining temporary and permanent versions of each starting status. Eg.
has been replaced withsetvar B_VAR_STARTING_STATUS STARTING_STATUS_PSYCHIC_TERRAIN | STARTING_STATUS_RAINBOW_OPPONENT setvar B_VAR_STARTING_STATUS_TIMER 5
They can be stacked on top of each other.setstartingstatus STATUS_PSYCHIC_TERRAIN_TEMPORARY setstartingstatus STARTING_STATUS_RAINBOW_OPPONENT - AI
ShouldPivotOverhaul by @Pawkkie in #8486 - Move disable struct members to battle mon volatiles by @AlexOn1ine in #8540
- Refactor switchin candidates to use
battlerby @Pawkkie in #8546 - Switchin calcs leverage saving / restoring
AiLogicDataby @Pawkkie in #8556 - Move target type refactor by @AlexOn1ine in #8513
- Counter/Mirror Coat/Metal Burst refactor by @PhallenTree in #8604
EFFECT_COUNTER,EFFECT_MIRROR_COATandEFFECT_METAL_BURSThave been combined intoEFFECT_REFLECT_DAMAGE- These now use
BattleScript_EffectHitand their damage is calculated inDoFixedDamageMoveCalc
- Refactor Endeavor to use DoFixedDamageMoveCalc func by @AlexOn1ine in #8618
- Move Explosion to attackcanceler and Terrain Boost effect by @AlexOn1ine in #8612
- Refactoring the way teachable learnsets are generated by @FosterProgramming in #8027
src/data/pokemon/teachable_learnsets.hhas been removed from the repo- If your config P_LEARNSET_HELPER_TEACHABLE is set to false, open your
.gitignorefile and remove thesrc/data/pokemon/teachable_learnsets.hline, commit your.gitignoreandsrc/data/pokemon/teachable_learnsets.hfiles then continue like before. - If your config P_LEARNSET_HELPER_TEACHABLE is set to true, it will be created again when you use
make. Documentation about the way the file is generated can be found indocs/tutorials/teachable_learnsets.md. Also the filesrc/data/pokemon/all_learnables.jsonis now replacing the porymoves files as the proper way to edit teachables sets. To your old teachables sets, runmake clean-teachablesand the file will be recreated based on the porymoves files when you runmake
- Add Move End Faint Block by @PhallenTree in #8673
- Further weather consolidation by @AlexOn1ine in #8161
- enum TrainerPicID to replace defines for TRAINER_PIC_XXXX and TRAINER_BACK_PIC_XXXX by @grintoul1 in #8789
- Requires a
make cleanprior to make so that all trainer and battle partner front and back pic defines are refreshed by trainerproc
- Requires a
- Refactor mon generation by @FosterProgramming in #8204
- Reworked the functions that generate Pokemon, it should not affect most users but please read
docs/tutorials/mon_generation.mdif you want to know more or have difficulties adapting custom code that used to rely on the changed functions - Synchronize and Cute Charm update: both of these overworld abilities now better match their cartridge behavior in regards to which pokemon are affected by the effect (use the
OW_SYNCHRONIZE_NATUREconfig to choose the version) and can be more easily customized by changing the data insrc/ow_abilities.c - OW_SYNCHRONIZE_NATURE now defaults to GEN_LATEST(gen 9) where Synchronize has no overworld effect
- Reworked the functions that generate Pokemon, it should not affect most users but please read
- Consolidate battle anim particles by @fdeblasio in #8797
- Refactor move relearner and small #8027 follow-up by @PCG06 in #8675
- Refactor protect failure to match vanilla by @AlexOn1ine in #8832
- Capture odds refactor and new catch rate modifiers by @FosterProgramming in #8682
- Added new configs for catch rate modifiers: B_INCAPACITATED_CATCH_BONUS, B_LOW_LEVEL_CATCH_BONUS, B_MISSING_BADGE_CATCH_MALUS
- B_MISSING_BADGE_CATCH_MALUS default config may reduce catch rate in your hack
- Add new CATCHING_CHANCE macro to the test engine that allow to record the catching chance to more easily test capture parameters
- Add setpreattackadditionaleffect and use it for brick break / spectra… by @AlexOn1ine in #8719
- Refactor move target failure by @AlexOn1ine in #8696
- Refactor multi test system trainer party allocation and adds enum BattleTrainer by @grintoul1 in #8908
- Cleanup healthbox printing by @hedara90 in #8958
- Refactor Lilycove quiz and favor ladies by @fdeblasio in #8929
- Move adjustdamage to the damage calc by @AlexOn1ine in #8948
- Refactor OHKO Moves by @AlexOn1ine in #8916
- Refactor chooseboxmon by @FosterProgramming in #8491
- WARNING: In Game trade have been modified and previous script might be broken, we recommend replacing you trade script by using the new macro
- Add a new macro for ingame trade:
ingame_trade tradeId:req wantTradeMsg:req, declineTradeJump:req, wrongMonJump:req, tradeCompleteMsg:req - Add a new macro for move tutor:
move_tutor moveId:req, wantTeachingMsg:req, monSelectMsg:req, declinedJmp:req, taughtJmp:req, flagId=0. flagId is optional, if it is present the move tutor can only be used once (it checks if the flag is unset and sets the flag after teaching the move). If it is not present, the move tutor can be used as many times as you want - Adds a new config
OW_CHOOSE_FROM_PC_AND_PARTYinccofig/overworld.hto select if you want npc (daycare, move tutors, trade npc, …) to let you pick a pokemon from the storage system (pc boxes+party) or just the party (defaults to TRUE allowing to choose mon from pc boxes - Adds a filter to show which mons are valid when picking a mon from PC
- Even more battle environment updates by @fdeblasio in #8835
- Adds CancelerSetTargets and improves Pre Attack Effects by @PhallenTree in #9178
- Setting targets for moves has been refactored:
gBattleStruct->battlerState[gBattlerAttacker]->targetsDone[target]is set toTRUEiftargetisn’t targeted by the move;- Moves now properly check failures against all targets when applicable. If it fails for all targets, it plays the same battle script as before; if it fails for some but not all targets, it will say “It doesn’t affect target!”, similar to Synchronoise.
- Additional effects that occur before the move animation (like Brick Break, Spectral Thief), can now be applied to multiple targets and can have a chance to activate.
- Sky Drop Fixes/Refactor by @AlexOn1ine in #9185
🧬 General 🧬
Added
- New debug menu actions: Give Egg and Set KO by @FosterProgramming in #8330
- New debug menu action Give -> Give Egg let you select a species and add an egg of that species to your party (even if that species is not supposed to have eggs)
- New debug menu action Party -> Inflict Status -> KO let you pick a pokemon in your party and sets its hp to 0
- 📜 Enable 3-color text by @Gudf in #8191
- Add trainers submenu for debug menu by @FosterProgramming in #8399
- 📜 Sprite text printing improvements by @hedara90 in #8345
- Sprite printing must be set up with
SetupSpritesForTextPrinting(arrayOfSpriteIds, arrayOfSourceSprites, numSpritesX, numSpritesY) - Has migration script to handle changes to
IsTextPrinterActive
- Sprite printing must be set up with
- Adding move animation backgrounds to the Pokemon Sprite Visualizer by @fdeblasio in #8764
- Add config flag to skip save overwrite confirmation by @spindrift64 in #8659
- Allow renaming and move relearning from box summary screen by @kittenchilly in #8854
- Change randomweightedarray to use u16 weights instead of u8 by @FosterProgramming in #8934
- Ease vanilla maps deletions by @FosterProgramming in #9199
- Added a new script that deletes all FRLG maps, just run
python dev_scripts/delete_frlg_maps.py. It should take care of all the map constants but you will need to fix mention the to fuschia city entrance in the safari_zone.inc script. This does not save ROM space and is only useful to clean your repo
- Added a new script that deletes all FRLG maps, just run
Changed
- Add FRLG (Part 1) by @cawtds in #7572
- Support NULLs in SpriteTemplate by @mrgriffin in #8292
- Adjusted battle string IDs to match the order in
gBattleStringsTableby @AsparagusEduardo in #8446 - Allow Starting Statuses beyond 15 by @AsparagusEduardo in #8485
- You may now define if a Trainer’s starting status is temporary or not, by adding “Temporary” at the end (eg. “Electric Terrain Temporary”)
B_VAR_STARTING_STATUSandB_VAR_STARTING_STATUS_TIMERhave been replaced withsetstartingstatusand the timer functionality has been removed in favor of defining temporary and permanent versions of each starting status. Eg.
has been replaced withsetvar B_VAR_STARTING_STATUS STARTING_STATUS_PSYCHIC_TERRAIN | STARTING_STATUS_RAINBOW_OPPONENT setvar B_VAR_STARTING_STATUS_TIMER 5
They can be stacked on top of each other.setstartingstatus STATUS_PSYCHIC_TERRAIN_TEMPORARY setstartingstatus STARTING_STATUS_RAINBOW_OPPONENT - Remove vestigial handledeoxys code by @FosterProgramming in #8509
- assertf: Formatted asserts by @mrgriffin in #8196
- Battle Factory move style automation by @AsparagusEduardo in #8368
- errorf by @mrgriffin in #8580
- Improve make_scr_cmd_constants.py by @cawtds in #8347
- Centralize message box and standard frame drawing by @estellarc in #8190
- Refactoring the way teachable learnsets are generated by @FosterProgramming in #8027
src/data/pokemon/teachable_learnsets.hhas been removed from the repo- If your config P_LEARNSET_HELPER_TEACHABLE is set to false, open your
.gitignorefile and remove thesrc/data/pokemon/teachable_learnsets.hline, commit your.gitignoreandsrc/data/pokemon/teachable_learnsets.hfiles then continue like before. - If your config P_LEARNSET_HELPER_TEACHABLE is set to true, it will be created again when you use
make. Documentation about the way the file is generated can be found indocs/tutorials/teachable_learnsets.md. Also the filesrc/data/pokemon/all_learnables.jsonis now replacing the porymoves files as the proper way to edit teachables sets. To your old teachables sets, runmake clean-teachablesand the file will be recreated based on the porymoves files when you runmake
- Fix
update_text_color_defs.pyon Python < 3.12 by @Gudf in #8549 - Clean up GenConfigTimeOfDay by @AlexOn1ine in #8710
- Added a include/config option to change mega cry sounds by @lordraindance2 in #7558
- Migrated some strings out of strings.c/strings.h by @fdeblasio in #8270
- DMA micro optimization by @estellarc in #8410
- Add a cleaner way to reset all_learnables.json by @FosterProgramming in #8747
- Easy chat data refactor by @fdeblasio in #8271
- enum TrainerPicID to replace defines for TRAINER_PIC_XXXX and TRAINER_BACK_PIC_XXXX by @grintoul1 in #8789
- Requires a
make cleanprior to make so that all trainer and battle partner front and back pic defines are refreshed by trainerproc
- Requires a
- Small code deduplication in battle_ai_switch.c by @cawtds in #8790
- Standardized use of macros in LoadPalette by @fdeblasio in #8822
- cleanup GetMon Null Data Instances by @Meister-anon in #8867
- Sprite Visualizer font update by @fdeblasio in #8883
- Decoupled trainer gender from encounter music by @fdeblasio in #8892
- More contest code consolidation by @fdeblasio in #8889
- Refactor pokerus and add configs by @FosterProgramming in #7731
- Standardized item indentation by @fdeblasio in #8913
- Change HP bar color calculation from pixel-width to actual values by @Kasenn in #8694
- Add sprite fill function taking a sprite as argument by @hedara90 in #8940
- Cleanup healthbox printing by @hedara90 in #8958
- Refactor Lilycove quiz and favor ladies by @fdeblasio in #8929
- Poke Ball consolidation by @fdeblasio in #8962
- More type checking across the repo by @Bassoonian in #8988
- Add FRLG by @cawtds in #7423
- use
make fireredormake leafgreento build FRLG - FRLG is playable, but missing some features
- Fame Checker, Map Preview an graphical elements aren’t added yet. Teachy TV, TM Case and Berry Pouch not in scope.
- use
- documentation on how to use frlg by @cawtds in #9045
- Fix another FRLG style oversight by @Bassoonian in #9046
- Fix FRLG comment oversight in
script_cmd_table.incby @Bassoonian in #9043 - Remove aif2pcm by @hedara90 in #9076
- Rename ow_synchronize.c by @FosterProgramming in #9097
- Delete irrelevant battle type comments for expansion by @AlexOn1ine in #9082
- Move SubtractClamped to util.c from battle_util.c by @AlexOn1ine in #9120
- docs(dns): add nighttime palette user guide by @izrofid in #9158
- Clean up
reshow_battle_screen.cby @Bassoonian in #9352 - Cleans up unused String IDs and EWRAM variables by @Bassoonian in #9363
- Fix spacing for conditions by @Bassoonian in #9369
- Regularise switch indentation by @Bassoonian in #9368
- Updated Trainer Tower formatting by @fdeblasio in #9209
- Fix space indentation in .s and .inc files by @Bassoonian in #9371
Fixed
- Fix balls used for battle factory mons by @FosterProgramming in #8480
- Frontier mons can now be assigned to originate from a strange ball
- Fix save text colors arg order by @Gudf in #8514
- Fixed Wally Tutorial and added option to check from Debug Menu by @AsparagusEduardo in #8502
- Assertf improvements and fixes by @hedara90 in #8570
- 3-color text fixes by @Gudf in #8672
- Fix Debug Menu accessing disabled species by @hedara90 in #8683
- Stop early if species is disabled in HGSS dex by @hedara90 in #8687
- Make Porygon not load-bearing by @hedara90 in #8688
SPECIES_NONEnow uses the cry of Porygon, and said cry is not disabled withP_FAMILY_PORYGON
- Remove unused moveEffect variable in MoveEnd_MultihitMove to fix upcoming by @grintoul1 in #8715
- Replaced undeclared variable in Cmd_tryswapitems; commented out Eject Button test conflicting with another Commander test by @grintoul1 in #8805
- Fix struct TextPrinterTemplate on old GCC versions by @hedara90 in #8825
- Fix missing deafult moves for trainer parties by @FosterProgramming in #8829
- Rework teachable learnset makefile by @FosterProgramming in #8803
- Fix auto-signpost textprinter by @hedara90 in #8833
- Fix in-game trade not having moves (missing default moves again) by @FosterProgramming in #8851
- Clear out text printer when closing dialogue windows by @hedara90 in #8848
- Fix trailing commas in define by @FosterProgramming in #8863
- Reduce area filled when printing HP by @hedara90 in #8866
- Fix ability name printing for trainer mon ability assertf by @hedara90 in #8877
- Add missing sprite fill functions by @hedara90 in #8975
- fix: add
__attribute__((packed))toenum Directionby @khbsd in #8994 - Fix gender selecting task not waiting for input by @FosterProgramming in #9001
sPlayerAvatarGfxToStateFlag’s graphics id tou16by @estellarc in #9101- Fix statement after label issue in chooseboxmon by @FosterProgramming in #9093
- Fix instant text option freezing the game by @hedara90 in #9132
- Squirtle is not a fire type by @Pawkkie in #9145
- Fix migration script output from move anim documentation by @hedara90 in #9140
- Move tutors makefile by @FosterProgramming in #9058
- fix(fanclub): use sText instead of non-existent gText by @izrofid in #9163
- Fix HGSS National Dex List Count by @HashtagMarky in #9189
- fix id range for object events and multi decrements/increments by @cawtds in #9098
- Show ability num instead of ability id whn picking ability with debug givemon by @FosterProgramming in #9225
- Fix sprite fill using wrong mask in some cases by @hedara90 in #9205
- Also fixes an issue where long mon names didn’t use narrower fonts.
- fix(build): fix debug builds failing by @izrofid in #9219
- Fix battle tutorial crashing after reshow in frlg by @FosterProgramming in #9243
- 📜 Make .party files use “enum Pokeball” instead of “enum Item” by @FosterProgramming in #9159
- Balls data in trainers.party and battle_partners.party now expect enum Pokeball instead of struct Item
- The “BALL_” prefix is automatically added just like “ITEM_” used to be be, it means “great ball” must become “great” or “love ball” must become “love”
- running the migration script
python3 migration_scripts/1.15/trainer_party_ball_type_change.pyshould change your files to the proper structure. If you have ball items not present in expansion in your project, you may need to edit the item_to_ball array inmigration_scripts/1.15/trainer_party_ball_type_change.pyto run the script
- Fix setting the wall clock crashing with OW_USE_FAKE_RTC set to FALSE and LTO=1 by @hedara90 in #9299
- Update Makefile to remove every rom on clean by @FosterProgramming in #9346
- Fix messed up palettes during battle intro by @hedara90 in #9333
- Merge metatile labels files by @FosterProgramming in #9351
- Adds a warning when trainer is invalid by @pkmnsnfrn in #9195
- Fix mapjson error with layouts missing layout_version key by @FosterProgramming in #9374
- Fix mapjson failing with long map/layout names by @FosterProgramming in #9375
🗺️ Overworld 🗺️
Added
- Add Chooseboxmon special by @Artrios in #5428
- Add gym leader support for vs seeker and clean vs seeker code by @FosterProgramming in #8172
- Vs seeker now support gym leaders rematches with the same conditions as match call
- Vs seeker now allow rematches with all NPC types (TRAINER_TYPE_NONE and TRAINER_TYPE_ALL_DIRECTIONS) in addition to (TRAINER_TYPE_NORMAL and TRAINER_TYPE_BURIED)
- Vs seeker now uses question mark emote to represent NPCs who are not TRAINER_TYPE_NONE and do not have a trainer id in the first line of their script.
Changed
- OW mon fixes by @purrfectdoodle in #8444
- waitmovementall by @mrgriffin in #8333
- Add OW_BERRY_COLORS and update gBerries to match by @pkmnsnfrn in #8353
- Add Gen2 OW_TIMES_OF_DAY configuration. by @GraionDilach in #8176
- Refactor exchange service corner by @fdeblasio in #8840
Fixed
- Fix slateport battle tent battle type by @FosterProgramming in #8475
- Refactor mon generation by @FosterProgramming in #8204
- Reworked the functions that generate Pokemon, it should not affect most users but please read
docs/tutorials/mon_generation.mdif you want to know more or have difficulties adapting custom code that used to rely on the changed functions - Synchronize and Cute Charm update: both of these overworld abilities now better match their cartridge behavior in regards to which pokemon are affected by the effect (use the
OW_SYNCHRONIZE_NATUREconfig to choose the version) and can be more easily customized by changing the data insrc/ow_abilities.c - OW_SYNCHRONIZE_NATURE now defaults to GEN_LATEST(gen 9) where Synchronize has no overworld effect
- Reworked the functions that generate Pokemon, it should not affect most users but please read
- fix small mistake in ScriptGiveMonParameterized by @artsquirrelb in #8820
- Another MOVE_DEFAULT bugfix by @FosterProgramming in #8823
- Fix Daycare party select with
ChooseBoxMonby @AsparagusEduardo in #8845 - Remove assert for surpassing total ev cap by @FosterProgramming in #8938
- Fix winning moves by @FosterProgramming in #8978
- Fix checking for rare move in disabled species by @FosterProgramming in #8977
- Fix checking for frontier banned disabled species by @FosterProgramming in #8980
- Refactor chooseboxmon by @FosterProgramming in #8491
- WARNING: In Game trade have been modified and previous script might be broken, we recommend replacing you trade script by using the new macro
- Add a new macro for ingame trade:
ingame_trade tradeId:req wantTradeMsg:req, declineTradeJump:req, wrongMonJump:req, tradeCompleteMsg:req - Add a new macro for move tutor:
move_tutor moveId:req, wantTeachingMsg:req, monSelectMsg:req, declinedJmp:req, taughtJmp:req, flagId=0. flagId is optional, if it is present the move tutor can only be used once (it checks if the flag is unset and sets the flag after teaching the move). If it is not present, the move tutor can be used as many times as you want - Adds a new config
OW_CHOOSE_FROM_PC_AND_PARTYinccofig/overworld.hto select if you want npc (daycare, move tutors, trade npc, …) to let you pick a pokemon from the storage system (pc boxes+party) or just the party (defaults to TRUE allowing to choose mon from pc boxes - Adds a filter to show which mons are valid when picking a mon from PC
- Fix return to field when selecting a move to forget by @FosterProgramming in #9000
- Fixed Link Overworld by @AsparagusEduardo in #9014
- Fix special var collision with battle frontier tutors by @FosterProgramming in #9072
- NO_WHITEOUT now prevent forfeits from B_RUN_TRAINER_BATTLE by @pkmnsnfrn in #9112
- Add wander around slower movement type by @FosterProgramming in #9164
- Make sure grass effect palette ignore fog when time blended by @FosterProgramming in #9235
- Fix batle dome streak thresholds by @FosterProgramming in #9257
- Fix sanitizeTrainerId by @FosterProgramming in #9244
- createmon:fix move order when all moves are default by @FosterProgramming in #9261
- Fix firered TV loading emerald TV script by @FosterProgramming in #9329
- Fix double actions on standard bike by @FosterProgramming in #9344
- Fix ss anne disappearing early by @FosterProgramming in #9334
- Fix frlg coinbox window by @FosterProgramming in #9336
- Fix region text when looking at map in frlg by @FosterProgramming in #9347
- Add original frlg safari zone menu and fix initial step counter by @FosterProgramming in #9340
- Fix floor menu in frlg elevator showing wrong values by @FosterProgramming in #9350
- Redraw money box after multi choice in bike shop script by @FosterProgramming in #9331
- Fix special vars in frlg ingame trade by @FosterProgramming in #9328
- Set var facing on all interactions by @FosterProgramming in #9330
- 📜 createmon uses enum Pokeball instead of Item by @FosterProgramming in #9281
- Balls data in when using createmon and givemon now expect enum Pokeball instead of struct Item
- Running the migration script python3 migration_scripts/1.15/givemon_balls_typechange.py should update your script file automatically. If you have ball items not present in expansion in your project, you may need to edit the item_to_ball array in migration_scripts/1.15/trainer_party_ball_type_change.py to run the script
- Add red and leaf icons to frlg map by @FosterProgramming in #9357
- Make sure prevo moves are not duplicated in move relearner by @FosterProgramming in #9377
- Movement follow player by @FosterProgramming in #9365
- add missing tv sprite in frlg pokecenter by @FosterProgramming in #9348
🐉 Pokémon 🐉
Added
- Add support for species unique eggs by @hedara90 in #8557
- New species unique eggs must be added to
enum EggIdsandsrc/data/pokemon/egg_data.h
- New species unique eggs must be added to
Changed
- OW mon fixes by @purrfectdoodle in #8444
- Simplified sprite visualizer’s battle backgrounds by @fdeblasio in #8775
- Convert
IsMonBannedFromSkyBattlestable to species flag by @Bassoonian in #8793- If you previously changed the table in
IsMonBannedFromSkyBattles, please mark species as banned from sky battles by adding theisSkyBattleBannedto them in theirgSpeciesInfostruct.
- If you previously changed the table in
- Refactor move relearner and small #8027 follow-up by @PCG06 in #8675
- Add Legends Z-A: Mega Dimension content by @LinathanZel in #8550
- To retain compatibility with your new items and species, make sure to move the new additions behind your own additions.
- The save block will shift if you have enabled USE_DEXNAV_SEARCH_LEVELS (due to the new species) or if OW_SHOW_ITEM_DESCRIPTIONS is set to OW_ITEM_DESCRIPTIONS_FIRST_TIME (due to the new items).
- Add Legends Z-A cries by @LinathanZel in #8151
- These cries result in a 2.26% increase in ROM space used.
- Toggling
P_MODIFIED_MEGA_CRIEStoFALSEsaves about 3.74% ROM space.
- Add missing cries for Cramorant-Gulping, Cramorant-Gorging, Oinkologne-Female, and Ursaluna-Bloodmoon by @LinathanZel in #8911
- New White Stripe Basculin Sprites by @SabataLunar in #8926
- Add Egg Moves to Pokémon introduced in Legends Arceus by @LinathanZel in #8982
Fixed
- fix(code): stop GetSpeciesPreEvolution from checking disabled species by @khbsd in #8598
- this prevents species from showing up as pre-evolutions if their evolutions are disabled; if a feature you have relies on that make sure to adjust.
- Fix file endings for White-Stripe Basculin palettes by @hedara90 in #8956
- Allow Power Construct Animation by @KnightGallade in #9298
- createmon:fix move order when all moves are default by @FosterProgramming in #9261
⚔️ Battle General ⚔️
Added
- Allow x items to be cross-used in double battles by @FosterProgramming in #8280
- Adds a new config
B_X_ITEMS_CROSSUSE(true by default) that allows X items to be used on any allied battler in double battle
- Adds a new config
- Support Gen 2’s Sandstorm not reducing Solar Beam’s power by @AsparagusEduardo in #8422
- Changed uses of
B_WEATHER_HAIL | B_WEATHER_SNOWtoB_WEATHER_ICY_ANY.
- Changed uses of
- Adds smart target type by @AlexOn1ine in #8639
- Adds assertf for incorrect usage of
ends,return,calland selection script commands by @PhallenTree in #9018
Changed
- Switch-in Events Refactor by @AlexOn1ine in #8128
- Updated Focus Punch failure check and moved to attackcanceler by @PhallenTree in #8360
- Move crit calculation into the damage calc by @AlexOn1ine in #8365
- Trainerbattle Type Differentiation by @u8-Salem in #6424
- for multi battles:
partnerIdis no longer set inmulti_*macros but instead bysetmultitrainerbattle
- for multi battles:
- Make Glaive Rush a MOVE_EFFECT_GLAIVE_RUSH by @AlexOn1ine in #8351
- Removed Hold Effects that do nothing by @AsparagusEduardo in #8420
- Removed
HOLD_EFFECT_DRAGON_SCALEandHOLD_EFFECT_UPGRADE.
- Removed
- Convert starting statuses to a bitmask by @AlexOn1ine in #8233
- Refactor Multi Hit moves to use a flag instead of effect by @AlexOn1ine in #8379
- Renames for struct BattleContext and DamageContext by @AlexOn1ine in #8426
- Decouples BattlerHasAi from battle positions to instead be determined by battler Battle Controller by @grintoul1 in #8247
- Streamline unable to use move flags by @AlexOn1ine in #8415
- Add fieldStatuses argument to Ai_CalcDamage for switch in calc by @AlexOn1ine in #8490
- Battle controller Ball throw cleanup by @AsparagusEduardo in #8519
- Add starting-status hazard support by @moostoet in #8302
B_VAR_STARTING_STATUSnow supports spawning layered hazards (Spikes, Toxic Spikes, Sticky Web, Stealth Rock, Steelsurge) with correct messaging and effects.
- Move disable struct members to battle mon volatiles by @AlexOn1ine in #8540
- Move target type refactor by @AlexOn1ine in #8513
- Counter/Mirror Coat/Metal Burst refactor by @PhallenTree in #8604
EFFECT_COUNTER,EFFECT_MIRROR_COATandEFFECT_METAL_BURSThave been combined intoEFFECT_REFLECT_DAMAGE- These now use
BattleScript_EffectHitand their damage is calculated inDoFixedDamageMoveCalc
- Refactor Endeavor to use DoFixedDamageMoveCalc func by @AlexOn1ine in #8618
- Move Explosion to attackcanceler and Terrain Boost effect by @AlexOn1ine in #8612
- Stockpile / WishFutureKnock / Order up clean up by @AlexOn1ine in #8528
- Add Move End Faint Block by @PhallenTree in #8673
- Clean up for touchedProtectLike by @AlexOn1ine in #8699
- Create battle_move_resolution.c by @AlexOn1ine in #8703
- Trainer slides for multiple trainers and multibattles by @grintoul1 in #7588
- Change Present edge case by @AlexOn1ine in #8708
- Add error handling to BS_GetStatValue by @hedara90 in #8734
- Fix Rage generational inaccuracies by @moostoet in #8642
- Further weather consolidation by @AlexOn1ine in #8161
- Add pre–Gen 4 handling for Hidden Power and Counter interaction by @izrofid in #8741
- Clean up volatiles by @AlexOn1ine in #8762
- Add handling for Trick/Switcheroo behavior when both battlers are choice-locked (pre–Gen 5) by @izrofid in #8730
- Fixed GetCopycatMove’s capitalization by @fdeblasio in #8808
- Added Secret Power animations to gBattleEnvironmentInfo by @fdeblasio in #8807
- More battle environment updates by @fdeblasio in #8809
- Refactor protect failure to match vanilla by @AlexOn1ine in #8832
- Adds type checking for battler positions by @Bassoonian in #8792
- Add setpreattackadditionaleffect and use it for brick break / spectra… by @AlexOn1ine in #8719
- Refactor move target failure by @AlexOn1ine in #8696
- Battle file cleanup & documentation by @Bassoonian in #8903
- Apply some cases of
STATUS1_ICY_ANYby @AsparagusEduardo in #8924 - Consolidated
HandleStatusIconUpdateby @AsparagusEduardo in #8925 GetBattleTrainer->GetBattlerTrainerby @AsparagusEduardo in #8952- Move adjustdamage to the damage calc by @AlexOn1ine in #8948
- Refactor OHKO Moves by @AlexOn1ine in #8916
- Move attack canceler to the move resolution file by @AlexOn1ine in #8921
- Add even more type checking by @Bassoonian in #8972
- Add missing copycatBanned to Mirror Coat by @fdeblasio in #9016
- Move Target failure follow up by @AlexOn1ine in #8986
- Even more battle environment updates by @fdeblasio in #8835
- Form Change Improvements by @AsparagusEduardo in #8850
- Clean up redundant item assignment after it was stolen by @AlexOn1ine in #9044
- Use direct config names instead of enum names by @AsparagusEduardo in #8824
GetConfigandWITH_CONFIGnow use the actual config define. Eg,B_STURDYinstead ofCONFIG_STURDY. However, in scripts, usingjumpifgenconfiglowerthanin scripts would use the full name ofCONFIG_B_STURDY.
- Adds CancelerSetTargets and improves Pre Attack Effects by @PhallenTree in #9178
- Setting targets for moves has been refactored:
gBattleStruct->battlerState[gBattlerAttacker]->targetsDone[target]is set toTRUEiftargetisn’t targeted by the move;- Moves now properly check failures against all targets when applicable. If it fails for all targets, it plays the same battle script as before; if it fails for some but not all targets, it will say “It doesn’t affect target!”, similar to Synchronoise.
- Additional effects that occur before the move animation (like Brick Break, Spectral Thief), can now be applied to multiple targets and can have a chance to activate.
- Sky Drop Fixes/Refactor by @AlexOn1ine in #9185
- FRLG accuracy check clean up by @AlexOn1ine in #9224
- Simplify defrosting/thawing and expand target thawing config by @PhallenTree in #9271
- Move undoing Dynamax to before faint cry by @PhallenTree in #9317
- Adjust the restriction for Pecharunt by @AlexOn1ine in #9181
Fixed
- Refactor Fury Cutter and Rollout by @AlexOn1ine in #8375
- Fix Snatch stealing snatched moves by @moostoet in #8350
- Fix Air Balloon message happening when another battler switches in by @PhallenTree in #8455
- Fix potential bug with CanBattlerGetOrLoseItem by @AlexOn1ine in #8518
- Fix Red Card / Eject Button interaction by @AlexOn1ine in #8780
- Fixes Chilly Reception displaying its message when called by another move by @PhallenTree in #8795
- Ability Shield allows for ability activation when obtained and Trick cleanup by @PhallenTree in #8784
- Update volatiles once again by @AlexOn1ine in #8798
- Fix field abilities activating when an other mon switches in by @AlexOn1ine in #8743
- Fix capture using strange ball by @FosterProgramming in #8874
- Fix Gen 4 Taunt for upcoming by @amiosi in #8878
- Fix wrong getter in GetSwitchinStatusDamage by @Bassoonian in #8896
- Follow up for anim issue in doubles by @AlexOn1ine in #8894
- Fix brackets in SetMoveEffect by @AlexOn1ine in #8922
- Misc battle engine changes by @AlexOn1ine in #8931
- Mold Breaker, Last Resort, Assume and Tantrum fixes by @AlexOn1ine in #9047
- Fixes Fling Booster Energy being prevented by target Paradox mon by @PhallenTree in #9050
- Fixes wild mon target choice in double battles by @izrofid in #9075
- Fix Electroweb crash by correcting target sprite resolution by @Cle-bit in #9091
- Clear Selection Scripts to prevents consequent fails by @PhallenTree in #9095
- NO_WHITEOUT now prevent forfeits from B_RUN_TRAINER_BATTLE by @pkmnsnfrn in #9112
- Fix Leppa Berry PP restore target under forced-consumption effects by @Cle-bit in #9108
- fix(battle ui): standardize hp bar color logic for
GEN_5and up by @khbsd in #9083 - Battle Heap and Animation Test fixes by @hedara90 in #9118
- Fix Instruct failing improperly when the instructed move isn’t in the target’s moveset by @Cle-bit in #9113
- Fix ShouldSkipAccuracyCalcPastFirstHit wrong return val by @AlexOn1ine in #9122
- Fixes Dancer activating on missed moves and Neutralizing Gas interaction by @PhallenTree in #9129
- Strength Sap fixes by @AlexOn1ine in #9130
- Fix Aroma Veil target-side check for ally-targeted limiting moves by @Cle-bit in #9157
- Fix immunity ability status sync to avoid persisting Toxic counter when only volatile conditions are cured by @Cle-bit in #9156
- Fix Pickpocket timing by @AlexOn1ine in #9165
- Fix Instruct Missing Checks for Focus Punch, Beak Blast, Shell Trap, and Sky Drop by @Cle-bit in #9152
- Fix Aqua Ring reuse failure check and add Aqua Ring/Ingrain tests by @Cle-bit in #9174
- Fix Transform fail conditions with gen-specific checks by @Cle-bit in #9070
- Fix Taunt to not block Me First in Gen 5+ by @Cle-bit in #9069
- Fix Present heal miss-flag handling and enforce Telepathy blocking by @Cle-bit in #9170
- Fix Commander cleanup after Volt Switch switch-in by @Cle-bit in #9141
- Fixes Gulp Missile crash on targets that can be statused by @AlexOn1ine in #9179
- Fix moves causing errors in Multiplayer due to recoil check in Battle TV by @hedara90 in #9183
- Fix multi battle switch checks for Eject items by @Cle-bit in #9190
- Fix incorrect player berry animation on opponent’s low-HP heal at battle start by @Cle-bit in #9198
- Fix accuracy bypass by @cawtds in #9201
- Fixes Protective Pads preventing Poison Touch activation by @PhallenTree in #9222
- Fix tera icon palettes by @grintoul1 in #9208
- Running from trainer battles properly handles whiteouts by @pkmnsnfrn in #9228
- Prevents
seteffectprimaryandseteffectsecondaryfrom softlocking by @PhallenTree in #9236 - fix cram form change issue #9182 by @Meister-anon in #9184
- Fixes Throat Chop timer being reset with every use of the move by @PhallenTree in #9246
- Fix pressing left or up when choosing target potentially causing a softlock by @PhallenTree in #9247
- Poltergeist Fix: Usable against Klutz targets and while Magic Room is in effect by @LinathanZel in #9256
- Fixes Rapid Spin and target defrost not being blocked by Sheer Force by @PhallenTree in #9252
- Fix incorrect Adaptability interaction with non Tera type moves after Terastalization by @Cle-bit in #9272
- Fix Ability Shield exemption when Neutralizing Gas ends by @Cle-bit in #9273
- Fix Tickle to be blocked by Substitute in Gen 4+ by @Cle-bit in #9288
- Fix Venom Drench bypassing Substitute by @Cle-bit in #9289
- Fix Assist to account for temporarily changed moves in Gen 5+ by @Cle-bit in #9287
- Fixes Minior not appearing in Meteor form when encountered in the wild by @luuma in #9282
- Fix Eviolite to use original species after Transform by @Cle-bit in #9285
- Fixes present master merge regression by @AlexOn1ine in #9301
- Fix Power Construct Z symbol color + Add Form Change Sounds by @LinathanZel in #9326
- Fix Sucker Punch to succeed against Me First targets by @Cle-bit in #9284
- Fix safari healthbox by @FosterProgramming in #9341
- Fixes post-KO animation assertf trigger caused by OOB battler number by @grintoul1 in #9343
- Temporary fix to sprite data corruption during multi-faint by @hedara90 in #9332
- Zen Mode Fix: Removes start battle form change and adds switch-out form change by @LinathanZel in #9304
- Fix trainer sprite no reshowing properly in safari battle by @FosterProgramming in #9353
- Fixes plasma fists and several let’s go and max move effects which should occur even when fainting a foe by @luuma in #9262
- Fix Paradox stat selection under Wonder Room by @Cle-bit in #9356
- Fix illegal switch due to hazards by @AlexOn1ine in #9361
- Fix reshowing battle not loading gimmick palettes by @hedara90 in #9391
🤹 Moves 🤹
Changed
- Consolidate battle anim particles by @fdeblasio in #8797
- Consolidated common steps for Brick Break, Psychic Fang, and Raging Bull’s animations by @fdeblasio in #9020
- Converted break_screen_animation from a macro to a function by @fdeblasio in #9115
- fix(bttl-anim): remove unused battle selector to silence warning by @izrofid in #9218
Fixed
- Fix Aqua Ring animation by @hedara90 in #8707
- Fixed an issue where double targeting a Pokemon on a single mon party causes animation issues by @LinathanZel in #8891
- Restore natural 0 battle TV score by @AsparagusEduardo in #8901
- correct move flags/data by @amiosi in #8858
🧶 Items 🧶
Added
- Add gym leader support for vs seeker and clean vs seeker code by @FosterProgramming in #8172
- Vs seeker now support gym leaders rematches with the same conditions as match call
- Vs seeker now allow rematches with all NPC types (TRAINER_TYPE_NONE and TRAINER_TYPE_ALL_DIRECTIONS) in addition to (TRAINER_TYPE_NORMAL and TRAINER_TYPE_BURIED)
- Vs seeker now uses question mark emote to represent NPCs who are not TRAINER_TYPE_NONE and do not have a trainer id in the first line of their script.
- Gen 3 Lax Incense by @amiosi in #8864
Changed
- Add OW_BERRY_COLORS and update gBerries to match by @pkmnsnfrn in #8353
- Updated Lemonade’s description’s formatting to match the rest of the healing items by @fdeblasio in #8888
- Adds
Itemenum by @Bassoonian in #8897- The struct
Itemwas renamed toItemInfofor consistency with the other structs.
- The struct
- Add all of the Z-A mega stone sprites by @kittenchilly in #9143
Fixed
- Fix Rare Candy reviving fainted level 100 Pokémon by @Cle-bit in #9117
🤖 Battle AI 🤖
Added
- Add Smarter AI Resist Berry Handling by @Pawkkie in #8376
- Improved behavior for AI X Items and Dire Hit; vanilla behavior moved to Force Setup First Turn by @surskitty in #7851
- Add AI_FLAG_RANDOMIZE_SWITCHINS by @Pawkkie and @lhearachel, @ghoulslash, @u8-Salem, @mrgriffin, @FosterProgramming in #6222
- AI will not stat boost if Yawn’d by @Pawkkie in #8377
- Improve self-sacrifice AI by @Pawkkie in #8427
- Adds TIE_BREAK_SCORE and TIE_BREAK_TARGET to test system to allow for forced or random move and target selection by @grintoul1 in #8398
- Due to how tests “crash” if the expected move is not what happens in the actual test, the move/target being expected must be the one selected in the last run of a test, else the crash causes an animation failure message.
- Trapping switch AI can see Shed Shell by @Pawkkie in #8388
- AI last chance / priority handling tweaks by @Pawkkie in #8384
- feat (AI): AI hits to KO considers Endure effects, and self-damage setup move handling by @ghostyboyy97 in #8482
- The AI now has logic for selecting Clangorous Soul and Fillet Away
- The AI now has improved logic for selecting Belly Drum
- The AI overall is more aware of whether or not its item and ability allows it to endure a hit.
- Switch AI sees terrain when calcing damage by @Pawkkie in #8498
- Add AI switchin quality consideration configs by @Pawkkie in #8508
- Improve AI Absorb Handling by @Pawkkie in #8465
- ShouldSwitch 1v1 calcs handle Endure effects by @Pawkkie in #8544
- Switchin calcs leverage saving / restoring
AiLogicDataby @Pawkkie in #8556 - AI uses Z-moves to ensure a low-accuracy KO. by @surskitty in #8584
- Cap AI scores for Quiver Dance, Victory Dance, and Shell Smash. by @surskitty in #8585
- Ensure Palafin prioritizes safe Flip Turn for Zero To Hero in battle by @Cle-bit in #8591
- Add Dynamic Switch AI Function by @Pawkkie in #8629
- Adjust AI two-turn move scoring by @Pawkkie in #8651
- Add AI_FLAG_RANDOMIZE_PARTY_INDICES by @Pawkkie in #8717
- AI uses Tailwind with Wind Rider and Wind Power by @Cle-bit in #8983
Changed
- Smarter AI handling for incoming heals / Revival Blessing by @moostoet in #8325
- AI now chooses Healing Wish/Wish/Lunar Dance/Z-Parting Shot/Z-Memento and Revival Blessing recipients intelligently, accounting for hazards, status cures, and matchup safety.
- Decouples BattlerHasAi from battle positions to instead be determined by battler Battle Controller by @grintoul1 in #8247
- Split
battle_ai_switch_items.cin two by @Pawkkie in #8414- Please see the PR description for guidance if you have modified anything in this file
- Enables AI to score all moves that KO as best damage, and store multiple moves as best damaging move for additional checks by @grintoul1 in #8425
- Rename
Ai_WhichMoveBettertoCompareMoveEffectsby @Pawkkie in #8468 - AI
ShouldPivotOverhaul by @Pawkkie in #8486 - Fix switch AI caring about super effective Snore by @Pawkkie in #8500
- Refactor switchin candidates to use
battlerby @Pawkkie in #8546 - Consolidate
GetIndexMoveby @Pawkkie in #8622 - Iterator cleanup in
battle_aifiles by @Pawkkie in #8582 - Improve Trick/Bestow AI logic for Toxic/Flame Orb and Utility Umbrella by @Cle-bit in #8729
- AI avoids Protect against Unseen Fist and protection‑ignoring moves by @Cle-bit in #8939
- AI sees No Guard prevents having Semi Invulnerability. by @surskitty in #8586
- Remove redundant Levitate check for Magnitute by @AlexOn1ine in #9197
Fixed
- Fixes dmg rounding error for AI by @grintoul1 in #8436
- Fixes uninitialised variable in IncreaseSleepScore and corrects Focus Punch check by @grintoul1 in #8481
- fix (scoring): configure GetNoOfHitsToKOBattler to allow optional endure consideration by @ghostyboyy97 in #8496
- The AI will NOT consider if it can endure an extra hit for setup consideration to prevent AI abuse
- Fix doubles moves bad / choice lock bad switch AI by @Pawkkie in #9078
- Fix AI_FLAG_RANDOMIZE_SWITCHIN logic by @Pawkkie in #9128
- Prevent Coaching score inflation in certain circumstances. by @surskitty in #9154
- Add missing weather checks for AI sandstorm/hail damage helpers by @Cle-bit in #9155
- Fix doubles switch looping by @Pawkkie in #9167
- Fix AI semi-invulnerable move handling and simplify switching logic by @Cle-bit in #9180
- Fix Toxic Spikes switchin typo by @Pawkkie in #9242
- Fix AI Sheer Force checks to allow Order Up’s Commander stat boost by @Cle-bit in #9250
🧹 Other Cleanup 🧹
- Removed Hold Effects that do nothing by @AsparagusEduardo in #8420
- Removed
HOLD_EFFECT_DRAGON_SCALEandHOLD_EFFECT_UPGRADE.
- Removed
- Support NULLs in SpriteTemplate by @mrgriffin in #8292
- Renames for struct BattleContext and DamageContext by @AlexOn1ine in #8426
- Adjusted battle string IDs to match the order in
gBattleStringsTableby @AsparagusEduardo in #8446 - Streamline unable to use move flags by @AlexOn1ine in #8415
- Split
battle_ai_switch_items.cin two by @Pawkkie in #8414- Please see the PR description for guidance if you have modified anything in this file
- Rename
Ai_WhichMoveBettertoCompareMoveEffectsby @Pawkkie in #8468 - Simplify some code by using GetBattlerParty by @AsparagusEduardo in #8488
- Remove vestigial handledeoxys code by @FosterProgramming in #8509
- Battle controller Ball throw cleanup by @AsparagusEduardo in #8519
- Removed more instances of hardcoded move IDs by @AsparagusEduardo in #8539
- Fix switch AI caring about super effective Snore by @Pawkkie in #8500
- Consolidate
GetIndexMoveby @Pawkkie in #8622 - Stockpile / WishFutureKnock / Order up clean up by @AlexOn1ine in #8528
- Iterator cleanup in
battle_aifiles by @Pawkkie in #8582 - Improve make_scr_cmd_constants.py by @cawtds in #8347
- Clean up for Wish struct, IsSpreadMove and all learnables file by @AlexOn1ine in #8680
- Clean up for touchedProtectLike by @AlexOn1ine in #8699
- Create battle_move_resolution.c by @AlexOn1ine in #8703
- Change Present edge case by @AlexOn1ine in #8708
- Migrated some strings out of strings.c/strings.h by @fdeblasio in #8270
- Add a cleaner way to reset all_learnables.json by @FosterProgramming in #8747
- Easy chat data refactor by @fdeblasio in #8271
- Clean up volatiles by @AlexOn1ine in #8762
- enum TrainerPicID to replace defines for TRAINER_PIC_XXXX and TRAINER_BACK_PIC_XXXX by @grintoul1 in #8789
- Requires a
make cleanprior to make so that all trainer and battle partner front and back pic defines are refreshed by trainerproc
- Requires a
- Convert
IsMonBannedFromSkyBattlestable to species flag by @Bassoonian in #8793- If you previously changed the table in
IsMonBannedFromSkyBattles, please mark species as banned from sky battles by adding theisSkyBattleBannedto them in theirgSpeciesInfostruct.
- If you previously changed the table in
- Small code deduplication in battle_ai_switch.c by @cawtds in #8790
- Fixed GetCopycatMove’s capitalization by @fdeblasio in #8808
- Added Secret Power animations to gBattleEnvironmentInfo by @fdeblasio in #8807
- More battle environment updates by @fdeblasio in #8809
- Standardized use of macros in LoadPalette by @fdeblasio in #8822
- Improve
IsBattlerSpritePresent’s alive check by @PhallenTree in #8847 - OCD PR: Test summary order by @AsparagusEduardo in #8853
- Remove hacky spaces from
src/data/battle_environment.hby @estellarc in #8828 - Refactor exchange service corner by @fdeblasio in #8840
- cleanup GetMon Null Data Instances by @Meister-anon in #8867
- Sprite Visualizer font update by @fdeblasio in #8883
- Updated Lemonade’s description’s formatting to match the rest of the healing items by @fdeblasio in #8888
- Decoupled trainer gender from encounter music by @fdeblasio in #8892
- More contest code consolidation by @fdeblasio in #8889
- Battle file cleanup & documentation by @Bassoonian in #8903
- Standardized item indentation by @fdeblasio in #8913
- Apply some cases of
STATUS1_ICY_ANYby @AsparagusEduardo in #8924 - Consolidated
HandleStatusIconUpdateby @AsparagusEduardo in #8925 GetBattleTrainer->GetBattlerTrainerby @AsparagusEduardo in #8952- Poke Ball consolidation by @fdeblasio in #8962
- Move attack canceler to the move resolution file by @AlexOn1ine in #8921
- Add even more type checking by @Bassoonian in #8972
- More type checking across the repo by @Bassoonian in #8988
- Properly capitalized the comments of new move animations by @fdeblasio in #9002
- Add missing copycatBanned to Mirror Coat by @fdeblasio in #9016
- Added
enum BattlerIdtype checks by @AsparagusEduardo in #8954 - Move Target failure follow up by @AlexOn1ine in #8986
- Consolidated common steps for Brick Break, Psychic Fang, and Raging Bull’s animations by @fdeblasio in #9020
- Fix another FRLG style oversight by @Bassoonian in #9046
- Fix FRLG comment oversight in
script_cmd_table.incby @Bassoonian in #9043 - Clean up redundant item assignment after it was stolen by @AlexOn1ine in #9044
- Remove aif2pcm by @hedara90 in #9076
- Remove trainers_frlg.h from repo for gitignore by @grintoul1 in #9081
- Rename ow_synchronize.c by @FosterProgramming in #9097
- Delete irrelevant battle type comments for expansion by @AlexOn1ine in #9082
- Move SubtractClamped to util.c from battle_util.c by @AlexOn1ine in #9120
- Converted break_screen_animation from a macro to a function by @fdeblasio in #9115
- Remove redundant Levitate check for Magnitute by @AlexOn1ine in #9197
- Add defines to Trainer Tower by @fdeblasio in #9187
- Re-enable disabled test by @Pawkkie in #9200
- fix(bttl-anim): remove unused battle selector to silence warning by @izrofid in #9218
- FRLG accuracy check clean up by @AlexOn1ine in #9224
- Simplify defrosting/thawing and expand target thawing config by @PhallenTree in #9271
- Move undoing Dynamax to before faint cry by @PhallenTree in #9317
- Adjust the restriction for Pecharunt by @AlexOn1ine in #9181
- Clean up
reshow_battle_screen.cby @Bassoonian in #9352 - Fix tabs in C/H files by @Bassoonian in #9364
- Cleans up unused String IDs and EWRAM variables by @Bassoonian in #9363
- Fix spacing for conditions by @Bassoonian in #9369
- Regularise switch indentation by @Bassoonian in #9368
- Updated Trainer Tower formatting by @fdeblasio in #9209
- Fix space indentation in .s and .inc files by @Bassoonian in #9371
🧪 Test Runner 🧪
Added
- Adds TIE_BREAK_SCORE and TIE_BREAK_TARGET to test system to allow for forced or random move and target selection by @grintoul1 in #8398
- Due to how tests “crash” if the expected move is not what happens in the actual test, the move/target being expected must be the one selected in the last run of a test, else the crash causes an animation failure message.
- Adds EXPECT_FAIL macro to test system to allow for testing of conditions correctly triggering failures by @grintoul1 in #8553
- Capture odds refactor and new catch rate modifiers by @FosterProgramming in #8682
- Added new configs for catch rate modifiers: B_INCAPACITATED_CATCH_BONUS, B_LOW_LEVEL_CATCH_BONUS, B_MISSING_BADGE_CATCH_MALUS
- B_MISSING_BADGE_CATCH_MALUS default config may reduce catch rate in your hack
- Add new CATCHING_CHANCE macro to the test engine that allow to record the catching chance to more easily test capture parameters
Changed
- Fix setup for some moves in animation tests by @hedara90 in #8492
- Add missing behavior when using focus punch while surviving an OHKO move by @FosterProgramming in #8484
- assertf: Formatted asserts by @mrgriffin in #8196
- Improve Trick/Bestow AI logic for Toxic/Flame Orb and Utility Umbrella by @Cle-bit in #8729
- Add handling for Trick/Switcheroo behavior when both battlers are choice-locked (pre–Gen 5) by @izrofid in #8730
- OCD PR: Test summary order by @AsparagusEduardo in #8853
- Refactor pokerus and add configs by @FosterProgramming in #7731
- AI avoids Protect against Unseen Fist and protection‑ignoring moves by @Cle-bit in #8939
- Adds Parabolic Charge spread damage healing test by @AlexOn1ine in #9094
- Use direct config names instead of enum names by @AsparagusEduardo in #8824
GetConfigandWITH_CONFIGnow use the actual config define. Eg,B_STURDYinstead ofCONFIG_STURDY. However, in scripts, usingjumpifgenconfiglowerthanin scripts would use the full name ofCONFIG_B_STURDY.
- Re-enable disabled test by @Pawkkie in #9200
- Added Weight battle tests by @AsparagusEduardo in #9202
- Add tests for Hadron Engine and Psyblade by @Cle-bit in #9314
- Add tests for Future Sight interaction with Ally Switch by @Cle-bit in #9300
Fixed
- Tie Break failsafe correction by @grintoul1 in #8596
- Fix Red Card / Eject Button interaction by @AlexOn1ine in #8780
- Replaced undeclared variable in Cmd_tryswapitems; commented out Eject Button test conflicting with another Commander test by @grintoul1 in #8805
- Fix field abilities activating when an other mon switches in by @AlexOn1ine in #8743
- Refactor multi test system trainer party allocation and adds enum BattleTrainer by @grintoul1 in #8908
- Fix Aqua Ring reuse failure check and add Aqua Ring/Ingrain tests by @Cle-bit in #9174
- Fixes Protective Pads preventing Poison Touch activation by @PhallenTree in #9222
- Fix tera icon palettes by @grintoul1 in #9208
- Adds a warning when trainer is invalid by @pkmnsnfrn in #9195
📚 Documentation 📚
- Add AI_FLAG_KNOW_OPPONENT_PARTY to ai_flags.md by @Pawkkie in #8366
- Add .isRestricted and .isSubLegendary by @jtebbe in #8501
- Require braces on bodies with multiline conditions by @mrgriffin in #8566
- Clean up for Wish struct, IsSpreadMove and all learnables file by @AlexOn1ine in #8680
- Move enum by @Bassoonian in #8739
- Extra enum typechecking by @Bassoonian in #8786
- Adds type checking for battler positions by @Bassoonian in #8792
- Updated Lemonade’s description’s formatting to match the rest of the healing items by @fdeblasio in #8888
- Battle file cleanup & documentation by @Bassoonian in #8903
- Adds
Itemenum by @Bassoonian in #8897- The struct
Itemwas renamed toItemInfofor consistency with the other structs.
- The struct
- Add even more type checking by @Bassoonian in #8972
- More type checking across the repo by @Bassoonian in #8988
- Properly capitalized the comments of new move animations by @fdeblasio in #9002
- Added
enum BattlerIdtype checks by @AsparagusEduardo in #8954 - documentation on how to use frlg by @cawtds in #9045
- Remove trainers_frlg.h from repo for gitignore by @grintoul1 in #9081
- docs(dns): add nighttime palette user guide by @izrofid in #9158
- Add defines to Trainer Tower by @fdeblasio in #9187
- Update new mon teachable learnset tutorial by @FosterProgramming in #9302
👻 Sprites 👻
Added
- Z-A Mega sprites from PokeCommunity by @kittenchilly in #8945
Changed
- Add Gba-style Substitute by @amiosi in #8655
Fixed
- Fixes Manaphy egg data blocking compiler with Manaphy disabled by @grintoul1 in #8671
- Fix tera icon palettes by @grintoul1 in #9208
- Fixes post-KO animation assertf trigger caused by OOB battler number by @grintoul1 in #9343
New Contributors
- @Artrios made their first contribution in #5428
- @Gudf made their first contribution in #8191
- @jtebbe made their first contribution in #8501
- @Kasenn made their first contribution in #8694
- @SabataLunar made their first contribution in #8926
- @luuma made their first contribution in #9282
- @KnightGallade made their first contribution in #9298
Full Changelog: https://github.com/rh-hideout/pokeemerald-expansion/compare/expansion/1.14.3...expansion/1.15.0
Version 1.14.4
## How to update
- If you haven't set up a remote, run the command `git remote add RHH https://github.com/rh-hideout/pokeemerald-expansion`.
- Once you have your remote set up, run the command `git pull RHH expansion/1.14.4
`.
🧬 General 🧬
Changed
- docs(dns): add nighttime palette user guide by @izrofid in #9158
Fixed
sPlayerAvatarGfxToStateFlag’s graphics id tou16by @estellarc in #9101- Fix migration script output from move anim documentation by @hedara90 in #9140
- Show ability num instead of ability id whn picking ability with debug givemon by @FosterProgramming in #9225
- Fix setting the wall clock crashing with OW_USE_FAKE_RTC set to FALSE and LTO=1 by @hedara90 in #9299
🗺️ Overworld 🗺️
Fixed
- NO_WHITEOUT now prevent forfeits from B_RUN_TRAINER_BATTLE by @pkmnsnfrn in #9112
- Make sure grass effect palette ignore fog when time blended by @FosterProgramming in #9235
- Fix batle dome streak thresholds by @FosterProgramming in #9257
🐉 Pokémon 🐉
Fixed
- Allow Power Construct Animation by @KnightGallade in #9298
⚔️ Battle General ⚔️
Changed
- Use direct config names instead of enum names by @AsparagusEduardo in #8824
GetConfigandWITH_CONFIGnow use the actual config define. Eg,B_STURDYinstead ofCONFIG_STURDY. However, in scripts, usingjumpifgenconfiglowerthanin scripts would use the full name ofCONFIG_B_STURDY.
Fixed
- NO_WHITEOUT now prevent forfeits from B_RUN_TRAINER_BATTLE by @pkmnsnfrn in #9112
- Fix Leppa Berry PP restore target under forced-consumption effects by @Cle-bit in #9108
- Fix Instruct failing improperly when the instructed move isn’t in the target’s moveset by @Cle-bit in #9113
- Fix Aroma Veil target-side check for ally-targeted limiting moves by @Cle-bit in #9157
- Fix immunity ability status sync to avoid persisting Toxic counter when only volatile conditions are cured by @Cle-bit in #9156
- Fix Instruct Missing Checks for Focus Punch, Beak Blast, Shell Trap, and Sky Drop by @Cle-bit in #9152
- Fix Aqua Ring reuse failure check and add Aqua Ring/Ingrain tests by @Cle-bit in #9174
- Fix Transform fail conditions with gen-specific checks by @Cle-bit in #9070
- Fix Taunt to not block Me First in Gen 5+ by @Cle-bit in #9069
- Fix Present heal miss-flag handling and enforce Telepathy blocking by @Cle-bit in #9170
- Fix Commander cleanup after Volt Switch switch-in by @Cle-bit in #9141
- Fixes Gulp Missile crash on targets that can be statused by @AlexOn1ine in #9179
- Fix multi battle switch checks for Eject items by @Cle-bit in #9190
- Fix incorrect player berry animation on opponent’s low-HP heal at battle start by @Cle-bit in #9198
- Fixes Protective Pads preventing Poison Touch activation by @PhallenTree in #9222
- Fix tera icon palettes by @grintoul1 in #9208
- Running from trainer battles properly handles whiteouts by @pkmnsnfrn in #9228
- Prevents
seteffectprimaryandseteffectsecondaryfrom softlocking by @PhallenTree in #9236 - Fixes Throat Chop timer being reset with every use of the move by @PhallenTree in #9246
- Fix incorrect Adaptability interaction with non Tera type moves after Terastalization by @Cle-bit in #9272
- Fix Ability Shield exemption when Neutralizing Gas ends by @Cle-bit in #9273
- Fix Tickle to be blocked by Substitute in Gen 4+ by @Cle-bit in #9288
- Fix Venom Drench bypassing Substitute by @Cle-bit in #9289
- Fix Assist to account for temporarily changed moves in Gen 5+ by @Cle-bit in #9287
- Fixes Minior not appearing in Meteor form when encountered in the wild by @luuma in #9282
- Fix Eviolite to use original species after Transform by @Cle-bit in #9285
- Fix Sucker Punch to succeed against Me First targets by @Cle-bit in #9284
- Fixes plasma fists and several let’s go and max move effects which should occur even when fainting a foe by @luuma in #9262
- Fix Paradox stat selection under Wonder Room by @Cle-bit in #9356
- Fix illegal switch due to hazards by @AlexOn1ine in #9361
- Fix Trapping Persisting after KO in doubles by @ChrispyChris27 in #9380
- Fix Baton Pass to clear Mean Look trapping on the target in Gen 5+ by @Cle-bit in #9378
- Fix Meloetta not reverting forms on switch and remove deprecated Lunar Dance string ID by @Meister-anon in #9379
- Corrects battler used in STRINGID_ATTACKERABILITYSTATRAISE by @grintoul1 in #9383
🤹 Moves 🤹
Changed
- fix(bttl-anim): remove unused battle selector to silence warning by @izrofid in #9218
Fixed
- correct move flags/data by @amiosi in #8858
🧶 Items 🧶
Fixed
- Fix Rare Candy reviving fainted level 100 Pokémon by @Cle-bit in #9117
🤖 Battle AI 🤖
Fixed
- Add missing weather checks for AI sandstorm/hail damage helpers by @Cle-bit in #9155
- Fix AI semi-invulnerable move handling and simplify switching logic by @Cle-bit in #9180
- Fix AI Sheer Force checks to allow Order Up’s Commander stat boost by @Cle-bit in #9250
🧹 Other Cleanup 🧹
- fix(bttl-anim): remove unused battle selector to silence warning by @izrofid in #9218
🧪 Test Runner 🧪
Changed
- Adds Parabolic Charge spread damage healing test by @AlexOn1ine in #9094
- Use direct config names instead of enum names by @AsparagusEduardo in #8824
GetConfigandWITH_CONFIGnow use the actual config define. Eg,B_STURDYinstead ofCONFIG_STURDY. However, in scripts, usingjumpifgenconfiglowerthanin scripts would use the full name ofCONFIG_B_STURDY.
- Added Weight battle tests by @AsparagusEduardo in #9202
- Add tests for Hadron Engine and Psyblade by @Cle-bit in #9314
- Add tests for Future Sight interaction with Ally Switch by @Cle-bit in #9300
Fixed
- Fix Aqua Ring reuse failure check and add Aqua Ring/Ingrain tests by @Cle-bit in #9174
- Fixes Protective Pads preventing Poison Touch activation by @PhallenTree in #9222
- Fix tera icon palettes by @grintoul1 in #9208
- Fix Meloetta not reverting forms on switch and remove deprecated Lunar Dance string ID by @Meister-anon in #9379
📚 Documentation 📚
- docs(dns): add nighttime palette user guide by @izrofid in #9158
👻 Sprites 👻
Fixed
- Fix tera icon palettes by @grintoul1 in #9208
New Contributors
Full Changelog: https://github.com/rh-hideout/pokeemerald-expansion/compare/expansion/1.14.3...expansion/1.14.4
Version 1.14.3
## How to update
- If you haven't set up a remote, run the command `git remote add RHH https://github.com/rh-hideout/pokeemerald-expansion`.
- Once you have your remote set up, run the command `git pull RHH expansion/1.14.3
`.
🧬 General 🧬
Changed
- Misc style and whitespace cleanup by @grintoul1 in #8681
- Disable L button config (throw ball shortcut or move description) when there is overlap with L=A option by @FosterProgramming in #8332
- Update CONTRIBUTING.md by @pkmnsnfrn in #8879
- Deleted unnecessary files by @Bassoonian in #8899
- Fix Metronome bans by @amiosi in #8834
- Move CMD_ARGS to battle_script_commands by @hedara90 in #8974
CMD_ARGSfor battle scripts now only exist insrc/battle_script_commands.c
- Pret merge (20th of January, 2026) by @hedara90 in #8973
- Remove trailing whitespace - Master by @AsparagusEduardo in #9011
- fix: updated rulings about big feature label by @pkmnsnfrn in #9027
- Add aif2pcm to gitignore by @hedara90 in #9077
Fixed
- Add check to warn of a non-working config setup by @FosterProgramming in #8686
- Various sprite visualizer fixes if configs disabled by @kittenchilly in #8697
- Fix trade evo with partner by @FosterProgramming in #8857
- Fixed Acc value shadow cut off when Accuracy = 100 by @montmoguri in #8886
- Fix vivillon icy snow icon by @FosterProgramming in #8970
- Fix premier ball wrong data size by @FosterProgramming in #8979
- Fixes creation of certain overworld sprites in object_event_pic_tables_followers.h by @ChrispyChris27 in #9065
🗺️ Overworld 🗺️
Fixed
- Fix teleport location by @cawtds in #8941
- Fix substitute follower appearing with dead party by @FosterProgramming in #9028
- Fix berry tree spawning with max yield when OW_BERRY_ALWAYS_WATERABLE is active by @FosterProgramming in #8976
- Fix debug menu using female icon with male palette by @FosterProgramming in #9092
🐉 Pokémon 🐉
Changed
- Miscellaneous species_info Changes by @amiosi in #8462
Fixed
- Fix in-battle form changes always reverting by @AsparagusEduardo in #8810
- Fix typo in Salazzle form species ID table reference by @ostomachion in #8904
- Mega Gardevoir should always be Fairy-type by @amiosi in #8955
⚔️ Battle General ⚔️
Changed
- Add enum for battle script commands by @AlexOn1ine in #8778
- Miscellaneous fixes to configs and other values by @amiosi in #8662
- Updating IsNonVolatileStatusBlocked by @bassforte123 in #8728
Fixed
- Fix berry activation timing for Yawn sleep and Leech Seed damage by @moostoet in #8776
- Fix Chesto/Sitrus berry activation timing for status and damage
- Fix Cheek Pouch not activating for Bug Bite, Pluck, and Fling berry effects by @Cle-bit in #8782
- Fix wrongly getting a battler position in the type effectiveness functions by @Bassoonian in #8787
- fix crash damage implementation and incorrect memento generation by @amiosi in #8804
- Fix Sticky Hold blocking user’s own Trick or Bestow by @Cle-bit in #8860
- Fixes Nightmare not affecting Comatose and adds various missing tests by @Cle-bit in #8859
- Fix Protosynthesis/Quark Drive defensive boost calculation by @hedara90 in #8875
- Fix wrong cases of DamageContext by @Bassoonian in #8895
- Fix misaligned shadows of transformed mons when
B_ENEMY_MON_SHADOW_STYLE <= GEN_3by @estellarc in #8887 - fix ITEM_NONE being considered a form change item by DoesSpeciesUseHoldItemToChangeForm by @phexmiau in #8915
- Fix Memento and Block regressions by @amiosi in #8942
- Fixed several issues with Parting Shot by @Cle-bit in #8928
- Align Crafty Shield with wiki and refine IsAllyProtectingFromMove by @Cle-bit in #8990
- Fixes Hyperspace Fury not breaking protection by @PhallenTree in #8999
- Fix Magnetic Flux target handling in singles by @Cle-bit in #9007
- fix: IsDoubleBattle() return value by @khbsd in #9012
- Remove player party shiny bit setting in CreateFrontierBrainPokemon by @grintoul1 in #9022
- Fix Foresight/Miracle Eye repeated-use behavior by @Cle-bit in #9025
- Fix Crafty Shield consecutive-use failure by @Cle-bit in #9023
- Fixes Beak Blast burning attacker when charging 2 turn move by @PhallenTree in #9026
- Fix Synchronoise typeless behavior in Gen7+ by @Cle-bit in #9031
- Fix Psych Up wrong battler message and Gen 6+ crit ratio copying by @Cle-bit in #9015
- Add accuracy check to BattleScript_EffectNightmare by @AlexOn1ine in #9032
- Fixes to Commander and Emergency Exit by @AlexOn1ine in #9040
- Fixes Fling being usable with reusable TMs by @PhallenTree in #8906
- Fix Forewarn edge cases and random selection by @Cle-bit in #9049
- Fix Pickpocket moveend target checks and Thief/Covet handoff by @Cle-bit in #9037
- Fixes Infiltrator and adds config for Substitute interaction by @PhallenTree in #9073
- Fix Tranformed mon changing forms when fainting by @AsparagusEduardo in #9106
- Prevent Incinerate from burning items under Sticky Hold by @Cle-Bit in #9068
🤹 Moves 🤹
Changed
- Corrected Stone Axe and Ceaseless Edge descriptions by @fdeblasio in #9062
Fixed
- Fix Hyper Beam animation by @hedara90 in #8872
- Fixed instances of COMBO_STARTER_CHARGE used incorrectly by @fdeblasio in #9034
🧶 Items 🧶
Changed
- Miscellaneous Item Changes by @amiosi in #8461
- add the type boost value for gen 3 sea incense by @amiosi in #8826
- Changes to Item icons and palettes by @amiosi in #8614
🤖 Battle AI 🤖
Fixed
- Fix Sticky Hold blocking user’s own Trick or Bestow by @Cle-bit in #8860
- Fix AI absorber switching for edge cases by @Cle-bit in #8964
- Fix the speed scoring of Tailwind for AI by @Cle-bit in #8968
- Fix AI wakeup-turn detection to consider Early Bird by @Cle-bit in #9053
🧹 Other Cleanup 🧹
- Misc style and whitespace cleanup by @grintoul1 in #8681
- Disable L button config (throw ball shortcut or move description) when there is overlap with L=A option by @FosterProgramming in #8332
- Various sprite visualizer fixes if configs disabled by @kittenchilly in #8697
- Updating IsNonVolatileStatusBlocked by @bassforte123 in #8728
- Deleted unnecessary files by @Bassoonian in #8899
- Fix Metronome bans by @amiosi in #8834
- Move CMD_ARGS to battle_script_commands by @hedara90 in #8974
CMD_ARGSfor battle scripts now only exist insrc/battle_script_commands.c
- Remove trailing whitespace - Master by @AsparagusEduardo in #9011
- Corrected Stone Axe and Ceaseless Edge descriptions by @fdeblasio in #9062
- Add aif2pcm to gitignore by @hedara90 in #9077
- Fixes Infiltrator test battler not using intended move by @PhallenTree in #9096
🧪 Test Runner 🧪
Changed
- Add inverse battle type matchup test by @izrofid in #8779
B_ABILITY_TRIGGER_CHANCEconfig tests by @AsparagusEduardo in #8594- Support end-of-battle party data check in tests by @AsparagusEduardo in #8831
- If you added tests that checks for party data (
gPlayerParty), make sure that you’re not using a species which changes form at the end of the battle, as its data could be overriten by the form change.
- If you added tests that checks for party data (
- Only test if move name fits on the bag screen for moves names within a TM/HM by @estellarc in #8882
- Added tests for fainting form changes by @AsparagusEduardo in #8912
- Add tests for type-changing abilities by @Cle-bit in #8794
- Fixes Infiltrator test battler not using intended move by @PhallenTree in #9096
Fixed
- Fix Sticky Hold blocking user’s own Trick or Bestow by @Cle-bit in #8860
- Fixes Nightmare not affecting Comatose and adds various missing tests by @Cle-bit in #8859
- Fixes Hyperspace Fury not breaking protection by @PhallenTree in #8999
- Fix Magnetic Flux target handling in singles by @Cle-bit in #9007
- Fix Foresight/Miracle Eye repeated-use behavior by @Cle-bit in #9025
- Fixes Beak Blast burning attacker when charging 2 turn move by @PhallenTree in #9026
- Fix Psych Up wrong battler message and Gen 6+ crit ratio copying by @Cle-bit in #9015
- Fix Pickpocket moveend target checks and Thief/Covet handoff by @Cle-bit in #9037
📚 Documentation 📚
- Add enum for battle script commands by @AlexOn1ine in #8778
- Port old list of credits to modern system by @Bassoonian in #7887
- Miscellaneous fixes to configs and other values by @amiosi in #8662
- Remove credits from code by @Bassoonian in #8748
- Miscellaneous species_info Changes by @amiosi in #8462
- Update CONTRIBUTING.md by @pkmnsnfrn in #8879
- Amend “SS Item” category of scope doc by @Pawkkie in #8966
- fix: updated rulings about big feature label by @pkmnsnfrn in #9027
👻 Sprites 👻
Changed
- Changes to Item icons and palettes by @amiosi in #8614
Fixed
- Fix vivillon icy snow icon by @FosterProgramming in #8970
- Fix premier ball wrong data size by @FosterProgramming in #8979
- Fixes creation of certain overworld sprites in object_event_pic_tables_followers.h by @ChrispyChris27 in #9065
New Contributors
- @ostomachion made their first contribution in #8904
- @ChrispyChris27 made their first contribution in #9065
Full Changelog: https://github.com/rh-hideout/pokeemerald-expansion/compare/expansion/1.14.2...expansion/1.14.3
Version 1.14.2
## How to update
- If you haven't set up a remote, run the command `git remote add RHH https://github.com/rh-hideout/pokeemerald-expansion`.
- Once you have your remote set up, run the command `git pull RHH expansion/1.14.2
`.
🌋 REFACTORS 🌋
📜 = Uses a migration script.
- Renamed Config Test system to more general names by @AsparagusEduardo in #7283
🧬 General 🧬
Changed
- Fix docs not compiling by @hedara90 in #8407
- Update mdbook to v0.5.1 by @rayrobdod in #8437
- Add a ci step that checks that documentation md files are mentioned in
docs/SUMMARY.mdby @rayrobdod in #8439 - Fix
GEN_6_ORASdefinition by @AsparagusEduardo in #8537 - Add different Poke Balls to more Trainers by @amiosi in #8467
- Remove another unused deoxys function by @FosterProgramming in #8576
- Gorilla Tactics and Test typos fix by @bassforte123 in #8653
- Use release instead of LTO in CI by @hedara90 in #8706
Fixed
- Fix merge error that broke some hgss palette by @FosterProgramming in #8411
- Make TRUE and 1 behave the same in config/species_enabled.h by @hedara90 in #8421
- Do not add padding to end of smol file when smol is natually word-sized by @rayrobdod in #8522
- Align gSpecialVars by @Stevebel in #8541
- Fix Safari and Wally backsprites when reshowing battle screen by @AsparagusEduardo in #8561
- Fix party pool oob by @hedara90 in #8581
- Fix progbits flags for iwram asm functions by @DizzyEggg in #8627
🗺️ Overworld 🗺️
Fixed
- Fix bug with enterCode default value by @FosterProgramming in #8438
- Free the allocated buffer before the second decompression call (hopefully helps) by @FosterProgramming in #8301
- Fix truck fade being cancelled by @FosterProgramming in #8617
- Refactor dexnav to not use overworld task by @FosterProgramming in #8602
🐉 Pokémon 🐉
Changed
- GBA Asset Fixes by @amiosi in #8382
- Fix Flabébé and Floette overworld sprites by @estellarc in #8511
- Fix Naclstack and Garganacl shadows by @kittenchilly in #8698
Fixed
- Fix Summary screen lag with move relearner when there’s a lot of TMs by @PCG06 in #8503
- Small fix that prevented TM relearner if
P_ENABLE_ALL_TM_MOVESwasTRUEby @PCG06 in #8525 - Re-colored Gliscor’s anim_front.png by @DaniRainbow in #8341
- Allow Floette Eternal to mega evolve by @PhallenTree in #8558
- Redraw Gurdurr’s overworld sprite by @artsquirrelb in #8625
- Expansion OW sprites fix by @artsquirrelb in #8633
- Fix the game not building with OW_POKEMON_OBJECT_EVENTS disabled by @kittenchilly in #8654
- Fix the sprite visualizer not showing asymmetrical follower sprites by @kittenchilly in #8643
- Fixes Kingambit evolution conditions by @PhallenTree in #8689
⚔️ Battle General ⚔️
Changed
- Generational Move Changes by @amiosi in #8405
- Fix Lunar Dance not checking PP by @AsparagusEduardo in #8364
- Added
EFFECT_LUNAR_DANCE, which is the same asEFFECT_HEALING_WISHbut also heals PP.
- Added
- Fixes Instruct’s message by @PhallenTree in #8543
- Adds tests for Beak Blast not burning when the target is protected by @PhallenTree in #8713
Fixed
- Multiple bugfixes (mostly Dancer/called moves) by @PhallenTree in #8401
- Fix Costar not copying partner’s critical hit boosts by @moostoet in #8386
- Fix transform tint applying to every from change on reload by @FosterProgramming in #8417
- Fix illusion not breaking properly when behind substitute by @FosterProgramming in #8423
- Fix substitute/defog interactions by @FosterProgramming in #8418
- Fixes Wind Power/Electromorphosis potentially boosting 2 electric attacks by @PhallenTree in #8431
- Add missing breakable flags by @AlexOn1ine in #8454
- Adds missing cases for Revenge and Assurance doubling power by @AlexOn1ine in #8453
- Fix potential issue when destiny knot fail after proccing from cute charm by @FosterProgramming in #8459
- Fix bug when changing forms multiple times by @FosterProgramming in #8458
- Fix gimmick icon not appearing correctly in 1v2 by @FosterProgramming in #8474
- Give dead mons priority over eggs when assigning battlers by @FosterProgramming in #8473
- Environment Fixes by @amiosi in #8471
- Fixes Disguise + Counter/Mirror Coat/Metal Burst + Disguise tests by @PhallenTree in #8495
- Fix battler side status check in CalcCritChanceStage by @AlexOn1ine in #8524
- Fix AI handling of Trick/Bestow and add comprehensive tests by @Cle-bit in #8516
- Fix incorrect “last to move” check for Analytic, Snatch, and Magic Coat by @moostoet in #8536
- Fix species gfx change in link battles by @AsparagusEduardo in #8552
- Fixes Water Sport/Mud Sport when B_SPORT_TURNS < GEN_6 by @PhallenTree in #8613
- fix poisons absorbing toxic spikes when fainting from other hazards by @spindrift64 in #8644
- Fix incorrectly applied change in atkcanceler by @AlexOn1ine in #8641
- Fix transform shininess in link battles by @AlexOn1ine in #8554
- Fix Mimic trying to access MOVE_UNAVAILABLE in an incredibly small amount of possible scenarios by @hedara90 in #8685
- Fix stat access for stats other than Attack in BS_GetStatValue by @hedara90 in #8684
- Add tests for abilities that affect weather by @Cle-bit in #8709
🤹 Moves 🤹
Fixed
- Fixes incorrect battler used in STRINGID_USEDINSTRUCTEDMOVE by @grintoul1 in #8704
🎭 Abilities 🎭
Fixed
- Fix some bugs related to abilities by @Cle-bit in #8695
🤖 Battle AI 🤖
Added
- Respect beneficial status in healing moves and add tests by @Cle-bit in #8478
Fixed
- fix (setup): ignore self-speed drop when checking speed control on KO threshold change by @ghostyboyy97 in #8409
- AI now correctly sees that moves like Hammer Arm are self-targeted speed drops on the player when evaluating speed control in setup scenarios.
- fix (hazards): ghosty used rapid spin! ghosty blew the semicolon away! by @ghostyboyy97 in #8433
- The AI will now correctly see if the player can prevent hazards on moves with a secondary Stealth Rock effect.
- Fix incorrect Spikes reference in switch AI by @Pawkkie in #8510
- Fix AI handling of Trick/Bestow and add comprehensive tests by @Cle-bit in #8516
- Fix: AI should not use Helping Hand on a partner with ABILITY_GOOD_AS_GOLD by @Cle-bit in #8560
- Fixing crash from Last Resort with Normalium Z in certain damage thresholds by @surskitty in #8583
- fix (scoring): AI_IsMoveEffectInPlus - AI should not see secondary effect of Sheer Force boosted moves as beneficial by @ghostyboyy97 in #8579
- The AI is now aware if its positive move effects are removed by Sheer Force when evaluating both guaranteed and secondary effects.
- Fix type check in Magnet Rise AI by @grintoul1 in #8609
- Fix Commander Dondozo Switching by @Pawkkie in #8624
- Prevent AI seeing Pollen Puff damage on its ally by @grintoul1 in #8693
🧹 Other Cleanup 🧹
- Include FEATURES.md in documentation by @AsparagusEduardo in #8464
- Fix Lunar Dance not checking PP by @AsparagusEduardo in #8364
- Added
EFFECT_LUNAR_DANCE, which is the same asEFFECT_HEALING_WISHbut also heals PP.
- Added
- Fixes Instruct’s message by @PhallenTree in #8543
- Fix
GEN_6_ORASdefinition by @AsparagusEduardo in #8537 - Automatically fix TM numbers over 100 in Bag menu by @AsparagusEduardo in #8531
- Add different Poke Balls to more Trainers by @amiosi in #8467
- Remove another unused deoxys function by @FosterProgramming in #8576
- Update maintainer list by @pkmnsnfrn in #8638
🧪 Test Runner 🧪
Changed
- Renamed Config Test system to more general names by @AsparagusEduardo in #7283
- Create missing hold effect test files by @AsparagusEduardo in #8397
WITH_CONFIGRefactor by @AsparagusEduardo in #7584- Changed the way configs into the testing system to occupy less memory and make it easier to add more.
- Fixes inconsistency in enum names.
- Starts reserving the memory necessary to allow testing for all configs.
- Add test for lum berry multi status by @FosterProgramming in #8430
- Added missing Move Effect TODO tests - Volume G by @AsparagusEduardo in #8428
- Fixed KNOWN_FAILING Dire Claw test by @AsparagusEduardo in #8442
- Finished Defog tests by @AsparagusEduardo in #8424
- Fix move anim tests sometimes leaking tasks by @hedara90 in #8493
- Added tests for stat-changing moves by @AsparagusEduardo in #8278
- Expanded
B_EXP_CATCHtest by @AsparagusEduardo in #8527 - Fixed
AI_GetSwitchinWeathernot consideringCONFIG_SNOW_WARNINGby @AsparagusEduardo in #8533 - Expanded
B_SANDSTORM_SPDEF_BOOSTtest by @AsparagusEduardo in #8532 B_SYMBIOSIS_GEMStests by @AsparagusEduardo in #8534- Added Ability TODO tests - Volume D by @AsparagusEduardo in #8538
- Finished Wish tests by @AsparagusEduardo in #8530
- Add SUB_HIT check to tests by @hedara90 in #8413
- Added Light Ball tests by @AsparagusEduardo in #8526
- Add debug print to show what move failed in Sheer Force tests by @hedara90 in #8523
B_STURDYconfig test by @AsparagusEduardo in #8565B_KLUTZ_FLING_INTERACTIONconfig test by @AsparagusEduardo in #8568B_IRON_BALLconfig test by @AsparagusEduardo in #8569B_SYNCHRONIZE_TOXICconfig test by @AsparagusEduardo in #8572B_BURN_DAMAGEconfig tests by @AsparagusEduardo in #8574B_REDIRECT_ABILITY_IMMUNITYconfig tests by @AsparagusEduardo in #8571B_UPDATED_CONVERSION_2config tests by @AsparagusEduardo in #8573B_TAILWIND_TURNSconfig tests by @AsparagusEduardo in #8592B_BINDING_TURNSconfig tests by @AsparagusEduardo in #8595B_SPORT_DMG_REDUCTIONconfig tests by @AsparagusEduardo in #8593- Add tests for Intrepid Sword and Dauntless Shield at max stages by @FosterProgramming in #8610
- Add some missing tests for heatproof, thick fat and grudge by @izrofid in #8705
- Adds tests for Beak Blast not burning when the target is protected by @PhallenTree in #8713
Fixed
- Fix random function in testing trying to run trials when rng tag is 0/RNG_NONE by @FosterProgramming in #8460
- Fix AI handling of Trick/Bestow and add comprehensive tests by @Cle-bit in #8516
- Corrects test system Forced Ability handing for multi battles by @grintoul1 in #8611
- Fix Status1 icon not being registered for recorded partner in tests by @AsparagusEduardo in #8520
- Prevent AI seeing Pollen Puff damage on its ally by @grintoul1 in #8693
- Fix some bugs related to abilities by @Cle-bit in #8695
- Add tests for abilities that affect weather by @Cle-bit in #8709
📚 Documentation 📚
- Fix docs not compiling by @hedara90 in #8407
- Add a ci step that checks that documentation md files are mentioned in
docs/SUMMARY.mdby @rayrobdod in #8439 - Include FEATURES.md in documentation by @AsparagusEduardo in #8464
- Document magic number in
createspriteontargetsby @AsparagusEduardo in #8551 - fix CONTRIBUTING.md by @u8-Salem in #8577
- Update maintainer list by @pkmnsnfrn in #8638
📦 Branch Synchronisation 📦
pret
- 1st of January, 2026 in #8737
- Document UpdateLegendaryMarkingColor by @mrgriffin in pret#2221
- Fix some typos by @Jaizu in pret#2219
- Document m4a xcmd_0C by @ShinyDragonHunter in pret#2218
- Fixed pokenav glow issue by @shachar700 in pret#2215
- Added bugfix for missing no weather case in Cmd_weather_get by @Mitsunee in pret#2203
- Label unused functions in siirtc.c, m4a.c & rtc.c with the “UNUSED” attribute by @ShinyDragonHunter in pret#2171
- Add fix for possible crash when decompressing trainer back pics by @GriffinRichards in pret#2074
- Change rangeX and rangeY to u8 in ObjectEvent struct by @NTx86 in pret#2176
- Fix sScrollableMultichoice_ListMenuItem allocation size magic number by @NTx86 in pret#2177
- Name pokemon summary screen remaining unnamed symbols by @FosterProgramming in pret#2178
- Fix FLAG_REGISTERED_WALLY by @mrgriffin in pret#2201
- Display error for invalid hidden item flags by @GriffinRichards in pret#2214
New Contributors
- @Stevebel made their first contribution in #8541
- @DaniRainbow made their first contribution in #8341
- @artsquirrelb made their first contribution in #8625
- @izrofid made their first contribution in #8705
Full Changelog: https://github.com/rh-hideout/pokeemerald-expansion/compare/expansion/1.14.1...expansion/1.14.2
Version 1.14.1
## How to update
- If you haven't set up a remote, run the command `git remote add RHH https://github.com/rh-hideout/pokeemerald-expansion`.
- Once you have your remote set up, run the command `git pull RHH expansion/1.14.1
`.
🧬 General 🧬
Changed
- Pret merge, (1st of December, 2025) by @hedara90 in #8402
- This changes all the audio samples from
.aifto.wav,.aifsupport is removed. - There’s a migration script to convert from
.binto.wavinmigration_scripts/1.14/bin_to_wav.py. - Run the migration script with
python migration_scripts/1.14/bin_to_wav.py path/to/folder/with/bin/samples
- This changes all the audio samples from
Full Changelog: https://github.com/rh-hideout/pokeemerald-expansion/compare/expansion/1.14.0...expansion/1.14.1
Version 1.14.0
## How to update
- If you haven't set up a remote, run the command `git remote add RHH https://github.com/rh-hideout/pokeemerald-expansion`.
- Once you have your remote set up, run the command `git pull RHH expansion/1.14.0
`.
🌋 REFACTORS 🌋
📜 = Uses a migration script.
- Refactors Attackstring and PP deduction by @AlexOn1ine in #7402
- Attackcanceller fixes and improvements by @AlexOn1ine in #7698
- Fixes activation order for a couple abilities by @AlexOn1ine in #7732
- feat: change defines in
constants/abilities.hto an enum by @khbsd in #7006 - Item battle effect refactor by @AlexOn1ine in #7857
- Optimize GetWhichBattlerFasterOrTies by @AlexOn1ine in #7953
- Decouple passive hp updates from move damage updates by @AlexOn1ine in #7942
- Make movelist calculations happen during compilation instead of runtime by @FosterProgramming in #7967
- tmIlliterate flag in speciesInfo changed to teachingType. The options are
DEFAULT_LEARNING,TM_ILLITERATEandALL_TEACHABLES. The first two options match the tmIlliterate = false and tmIlliterate = true while the third one allow a pokemon to learn all teachables similarly to Mew - Reduce EWRAM usage of HGSS dex
- Fix pokemon.c needing to be recompiled everytime a .inc file was changed
- P_TUTOR_MOVES_ARRAY has been removed (now always true when HGSS dex is enabled)
- Mew move teaching exception and univeral moves are now coded in the JSON file
src/data/pokemon/special_movesets.jsonunder the name signatureTeachables and universalMoves
- tmIlliterate flag in speciesInfo changed to teachingType. The options are
- Grudge, Destiny Bond and FaintBattler refactor by @AlexOn1ine in #8072
- Increase number of additional move effects by @AlexOn1ine in #8149
- 📜 update: time-based encounters system tuneup and @cawtds’ header script by @khbsd in #8158
- Refactor random functions to be runner specific by @FosterProgramming in #7816
🧬 General 🧬
Added
-
Battle debug menu: highlight chosen action and change separator by @grintoul1 in #7709
-
Implement
field_name_boxby @mudskipper13 in #7697 -
Add new actions to Debug Menu by @FosterProgramming in #7837
- Adds an action to change a Pokemon ability in the party side of the Debug Menu
- Adds an action to set the friendship of a Pokemon in the party side of the Debug Menu
-
Display TM/HM’s move name in the debug menu by @estellarc in #7994
Changed
- Text rendering optimizations by @mrgriffin in #7497
- Battle debug menu now checks correct parties depending on battler party by @grintoul1 in #7652
- Add make release target by @jschoeny in #7296
- Most of what’s above. But most importantly, that normal
makewill have all the debug stuff enabled and so releases should be done withmake release.
- Most of what’s above. But most importantly, that normal
- Add pool rules for Mega Stones and Z-Crystals by @hedara90 in #7720
field_name_boxsmol followup by @mudskipper13 in #7762- Added COMPOUND_STRINGs to region_map_entries.h by @fdeblasio in #7669
- Improve ability/heldEffect access for IsBattlerGrounded func by @AlexOn1ine in #7753
- Removed
SAVE_TYPE_ERROR_SCREENconfig by @AsparagusEduardo in #7836 - Give the Coin Case when coins are maxed by @estellarc in #7973
- Revert HGSS dex and movelist changes by @FosterProgramming in #8016
- Converts some defines to enums and name unnamed enums by @Bassoonian in #8019
- Some more documentation and cleanup by @Bassoonian in #8020
- Even more enums and documentation by @Bassoonian in #8029
- Add type enum by @Bassoonian in #8054
- Minor clean up in menu.c by @estellarc in #8060
- Adds an auto-generated include file of script commands by @FosterProgramming in #8156
- Master to upcoming merge 20251107 by @grintoul1 in #8167
- porymap default settings by @FosterProgramming in #8038
- WARNING: A change was made for new projects map files to match poymap output. This change might break people’s projects with existing versions of those files. The files affected are
data/maps/map_groups.json,src/data/heal_locations.json,src/data/region_map/region_map_sections.jsonandsrc/data/wild_encounters.jsonIf you have an issue with one of those files during the merging process, you should run this commandgit checkout HEAD -- <filename>which will reset the file to the version before you initiated the merge
- WARNING: A change was made for new projects map files to match poymap output. This change might break people’s projects with existing versions of those files. The files affected are
- Adjust label workflow to only run if PR is approved by @hedara90 in #8183
- Add include/constants/script_commands.h to gitignore by @AlexOn1ine in #8169
- Converted landmarks to COMPOUND_STRINGs by @fdeblasio in #8205
- Added contest config and cleaned up contest category variables by @fdeblasio in #8178
- Moves name box configs into a new file by @AlexOn1ine in #8250
- Converted options text into COMPOUND_STRINGs by @fdeblasio in #8248
- Adjust Canceler naming to contain only one l by @AlexOn1ine in #8258
- Pret merge (16th of November, 2025) by @AlexOn1ine in #8262
- Fixed bKGD for last_used_ball_r_cycle.png by @montmoguri in #8261
- Small bg drawing optimization by @estellarc in #8259
- Added missing ‘coolness’ string by @fdeblasio in #8274
- *.party: text with lfs by @mrgriffin in #8320
- Fedora install instructions by @estellarc in #8355
- Indent unintented if statement by @hedara90 in #8367
Fixed
- Added brackets where needed by @hedara90 in #7781
- Fix shiny stars being freed before shiny animation was played by @FosterProgramming in #7917
- Fixes shiny sparks in battle not appearing properly in rare circumstances (more common with various speedup options)
- Make movelist calculations happen during compilation instead of runtime by @FosterProgramming in #7967
- tmIlliterate flag in speciesInfo changed to teachingType. The options are
DEFAULT_LEARNING,TM_ILLITERATEandALL_TEACHABLES. The first two options match the tmIlliterate = false and tmIlliterate = true while the third one allow a pokemon to learn all teachables similarly to Mew - Reduce EWRAM usage of HGSS dex
- Fix pokemon.c needing to be recompiled everytime a .inc file was changed
- P_TUTOR_MOVES_ARRAY has been removed (now always true when HGSS dex is enabled)
- Mew move teaching exception and univeral moves are now coded in the JSON file
src/data/pokemon/special_movesets.jsonunder the name signatureTeachables and universalMoves
- tmIlliterate flag in speciesInfo changed to teachingType. The options are
- Fix unhandled config in hgss dex by @FosterProgramming in #7999
- Fixes compilation error due to #8002 by @AlexOn1ine in #8050
- Fix compile issue in gcc 11 by @AsparagusEduardo in #8095
- Update mdbook to v0.5.0-beta.1 by @rayrobdod in #8133
- Fix build failing with NOOPT=1 due to discarding static data. by @Ultimate-Bob in #8053
- Fix wild_encounters script not closing arrays properly by @FosterProgramming in #8123
- Fix missing FREE_MATCH_CALL by @FosterProgramming in #8171
- Again fixed compiling in GCC11 by @AsparagusEduardo in #8184
- Fix scroll prompt sometimes being off-screen with automatic line breaks by @hedara90 in #8182
- Fix gcc11 again by @AsparagusEduardo in #8188
- Fixed decompression error reporter OOB window creation by @hedara90 in #8199
- Fix error when compiling with P_FUSION_FORMS disabled by @cawtds in #8298
- Fix compile on gcc11 by @AlexOn1ine in #8300
- Fix debug battle flag never being cleared by @FosterProgramming in #8357
🗺️ Overworld 🗺️
Added
- New Feature: ORAS Dowsing by @Bivurnum in #7211
- Added ORAS Dowsing Machine mechanics.
- feat: adds stevebeller’s instant text and MandL27’s faster text printing by @khbsd in #8063
- Implement GSC berry/apricorn tree functionality. by @GraionDilach in #7777
- Implement GSC berry/apricorn tree functionality.
Changed
- Trainers trigger in local id order by @grintoul1 in #7424
- Added regional form evolution condition by @AsparagusEduardo in #6990
- Update fishing odds to match official games by @FosterProgramming in #7574
- (BREAKING!) Fishing config has been moved to a new file. If you did not use default config fishing, make sure to reapply your config settings in the new file.
- (WARNING!) If you wrote custom code that calls one the following function, you may need to include
fishing.hto get access to them(their functionaly was not affected): StartFishingpreviously defined infield_player_avatar.hCalculateChainFishingShinyRollspreviously_defined inwild_encounter.h- Adds a new config option to increase fish bite chance in morning and evening to match XY
- Modifies the way fishing “proximity boost” is calculated to match XY
- Fix Sticky Hold / Suction Cups bug which were increasing odds the wrong way
- Add additional comment explaing map name popup transparency side-effects by @FosterProgramming in #8117
- update: time-based encounters system tuneup and @cawtds’ header script by @khbsd in #8158
- Sets instant text speed flag to false by default by @khbsd in #8179
- Follower NPCs no longer move if the player would be forced back onto the same tile. by @Bivurnum in #8260
- Follower NPCs no longer move if the player would be forced back onto the same tile
Fixed
- CheckForTrainersWantingBattle trainerObjects array now initialized to zero and loop now starts at zero by @grintoul1 in #7765
- Bugfix
setspeakerNamebox not beign drawn correctly by @estellarc in #7771 - Banned species list by @FosterProgramming in #8003
- Add a window displaying caught banned species list in the Battle Frontier instead of the string detailing all the is
- Fix namebox bug when reloading the map mid-script by @FosterProgramming in #8073
- Fix copyvar instead of setvar causing issue with LTO by @FosterProgramming in #8097
- Fix berry blender not computing flavor correctly by @FosterProgramming in #8113
- Allow vs seekers to work with script not starting with trainerbattle by @FosterProgramming in #8062
- VS seeker now work with trainers who don’t start with trainer_battle. You can use
vsseeker_rematchid TRAINER_IDto indicate that this NPC is a battling trainer and the game will fetch the appropriate rematch if necessary.vsseeker_rematchidwork like acant_see_if_trainerflag_setwith additional functionality to handle vs seeker. - All NPCs who don’t start with either
vsseeker_rematchidortrainerbattlewill show as “X”/unmatchable by the vs seeker, so non-rematchable trainer who do not start withtrainerbattle may "lie" and not show an excalmation mark showing they haven't been fought yet. This can be fixed by including avsseeker_rematchid` for them too.
- VS seeker now work with trainers who don’t start with trainer_battle. You can use
- Fix grade in summary screen not accounting for 26 IV by @FosterProgramming in #8157
- Fix match call regression by @FosterProgramming in #8227
- Fix mew sprite not appearing correctly by @FosterProgramming in #8235
- Fix wrong palette for types sprites in hgss dex after catching mon by @FosterProgramming in #8153
- Fix Apricorns with OW_SHOW_ITEM_DESCRIPTIONS not off by @hedara90 in #8253
- Fix mirage tower ceiling crumble color by @FosterProgramming in #8081
- Fix light flickering when different types of light sprite are present by @FosterProgramming in #8043
- Light intensity of neon signs was reduced to avoid conflicts with other light sources
- Fix flickering when both neon signs and light ball are present on screen
- Bug Fix: NPC Followers not working on slow sideways stairs by @Bivurnum in #8257
- Fixed NPC followers on slow sideways stairs
- Fix not enough memory being allocated when moves load background in contests by @FosterProgramming in #8284
- Make MON_DATA_NICKNAME10 return a 10 character string by @FosterProgramming in #8291
- Fix bug where interviews would print bad data in their string
- Fix game freeze when trainers try to walk on sideway stairs by @FosterProgramming in #8316
- Fix tossing items applying to the wrong stack by @FosterProgramming in #8282
- Prevent moves to be changed when choosing half party by @FosterProgramming in #8336
🐉 Pokémon 🐉
Added
- Add Legends Z-A content by @Bassoonian in #7935
- To retain compatibility with your new items and species, make sure to move the new additions behind your own additions.
- The save block will shift if you have enabled
USE_DEXNAV_SEARCH_LEVELS(due to the new species) or ifOW_SHOW_ITEM_DESCRIPTIONSis set toOW_ITEM_DESCRIPTIONS_FIRST_TIME(due to the new items).
- Move Relearners for TMs, Tutors and Egg moves by @PCG06 in #8040
- Increased the size of
MAX_RELEARNER_MOVESto 60 to prevent crashes when viewing Mew.
- Increased the size of
Changed
- Nickit & Thievul visual revamp by @purrfectdoodle in #7689
- Fix Kyurem typo in swap move tables by @Bassoonian in #8139
- Fix typo in Voltorb-Hisui pokedex entry by @PhallenTree in #8143
- Fix some followers sprites by @estellarc in #8208
Fixed
- Fix gba sprites trying load non existent female versions by @FosterProgramming in #7996
- Fixes issues with pokemon getting gender differences in later gens when using gen3 sprite config
- GetEggSpecies: Only enabled species by @mrgriffin in #8221
- Fix compiling using
make debugby @PCG06 in #8380
⚔️ Battle General ⚔️
Added
- Config for capture to appear critical if the pokemon is already caught by @FosterProgramming in #7730
Changed
- Separates FRB and FRZ animations by @grintoul1 in #7611
- Update multiple battle messages by @AsparagusEduardo in #7529
- Removed unused messages
- Changed ability “X prevents Y” to “It doesn’t affect X…”
- Eg.
"The opposing Snorlax's Immunity prevents poisoning!" - Removed
B_ABILITY_POP_UP. Revert commitb501fe7354bcd957396465c621ae7af5959ac5b0to undo this.
- Refactors Attackstring and PP deduction by @AlexOn1ine in #7402
- Remove Uproar attack battle script by @AlexOn1ine in #7715
- Fix up end turn scripts plus small documentation by @AlexOn1ine in #7758
- Remove redundant function call by @AlexOn1ine in #7752
- Minor White Herb and Neutralizing Gas clean up by @AlexOn1ine in #7754
- Minor clean up for Lightning Rod / Storm Drain by @AlexOn1ine in #7778
- Improve ability/heldEffect access for IsBattlerGrounded func by @AlexOn1ine in #7753
- Add func GetChosenMoveFromPosition by @AlexOn1ine in #7810
- GetBattlerHoldEffect clean up by @AlexOn1ine in #7819
- Remove unused gBattleStruct fields by @Bassoonian in #7822
- feat: change defines in
constants/abilities.hto an enum by @khbsd in #7006 - Streamline tryheal macros by @Bassoonian in #7830
- No bag use flag changed to a varable by @FosterProgramming in #7780
- IMPORTANT: The config flag B_FLAG_NO_BAG_USE has been removed
- A config var B_VAR_NO_BAG_USE has been added to replace it. It allows you to choose between: bag available in battle, bag available in wild battle only, and unavailable bag
- Remove two unused bits from battle structs by @Bassoonian in #7835
- Removes a few redundant hitmarkers by @AlexOn1ine in #7915
- Remove EffectHitSetTerrain script to use moveeffect by @AlexOn1ine in #7938
- Clean up follow up for AtkCanceller refactor by @AlexOn1ine in #7951
- Optimize GetWhichBattlerFasterOrTies by @AlexOn1ine in #7953
- Decouple passive hp updates from move damage updates by @AlexOn1ine in #7942
- Remove appearedInBattle bitfield & redundant use of sentOut partyState by @Nopinou in #8011
- Volatile cleared in a redundant spot by @AlexOn1ine in #8015
- Moved usedHeldItem to Party State struct by @AlexOn1ine in #8006
- Remove usage of gBattlerTarget for MirrorHerb/Opportunist by @AlexOn1ine in #8033
- Fixed test “Revival Blessing cannot revive a partner’s party member” by @grintoul1 in #8031
- Decouple (Overworld) Statuses from ability function by @AlexOn1ine in #8002
- Combine Simple Beam and Worry Seed into one effect by @AlexOn1ine in #8039
- Clean up for item hold effect refactor by @AlexOn1ine in #8014
- Grudge, Destiny Bond and FaintBattler refactor by @AlexOn1ine in #8072
- Parametrized Ice Face’s weather form change by @AsparagusEduardo in #8115
- Clean up redundant todo by @AlexOn1ine in #8094
- Deprecate various macro by @AlexOn1ine in #8092
- Fixes hacky SetMoveEffect script calls by @AlexOn1ine in #7987
- Create BattleStruct sub struct for event states by @AlexOn1ine in #8131
- Attackstring hitmarker clean up by @AlexOn1ine in #8136
- Clean up ability effect hitmarker by @AlexOn1ine in #8138
- Increase number of additional move effects by @AlexOn1ine in #8149
- Remove redundant Future Sight flag by @AlexOn1ine in #8185
- Powder Move blocking cleanup by @PhallenTree in #8194
- Micro clean up in BattleStruct by @AlexOn1ine in #8177
- HandleAction_UseMove minor cleanup by @mrgriffin in #8214
- Revert gBattleTurnCounter change by @AlexOn1ine in #8197
- Canceller -> Canceler rename by @AlexOn1ine in #8294
- Remove leftover scrtipt redirection by @AlexOn1ine in #8317
- Expand usage of FaintedActions enum in HandleFaintedMonActions by @PhallenTree in #8346
- Move end clear bits clean up by @AlexOn1ine in #8354
- Restored encourageEncore flag to non-volatile status effects by @AsparagusEduardo in #8387
Fixed
- Fixes Weak Armor and items not displaying stat change attributes by @PhallenTree in #7701
- Refactors ruin ability checks into a field effect by @AlexOn1ine in #7711
- Attackcanceller fixes and improvements by @AlexOn1ine in #7698
- Fix Critical Capture RNG and Catching Charm boost by @kittenchilly in #7534
- Fixes activation order for a couple abilities by @AlexOn1ine in #7732
- More White Herb fixes/clean up by @AlexOn1ine in #7826
- Missing IsBattlerAlive checks in Opportunist/Mirror Herb by @AlexOn1ine in #7829
- Item battle effect refactor by @AlexOn1ine in #7857
- Fix Fling Mental Herb message by @AlexOn1ine in #7984
- Fixes Ruin field statuses negation conditions + upcoming cleanup by @PhallenTree in #8042
- Fix nature power string and add support for evnvironment in tests by @FosterProgramming in #8068
- Add option to choose an environment when setting up a battle test
- Corrects battler position checks in battle_message.c by @grintoul1 in #8070
- Emergency Exit on hazards activation + fix end of turn activation by @PhallenTree in #8075
- Improve sBattleIntroSlideFuncs bounds check by @hedara90 in #8084
- Fixes Sticky Barb never getting transferred to attacker + tests by @PhallenTree in #8108
- Fixes flung items sometimes being blocked by Unnerve by @PhallenTree in #8114
- Adjust faint battler script by @AlexOn1ine in #8137
- Allow to send active mon to PC when capturing a Pokemon by @FosterProgramming in #8111
- Fix transform not loading the correct sprites when facing shiny or unown by @FosterProgramming in #8146
- Fixes Receiver not immediately activating copied abilities by @PhallenTree in #8162
- Fix destiny knot behavior and add tests by @FosterProgramming in #8174
- Fix recharge moves + add recharge move tests by @FosterProgramming in #8181
- Fixes Magician for spread moves by @AlexOn1ine in #8170
- Fix tera tint not applying on activation by @FosterProgramming in #8135
- Fixes wrongly assigned count for Semi Invulnerable state by @AlexOn1ine in #8175
- Fixes Drain Punch / Parental Bond / Scale Shot interaction by @AlexOn1ine in #8198
- Avoid illegal GetBattlerAtPosition by @mrgriffin in #8225
- DamageContext: chosenMove by @mrgriffin in #8224
- AccuracyCheck: Avoid calling GetMoveEffect with NO_ACC_CALC_CHECK_LOC… by @mrgriffin in #8222
- moveend: Handle MOVE_UNAVAILABLE in MOVEEND_THIRD_MOVE_BLOCK by @mrgriffin in #8215
- Fix wrong ditto sprite on capture by @FosterProgramming in #8226
- SpriteCB_EnemyShadow: Avoid use-after-free by @mrgriffin in #8220
- trysethelpinghand avoid illegal target by @mrgriffin in #8218
- Fixed an issue related to same turn Encore targeting by @LinathanZel in #8230
- Avoid illegal move retargeting in singles by @mrgriffin in #8217
- Fixes Shell Trap not activating on contact but no damage by @AlexOn1ine in #8243
- Fix Magic Coat reflecting hazard moves incorrectly when used by a partner by @moostoet in #8272
- Magic Coat now properly reflects hazard moves from either slot in double battles.
- Shell Trap tests and Fix for Encore interaction by @AlexOn1ine in #8268
- Fix max mushroom unable to be selected when one stat is maxed by @FosterProgramming in #8287
- Block selecting x items when contrary pokemon are at minimum stages by @FosterProgramming in #8288
- Fix Fur Coat affecting confusion self-damage by @moostoet in #8267
- Fix confusion self-damage ignoring defense/attack abilities such as Fur Coat.
- Fixes End Turn Speed Order by @AlexOn1ine in #8289
- Make switchout abilities trigger after a pokemon has returned to its ball by @FosterProgramming in #8304
- Fix Shed Shell allowing fleeing/teleporting and Smoke Ball failing to guarantee escape by @moostoet in #8286
- Fix bug where defiant/competitive would pass their stat change to the next target by @FosterProgramming in #8312
- Fix max move message against semi invulnerable target by @FosterProgramming in #8313
- Fixes Neutralizing Gas displaying message when exiting with multiple users by @PhallenTree in #8318
- Fix Kings Rock not being ignored by flinch moves by @AlexOn1ine in #8327
- Fix Upper Hand failure still activating Protean by @AlexOn1ine in #8329
- Fix Protosynthesis stat boosts ignoring speed drops by @moostoet in #8277
- Protosynthesis and Quark Drive now recalculate their boosted stat when Speed is lowered or Neutralizing Gas temporarily disables the ability.
- Fix switch-in abilities not triggering on revive by @FosterProgramming in #8293
- More Neutralizing Gas cleanup by @PhallenTree in #8335
- Clear Destiny Bond/Grudge bits when not activated by @PhallenTree in #8334
- Fix cure status item effect not working properly in doubles by @FosterProgramming in #8339
- Fix infinite confusion (berserk gene) not being cured by cure_status bag items by @FosterProgramming in #8343
- Fix
B_PHYSICAL_SPECIAL_SPLITwhen set to Gen 4 by @AsparagusEduardo in #8348 - Refactor Beat Up handling for Gen 3/4 defaults, fix crit check, and expand test coverage by @moostoet in #8307
- BUGFIX: Beat Up (
GEN =< 5) now no longer doubles its damage on every non-critical hit - Beat Up now precomputes eligible party members/strikers for consistent multi-hit resolution and expanded tests covering both pre-Gen5 and Gen5+ rules
- BUGFIX: Beat Up (
- Fix substitute graphic not disappearing after using a pivor move by @FosterProgramming in #8340
- Fixes Beak Blast burning after Beak Blast was already used by @PhallenTree in #8361
- Fix Roar not being recorded for LastUsedMove by @AlexOn1ine in #8362
- Fixes Neutralizing Gas / Mold Breaker / Dragon Darts interaction by @AlexOn1ine in #8389
- Fixes battle tv overwriting damage values by @AlexOn1ine in #8378
- Fix ball cycling not working properly when the same ball take multiple bag slots by @FosterProgramming in #8163
- Two new defines added to items.h
FIRST_BALL_INDEXandLAST_BALL_INDEX - We now assume the indexes of all regular ball usable in wild battle have consecutive indexes and some features (throw ball shortcut in battle) might break if not true
- Two new defines added to items.h
- Prevent double Dynamax for single-trainer 2v1 multi battles by @moostoet in #8323
- Fixed AI 2v1 multibattles incorrectly allowing both opponent leads to Dynamax in the same turn.
🤹 Moves 🤹
Changed
- Separates FRB and FRZ animations by @grintoul1 in #7611
- Fixed test “Revival Blessing cannot revive a partner’s party member” by @grintoul1 in #8031
- Fixed Uproar’s description and spacing by @fdeblasio in #8187
- Clean usage of gMovesInfo by @AsparagusEduardo in #8234
- Also, fixed an OOB in
HasMoveThatChangesKOThreshold
- Also, fixed an OOB in
- Added Gen 6 contest combos by @fdeblasio in #8251
- Make tailwind anim mirror based on side by @FosterProgramming in #8249
- Make rainbow effect anim change based on side by @FosterProgramming in #8269
- Art assets by SonikkuA-DatH
- Update Lash Out description to clarify its effect by @PhallenTree in #8372
Fixed
- Fix some move animations leaking VRAM and freeing already freed tags by @hedara90 in #7977
🎭 Abilities 🎭
Changed
- followup: AbilityBattleEffects return type is incorrect by @khbsd in #7827
🧶 Items 🧶
Fixed
- Allow vs seekers to work with script not starting with trainerbattle by @FosterProgramming in #8062
- VS seeker now work with trainers who don’t start with trainer_battle. You can use
vsseeker_rematchid TRAINER_IDto indicate that this NPC is a battling trainer and the game will fetch the appropriate rematch if necessary.vsseeker_rematchidwork like acant_see_if_trainerflag_setwith additional functionality to handle vs seeker. - All NPCs who don’t start with either
vsseeker_rematchidortrainerbattlewill show as “X”/unmatchable by the vs seeker, so non-rematchable trainer who do not start withtrainerbattle may "lie" and not show an excalmation mark showing they haven't been fought yet. This can be fixed by including avsseeker_rematchid` for them too.
- VS seeker now work with trainers who don’t start with trainer_battle. You can use
- Removed extra period in Pokéshi Doll description by @montmoguri in #8252
🤖 Battle AI 🤖
Added
- Improved move additional effect handling; now accounts for Shield Dust. by @surskitty in #7650
- Adjusted AI handling for Gravity; AI for weather/field status additional effects. by @surskitty in #7651
- Improved AI for status curing; trainer items, Purify, Smelling Salts, Sparkling Aria by @surskitty in #7853
Changed
- AI uses Magnetic Flux. by @surskitty in #7642
- AI uses Flower Shield. by @surskitty in #7640
- AI uses Life Dew. by @surskitty in #7643
- AI uses Gear Up. by @surskitty in #7641
- Correcting test AI won’t use status moves if partner chose Helping Hand by @surskitty in #7649
- IncreaseStatUpScore adjustments for Simple, +3 moves, Acupressure, max move effects by @surskitty in #7662
- AI handling for Coaching. by @surskitty in #7661
- Simplifying calls to IsBattlerTrapped; treats being unable to switch as trappedness by @surskitty in #7671
- AI Tests: Gimmick Support by @mrgriffin in #7694
- AI can use Z-status moves by @surskitty in #7666
- Move some checks out of IncreaseStatUpScore to ShouldRaiseAnyStat by @surskitty in #7722
- Moving additional effects out of AI_CalcMoveEffectScore and into AI_CalcMoveAdditionalEffectScore by @surskitty in #7727
- AI sees dynamic moves and Nature Power as correct types for weather, terrain by @surskitty in #7759
- Fix abusable two-turn-move switch behaviour by @Pawkkie in #7770
- Z Status move handling: Conversion, Detect, Nature Power, Transform by @surskitty in #7721
- Use stored values for ai switch-in effectiveness checks by @AlexOn1ine in #7794
- Changing all HasBattlerSideAbility to AI_IsAbilityOnSide. by @surskitty in #7927
- Weather/Terrain AI touch-ups. by @surskitty in #7933
- Improving the checks for the AI to avoid Encore; adding RISK_ENCORE_CHANCE config. by @surskitty in #7929
- Fixes CanUseLastResort and resolves 3 KNOWN_FAILING Last Resort tests by @grintoul1 in #8032
- Add AI flag AI_FLAG_KNOW_OPPONENT_PARTY to know all species in party by @moostoet in #8290
Fixed
- Score adjustments towards guaranteed stat drops. by @surskitty in #7670
- AI uses Extreme Evoboost. by @surskitty in #7706
- Fixes AI scoring when Priority moves are blocked by @PhallenTree in #7745
- fix (AI scoring): shield dust considerations, IsMoveEffectInMinus self effect edge case, hitsToKO zero-case consideration by @ghostyboyy97 in #8126
- The AI now sees Shield Dust on the player’s Pokemon correctly
- The AI now sees self-targeted positive effect boosts correctly
- fix (contrary): Contrary stat down handling in MoveEffectInPlus by @ghostyboyy97 in #8165
- When comparing positive move effects in damaging move comparison, the AI will correctly see moves like Leaf Storm as beneficial if their Pokemon has Contrary.
- Added check for parental bond killing through sturdy by @MaximeGr00 in #8206
- AI now accounts for Parental Bond when checking if a move can ko the player through sturdy/focus sash.
- AI: Handle MOVE_UNAVAILABLE in last used moves by @mrgriffin in #8219
- Fix AI_FLAG_DOUBLE_ACE_POKEMON sending duplicate Pokémon in doubles by @moostoet in #8279
- Fixed AI_FLAG_DOUBLE_ACE_POKEMON trainers resending the same Pokémon after a KO instead of their two Ace Pokémon in double battles.
- Rework switch AI and add more tests for ace pokemon flags by @FosterProgramming in #8321
- All remaining issues with the AI flags Ace Pokemon and Double Ace pokemon should be fixed
- The smart switching AI should be less likely to switch a pokemon about to die if it doesn’t have a pokemon with a good matchup to replace it
- Fix switchin KO threshold logic by @Pawkkie in #8370
🧹 Other Cleanup 🧹
- Update multiple battle messages by @AsparagusEduardo in #7529
- Removed unused messages
- Changed ability “X prevents Y” to “It doesn’t affect X…”
- Eg.
"The opposing Snorlax's Immunity prevents poisoning!" - Removed
B_ABILITY_POP_UP. Revert commitb501fe7354bcd957396465c621ae7af5959ac5b0to undo this.
- Battle debug menu now checks correct parties depending on battler party by @grintoul1 in #7652
- Correcting test AI won’t use status moves if partner chose Helping Hand by @surskitty in #7649
- Remove Uproar attack battle script by @AlexOn1ine in #7715
- Fix up end turn scripts plus small documentation by @AlexOn1ine in #7758
field_name_boxsmol followup by @mudskipper13 in #7762- Remove redundant function call by @AlexOn1ine in #7752
- Minor White Herb and Neutralizing Gas clean up by @AlexOn1ine in #7754
- Minor clean up for Lightning Rod / Storm Drain by @AlexOn1ine in #7778
- Add func GetChosenMoveFromPosition by @AlexOn1ine in #7810
- GetBattlerHoldEffect clean up by @AlexOn1ine in #7819
- Remove unused gBattleStruct fields by @Bassoonian in #7822
- followup: AbilityBattleEffects return type is incorrect by @khbsd in #7827
- Streamline tryheal macros by @Bassoonian in #7830
- Remove two unused bits from battle structs by @Bassoonian in #7835
- Removes a few redundant hitmarkers by @AlexOn1ine in #7915
- Remove EffectHitSetTerrain script to use moveeffect by @AlexOn1ine in #7938
- Clean up follow up for AtkCanceller refactor by @AlexOn1ine in #7951
- Remove appearedInBattle bitfield & redundant use of sentOut partyState by @Nopinou in #8011
- Some more documentation and cleanup by @Bassoonian in #8020
- Volatile cleared in a redundant spot by @AlexOn1ine in #8015
- Moved usedHeldItem to Party State struct by @AlexOn1ine in #8006
- Remove usage of gBattlerTarget for MirrorHerb/Opportunist by @AlexOn1ine in #8033
- Even more enums and documentation by @Bassoonian in #8029
- Decouple (Overworld) Statuses from ability function by @AlexOn1ine in #8002
- Fixes Ruin field statuses negation conditions + upcoming cleanup by @PhallenTree in #8042
- Minor clean up in menu.c by @estellarc in #8060
- Clean up for item hold effect refactor by @AlexOn1ine in #8014
- Parametrized Ice Face’s weather form change by @AsparagusEduardo in #8115
- Clean up redundant todo by @AlexOn1ine in #8094
- Deprecate various macro by @AlexOn1ine in #8092
- Fixes hacky SetMoveEffect script calls by @AlexOn1ine in #7987
- Create BattleStruct sub struct for event states by @AlexOn1ine in #8131
- Attackstring hitmarker clean up by @AlexOn1ine in #8136
- Clean up ability effect hitmarker by @AlexOn1ine in #8138
- Fix Kyurem typo in swap move tables by @Bassoonian in #8139
- Fix typo in Voltorb-Hisui pokedex entry by @PhallenTree in #8143
- porymap default settings by @FosterProgramming in #8038
- WARNING: A change was made for new projects map files to match poymap output. This change might break people’s projects with existing versions of those files. The files affected are
data/maps/map_groups.json,src/data/heal_locations.json,src/data/region_map/region_map_sections.jsonandsrc/data/wild_encounters.jsonIf you have an issue with one of those files during the merging process, you should run this commandgit checkout HEAD -- <filename>which will reset the file to the version before you initiated the merge
- WARNING: A change was made for new projects map files to match poymap output. This change might break people’s projects with existing versions of those files. The files affected are
- Sets instant text speed flag to false by default by @khbsd in #8179
- Remove redundant Future Sight flag by @AlexOn1ine in #8185
- Fix incorrect comments by @AlexOn1ine in #8193
- Fixed Uproar’s description and spacing by @fdeblasio in #8187
- Add include/constants/script_commands.h to gitignore by @AlexOn1ine in #8169
- Powder Move blocking cleanup by @PhallenTree in #8194
- Converted landmarks to COMPOUND_STRINGs by @fdeblasio in #8205
- Micro clean up in BattleStruct by @AlexOn1ine in #8177
- Clean usage of gMovesInfo by @AsparagusEduardo in #8234
- Also, fixed an OOB in
HasMoveThatChangesKOThreshold
- Also, fixed an OOB in
- HandleAction_UseMove minor cleanup by @mrgriffin in #8214
- Revert gBattleTurnCounter change by @AlexOn1ine in #8197
- Added contest config and cleaned up contest category variables by @fdeblasio in #8178
- Adjust Canceler naming to contain only one l by @AlexOn1ine in #8258
- Fix wrongly renamed logs by @AlexOn1ine in #8264
- Test type enum indentation by @AsparagusEduardo in #8273
- Added missing ‘coolness’ string by @fdeblasio in #8274
- Canceller -> Canceler rename by @AlexOn1ine in #8294
- Tests for Max Moves already exist by @AlexOn1ine in #8314
- Documentation clean up for MoveCanceler by @AlexOn1ine in #8297
- Use MAP_OFFSET by @estellarc in #8328
- Remove leftover scrtipt redirection by @AlexOn1ine in #8317
- Fixed broken friendship from items in battle test and added new test for opposite case by @pkmnsnfrn in #7872
- Expand usage of FaintedActions enum in HandleFaintedMonActions by @PhallenTree in #8346
- Move end clear bits clean up by @AlexOn1ine in #8354
- Indent unintented if statement by @hedara90 in #8367
- Update Lash Out description to clarify its effect by @PhallenTree in #8372
- Slight Protect moveend cleanup by @AsparagusEduardo in #8385
- Restored encourageEncore flag to non-volatile status effects by @AsparagusEduardo in #8387
🧪 Test Runner 🧪
Added
- Multibattle testing system by @grintoul1 in #7257
- Prevent EXPECT functions from casting negative numbers into unsigned by @FosterProgramming in #7866
Changed
- AI Tests: Gimmick Support by @mrgriffin in #7694
- Some tests for future Dynamax AI behavior. by @surskitty in #7707
- Add some missing move animations to the move animation tests by @FosterProgramming in #7507
- Fixes CanUseLastResort and resolves 3 KNOWN_FAILING Last Resort tests by @grintoul1 in #8032
- Fixed test “Revival Blessing cannot revive a partner’s party member” by @grintoul1 in #8031
- Added Soundproof and Bulletproof tests by @AsparagusEduardo in #8189
- Wrote some missing tests by @AsparagusEduardo in #8203
- Refactor random functions to be runner specific by @FosterProgramming in #7816
- A couple more tests by @AsparagusEduardo in #8209
- Fixed some failing tests with GEN_LATEST = GEN_5 by @AsparagusEduardo in #8241
- Add test for mold breaker/ice scales interaction by @FosterProgramming in #8240
- Yet more tests by @AsparagusEduardo in #8228
- Added tests for:
- Dark Aura
- Fairy Aura
- Flare Boost
- Toxic Boost
- Added test names for Flying Press.
- Test type enum indentation by @AsparagusEduardo in #8273
- Slightly increase headless test speed by modifying animations by @AsparagusEduardo in #8299
- Make
gTestRunnerHeadlessinto a constant outside of tests by @hedara90 in #8306 - Tests for Max Moves already exist by @AlexOn1ine in #8314
- Finished fixing tests when setting
GEN_LATESTtoGEN_5by @AsparagusEduardo in #8263 - Wrote missing Fling tests by @AsparagusEduardo in #8383
Fixed
- Corrects ONE_VS_TWO_BATTLE_TEST to use BATTLE_TEST_ARGS_ONE_VS_TWO by @grintoul1 in #8061
- Fixes difficulty not being restored after tests by @grintoul1 in #8129
- Reset saveblock data between test runs by @hedara90 in #8145
- Sheer force test fix by @grintoul1 in #8142
- Test only enabled species by @mrgriffin in #8216
- Fix ohko moves ai tests by @FosterProgramming in #8309
- Fixed broken friendship from items in battle test and added new test for opposite case by @pkmnsnfrn in #7872
- Add tests to verify aromatherapy is not affected by heal bell config by @FosterProgramming in #8344
- Pre gen 5 encored move now signals the test engine a move is happening by @FosterProgramming in #8338
- Refactor Beat Up handling for Gen 3/4 defaults, fix crit check, and expand test coverage by @moostoet in #8307
- BUGFIX: Beat Up (
GEN =< 5) now no longer doubles its damage on every non-critical hit - Beat Up now precomputes eligible party members/strikers for consistent multi-hit resolution and expanded tests covering both pre-Gen5 and Gen5+ rules
- BUGFIX: Beat Up (
- Fix player and partner trainer sprite palettes to 8 and 9, preventing unwanted palette changes by @grintoul1 in #8127
- Fix known failing AI trace test by @FosterProgramming in #8337
📚 Documentation 📚
- Converts some defines to enums and name unnamed enums by @Bassoonian in #8019
- Some more documentation and cleanup by @Bassoonian in #8020
- Even more enums and documentation by @Bassoonian in #8029
- Add type enum by @Bassoonian in #8054
- Revert reversion by @AlexOn1ine in #8112
- Lock mdbook to v0.4.35 to fix docs not building by @grintoul1 in #8130
- Add additional comment explaing map name popup transparency side-effects by @FosterProgramming in #8117
- Fix incorrect comments by @AlexOn1ine in #8193
- Moves name box configs into a new file by @AlexOn1ine in #8250
- Fix wrongly renamed logs by @AlexOn1ine in #8264
- Documentation clean up for MoveCanceler by @AlexOn1ine in #8297
- Use MAP_OFFSET by @estellarc in #8328
- Fedora install instructions by @estellarc in #8355
New Contributors
- @purrfectdoodle made their first contribution in #7689
- @montmoguri made their first contribution in #8252
Full Changelog: https://github.com/rh-hideout/pokeemerald-expansion/compare/expansion/1.13.3...expansion/1.14.0
Version 1.13.4
## How to update
- If you haven't set up a remote, run the command `git remote add RHH https://github.com/rh-hideout/pokeemerald-expansion`.
- Once you have your remote set up, run the command `git pull RHH expansion/1.13.4
`.
🧬 General 🧬
Changed
- 1.13.3 release by @hedara90 in #8109
- Adds an auto-generated include file of script commands by @FosterProgramming in #8156
- Adjust label workflow to only run if PR is approved by @hedara90 in #8183
- Add include/constants/script_commands.h to gitignore by @AlexOn1ine in #8169
- add fdeblasio as a contributor for code by @allcontributors[bot] in #8200
- Adjust Canceler naming to contain only one l by @AlexOn1ine in #8258
- Pret merge (16th of November, 2025) by @AlexOn1ine in #8262
- *.party: text with lfs by @mrgriffin in #8320
- Fedora install instructions by @estellarc in #8355
- Indent unintented if statement by @hedara90 in #8367
Fixed
- Update mdbook to v0.5.0-beta.1 by @rayrobdod in #8133
- Fix wild_encounters script not closing arrays properly by @FosterProgramming in #8123
- Fix missing FREE_MATCH_CALL by @FosterProgramming in #8171
- Fix scroll prompt sometimes being off-screen with automatic line breaks by @hedara90 in #8182
- Fix gcc11 again by @AsparagusEduardo in #8188
- Fixed decompression error reporter OOB window creation by @hedara90 in #8199
- Fix error when compiling with P_FUSION_FORMS disabled by @cawtds in #8298
- Fix compile on gcc11 by @AlexOn1ine in #8300
- Fix debug battle flag never being cleared by @FosterProgramming in #8357
🗺️ Overworld 🗺️
Changed
- Add additional comment explaing map name popup transparency side-effects by @FosterProgramming in #8117
Fixed
- Fix berry blender not computing flavor correctly by @FosterProgramming in #8113
- Allow vs seekers to work with script not starting with trainerbattle by @FosterProgramming in #8062
- VS seeker now work with trainers who don’t start with trainer_battle. You can use
vsseeker_rematchid TRAINER_IDto indicate that this NPC is a battling trainer and the game will fetch the appropriate rematch if necessary.vsseeker_rematchidwork like acant_see_if_trainerflag_setwith additional functionality to handle vs seeker. All NPCs who don’t start with eithervsseeker_rematchidortrainerbattlewill show as “X”/unmatchable by the vs seeker, so non-rematchable trainer who do not start withtrainerbattle may "lie" and not show an excalmation mark showing they haven't been fought yet. This can be fixed by including avsseeker_rematchid` for them too.
- VS seeker now work with trainers who don’t start with trainer_battle. You can use
- Fix grade in summary screen not accounting for 26 IV by @FosterProgramming in #8157
- Fix match call regression by @FosterProgramming in #8227
- Fix mew sprite not appearing correctly by @FosterProgramming in #8235
- Fix wrong palette for types sprites in hgss dex after catching mon by @FosterProgramming in #8153
- Fix mirage tower ceiling crumble color by @FosterProgramming in #8081
- Fix light flickering when different types of light sprite are present by @FosterProgramming in #8043
- Light intensity of neon signs was reduced to avoid conflicts with other light sources
- Fix flickering when both neon signs and light ball are present on screen
- Bug Fix: NPC Followers not working on slow sideways stairs by @Bivurnum in #8257
- Fix not enough memory being allocated when moves load background in contests by @FosterProgramming in #8284
- Make MON_DATA_NICKNAME10 return a 10 character string by @FosterProgramming in #8291
- Fix bug where interviews would print bad data in their string
- Fix game freeze when trainers try to walk on sideway stairs by @FosterProgramming in #8316
- Fix tossing items applying to the wrong stack by @FosterProgramming in #8282
- Prevent moves to be changed when choosing half party by @FosterProgramming in #8336
🐉 Pokémon 🐉
Changed
- Fix Kyurem typo in swap move tables by @Bassoonian in #8139
- Fix typo in Voltorb-Hisui pokedex entry by @PhallenTree in #8143
- Fix some followers sprites by @estellarc in #8208
⚔️ Battle General ⚔️
Changed
- Clean up redundant todo by @AlexOn1ine in #8094
- Powder Move blocking cleanup by @PhallenTree in #8194
- Restored encourageEncore flag to non-volatile status effects by @AsparagusEduardo in #8387
Fixed
- Allow to send active mon to PC when capturing a Pokemon by @FosterProgramming in #8111
- Fix transform not loading the correct sprites when facing shiny or unown by @FosterProgramming in #8146
- Fixes Receiver not immediately activating copied abilities by @PhallenTree in #8162
- Fix destiny knot behavior and add tests by @FosterProgramming in #8174
- Fix recharge moves + add recharge move tests by @FosterProgramming in #8181
- Fixes Magician for spread moves by @AlexOn1ine in #8170
- Fix tera tint not applying on activation by @FosterProgramming in #8135
- Fixes wrongly assigned count for Semi Invulnerable state by @AlexOn1ine in #8175
- Fixes Drain Punch / Parental Bond / Scale Shot interaction by @AlexOn1ine in #8198
- Fix wrong ditto sprite on capture by @FosterProgramming in #8226
- Fixed an issue related to same turn Encore targeting by @LinathanZel in #8230
- Fixes Shell Trap not activating on contact but no damage by @AlexOn1ine in #8243
- Fix Magic Coat reflecting hazard moves incorrectly when used by a partner by @moostoet in #8272
- Magic Coat now properly reflects hazard moves from either slot in double battles.
- Shell Trap tests and Fix for Encore interaction by @AlexOn1ine in #8268
- Fix max mushroom unable to be selected when one stat is maxed by @FosterProgramming in #8287
- Block selecting x items when contrary pokemon are at minimum stages by @FosterProgramming in #8288
- Fix Fur Coat affecting confusion self-damage by @moostoet in #8267
- Fix confusion self-damage ignoring defense/attack abilities such as Fur Coat.
- Fixes End Turn Speed Order by @AlexOn1ine in #8289
- Make switchout abilities trigger after a pokemon has returned to its ball by @FosterProgramming in #8304
- Fix Shed Shell allowing fleeing/teleporting and Smoke Ball failing to guarantee escape by @moostoet in #8286
- Fix bug where defiant/competitive would pass their stat change to the next target by @FosterProgramming in #8312
- Fix max move message against semi invulnerable target by @FosterProgramming in #8313
- Fixes Neutralizing Gas displaying message when exiting with multiple users by @PhallenTree in #8318
- Fix Kings Rock not being ignored by flinch moves by @AlexOn1ine in #8327
- Fix Protosynthesis stat boosts ignoring speed drops by @moostoet in #8277
- Protosynthesis and Quark Drive now recalculate their boosted stat when Speed is lowered or Neutralizing Gas temporarily disables the ability.
- Fix switch-in abilities not triggering on revive by @FosterProgramming in #8293
- More Neutralizing Gas cleanup by @PhallenTree in #8335
- Fix cure status item effect not working properly in doubles by @FosterProgramming in #8339
- Fix infinite confusion (berserk gene) not being cured by cure_status bag items by @FosterProgramming in #8343
- Fix
B_PHYSICAL_SPECIAL_SPLITwhen set to Gen 4 by @AsparagusEduardo in #8348 - Refactor Beat Up handling for Gen 3/4 defaults, fix crit check, and expand test coverage by @moostoet in #8307
- BUGFIX: Beat Up (
GEN =< 5) now no longer doubles its damage on every non-critical hit - Beat Up now precomputes eligible party members/strikers for consistent multi-hit resolution and expanded tests covering both pre-Gen5 and Gen5+ rules
- BUGFIX: Beat Up (
- Fix substitute graphic not disappearing after using a pivor move by @FosterProgramming in #8340
- Fixes Beak Blast burning after Beak Blast was already used by @PhallenTree in #8361
- Fix Roar not being recorded for LastUsedMove by @AlexOn1ine in #8362
- Fixes Neutralizing Gas / Mold Breaker / Dragon Darts interaction by @AlexOn1ine in #8389
- Fixes battle tv overwriting damage values by @AlexOn1ine in #8378
- Fix ball cycling not working properly when the same ball take multiple bag slots by @FosterProgramming in #8163
- Two new defines added to items.h
FIRST_BALL_INDEXandLAST_BALL_INDEX - We now assume the indexes of all regular ball usable in wild battle have consecutive indexes and some features (throw ball shortcut in battle) might break if not true
- Two new defines added to items.h
🤹 Moves 🤹
Changed
- Fixed Uproar’s description and spacing by @fdeblasio in #8187
- Clean usage of gMovesInfo by @AsparagusEduardo in #8234
- Also, fixed an OOB in
HasMoveThatChangesKOThreshold
- Also, fixed an OOB in
- Make tailwind anim mirror based on side by @FosterProgramming in #8249
- Make rainbow effect anim change based on side by @FosterProgramming in #8269
- Art assets by SonikkuA-DatH
- Update Lash Out description to clarify its effect by @PhallenTree in #8372
Fixed
- Fix some move animations leaking VRAM and freeing already freed tags by @hedara90 in #7977
🧶 Items 🧶
Fixed
- Allow vs seekers to work with script not starting with trainerbattle by @FosterProgramming in #8062
- VS seeker now work with trainers who don’t start with trainer_battle. You can use
vsseeker_rematchid TRAINER_IDto indicate that this NPC is a battling trainer and the game will fetch the appropriate rematch if necessary.vsseeker_rematchidwork like acant_see_if_trainerflag_setwith additional functionality to handle vs seeker. All NPCs who don’t start with eithervsseeker_rematchidortrainerbattlewill show as “X”/unmatchable by the vs seeker, so non-rematchable trainer who do not start withtrainerbattle may "lie" and not show an excalmation mark showing they haven't been fought yet. This can be fixed by including avsseeker_rematchid` for them too.
- VS seeker now work with trainers who don’t start with trainer_battle. You can use
🤖 Battle AI 🤖
Fixed
- fix (AI scoring): shield dust considerations, IsMoveEffectInMinus self effect edge case, hitsToKO zero-case consideration by @ghostyboyy97 in #8126
- The AI now sees Shield Dust on the player’s Pokemon correctly
- The AI now sees self-targeted positive effect boosts correctly
- fix (contrary): Contrary stat down handling in MoveEffectInPlus by @ghostyboyy97 in #8165
- When comparing positive move effects in damaging move comparison, the AI will correctly see moves like Leaf Storm as beneficial if their Pokemon has Contrary.
- Added check for parental bond killing through sturdy by @MaximeGr00 in #8206 AI now accounts for Parental Bond when checking if a move can ko the player through sturdy/focus sash.
- Fix AI_FLAG_DOUBLE_ACE_POKEMON sending duplicate Pokémon in doubles by @moostoet in #8279
- Fixed AI_FLAG_DOUBLE_ACE_POKEMON trainers resending the same Pokémon after a KO instead of their two Ace Pokémon in double battles.
- Fix switchin KO threshold logic by @Pawkkie in #8370
🧹 Other Cleanup 🧹
- Clean up redundant todo by @AlexOn1ine in #8094
- Fix Kyurem typo in swap move tables by @Bassoonian in #8139
- Fix typo in Voltorb-Hisui pokedex entry by @PhallenTree in #8143
- Fixed Uproar’s description and spacing by @fdeblasio in #8187
- Add include/constants/script_commands.h to gitignore by @AlexOn1ine in #8169
- Powder Move blocking cleanup by @PhallenTree in #8194
- Clean usage of gMovesInfo by @AsparagusEduardo in #8234
- Also, fixed an OOB in
HasMoveThatChangesKOThreshold
- Also, fixed an OOB in
- Adjust Canceler naming to contain only one l by @AlexOn1ine in #8258
- Fix wrongly renamed logs by @AlexOn1ine in #8264
- Tests for Max Moves already exist by @AlexOn1ine in #8314
- Use MAP_OFFSET by @estellarc in #8328
- Fixed broken friendship from items in battle test and added new test for opposite case by @pkmnsnfrn in #7872
- Indent unintented if statement by @hedara90 in #8367
- Update Lash Out description to clarify its effect by @PhallenTree in #8372
- Restored encourageEncore flag to non-volatile status effects by @AsparagusEduardo in #8387
🧪 Test Runner 🧪
Added
- Prevent EXPECT functions from casting negative numbers into unsigned by @FosterProgramming in #7866
Changed
- Added Soundproof and Bulletproof tests by @AsparagusEduardo in #8189
- Wrote some missing tests by @AsparagusEduardo in #8203
- A couple more tests by @AsparagusEduardo in #8209
- Fixed some failing tests with GEN_LATEST = GEN_5 by @AsparagusEduardo in #8241
- Add test for mold breaker/ice scales interaction by @FosterProgramming in #8240
- Yet more tests by @AsparagusEduardo in #8228
- Added tests for:
- Dark Aura
- Fairy Aura
- Flare Boost
- Toxic Boost
- Added test names for Flying Press.
- Slightly increase headless test speed by modifying animations by @AsparagusEduardo in #8299
- Make
gTestRunnerHeadlessinto a constant outside of tests by @hedara90 in #8306 - Tests for Max Moves already exist by @AlexOn1ine in #8314
- Finished fixing tests when setting
GEN_LATESTtoGEN_5by @AsparagusEduardo in #8263 - Wrote missing Fling tests by @AsparagusEduardo in #8383
Fixed
- Fixes difficulty not being restored after tests by @grintoul1 in #8129
- Reset saveblock data between test runs by @hedara90 in #8145
- Fix ohko moves ai tests by @FosterProgramming in #8309
- Fixed broken friendship from items in battle test and added new test for opposite case by @pkmnsnfrn in #7872
- Add tests to verify aromatherapy is not affected by heal bell config by @FosterProgramming in #8344
- Pre gen 5 encored move now signals the test engine a move is happening by @FosterProgramming in #8338
- Refactor Beat Up handling for Gen 3/4 defaults, fix crit check, and expand test coverage by @moostoet in #8307
- BUGFIX: Beat Up (
GEN =< 5) now no longer doubles its damage on every non-critical hit - Beat Up now precomputes eligible party members/strikers for consistent multi-hit resolution and expanded tests covering both pre-Gen5 and Gen5+ rules
- BUGFIX: Beat Up (
- Fix known failing AI trace test by @FosterProgramming in #8337
📚 Documentation 📚
- Lock mdbook to v0.4.35 to fix docs not building by @grintoul1 in #8130
- Add additional comment explaing map name popup transparency side-effects by @FosterProgramming in #8117
- Fix wrongly renamed logs by @AlexOn1ine in #8264
- Use MAP_OFFSET by @estellarc in #8328
- Fedora install instructions by @estellarc in #8355
Full Changelog: https://github.com/rh-hideout/pokeemerald-expansion/compare/expansion/1.13.3...expansion/1.13.4
Version 1.13.3
## How to update
- If you haven't set up a remote, run the command `git remote add RHH https://github.com/rh-hideout/pokeemerald-expansion`.
- Once you have your remote set up, run the command `git pull RHH expansion/1.13.3
`.
🧬 General 🧬
Added
- Add test to detect save file shifting by @Bassoonian in #8030
Changed
- 1.13.2 release by @hedara90 in #7831
- Remove unnecessary EWRAM and IWRAM variables from the Window code by @estellarc in #7897
- Replace magic numbers with define’d values in field_player_avatar.c by @FosterProgramming in #7910
- Pret merge (1st of November, 2025) by @hedara90 in #8103
Fixed
- Fixes
EVO_BATTLE_ENDevolutions not removing item with additional conditions by @PhallenTree in #7841 - Fix EV display in debug menu by @cawtds in #7848
- Fix right player position battle partner target display by @ravepossum in #7878
- Ensure last used ball and move description window sprites don’t free palette too early by @ravepossum in #7875
- Fix fusion pokemon aquiring illegal movesets by @FosterProgramming in #7896
- Calyrex will now delete moves if they are not part of its learnset when unfusing
- Kyurem will now properly swap the moves Glaciate and Scary Face to its signature moves when fusing/unfusing
- Fix bug causing hgss dex to freeze by @FosterProgramming in #7936
- Fix a bug when checking evolutions info screen while search mode is active in the hgss dex
- Show convergent evolution to Gholdengo in HGSS dex by @FosterProgramming in #7934
- Fix HGSS dex sprites for gen9+ by @FosterProgramming in #7922
- Fix nicknames containing many / overflowing the party screen textbox by @hedara90 in #7970
- Fix ruination and nature’s madness damage percentage by @FosterProgramming in #7983
- Fix ribbon colours by @hedara90 in #7971
- Fix long pokemon name in partner party not appearing properly by @FosterProgramming in #8009
- Fix battle dome bug (again) by @FosterProgramming in #8007
- Fix battle arena counting all judges loss for the opponent by @FosterProgramming in #8046
- Fix battle arena referees giving undeserved wins to the player
- Fix wrong gimmick spite showing when inputting too fast by @FosterProgramming in #8066
🗺️ Overworld 🗺️
Fixed
- Fix LTO breaking with FREE_MYSTERY_GIFT set to TRUE by @DizzyEggg in #7844
- Fix dns palette weight by @FosterProgramming in #7855
- Bug Fix: NPC follower not inheriting facing direction upon creation by @Bivurnum in #7895
- Fix follower pokemon not playing animation when colliding by @FosterProgramming in #7908
- Fix incorrect font width in Dexnav search window hiding some elements by @FosterProgramming in #7949
- Fix dns color transition not applying weather blending by @FosterProgramming in #7883
- Fix follower NPC sidewaystair movement by @FosterProgramming in #7909
- Fix battle dome pre round 1 waiting room by @FosterProgramming in #7976
- Fix no_effect script command overwriting trainer data in trainer script by @FosterProgramming in #7978
- Setting wallclock time now properly sets fakeRTC by @FosterProgramming in #7860
- Fix time bug when setting wallclock in fakeRTC mode
- When setting the wall clock, it will start on current time instead of 10AM
- If FakeRTC is active, new game will start at 10AM
- Bugfix hidefollower not waiting properly by @FosterProgramming in #7768
- Bugfix Emotes not loading their palette by @estellarc in #7843
- Fix OW Pokémon VObjects by @HashtagMarky in #7991
- fix: hypertraining a stat now optionally reflects in the summary screen by @khbsd in #8035
- Fix pc turning on/off animation not working in battle frontier by @FosterProgramming in #8048
- Fix non-battle trainer script not running properly by @FosterProgramming in #8056
🐉 Pokémon 🐉
Fixed
- Fixes shininess for givemon by @cawtds in #7847
- Fix Minior start of battle form by @hedara90 in #7972
- Add error messages for trying to send an illegal mon to the PC and fixes index in double wild battles by @hedara90 in #7982
- fix: hypertraining a stat now optionally reflects in the summary screen by @khbsd in #8035
- Add camera-facing right-walking Krabby and Kingler follower sprites by @rayrobdod in #7881
⚔️ Battle General ⚔️
Changed
Fixed
- Fixes Endure lasting forever by @AlexOn1ine in #7838
- Fix for uncaught mon with terrain active by @DizzyEggg in #7868
- Fixes Steadfast not activating + tests by @PhallenTree in #7886
- Fix hgss pokedex when catching mon with terrain by @DizzyEggg in #7884
- Fix SmartStrike crashing the game in double battles by @DizzyEggg in #7902
- Fix palaceUnableToUseMove falling through to change battle script by @ghoulslash in #7912
- Add new Move target types to GetBattlePalaceMoveGroup by @ghoulslash in #7913
- Fixes 2 instances of global usage in the
Cmd_adjustdamageloop by @AlexOn1ine in #7918 - Fix Battle Anim monbg calls Part 1 by @ghoulslash in #7906
- Adds missing breakable flag for Bulletproof by @AlexOn1ine in #7928
- Fix multiple battle arena bugs by @FosterProgramming in #7941
- Fixes Cursed Body failing to disable moves on the last PP by @PhallenTree in #7940
- Fixed an issue related to Pokemon animation bleeding into attack anim… by @LinathanZel in #7924
- Fixes terrain not failing on duplicate by @AlexOn1ine in #7939
- Fix volt tackle not inflicting recoil by @FosterProgramming in #7944
- Fix Knock Off not being restored and Wild Battles by @ghoulslash in #7952
- Fix Anticipation type effectiveness check by @spindrift64 in #7840
- Fix Cherim and Castfrom not reverting to baseform when Teraform Zero is triggered by @FosterProgramming in #7961
- Fix Focus Energy boosting crit by the wrong amount with gen1 crit chance by @FosterProgramming in #7956
- Fix bug where transformed pokemon lose copied stats on levelup by @FosterProgramming in #7969
- Fixes Shields Down incorrectly preventing status on Minior Core form by @PhallenTree in #7968
- SetShellSideArmCategory avoid div by zero by @DizzyEggg in #7980
- CalcBarFilledPixels Safe Div by @DizzyEggg in #7979
- Fix psychic terrain affecting semi-invulnerable mons by @FosterProgramming in #7986
- Fixes Terrain Extender timer by @AlexOn1ine in #7995
- Fixed Max Move in-battle descriptions by @AsparagusEduardo in #8004
- Fixes Echoed Voice base power increase depending on attacker’s use of the move by @PhallenTree in #7997
- Fixed Stomping Tantrum not doubling in damage if the user failed Protect by @AsparagusEduardo in #8008
- Fix badge boost not applying in gen1 and 2 by @FosterProgramming in #8013
- Fix toxic debris setting hazards on the wrong side when hit by an ally by @FosterProgramming in #8026
- Adds missing alive check for Rapid Spin by @AlexOn1ine in #8024
- Fixes visual glitch after Misty Explosion by @AlexOn1ine in #8022
- Fixes Protosynthesis not activating after weather was reset by @AlexOn1ine in #8021
- Fix Salt Cure script by @AlexOn1ine in #8005
- Fix emergency exit not triggering properly during wild battles by @FosterProgramming in #8037
- Fix target cancelling not working properly with z-move by @FosterProgramming in #8067
- Corrects battler partner identification in battle_ai_switch_items.c by @grintoul1 in #8071
- Fix Ally Switch being useable in Frontier Link Multi battles by @grintoul1 in #8059
- Fixes hazards and switch-in items not being reset when switching in by @PhallenTree in #8074
- Fixes Liquid Ooze dmg not blocked by Magic Guard by @AlexOn1ine in #8036
- Fix move description prompt window not appear when choosing a move after canceling target selection by @FosterProgramming in #8055
- Initialize DamageContext on declaration to zero by @AlexOn1ine in #8076
- Fixed Hunger Switch changing forms on switch out while Tera’d by @AsparagusEduardo in #8080
- Fixes Gooey/Tangling Hair ability pop up triggering on Clear Body by @AlexOn1ine in #8083
- Fixes intimidate activating on empty field by @AlexOn1ine in #8058
- Fix bug where mon selection doesn’t properly account for party order by @FosterProgramming in #8088
- Fix bug when a captured pokemon replaces a party member who changed forms by @FosterProgramming in #8091
- Fixed Zygarde Complete disappearing upon catch by @AsparagusEduardo in #8089
- Initialize DamageContext struct with zero values by @AlexOn1ine in #8107
🤹 Moves 🤹
Fixed
- Updated Mountain Gale’s PP for Gen 9 by @fdeblasio in #7856
- Fix Brine move anim and document Water Spout anim by @ravepossum in #7865
- Add Struggle tests, weakness berry tests and prevent Struggle from activating Silk Scarf and Chilan Berry by @rayrobdod in #7880
- Fix Battle Anim monbg calls Part 1 by @ghoulslash in #7906
- Add missing end signal for AnimTask_SetAttackerInvisibleWaitForSignal by @hedara90 in #7950
- Fix Ally Switch being useable in Frontier Link Multi battles by @grintoul1 in #8059
- Fixed Belly Drum/Contrary interaction at max Attack by @AsparagusEduardo in #8078
🎭 Abilities 🎭
Changed
🧶 Items 🧶
Fixed
- Add gBallItemIds Array by @HashtagMarky in #7905
- Fix Persim Berry battle usage by @hedara90 in #7963
🤖 Battle AI 🤖
Fixed
- Add failsafe to AI_DecideHoldEffectForTurn by @AlexOn1ine in #7849
- Fix some ai action check happening before the logic was computed by @FosterProgramming in #7867
- Roamers will now flee in the first turn of battle
- Fix ShouldPivot overwriting random memory by @DizzyEggg in #7882
- Fix AI seeing priority wrong for players choice lock by @MaximeGr00 in #7899
- fix (post-KO switch): force AI data recalc to see abilities on field correctly when pivot moves used by player by @ghostyboyy97 in #7900
- Add missing break to Power Split AI case by @ghoulslash in #7959
🧹 Other Cleanup 🧹
- Fix some failed and assume fail tests with
GEN_LATEST=GEN_5by @AsparagusEduardo in #7735 - Update INSTALL.md by @RubyRaven6 in #7852
- Remove unnecessary EWRAM and IWRAM variables from the Window code by @estellarc in #7897
- Replace magic numbers with define’d values in field_player_avatar.c by @FosterProgramming in #7910
- Reverts wrongly applies fix to book.toml by @AlexOn1ine in #8105
🧪 Test Runner 🧪
Changed
- Fix some failed and assume fail tests with
GEN_LATEST=GEN_5by @AsparagusEduardo in #7735 - Tests for Battery ability by @grintoul1 in #7846
- Fixed fainting form change tests by @AsparagusEduardo in #8079
- Aura Break tests by @grintoul1 in #8099
Fixed
- Fix Knock Off not being restored and Wild Battles by @ghoulslash in #7952
- Fixes Shields Down incorrectly preventing status on Minior Core form by @PhallenTree in #7968
- Fixed Stomping Tantrum not doubling in damage if the user failed Protect by @AsparagusEduardo in #8008
- Fix stats defined in tests being overwritteng by stat change by @FosterProgramming in #8018
📚 Documentation 📚
- Update INSTALL.md by @RubyRaven6 in #7852
- Updated PR template to make existing credit policy clearer by @pkmnsnfrn in #7864
- Fix image links in doc site by @rayrobdod in #7948
- Add all pages in
docsto doc website by @rayrobdod in #7907 - Relativize doc links, to fix links in docs site by @rayrobdod in #7964
- Fix docs compile issue by @AlexOn1ine in #8101
- Reverts wrongly applies fix to book.toml by @AlexOn1ine in #8105
New Contributors
- @HashtagMarky made their first contribution in #7905
- @MaximeGr00 made their first contribution in #7899
Full Changelog: https://github.com/rh-hideout/pokeemerald-expansion/compare/expansion/1.13.2...expansion/1.13.3
Version 1.13.2
## How to update
- If you haven't set up a remote, run the command `git remote add RHH https://github.com/rh-hideout/pokeemerald-expansion`.
- Once you have your remote set up, run the command `git pull RHH expansion/1.13.2
`.
🧬 General 🧬
Changed
- Removed superflous palette compression check by @hedara90 in #7718
- update of sv.json to consider newest DLC changes by @wiz1989 in #7672
- Adjusted line break substring breaking by @hedara90 in #7789
- Fixup add-new-trainer-front-pic tutorial. by @GraionDilach in #7802
- Adds conversion script for trainers.h by @AlexOn1ine in #7663
Fixed
- Fix bug with IF_GENDER evolution condition by @FosterProgramming in #7749
- Pokemon storage moving items bugfix by @FosterProgramming in #7763
- Fix catch bug introduced in #7774 by @FosterProgramming in #7782
- Fix Party Menu move select name width by @AsparagusEduardo in #7820
- Fix Debug Give Pokémon (Complex) with duplicate moves by @AsparagusEduardo in #7821
🗺️ Overworld 🗺️
Changed
- Added missing
LOCALID_NONEby @estellarc in #7783
Fixed
- Fix TRAINER_TYPE_SEE_ALL_DIRECTIONS by @DizzyEggg in #7779
🐉 Pokémon 🐉
Fixed
- fix: seen flags for first mon in enemy party by @khbsd in #7791
⚔️ Battle General ⚔️
Fixed
- Fix most failed tests with
GEN_LATEST=GEN_7by @AsparagusEduardo in #7688 - Fixes Sweet Veil not protecting sleep from Yawn status by @AlexOn1ine in #7704
- Fix incorrect wrap turn amount by @AlexOn1ine in #7667
- Fixes Rage Fist for gen7 Disguise by @AlexOn1ine in #7692
- Fixes Intrepid Sword/Dauntless Shield boosting after entering while at max stats by @PhallenTree in #7716
- Fixes incorrect ending for some scripts by @AlexOn1ine in #7691
- Fixes Uproar not waking up mons by @AlexOn1ine in #7714
- Fixes Endure and Eject Pack issues by @AlexOn1ine in #7687
- Fix Beak Blast burning fire types by @hedara90 in #7740
- Fixes Recharge not actually being removed when recharge turn occurs by @PhallenTree in #7744
- Bugfixes Batch by @AlexOn1ine in #7739
- Fixes Beat Up incorrect slots usage by @AlexOn1ine in #7741
- Fixes Mycelium Might and Lagging Tail adjusting prio incorrectly by @AlexOn1ine in #7742
- Wrong argument passed down by @AlexOn1ine in #7751
- Fixed Ball Fetch Ability by @bassforte123 in #7764
- Fixes Flower Shield affecting semi-invulnerable mons by @AlexOn1ine in #7766
- Fixes Helping Hand boosts not stacking with each other by @PhallenTree in #7775
- Fixes OHKO moves calculating accuracy twice by @AlexOn1ine in #7785
- Fixes Instructed moves looking at the wrong turn order number by @PhallenTree in #7788
- Fix Flame Burst timeout if primary target is fainted by @hedara90 in #7793
- Fixes Leppa Berry timings by @AlexOn1ine in #7787
- Fixes Effects activating when move wasn’t successful by @AlexOn1ine in #7803
- Fixes Throat Spray being blocked by Sheer Force by @AlexOn1ine in #7808
- Fixes inaccurate save / restore in Fling script by @AlexOn1ine in #7811
- Fix test exit prints for stored battlers by @AlexOn1ine in #7807
- Fixes EndTurn Eject Pack by @AlexOn1ine in #7813
- Fix Battle Frontier using Strange Balls by @AsparagusEduardo in #7823
- Fix Throat Spray activating multiply times by @AlexOn1ine in #7818
- fix (choice lock): Gorilla Tactics interactions with choice item removal by @ghostyboyy97 in #7824
- Fixed interactions with choice items and Gorilla Tactics both present when choice item is removed by a thief effect or item swap effect.
- Fixes encore random target for gen5+ by @AlexOn1ine in #7800
🤹 Moves 🤹
Changed
- Initial Lash Out tests by @grintoul1 in #7769
Fixed
- Fix Salt Cure in double battles by @Bassoonian in #7797
🎭 Abilities 🎭
Fixed
- Fix for Levitate and Mold Breaker being seen correctly by switch AI, with Levitate tests by @grintoul1 in #7748
- Fix Forecast and Flower Gift corruption by @Bassoonian in #7796
- Immunity abilities trigger on turn 0 (leads) by @spindrift64 in #7814
🤖 Battle AI 🤖
Changed
- Tidy up CanTargetFaintAiWithMod and CanTargetMoveFaintAi by @grintoul1 in #7693
- Doubles AI: Trick Room timer fix and test for DOUBLE_TRICK_ROOM_ON_LAST_TURN_CHANCE by @grintoul1 in #7622
Fixed
- Toxic thread uses light screen’s scoring…. by @surskitty in #7674
- Fix most failed and assume fail tests with
GEN_LATEST=GEN_6by @AsparagusEduardo in #7696 - Fix for Levitate and Mold Breaker being seen correctly by switch AI, with Levitate tests by @grintoul1 in #7748
🧹 Other Cleanup 🧹
- Tidy up CanTargetFaintAiWithMod and CanTargetMoveFaintAi by @grintoul1 in #7693
- Removed superflous palette compression check by @hedara90 in #7718
- Fix failing test for B_PREFERRED_ICE_WEATHER = B_ICE_WEATHER_SNOW by @phexmiau in #7755
- Adjusted line break substring breaking by @hedara90 in #7789
- Added missing
LOCALID_NONEby @estellarc in #7783
🧪 Test Runner 🧪
Changed
- Add tests for Filter, Solid Rock and Prism Armor by @hedara90 in #7734
- Fix failing test for B_PREFERRED_ICE_WEATHER = B_ICE_WEATHER_SNOW by @phexmiau in #7755
- Initial Lash Out tests by @grintoul1 in #7769
- Improve how test involving ball throw work by @FosterProgramming in #7774
Fixed
- Fix EWRAM_INIT in tests and add a default state to test runner main loop by @hedara90 in #7699
- Fix most failed and assume fail tests with
GEN_LATEST=GEN_6by @AsparagusEduardo in #7696 - Fix for Levitate and Mold Breaker being seen correctly by switch AI, with Levitate tests by @grintoul1 in #7748
- Fix Big Root tests by @hedara90 in #7817
📚 Documentation 📚
- Fixup add-new-trainer-front-pic tutorial. by @GraionDilach in #7802
New Contributors
- @phexmiau made their first contribution in #7755
- @ghostyboyy97 made their first contribution in #7824
Full Changelog: https://github.com/rh-hideout/pokeemerald-expansion/compare/expansion/1.13.1...expansion/1.13.2
Version 1.13.1
## How to update
- If you haven't set up a remote, run the command `git remote add RHH https://github.com/rh-hideout/pokeemerald-expansion`.
- Once you have your remote set up, run the command `git pull RHH expansion/1.13.1
`.
🧬 General 🧬
Fixed
- Added sortType to Douse Drive by @fdeblasio in #7664
🐉 Pokémon 🐉
Fixed
- Fixed disabled cross-evolutions still being possible by @AsparagusEduardo in #7678
⚔️ Battle General ⚔️
Changed
- Replace boolean multiplications with ternaries by @hedara90 in #7653
🤖 Battle AI 🤖
Fixed
- Helping Hand bugfix; used FOE instead of BATTLE_OPPOSITE. by @surskitty in #7659
🧹 Other Cleanup 🧹
- Replace boolean multiplications with ternaries by @hedara90 in #7653
- Fix Rage Fist test name by @AlexOn1ine in #7681
🧪 Test Runner 🧪
Changed
- Fix Rage Fist test name by @AlexOn1ine in #7681
Fixed
- Fix crashing tests duplicating tests from another thread by @hedara90 in #7683
📚 Documentation 📚
- Update README.md by @Bassoonian in #7639
Full Changelog: https://github.com/rh-hideout/pokeemerald-expansion/compare/expansion/1.13.0...expansion/1.13.1
Version 1.13.0
## How to update
- If you haven't set up a remote, run the command `git remote add RHH https://github.com/rh-hideout/pokeemerald-expansion`.
- Once you have your remote set up, run the command `git pull RHH expansion/1.13.0
`.
🌋 REFACTORS 🌋
📜 = Uses a migration script.
- Refactor field moves by @cawtds in #6660
- Refactors Final Gambit + Tests by @AlexOn1ine in #7005
- Combines Super Fang and Guardian of Alola effects by @AlexOn1ine in #7048
- Refactor damage calculations aruguments by using a struct context by @AlexOn1ine in #7108
- Add damage context to effectiveness multiplier by @AlexOn1ine in #7111
- Decouple Status set by ability from SetMoveEffect by @AlexOn1ine in #7125
- Converted Relic Song into a proper form change by @AsparagusEduardo in #7139
- Added
FORM_CHANGE_BATTLE_AFTER_MOVEto parametrize Relic Song’s form change
- Added
- Removed Mind Blown effect in favor of move flag by @AsparagusEduardo in #7138
- Volatile status refactoring by @cfmnephrite in #6983
- Bag refactor (groundwork for expansion) by @cfmnephrite in #7018
- If you’re using @ghoulslash’s bag sort branch, this PR will break it
- Stat Change (Animation) Refactor by @PhallenTree in #7144
setgraphicalstatchangevaluesandplaystatchangeanimationhave been removed and now Stat Change Animations are handled instatbuffchange.- To update your custom battle scripts:
setgraphicalstatchangevaluesis often accompanied byplayanimation X, B_ANIM_STATS_CHANGE. When I refer to deletingsetgraphicalstatchangevaluesbelow, that command should also be deleted.
- If
statbuffchangeis beforesetgraphicalstatchangevalues/playstatchangeanimationand there is something in between them (for example,attackanimationandwaitanimation), add the flagSTAT_CHANGE_ONLY_CHECKINGand replace the command (setgraphicalstatchangevalues/playstatchangeanimation) with a copy of the originalstatbuffchange. - If
statbuffchangeis aftersetgraphicalstatchangevalues/playstatchangeanimationor there is nothing in between, you should delete those commands (setgraphicalstatchangevalues/playstatchangeanimation) and no further changes other than those in 3. should be required. - If
playstatchangeanimationhad bits assigned to them (BIT_ATK | BIT_SPATK, for example), add “, “ followed by those bits to the firststatbuffchange; for the followingstatbuffchanges, remove stats that have already been increased/decreased.
- To update your custom battle scripts:
- Untangle
InitBtlControllersfunctions by @AsparagusEduardo in #6748 - Use battler arguments for SetMoveEffect by @AlexOn1ine in #7156
- Easier expandability of debug menu by @AsparagusEduardo in #6910
- Use dedicated functions for Mud/Water Sport by @AlexOn1ine in #7248
- Expanding and Refactoring Skill Swap and other ability-changing moves by @surskitty in #7238
- Refactor move Synchronise by @AlexOn1ine in #7271
- Adds hazard queue by @AlexOn1ine in #7295
- Changes AccuracyCalcHelper into CanMoveSkipAccuracyCalc by @AlexOn1ine in #7303
- battle_interface: overhaul ability pop up by @mudskipper13 in #7227
- The layout of the ability pop up’s image (
graphics/battle_interface/ability_pop_up.png) has been changed.
- The layout of the ability pop up’s image (
- Bag refactor 2 by @cfmnephrite in #7166
- Replaces STATUS2 usage with volatiles in code by @cfmnephrite in #7262
- Replaced all references to STATUS2 in the code with volatiles (but left the old bitfield behind for compatibility with downstream users). The list of volatiles is in
include/constants/battle.hand includes information such as an enum, a field name, type and max size, and whether or not the move is Baton Passable. Users can use VOLATILE_X with any function that previously took STATUS2_X in scripts, and can check/set volatiles in C withgBattleMons[battler].volatiles.{field name}syntax instead of checking a flag in a bitfield.
- Replaced all references to STATUS2 in the code with volatiles (but left the old bitfield behind for compatibility with downstream users). The list of volatiles is in
- Refactor battle environment by @fdeblasio in #4891
- Convert various to callnatives by @AlexOn1ine in #7355
- AI refactor for weather-setting, terrain-setting, Trick Room behaviors; doubles-focused by @surskitty in #7319
- AI is more likely to use Trick Room in double battles and Terrains in general.
- Convert Status4 to volatiles by @AlexOn1ine in #7411
- Split Sheer Force tests by gen instead of by four by @AlexOn1ine in #7260
- Modify move prediction to work in doubles by @AlexOn1ine in #7087
- Convert statuses3 to volatiles by @AlexOn1ine in #7514
- Added trainerBackPic to Trainer struct to de-couple trainer pic and trainer back pic defines by @grintoul1 in #7425
🧬 General 🧬
Added
- New sprite compressor by @hedara90, @DizzyEggg Improved performance massively for the instruction decoding., @mrgriffin, SBird and @tertu-m who has done even more optimization and answered questions about the GBA hardware whenever I had them. and @rayrobdod for the better migration script. in #5627
LZDecompressVramandLZDecompressWramhas been deprecated. All calls do decompress LZ compressed data should be using the wrapper functionsDecompressDataWithHeaderVramorDecompressDataWithHeaderWram.- A new sprite compression format has been introduced. To use it, replace files with
.4bpp.lzwith.4bpp.smolor.4bpp.fastSmol. .smolis a compression format utilizing entropy encoding in the form of tabled Asymmetric Numeral Systems (tANS) and a modified LZ style RLE/Dictionary encoding scheme specialized for the sprites used in Pokemon games. This is approximately 25% smaller than the default LZ77 compression..fastSmolskips the entropy encoding and is therefore slightly larger than the default LZ77 compression, but decoding sprites is faster than the default LZ77 compression..smolTMis a compression scheme for tilemaps.- Might have unexpected behavior if user introduced decompression during hardware interrupts.
- Has a migration script that handles all files under
src/,migration_scripts/1.12/convert_compressed_files.py.
- Adds FRLG asserts to Alloc/Free by @cawtds in #7025
- Debug parties and battles by @SBird1337 in #6884
- Adds options to set debug parties and battles using the debug menu
- Added naive line break by @hedara90 in #7076
- Disable unowned evo methods by @Bolt-Strike in #7103
- lto support by @DizzyEggg in #7182
- Improve trainer back pic-related data and code (+ smol documentation) by @mudskipper13 in #6821
- Add Set Hidden Nature option to the debug menu by @AlexOn1ine in #7281
- Instant Win option in Battle Debug by @AlexOn1ine in #7333
trainerproccopy other trainer party by @hedara90 in #7251- Adds the
Copy Poolcommand totrainerprocwhich copies the party/pool from another trainer.
- Adds the
- Show chosen move in the battle debug menu by @AlexOn1ine in #7382
- Rock climb by ghoulslash by @pokesidv in #7432
- Added rock climb field effect
Changed
- Restore git history check by @ravepossum in #7463
- Moved summary screen nature colors to summary_screen.h by @RubyRaven6 in #7560
- Added comment in event.inc for simple menus in dynmultichoice by @RubyRaven6 in #7568
- Changed default print level for DebugPrintf for mGBA to MGBA_LOG_WARN by @hedara90 in #7567
- Fixed Teleport’s description not being updated based on
B_TELEPORT_BEHAVIORby @AsparagusEduardo in #7580 - Minor Clean up in battle_ai_main.c by @AlexOn1ine in #7551
- Refactor field moves by @cawtds in #6660
- Replace all usages of lz compression with smol by @hedara90 in #7032
BtlController_EmitTwoReturnValuescleanup by @AsparagusEduardo in #6855- Put the gen 1 compression tests behind a config by @hedara90 in #7033
- Converts a bunch of defines to enums by @Bassoonian in #7041
- chore: remove unused section from credits by @Emiliasky in #7085
- Simplify white out messages by @kittenchilly in #6961
- Improve music/se macros and fix names by @cawtds in #7030
- Bag refactor (groundwork for expansion) by @cfmnephrite in #7018
- If you’re using @ghoulslash’s bag sort branch, this PR will break it
- Converts more defines to enums and name unnamed enums by @Bassoonian in #7071
- Add config options for removing bard phoneme audio to save ROM space by @poetahto in #7155
- Fix debug text order by @hedara90 in #7149
- More battle controller function consolidation. by @AsparagusEduardo in #6877
- Easier expandability of debug menu by @AsparagusEduardo in #6910
- Update .gitignore to add heal locations by @Bassoonian in #7050
- Add ‘Give Decoration’ function to overworld debug menu by @rayrobdod in #7219
- Changes pre-proc to a normal if for Item Desc Header by @AlexOn1ine in #7231
- Use compound strings in battle debug menu by @AsparagusEduardo in #7282
- Remove competitive syntax config by @hedara90 in #7154
- This change can be reverted by doing
git revert 14dbbf63d454073dbb198b941cc3566168c89f11.
- This change can be reverted by doing
- Turn
OW_FRLG_WHITEOUTintoOW_WHITEOUT_CUTSCENEand make it generational by @kittenchilly in #6962 - Add
Macrokey to trainerproc by @hedara90 in #7157 - preproc: Support attribute in enums by @mrgriffin in #7344
- Enum conversion for
enum MoveEffectsandenum BattleMoveEffectsby @hedara90 in #7366- This enables
-Wenum-conversion, additional compilation errors can occur
- This enables
- Get/SetMonData optimisation by @cfmnephrite in #7313
- Bag refactor3 + Ghoulslash’s sorting feature port by @cfmnephrite in #7330
- Replace all usages of rl compression with smol by @rayrobdod in #7458
- Bag sorting cleanup by @mrgriffin in #7489
- Adds ghouls Rock Climb git history by @AlexOn1ine in #7493
- Changed item name/pluralName to a compound string by @cfmnephrite in #7359
- Added trainerBackPic to Trainer struct to de-couple trainer pic and trainer back pic defines by @grintoul1 in #7425
- Suppress trainerproc compile warning for unused func by @AlexOn1ine in #7592
Fixed
- Fix .smol compression in debug builds by @hedara90 in #7090
- Improve smol compressor by @hedara90 in #7073
- Increased heap by 768 bytes by @hedara90 in #7097
- Fix healthbox when blending effects happen by @AsparagusEduardo in #7203
- Fixed Fake RTC debug menu by @AsparagusEduardo in #7218
- Added missing braces by @cfmnephrite in #7288
- Fixed Flag Vars menu keeping artifacts from bag menu + cleanup by @AsparagusEduardo in #7226
- Fix HGSS dex running out of heap by @hedara90 in #7317
- battle intro: fix issues with follower slide-in and wild shiny mon by @mudskipper13 in #7325
- Fix sorting bag by type by @mrgriffin in #7488
- Hacky support for enums in C asm statements by @mrgriffin in #7494
- Fixed compile issue in gcc 11 by @AsparagusEduardo in #7579
- Fix overlap between spin evolution and script evolution by @FosterProgramming in #7593
🗺️ Overworld 🗺️
Added
- Added createfollowernpc macro to make a new follower from a gfx id by @Bivurnum in #7196
- Follower NPCs can now be created without using an existing NPC, using the
createfollowernpcmacro.
- Follower NPCs can now be created without using an existing NPC, using the
- feat: separate water and rock smash encounter rate checks by @khbsd in #7293
Changed
- fix: remove unused wild_encounters.json.txt jinja file by @khbsd in #7581
- added Ash Greninja overworld sprites by @wiz1989 in #6976
- Update FRLG whiteouts to new pret system by @Bassoonian in #7040
- Make sure to migrate your changes to the now deleted
heal_locations_pkm_center.hto the json file.
- Make sure to migrate your changes to the now deleted
- Use CanAbilityAbsorbMove in GetOverworldTypeEffectiveness by @AlexOn1ine in #7115
- Add config options for removing bard phoneme audio to save ROM space by @poetahto in #7155
- Add debug options for follower NPCs by @Bivurnum in #7215
- Better system for Follower NPC running frames by @Bivurnum in #7222
- Update follower NPC tutorial doc for createfollowernpc macro by @Bivurnum in #7230
Fixed
- Bug fix: add handling for forced movements into/after ledge jumps with follower NPCs by @Bivurnum in #7055
- Fixed compile issue
OW_TIMES_OF_DAYisGEN_3by @AsparagusEduardo in #7499 - Remove shadow and hide follower on stair warp by @cornixsenex in #7368
- Fix Form Change Item Task Data and Clean Up Field Use Funcs by @ravepossum in #7535
- Fix Vs Seeker Trainer Battle script issue by @pkmnsnfrn in #7615
- Fix follower compression by @hedara90 in #7038
- Changing P_ONLY_OBTAINABLE_SHINIES to truly be Only Obtainable Shinies by @surskitty in #7275
🐉 Pokémon 🐉
Added
- Add P_ASK_MOVE_CONFIRMATION by @pkmnsnfrn in #7132
- This will change the behavior of the game for players, as a new default is being set.
- Added
CRY_MODE_DYNAMAXby @AsparagusEduardo in #6933 - Wild Pokémon animate after breaking out of Poké Ball by @LinathanZel in #7339
Changed
- Add dedicated getter functions for Pokémon types and abilities by @Bassoonian in #7043
- added Ash Greninja overworld sprites by @wiz1989 in #6976
- Get/SetMonData optimisation by @cfmnephrite in #7313
Fixed
- fixes #7129: ‘add to full party’ feature in the safari zone by @fakuzatsu in #7147
- Fix substruct offsets from #7313 by @mrgriffin in #7431
- Fixes refusing to replace a move on evolution causing a softlock by @PhallenTree in #7585
⚔️ Battle General ⚔️
Added
- Add Gen 2 Moonlight, Morning Sun, Synthesis configuration by @i0brendan0 in #7209
- Add a heal animation to Hospitality recovery by @AlexOn1ine in #7426
- Updated Dream Eater/Liquid Ooze’s interaction to Gen 5 standards by @AsparagusEduardo in #7528
Changed
- Remove unused function by @AlexOn1ine in #7617
- Clean up battlescript calls with func BattleScriptCall by @AlexOn1ine in #6873
- Refactors Final Gambit + Tests by @AlexOn1ine in #7005
GetBattlerMoncleanup by @AsparagusEduardo in #6967- Change GetZMaxMoveAgainstProtectionModifier to prevent regressions by @AlexOn1ine in #7047
- Combines Super Fang and Guardian of Alola effects by @AlexOn1ine in #7048
- Remove more instances of hard-coded Move IDs by @AsparagusEduardo in #7056
- Added
EFFECT_SHEER_COLDto parametrize Sheer Cold’s interactions with Ice types
- Added
- Deprecate sStatusFlagsForMoveEffects by @AlexOn1ine in #7063
- Removes duplicate AI ability func by @AlexOn1ine in #7045
- Deprecate absent member from battlerState by @AlexOn1ine in #7091
- Refactor damage calculations aruguments by using a struct context by @AlexOn1ine in #7108
- Add damage context to effectiveness multiplier by @AlexOn1ine in #7111
- Decouple Status set by ability from SetMoveEffect by @AlexOn1ine in #7125
- Removed redundant Damp check by @AsparagusEduardo in #7134
- Converted Relic Song into a proper form change by @AsparagusEduardo in #7139
- Added
FORM_CHANGE_BATTLE_AFTER_MOVEto parametrize Relic Song’s form change
- Added
- Removed Mind Blown effect in favor of move flag by @AsparagusEduardo in #7138
- Volatile status refactoring by @cfmnephrite in #6983
- Repurposes IsMagicGuardProtected into a general function by @AlexOn1ine in #7114
- Stat Change (Animation) Refactor by @PhallenTree in #7144
-
setgraphicalstatchangevaluesandplaystatchangeanimationhave been removed and now Stat Change Animations are handled instatbuffchange.- To update your custom battle scripts:
setgraphicalstatchangevaluesis often accompanied byplayanimation X, B_ANIM_STATS_CHANGE. When I refer to deletingsetgraphicalstatchangevaluesbelow, that command should also be deleted.
- If
statbuffchangeis beforesetgraphicalstatchangevalues/playstatchangeanimationand there is something in between them (for example,attackanimationandwaitanimation), add the flagSTAT_CHANGE_ONLY_CHECKINGand replace the command (setgraphicalstatchangevalues/playstatchangeanimation) with a copy of the originalstatbuffchange. - If
statbuffchangeis aftersetgraphicalstatchangevalues/playstatchangeanimationor there is nothing in between, you should delete those commands (setgraphicalstatchangevalues/playstatchangeanimation) and no further changes other than those in 3. should be required. - If
playstatchangeanimationhad bits assigned to them (BIT_ATK | BIT_SPATK, for example), add “, “ followed by those bits to the firststatbuffchange; for the followingstatbuffchanges, remove stats that have already been increased/decreased.
- To update your custom battle scripts:
- Use
argument.typeforEFFECT_SOAKby @AsparagusEduardo in #7141 - Untangle
InitBtlControllersfunctions by @AsparagusEduardo in #6748 - Increase party action limit by @cawtds in #7119
- Adds Gen5+ Encore config by @AlexOn1ine in #7051
- Attackcanceller clean up by @AlexOn1ine in #7210
- Remove redundant move result flag checks by @AlexOn1ine in #7223
- Use dedicated functions for Mud/Water Sport by @AlexOn1ine in #7248
- Script clean up for Flame Burst and Costar by @AlexOn1ine in #7264
- Renaming STATUS1_REFRESH and adding more constants for common STATUS1 checks. by @surskitty in #7284
- Refactor move Synchronise by @AlexOn1ine in #7271
- Adds hazard queue by @AlexOn1ine in #7295
- Removed all instances of .chance = 100, SHEER_FORCE_NO_BOOST by @cfmnephrite in #7300
- Changes AccuracyCalcHelper into CanMoveSkipAccuracyCalc by @AlexOn1ine in #7303
- Replaces STATUS2 usage with volatiles in code by @cfmnephrite in #7262
- Replaced all references to STATUS2 in the code with volatiles (but left the old bitfield behind for compatibility with downstream users). The list of volatiles is in
include/constants/battle.hand includes information such as an enum, a field name, type and max size, and whether or not the move is Baton Passable. Users can use VOLATILE_X with any function that previously took STATUS2_X in scripts, and can check/set volatiles in C withgBattleMons[battler].volatiles.{field name}syntax instead of checking a flag in a bitfield.
- Replaced all references to STATUS2 in the code with volatiles (but left the old bitfield behind for compatibility with downstream users). The list of volatiles is in
- Refactor battle environment by @fdeblasio in #4891
- Convert various to callnatives by @AlexOn1ine in #7355
- Remove leftover code by @AlexOn1ine in #7397
- Moved some fields to BattlerState/PartyState by @AsparagusEduardo in #7409
- Additional effects tweak by @cfmnephrite in #7392
- Clean up noResultString by @AlexOn1ine in #7408
- Convert Status4 to volatiles by @AlexOn1ine in #7411
- Convert statuses3 to volatiles by @AlexOn1ine in #7514
- Prevents a regression for custom abilties by @AlexOn1ine in #7616
Fixed
- Fixes Magnet Rise when user is Rooted/Smacked Down by @PhallenTree in #7449
- Fixes Leech Seed recovery not applying behind Sub by @AlexOn1ine in #7468
- Fixes Round and Fusion moves doubling power from previous turn’s move by @PhallenTree in #7476
- Fixes shadows and mon animations for transformed battlers by @AsparagusEduardo in #7500
- Fixes Life Orb still activating if move was absorbed by @AlexOn1ine in #7521
- Fix Mimicry Only Activating Once per Turn by @ghoulslash in #7537
- Fixes Knock Off still activating when there is no Item by @AlexOn1ine in #7496
- Fixed
B_PSYWAVE_DMGby @AsparagusEduardo in #7557 - Fixes Counter / Mirror Coat / Metal Burst damage assignment by @AlexOn1ine in #7538
- Fix in-game partner battles always causing a whiteout by @ravepossum in #7587
- Fix B_ANIMATE_MON_AFTER_KO with a new counter by @hedara90 in #7531
- Fixes Rage Fist counter increment by @AlexOn1ine in #7582
- Fixes moveend_absorb hitmarker by @AlexOn1ine in #7591
- switchinabilities also runs ON_WEATHER and ON_TERRAIN by @ghoulslash in #7612
- Fixes Explosion behavior when 3 mons can endure hit by @AlexOn1ine in #7594
- Fixes octolock not ending after user switched out by @AlexOn1ine in #7556
- The original attacker wasn’t restored for Doodle by @AlexOn1ine in #7620
- Restore X item friendship increase by @ravepossum in #7583
- Fixes Wonder Room interactions with Defense/Special Defense boosting effects by @PhallenTree in #7626
- Ally Switch attract battler swapping, test for leech seed by @ghoulslash in #7634
- Fixes Defiant/Competitive not resetting stat change animations and stat change related cleanup by @PhallenTree in #7004
- Use battler arguments for SetMoveEffect by @AlexOn1ine in #7156
- Fixes Booster Energy timing activation + Clean up by @AlexOn1ine in #7175
- Fixes Eject Pack not resolving correctly during switch in effects by @AlexOn1ine in #7002
- Adds Ability Shield activation message by @PhallenTree in #7224
- Fix incorrect type input by @hedara90 in #7228
- Set correct Instruction by @AlexOn1ine in #7236
- Fixes Life Dew playing anim when it is not supposed to + tests by @AlexOn1ine in #7239
- Fixes instances of battler mutation for abilities by @AlexOn1ine in #7250
- Fix Psych Up message and cleanup and don’t allow switching to self in tests by @PhallenTree in #7277
- Fix incorrect status in beneficial ability Guts check by @grintoul1 in #7285
- battle_interface: overhaul ability pop up by @mudskipper13 in #7227
- The layout of the ability pop up’s image (
graphics/battle_interface/ability_pop_up.png) has been changed.
- The layout of the ability pop up’s image (
- Fixes Status overwrites and Effect Spore wrong func args by @AlexOn1ine in #7340
- Fixes various Choice lock issues by @AlexOn1ine in #7383
- Fixes draining moves recovering 1 HP when dealing 0 damage by @LinathanZel in #7523
🤹 Moves 🤹
Changed
- New Attack Animations: 25w20a by @ShinyVolcarona in #6886
- Added move animations for multiple moves by @LinathanZel
- Dynamax Cannon, Behemoth Blade, Behemoth Bash, Eternabeam, Glaive Rush, Triple Dive, Doodle, Ruination, Collision Course, Electro Drift, Blazing Torque, Wicked Torque, Noxious Torque, Combat Torque, Magical Torque, Psyblade, Mighty Cleave, Supercell Slam
- Documented usage of
delay Xby @AsparagusEduardo in #6951 - Animation documentation by @AsparagusEduardo in #7052
- New and polished battle animations by @LinathanZel in #7074
Fixed
- Clear gScanlineEffect to fix timeout in acid downpour animation by @FosterProgramming in #7442
- Fix terastallization anims flickering by @ravepossum in #7613
🧶 Items 🧶
Changed
- Fix using town map as registered item by @ravepossum in #7482
- Compound strings for hold effect names by @AsparagusEduardo in #7140
- Untangled TMs and HMs from item ids by @cfmnephrite in #7173
- Bag refactor 2 by @cfmnephrite in #7166
Fixed
- Implement using party menu items from field by @ravepossum in #7481
- Fixed TM and Berries disappearing when sorting by @AsparagusEduardo in #7168
- Fixed item swapping bug (#7428) by @cfmnephrite in #7430
- Fixes some Ability Shield interactions by @PhallenTree in #7532
- Fix tossing a stack of berries hiding following berries by @hedara90 in #7571
🤖 Battle AI 🤖
Added
- AI: Add AI_SMART_TERA flag to make smarter decisions about when to terastalize. by @jfb1337 in #6705
- Only single battles are currently supported.
- Haze Boosting AI Followup by @Pawkkie in #6966
- Improved logic for Guard Split and Power Split. by @surskitty in #7298
- Add AI_FLAG_ASSUME_STAB by @Pawkkie in #6797
- AI checks the partner’s moves for Flatter, Swagger, and Soak. by @surskitty in #7306
- AI uses After You to help set up Trick Room. by @surskitty in #7310
- AI assumes Magnitude / Present damage by @Pawkkie in #7334
- AI_FLAG_ASSUME_STATUS_MOVES – AI flag to randomly know some of the player’s status moves by @surskitty in #7324
- Improve AI’s setup logic by @Pawkkie in #7345
- Improve AI’s ShouldRecover by @Pawkkie in #7342
- Switch AI can see weather abilities of switchin candidates during damage calcs by @Pawkkie in #7373
- AI refactor for weather-setting, terrain-setting, Trick Room behaviors; doubles-focused by @surskitty in #7319
- AI is more likely to use Trick Room in double battles and Terrains in general.
- Improve AI type matchup calcs by @Pawkkie in #7364
- Multibattle Partner AI Flags and 2vs1 battler3 AI Flags fix by @grintoul1 in #7378
- Improve AI’s Sucker Punch handling by @Pawkkie in #7389
- Improve AI’s priority handling by @Pawkkie in #7337
- Fix dynamic move types in switching by @Pawkkie in #7415
- Adds AI_FLAG_ASSUMPTIONS as a constant for semi-omniscience by @surskitty in #7435
- AI_FLAG_ATTACKS_PARTNER with a config for bloodthirstiness by @surskitty in #7401
- Improved Guaranteed Flinch logic (fake out et al) by @surskitty in #7501
- AI uses Court Change. by @surskitty in #7525
- AI uses Tailwind. by @surskitty in #7515
- AI should not use Dark Void or Hyperspace Fury while wrong species by @surskitty in #7540
- AI uses Rototiller. by @surskitty in #7542
- Helping Hand logic by @surskitty in #7504
Changed
- Macro-for-AI-Flag-definitions by @grintoul1 in #7471
- Remove redundancy for ShouldLowerStat functions by @AlexOn1ine in #6577
- Expanding and Refactoring Skill Swap and other ability-changing moves by @surskitty in #7238
- Changes AccuracyCalcHelper into CanMoveSkipAccuracyCalc by @AlexOn1ine in #7303
- AI Tests + accompanying bugfixes for Skill Swap, Worry Seed, weather setting in double battles, and Discharging into an ally’s lightningrod by @surskitty in #7297
- Fix AI resisted move scoring by @Pawkkie in #7350
- Fiddling with CanLowerStat. by @surskitty in #7510
- Improved hazards logic and Mycelium Might ignores ability checks by @surskitty in #7509
- AI handling for similar utility moves by @surskitty in #7513
- Modify move prediction to work in doubles by @AlexOn1ine in #7087
- Uncommenting out No Retreat, Clangorous Soul, and Extreme Evoboost from CheckBadMove by @surskitty in #7541
- AI Tailwind singles fix correction. by @surskitty in #7543
- Remove funcResult from AiThinkingStruct by @Pawkkie in #7545
- AI handling for Autotomize. by @surskitty in #7550
- AI uses Stuff Cheeks; treating it simply as a def +2 move for now. by @surskitty in #7554
- Slight Purify adjustment for targeting ally; test that AI can use Purify. by @surskitty in #7553
- AI handling for Howl. by @surskitty in #7549
- Test that AI uses Dragon Cheer. by @surskitty in #7552
- Tests to see that the AI uses moves. by @surskitty in #7555
Fixed
- Incorrect call in Rest by @surskitty in #7569
- Fix duplicate switch in after faint by @AlexOn1ine in #7600
- Feature/ai/wide guard quick guard singles by @Emiliasky in #7086
- Add missing break by @Pawkkie in #7356
- fixed-damage-move-ai-calc-fix by @grintoul1 in #7385
- Avoid doubling up on status moves in double battles. by @surskitty in #7452
- Fix doubles switch AI to use new type matchup system by @Pawkkie in #7495
- Fix Bad Odds not seeing damage properly by @Pawkkie in #7492
- Fix GetSwitchinHitsToKO one shot heal calcs by @Pawkkie in #7502
- Fix AI’s KO evaluation getting messed up by priority by @Pawkkie in #7533
- Fixing Refresh AI scoring by @surskitty in #7539
- Fix switch AI not seeing its own move PP by @Pawkkie in #7578
- Fix wrong battler argument in
GetBattleMovePrioritycall by @Pawkkie in #7576 - Restore AI: Basic Trainer to PARTNER_STEVEN by @grintoul1 in #7586
🧹 Other Cleanup 🧹
- Macro-for-AI-Flag-definitions by @grintoul1 in #7471
- Moved summary screen nature colors to summary_screen.h by @RubyRaven6 in #7560
- fix: remove unused wild_encounters.json.txt jinja file by @khbsd in #7581
- Fix Form Change Item Task Data and Clean Up Field Use Funcs by @ravepossum in #7535
- Fixed Teleport’s description not being updated based on
B_TELEPORT_BEHAVIORby @AsparagusEduardo in #7580 - Fixed typo in test name by @hedara90 in #7610
- Minor Clean up in battle_ai_main.c by @AlexOn1ine in #7551
- Remove unused function by @AlexOn1ine in #7617
- Fix Vs Seeker Trainer Battle script issue by @pkmnsnfrn in #7615
- Clean up battlescript calls with func BattleScriptCall by @AlexOn1ine in #6873
- Replace all usages of lz compression with smol by @hedara90 in #7032
BtlController_EmitTwoReturnValuescleanup by @AsparagusEduardo in #6855GetBattlerMoncleanup by @AsparagusEduardo in #6967- Converts a bunch of defines to enums by @Bassoonian in #7041
- Change GetZMaxMoveAgainstProtectionModifier to prevent regressions by @AlexOn1ine in #7047
- Remove more instances of hard-coded Move IDs by @AsparagusEduardo in #7056
- Added
EFFECT_SHEER_COLDto parametrize Sheer Cold’s interactions with Ice types
- Added
- Animation documentation by @AsparagusEduardo in #7052
- Deprecate sStatusFlagsForMoveEffects by @AlexOn1ine in #7063
- chore: remove unused section from credits by @Emiliasky in #7085
- Removes duplicate AI ability func by @AlexOn1ine in #7045
- Remove redundancy for ShouldLowerStat functions by @AlexOn1ine in #6577
- Deprecate absent member from battlerState by @AlexOn1ine in #7091
- Use CanAbilityAbsorbMove in GetOverworldTypeEffectiveness by @AlexOn1ine in #7115
- Removed redundant Damp check by @AsparagusEduardo in #7134
- Improve music/se macros and fix names by @cawtds in #7030
- Compound strings for hold effect names by @AsparagusEduardo in #7140
- Repurposes IsMagicGuardProtected into a general function by @AlexOn1ine in #7114
- Converts more defines to enums and name unnamed enums by @Bassoonian in #7071
- Use
argument.typeforEFFECT_SOAKby @AsparagusEduardo in #7141 - More battle controller function consolidation. by @AsparagusEduardo in #6877
- Add assumes for bag tests by @Bassoonian in #7188
- Fixes Booster Energy timing activation + Clean up by @AlexOn1ine in #7175
- Update .gitignore to add heal locations by @Bassoonian in #7050
- Attackcanceller clean up by @AlexOn1ine in #7210
- Remove redundant move result flag checks by @AlexOn1ine in #7223
- Add P_ASK_MOVE_CONFIRMATION by @pkmnsnfrn in #7132
- This will change the behavior of the game for players, as a new default is being set.
- Script clean up for Flame Burst and Costar by @AlexOn1ine in #7264
- Use compound strings in battle debug menu by @AsparagusEduardo in #7282
- Renaming STATUS1_REFRESH and adding more constants for common STATUS1 checks. by @surskitty in #7284
- Removed all instances of .chance = 100, SHEER_FORCE_NO_BOOST by @cfmnephrite in #7300
- AI Tests + accompanying bugfixes for Skill Swap, Worry Seed, weather setting in double battles, and Discharging into an ally’s lightningrod by @surskitty in #7297
- Turn
OW_FRLG_WHITEOUTintoOW_WHITEOUT_CUTSCENEand make it generational by @kittenchilly in #6962 - Fix AI resisted move scoring by @Pawkkie in #7350
- Convert various to callnatives by @AlexOn1ine in #7355
- Remove leftover code by @AlexOn1ine in #7397
- Moved some fields to BattlerState/PartyState by @AsparagusEduardo in #7409
- Additional effects tweak by @cfmnephrite in #7392
- Clean up noResultString by @AlexOn1ine in #7408
- Bag sorting cleanup by @mrgriffin in #7489
- Convert statuses3 to volatiles by @AlexOn1ine in #7514
- Uncommenting out No Retreat, Clangorous Soul, and Extreme Evoboost from CheckBadMove by @surskitty in #7541
- AI Tailwind singles fix correction. by @surskitty in #7543
- Remove funcResult from AiThinkingStruct by @Pawkkie in #7545
- Suppress trainerproc compile warning for unused func by @AlexOn1ine in #7592
- Prevents a regression for custom abilties by @AlexOn1ine in #7616
🧪 Test Runner 🧪
Changed
- Clean up some Normalize tests to make them make sense by @hedara90 in #7461
- Add Synthesis + Utililty Umbrella test by @ghoulslash in #7472
- Add test for BoxPokemon integrity by @hedara90 in #7487
- Re-order moves in fling test by @hedara90 in #7559
- Wrote some tests by @AsparagusEduardo in #7563
- Added Ability TODO tests - Volume C by @AsparagusEduardo in #7562
- Added missing Move Effect TODO tests - Volume F by @AsparagusEduardo in #7605
- Fixed typo in test name by @hedara90 in #7610
- Add assumes for bag tests by @Bassoonian in #7188
- Split Sheer Force tests by gen instead of by four by @AlexOn1ine in #7260
- make check TESTS=“…” support for filenames and infix matches by @mrgriffin in #7536
- Fix shell side arm rng in battle tests moves by @FosterProgramming in #7548
- Test that AI uses Dragon Cheer. by @surskitty in #7552
- Tests to see that the AI uses moves. by @surskitty in #7555
Fixed
- Clear out parties between battle tests by @hedara90 in #7460
- Fixed most failed tests with
GEN_LATEST GEN_8by @AsparagusEduardo in #7498 - Corrected Liquid Ooze test by @AsparagusEduardo in #7527
- switchinabilities also runs ON_WEATHER and ON_TERRAIN by @ghoulslash in #7612
- Ally Switch attract battler swapping, test for leech seed by @ghoulslash in #7634
- Fixed changed effect for Sheer Cold by @hedara90 in #7099
- Fixed Transistor damage calculation test failing when
GEN_LATESTis less thanGEN_9by @AsparagusEduardo in #7577
📚 Documentation 📚
- Update how_to_new_pokemon.md by @kevinwklawrence in #7440
- Updating a link to porytiles in INSTALL.md by @ThePeeps191 in #7490
- Added comment in event.inc for simple menus in dynmultichoice by @RubyRaven6 in #7568
- Documented usage of
delay Xby @AsparagusEduardo in #6951 - Update follower NPC tutorial doc for createfollowernpc macro by @Bivurnum in #7230
- Improve trainer back pic-related data and code (+ smol documentation) by @mudskipper13 in #6821
- Update trainer.h usage warning by @hedara90 in #7439
New Contributors
- @kevinwklawrence made their first contribution in #7440
- @ThePeeps191 made their first contribution in #7490
- @cornixsenex made their first contribution in #7368
Full Changelog: https://github.com/rh-hideout/pokeemerald-expansion/compare/expansion/1.12.2...expansion/1.12.3
New Contributors
- @ShinyVolcarona made their first contribution in #6886
- @Emiliasky made their first contribution in #7085
- @poetahto made their first contribution in #7155
- @Bolt-Strike made their first contribution in #7103
- @kevinwklawrence made their first contribution in #7440
- @FosterProgramming made their first contribution in #7442
- @ThePeeps191 made their first contribution in #7490
- @cornixsenex made their first contribution in #7368
Full Changelog: https://github.com/rh-hideout/pokeemerald-expansion/compare/expansion/1.12.2...expansion/1.13.0
Version 1.12.3
## How to update
- If you haven't set up a remote, run the command `git remote add RHH https://github.com/rh-hideout/pokeemerald-expansion`.
- Once you have your remote set up, run the command `git pull RHH expansion/1.12.3
`.
🧬 General 🧬
Changed
- Restore git history check by @ravepossum in #7463
- Moved summary screen nature colors to summary_screen.h by @RubyRaven6 in #7560
- Added comment in event.inc for simple menus in dynmultichoice by @RubyRaven6 in #7568
- Changed default print level for DebugPrintf for mGBA to MGBA_LOG_WARN by @hedara90 in #7567
- Fixed Teleport’s description not being updated based on
B_TELEPORT_BEHAVIORby @AsparagusEduardo in #7580 - Minor Clean up in battle_ai_main.c by @AlexOn1ine in #7551
🗺️ Overworld 🗺️
Changed
- fix: remove unused wild_encounters.json.txt jinja file by @khbsd in #7581
Fixed
- Bug fix: add handling for forced movements into/after ledge jumps with follower NPCs by @Bivurnum in #7055
- Fixed compile issue
OW_TIMES_OF_DAYisGEN_3by @AsparagusEduardo in #7499 - Remove shadow and hide follower on stair warp by @cornixsenex in #7368
- Fix Form Change Item Task Data and Clean Up Field Use Funcs by @ravepossum in #7535
- Fix Vs Seeker Trainer Battle script issue by @pkmnsnfrn in #7615
⚔️ Battle General ⚔️
Changed
- Remove unused function by @AlexOn1ine in #7617
Fixed
- Fixes Magnet Rise when user is Rooted/Smacked Down by @PhallenTree in #7449
- Fixes Leech Seed recovery not applying behind Sub by @AlexOn1ine in #7468
- Fixes Round and Fusion moves doubling power from previous turn’s move by @PhallenTree in #7476
- Fixes shadows and mon animations for transformed battlers by @AsparagusEduardo in #7500
- Fixes Life Orb still activating if move was absorbed by @AlexOn1ine in #7521
- Fix Mimicry Only Activating Once per Turn by @ghoulslash in #7537
- Fixes Knock Off still activating when there is no Item by @AlexOn1ine in #7496
- Fixed
B_PSYWAVE_DMGby @AsparagusEduardo in #7557 - Fixes Counter / Mirror Coat / Metal Burst damage assignment by @AlexOn1ine in #7538
- Fix in-game partner battles always causing a whiteout by @ravepossum in #7587
- Fix B_ANIMATE_MON_AFTER_KO with a new counter by @hedara90 in #7531
- Fixes Rage Fist counter increment by @AlexOn1ine in #7582
- Fixes moveend_absorb hitmarker by @AlexOn1ine in #7591
- switchinabilities also runs ON_WEATHER and ON_TERRAIN by @ghoulslash in #7612
- Fixes Explosion behavior when 3 mons can endure hit by @AlexOn1ine in #7594
- Fixes octolock not ending after user switched out by @AlexOn1ine in #7556
- The original attacker wasn’t restored for Doodle by @AlexOn1ine in #7620
- Restore X item friendship increase by @ravepossum in #7583
- Fixes Wonder Room interactions with Defense/Special Defense boosting effects by @PhallenTree in #7626
- Ally Switch attract battler swapping, test for leech seed by @ghoulslash in #7634
🤹 Moves 🤹
Fixed
- Clear gScanlineEffect to fix timeout in acid downpour animation by @FosterProgramming in #7442
- Fix terastallization anims flickering by @ravepossum in #7613
🧶 Items 🧶
Changed
- Fix using town map as registered item by @ravepossum in #7482
Fixed
- Implement using party menu items from field by @ravepossum in #7481
🤖 Battle AI 🤖
Changed
- Macro-for-AI-Flag-definitions by @grintoul1 in #7471
Fixed
- Incorrect call in Rest by @surskitty in #7569
- Fix duplicate switch in after faint by @AlexOn1ine in #7600
🧹 Other Cleanup 🧹
- Macro-for-AI-Flag-definitions by @grintoul1 in #7471
- Moved summary screen nature colors to summary_screen.h by @RubyRaven6 in #7560
- fix: remove unused wild_encounters.json.txt jinja file by @khbsd in #7581
- Fix Form Change Item Task Data and Clean Up Field Use Funcs by @ravepossum in #7535
- Fixed Teleport’s description not being updated based on
B_TELEPORT_BEHAVIORby @AsparagusEduardo in #7580 - Fixed typo in test name by @hedara90 in #7610
- Minor Clean up in battle_ai_main.c by @AlexOn1ine in #7551
- Remove unused function by @AlexOn1ine in #7617
- Fix Vs Seeker Trainer Battle script issue by @pkmnsnfrn in #7615
🧪 Test Runner 🧪
Changed
- Clean up some Normalize tests to make them make sense by @hedara90 in #7461
- Add Synthesis + Utililty Umbrella test by @ghoulslash in #7472
- Add test for BoxPokemon integrity by @hedara90 in #7487
- Re-order moves in fling test by @hedara90 in #7559
- Wrote some tests by @AsparagusEduardo in #7563
- Added Ability TODO tests - Volume C by @AsparagusEduardo in #7562
- Added missing Move Effect TODO tests - Volume F by @AsparagusEduardo in #7605
- Fixed typo in test name by @hedara90 in #7610
Fixed
- Clear out parties between battle tests by @hedara90 in #7460
- Fixed most failed tests with
GEN_LATEST GEN_8by @AsparagusEduardo in #7498 - Corrected Liquid Ooze test by @AsparagusEduardo in #7527
- switchinabilities also runs ON_WEATHER and ON_TERRAIN by @ghoulslash in #7612
- Ally Switch attract battler swapping, test for leech seed by @ghoulslash in #7634
📚 Documentation 📚
- Update how_to_new_pokemon.md by @kevinwklawrence in #7440
- Updating a link to porytiles in INSTALL.md by @ThePeeps191 in #7490
- Added comment in event.inc for simple menus in dynmultichoice by @RubyRaven6 in #7568
New Contributors
- @kevinwklawrence made their first contribution in #7440
- @ThePeeps191 made their first contribution in #7490
- @cornixsenex made their first contribution in #7368
Full Changelog: https://github.com/rh-hideout/pokeemerald-expansion/compare/expansion/1.12.2...expansion/1.12.3
Version 1.12.2
## How to update
- If you haven't set up a remote, run the command `git remote add RHH https://github.com/rh-hideout/pokeemerald-expansion`.
- Once you have your remote set up, run the command `git pull RHH expansion/1.12.1
`.
🧬 General 🧬
Changed
- Changed trainer tutorial to take into account removed palette compression by @hedara90 in #7044
- Update CI to ignore allcontributors commits by @pkmnsnfrn in #7046
- add bassforte123 as a contributor for code by @allcontributors[bot] in #7003
- add iriv24 as a contributor for code by @allcontributors[bot] in #7059
- add Bivurnum as a contributor for code by @allcontributors[bot] in #7067
- Fixed CI issue introduced 7046 by @pkmnsnfrn in #7072
- Added loop iterator style by @hedara90 in #7092
- add Emiliasky as a contributor for test by @allcontributors[bot] in #7082
- Update CREDITS.md with correct line placement by @pkmnsnfrn in #7096
- Fix typo in INSTALL.md by @hedara90 in #7116
- Use RGB values for DEFAULT_LIGHT_COLOR by @hedara90 in #7133
- Applied Kasen’s documentation improvements by @hedara90 in #7104
- add fakuzatsu as a contributor for code by @allcontributors[bot] in #7136
- Fixed description of
FORM_CHANGE_WITHDRAWby @AsparagusEduardo in #7152 - add poetahto as a contributor for code by @allcontributors[bot] in #7162
- Pret merge (19th of June, 2025) by @Bassoonian in #7163
- Update the description of OW_OBJECT_VANILLA_SHADOWS by @pkmnsnfrn in #7184
- fix: use BackPickId to calculate player intro ball throw animation palette by @pablopenna in #7193
- add pablopenna as a contributor for code by @allcontributors[bot] in #7202
Fixed
- Added line break between Trainer 1 name and Trainer 2 name in sText_TwoTrainersWantToBattle by @grintoul1 in #7028
- Fixed Battle Pyramid mon generation by @hedara90 in #7146
- force sGFRomHeader to always be present by @DizzyEggg in #7186
- force RHH Rom Header to always be present by @DizzyEggg in #7187
- Fixed debug flag menu sound by @AsparagusEduardo in #7190
- Fix BtlController_EmitChosenMonReturnValue UB by @DizzyEggg in #7197
- Backported Safari catch and add to party fix by @hedara90 in #7192
- Fix 01_battle_engine_bugs.yaml by @hedara90 in #7242
🗺️ Overworld 🗺️
Fixed
- Bug fix: clear saved follower NPC door warp when doing dive warp by @Bivurnum in #7065
- Fix Contest Painting load palette error by @ExMingYan in #7077
- Bug fix: Follower NPC no longer retains bike sprite after white out by @Bivurnum in #7120
- Bug fix: clear follower npc surf blob on white out by @Bivurnum in #7153
🐉 Pokémon 🐉
Changed
- Fixes Rapid Spin description (#7178) by @grintoul1 in #7181
Fixed
- Fixed text width for a lot of forms in HGSS Dex by @AsparagusEduardo in #7035
- Fixes Roamers not saving shininess by @i0brendan0 in #7185
- [FIX] Prevent caught Pokémon loss in NPC partner battles by @J2M2 in #7177
⚔️ Battle General ⚔️
Changed
- Fixes large battle messages being cut off instead of being prompted to advance 2 by @PhallenTree in #7036
- Battle controller pret documentation by @AlexOn1ine in #7029
- Fix typos and some cleanup (mainly in battle files) by @PhallenTree in #7107
Fixed
-
Fixes multi battle party re-order by @AlexOn1ine in #7042
-
Fixes Aura Wheel + Normalize and Hunger Switch while Transformed/Terastallized by @PhallenTree in #7061
-
Fixes speed calculation order by @AlexOn1ine in #7064
-
Bug fix for Grassy Terrain incorrectly healing non-grounded Pokemon by @LinathanZel in #7058
-
Fixes Wandering Spirit copied ability activation on fainted mon by @AlexOn1ine in #7066
-
Chloroblast fix by @LinathanZel in #7008
- Chloroblast causing recoil damage even if the move fails to connect by @LinathanZel in #7007
-
[DRAFT] Fix Normalize not boosting Normal type moves if they were already Normal type by @i0brendan0 in #7060
-
Fixes freeze during a 1v2 double battle by @AlexOn1ine in #7075
-
Fixes Pursuit potentially causing both battlers to switch into the same mon by @PhallenTree in #7084
-
Fixed potential mismatch between players and battlers in tests by @AsparagusEduardo in #7101
-
Fixes Ally Switch in multi battles by @AlexOn1ine in #7109
-
Add missing flag for Berserk Gene by @AlexOn1ine in #7151
-
Fixes Neutralizing Gas leaving the field activating unsuppressable abilities again by @PhallenTree in #7170
-
Fixes Enigma, Kee and Maranga Berry activation timing by @AlexOn1ine in #7171
-
Fixes wrong Future Sight indexing by @AlexOn1ine in #7198
-
Fixes OOB for Teatime and Flower Shield by @AlexOn1ine in #7214
-
Fixes wrong assignment in TrySymbiosis by @AlexOn1ine in #7221
-
Adds missing healBlockTimer for Baton Pass by @AlexOn1ine in #7220
-
Jaboca berry triggers instead of being stolen by bug bite by @ghoulslash in #7237
-
Fixes Scald defrosting target while asleep by @AlexOn1ine in #7233
-
Fixes Emergency Exit sometimes causing an unrelated battler to become invisible by @PhallenTree in #7241
🤹 Moves 🤹
Changed
- Fix ScaryFace anim for Bitter Malice by @TLM-PsIQ in #6476
Fixed
- Fix savage spin out spider web template by @ghoulslash in #7137
🎭 Abilities 🎭
Changed
- Flush textbox for Truant Popup by @ghoulslash in #7252
🧶 Items 🧶
Fixed
- Fix sell price display by @cawtds in #7123
🤖 Battle AI 🤖
Fixed
- Added AI_FLAG_PP_STALL_PREVENTION to AI_FLAG_SMART_TRAINER by @AlexOn1ine in #7112
- Fix incorrect function parameters used in AI damage calc by @Pawkkie in #7130
🧹 Other Cleanup 🧹
- Update CI to ignore allcontributors commits by @pkmnsnfrn in #7046
- Update CREDITS.md with correct line placement by @pkmnsnfrn in #7096
- Fix typos and some cleanup (mainly in battle files) by @PhallenTree in #7107
- Fix typo in INSTALL.md by @hedara90 in #7116
- Fixed description of
FORM_CHANGE_WITHDRAWby @AsparagusEduardo in #7152 - Spruce up
FEATURES.mdby @AsparagusEduardo in #7159 - Fixes Rapid Spin description (#7178) by @grintoul1 in #7181
🧪 Test Runner 🧪
Changed
- Wrote some missing tests by @AsparagusEduardo in #7094
- Fixed KNOWN_FAILING Tera test by @AsparagusEduardo in #6949
- Add some tests by @ghoulslash in #7234
- Added tests for Toxic Thread by @hedara90 in #7244
Fixed
- Test runner fixes by @hedara90 in #7100
- Fixed Aura Wheel
KNOWN_FAILINGtest by @AsparagusEduardo in #7135 - Fix AI party count calc being maintained between tests by @AsparagusEduardo in #7200
- Fix tests failing with
B_FRIENDSHIP_BOOSTbeingTRUEby @AsparagusEduardo in #7194 - Jaboca berry triggers instead of being stolen by bug bite by @ghoulslash in #7237
📚 Documentation 📚
- Changed trainer tutorial to take into account removed palette compression by @hedara90 in #7044
- Battle controller pret documentation by @AlexOn1ine in #7029
- Added loop iterator style by @hedara90 in #7092
- Use RGB values for DEFAULT_LIGHT_COLOR by @hedara90 in #7133
- Applied Kasen’s documentation improvements by @hedara90 in #7104
- Spruce up
FEATURES.mdby @AsparagusEduardo in #7159 - Update the description of OW_OBJECT_VANILLA_SHADOWS by @pkmnsnfrn in #7184
📦 Branch Synchronisation 📦
pret
- 24th of June, 2025 in #7206
- Move gTradePlatform_Tilemap to header and change to u32 by @DizzyEggg in pret#2088
- Fix wrong keep temps files directory in makefile by @DizzyEggg in pret#2156
- Fix collision comparison in PlayerNotOnBikeMoving by @GriffinRichards in pret#2104
- Match graphics declarations with externs in graphics.h by @DizzyEggg in pret#2089
New Contributors
- @TLM-PsIQ made their first contribution in #6476
- @pablopenna made their first contribution in #7193
- @J2M2 made their first contribution in #7177
Full Changelog: https://github.com/rh-hideout/pokeemerald-expansion/compare/expansion/1.12.0...expansion/1.12.1
Version 1.12.1
## How to update
- If you haven't set up a remote, run the command `git remote add RHH https://github.com/rh-hideout/pokeemerald-expansion`.
- Once you have your remote set up, run the command `git pull RHH expansion/1.12.1
`.
🧬 General 🧬
Changed
- Changed trainer tutorial to take into account removed palette compression by @hedara90 in #7044
- Update CI to ignore allcontributors commits by @pkmnsnfrn in #7046
- Fixed CI issue introduced 7046 by @pkmnsnfrn in #7072
- Added loop iterator style by @hedara90 in #7092
- Fix typo in INSTALL.md by @hedara90 in #7116
- Use RGB values for DEFAULT_LIGHT_COLOR by @hedara90 in #7133
- Applied Kasen’s documentation improvements by @hedara90 in #7104
- Fixed description of
FORM_CHANGE_WITHDRAWby @AsparagusEduardo in #7152 - Pret merge (19th of June, 2025) by @Bassoonian in #7163
- Update the description of OW_OBJECT_VANILLA_SHADOWS by @pkmnsnfrn in #7184
- fix: use BackPickId to calculate player intro ball throw animation palette by @pablopenna in #7193
Fixed
- Added line break between Trainer 1 name and Trainer 2 name in sText_TwoTrainersWantToBattle by @grintoul1 in #7028
- Fixed Battle Pyramid mon generation by @hedara90 in #7146
- force sGFRomHeader to always be present by @DizzyEggg in #7186
- force RHH Rom Header to always be present by @DizzyEggg in #7187
- Fixed debug flag menu sound by @AsparagusEduardo in #7190
- Fix BtlController_EmitChosenMonReturnValue UB by @DizzyEggg in #7197
- Backported Safari catch and add to party fix by @hedara90 in #7192
- Fix 01_battle_engine_bugs.yaml by @hedara90 in #7242
🗺️ Overworld 🗺️
Fixed
- Bug fix: clear saved follower NPC door warp when doing dive warp by @Bivurnum in #7065
- Fix Contest Painting load palette error by @ExMingYan in #7077
- Bug fix: Follower NPC no longer retains bike sprite after white out by @Bivurnum in #7120
- Bug fix: clear follower npc surf blob on white out by @Bivurnum in #7153
🐉 Pokémon 🐉
Changed
- Fixes Rapid Spin description (#7178) by @grintoul1 in #7181
Fixed
- Fixed text width for a lot of forms in HGSS Dex by @AsparagusEduardo in #7035
- Fixes Roamers not saving shininess by @i0brendan0 in #7185
- [FIX] Prevent caught Pokémon loss in NPC partner battles by @J2M2 in #7177
⚔️ Battle General ⚔️
Changed
- Fixes large battle messages being cut off instead of being prompted to advance 2 by @PhallenTree in #7036
- Battle controller pret documentation by @AlexOn1ine in #7029
- Fix typos and some cleanup (mainly in battle files) by @PhallenTree in #7107
Fixed
- Fixes multi battle party re-order by @AlexOn1ine in #7042
- Fixes Aura Wheel + Normalize and Hunger Switch while Transformed/Terastallized by @PhallenTree in #7061
- Fixes speed calculation order by @AlexOn1ine in #7064
- Bug fix for Grassy Terrain incorrectly healing non-grounded Pokemon by @LinathanZel in #7058
- Fixes Wandering Spirit copied ability activation on fainted mon by @AlexOn1ine in #7066
- Chloroblast fix by @LinathanZel in #7008
- Fix Normalize not boosting Normal type moves if they were already Normal type by @i0brendan0 in #7060
- Fixes freeze during a 1v2 double battle by @AlexOn1ine in #7075
- Fixes Pursuit potentially causing both battlers to switch into the same mon by @PhallenTree in #7084
- Fixed potential mismatch between players and battlers in tests by @AsparagusEduardo in #7101
- Fixes Ally Switch in multi battles by @AlexOn1ine in #7109
- Add missing flag for Berserk Gene by @AlexOn1ine in #7151
- Fixes Neutralizing Gas leaving the field activating unsuppressable abilities again by @PhallenTree in #7170
- Fixes Enigma, Kee and Maranga Berry activation timing by @AlexOn1ine in #7171
- Fixes wrong Future Sight indexing by @AlexOn1ine in #7198
- Fixes OOB for Teatime and Flower Shield by @AlexOn1ine in #7214
- Fixes wrong assignment in TrySymbiosis by @AlexOn1ine in #7221
- Adds missing healBlockTimer for Baton Pass by @AlexOn1ine in #7220
- Jaboca berry triggers instead of being stolen by bug bite by @ghoulslash in #7237
- Fixes Scald defrosting target while asleep by @AlexOn1ine in #7233
- Fixes Emergency Exit sometimes causing an unrelated battler to become invisible by @PhallenTree in #7241
🤹 Moves 🤹
Changed
- Fix ScaryFace anim for Bitter Malice by @TLM-PsIQ in #6476
Fixed
- Fix savage spin out spider web template by @ghoulslash in #7137
🎭 Abilities 🎭
Changed
- Flush textbox for Truant Popup by @ghoulslash in #7252
🧶 Items 🧶
Fixed
- Fix sell price display by @cawtds in #7123
🤖 Battle AI 🤖
Fixed
- Added AI_FLAG_PP_STALL_PREVENTION to AI_FLAG_SMART_TRAINER by @AlexOn1ine in #7112
- Fix incorrect function parameters used in AI damage calc by @Pawkkie in #7130
🧹 Other Cleanup 🧹
- Fix typos and some cleanup (mainly in battle files) by @PhallenTree in #7107
- Fix typo in INSTALL.md by @hedara90 in #7116
- Fixed description of
FORM_CHANGE_WITHDRAWby @AsparagusEduardo in #7152 - Spruce up
FEATURES.mdby @AsparagusEduardo in #7159 - Fixes Rapid Spin description (#7178) by @grintoul1 in #7181
🧪 Test Runner 🧪
Changed
- Wrote some missing tests by @AsparagusEduardo in #7094
- Fixed KNOWN_FAILING Tera test by @AsparagusEduardo in #6949
- Add some tests by @ghoulslash in #7234
- Added tests for Toxic Thread by @hedara90 in #7244
Fixed
- Test runner fixes by @hedara90 in #7100
- Fixed Aura Wheel
KNOWN_FAILINGtest by @AsparagusEduardo in #7135 - Fix AI party count calc being maintained between tests by @AsparagusEduardo in #7200
- Fix tests failing with
B_FRIENDSHIP_BOOSTbeingTRUEby @AsparagusEduardo in #7194 - Jaboca berry triggers instead of being stolen by bug bite by @ghoulslash in #7237
📚 Documentation 📚
- Changed trainer tutorial to take into account removed palette compression by @hedara90 in #7044
- Battle controller pret documentation by @AlexOn1ine in #7029
- Added loop iterator style by @hedara90 in #7092
- Use RGB values for DEFAULT_LIGHT_COLOR by @hedara90 in #7133
- Applied Kasen’s documentation improvements by @hedara90 in #7104
- Spruce up
FEATURES.mdby @AsparagusEduardo in #7159 - Update the description of OW_OBJECT_VANILLA_SHADOWS by @pkmnsnfrn in #7184
📦 Branch Synchronisation 📦
pret
- 24th of June, 2025 in #7206
- Move gTradePlatform_Tilemap to header and change to u32 by @DizzyEggg in pret#2088
- Fix wrong keep temps files directory in makefile by @DizzyEggg in pret#2156
- Fix collision comparison in PlayerNotOnBikeMoving by @GriffinRichards in pret#2104
- Match graphics declarations with externs in graphics.h by @DizzyEggg in pret#2089
New Contributors
- @TLM-PsIQ made their first contribution in #6476
- @pablopenna made their first contribution in #7193
- @J2M2 made their first contribution in #7177
Full Changelog: https://github.com/rh-hideout/pokeemerald-expansion/compare/expansion/1.12.0...expansion/1.12.1
Version 1.12.0
## How to update
- If you haven't set up a remote, run the command `git remote add RHH https://github.com/rh-hideout/pokeemerald-expansion`.
- Once you have your remote set up, run the command `git pull RHH expansion/1.12.0
`.
🌋 REFACTORS 🌋
📜 = Uses a migration script.
- Minor Recoil Effect refactor by @AlexOn1ine in #6409
- Refactor HasWeatherEffect and IsUnnerveAbilityOnOpposingSide by @AlexOn1ine in #6441
- Refactor the function IsAbilityPreventingEscape by @AlexOn1ine in #6439
- Unifies dynamic move category checks by @AlexOn1ine in #6443
- Refactors faint target abilities and adds Battle Bond config by @AlexOn1ine in #6519
- Refactor protect to allow at least 126 different types of protect eff… by @AlexOn1ine in #6506
- Refactor / Simlify Cmd_adjustdamage and remove redundancy by @AlexOn1ine in #6499
- Refactors Move absorb / block function calls to remove redundancy by @AlexOn1ine in #6490
- Refactor fixed damage moves by @AlexOn1ine in #6449
- EndTurnEffectOrder Refactor by @AlexOn1ine in #6224
- Refactor hit escape moves to use moveend by @AlexOn1ine in #6671
- 📜 Evolution Refactor by @khbsd, @AsparagusEduardo for everything he did, including #6530! and @AlexOn1ine for writing the migration script! in #6556
- make sure to back up your alcremie evolution data if you have it implemented already: pulling this will overwrite it
- Centralizes non volatile status effect checks by @AlexOn1ine in #6533
- Refactor battler flee and watch options + clean up by @AlexOn1ine in #6724
- Refactor AI flags to u64 by @Pawkkie and @DizzyEggg, @AlexOn1ine, @hedara90 in #6753
- Refactor battler message ids by @AlexOn1ine in #6765
- Refactor stockpile resets by @AlexOn1ine in #6810
- Move out ai structs out of BattleResources by @AlexOn1ine in #6741
- Consolidates a bunch of battle controller functions by @Bassoonian in #6838
- Further moveend changes (move blocks) by @AlexOn1ine in #6820
- Added weather accuracy move flags by @AsparagusEduardo in #6857
- Removed
EFFECT_THUNDER,EFFECT_BLIZZARDandEFFECT_RAIN_ALWAYS_HITeffects in favor ofalwaysHitsInRain,alwaysHitsInHailSnowandaccuracy50InSunmove flags.
- Removed
- Remove non-volatile status EFFECTs by @AsparagusEduardo in #6772
- 📜 Remove compressed palettes by @hedara90 in #6455
- All handling for compressed palettes has been removed, use
u16 *for palettes instead. - Has migration script to convert palettes to
u16,struct SpritePaletteand palette loading calls from their compressed variants.
- All handling for compressed palettes has been removed, use
🧬 General 🧬
Added
- Low Health Beeps Configuration by @khbsd in #6328
- Adds SHOW_TYPES_SEEN to the B_SHOW_TYPES option by @khbsd in #6561
- this slightly alters how the flag
FLAG_GET_SEENis set, so keep that in mind if you have any functionality that relies on it being at the start of the battle.
- this slightly alters how the flag
- Type Effectiveness Indicators when selecting moves by @agsmgmaster64 in #6559
- FakeRtc datetime and ResetRtcScreen day increments by @cawtds in #5695
- Battle Transition: mugshots for multibattles by @grintoul1 and @AlexOn1ine for advice on simplifying the conditions that check for 2nd opponent and presence of battle partner, and general advice/troubleshooting in #6567
- Time menu for RTC in debug menu. by @RubyRaven6, @cawtds for RTC refactors that makes all of this easier, @HashtagMarky for helping me understand how the debug menu works, especially with destroying menus, @zetraphes, for helping with refactoring the redundant functions into a single function. and @makosear for originally getting me into the RTC hellhole in #6634
- In order to apply the new time the map is reloaded through The LoadMap Callback (CB2_LoadMap). As such, this will also do everything else that comes with loading map in.
- Pokedex Plus HGSS move configs by @PCG06 in #6687
Adds three configs for Pokedex Plus HGSS.
- To sort TM moves by num.
- To show egg moves for evolved Pokémon.
- Creating a dynamic tutor moves array to use for tutor moves counting.
- Allow different flags for Badge boost by @AsparagusEduardo and @ghoulslash, @klemniops, whose’ code I was using for comparison when I found these in #6805
- Timemacros by @RubyRaven6 in #6696
Changed
- Rename absentBattlerFlags to absent by @AlexOn1ine in #6432
- Removed unused debug EWRAM variables by @hedara90 in #6468
- Removes unused Special Status members by @AlexOn1ine in #6479
- Remove potential pitfall with saved damage for recoil moves by @AlexOn1ine in #6485
- Add CONTRIBUTING.md and STYLEGUIDE.md by @pkmnsnfrn and @Pawkkie, @garakmon in #6340
- Alcremie Evolution clean up follow up by @AlexOn1ine in #6557
- Fix broken links in merge_checklist.md by @pkmnsnfrn and @grintoul1 in #6570
- Converts some defines to enums by @Bassoonian in #6592
- Removes vestigial EWRAM variable from debug menu. by @RubyRaven6 in #6686
- Keep Steven Multi Debug Option at the Bottom Forever by @Pawkkie in #6694
- Better handling of battle coords by @AsparagusEduardo and @ghoulslash, @klemniops for the original code. in #6787
battle_mainenum cleanup by @AsparagusEduardo and @ghoulslash, @klemniops, whose’ code I was using for comparison when I found these in #6788- Add missing uses of
IsBattlerAllyby @AsparagusEduardo and @ghoulslash, @klemniops, whose’ code I was using for comparison when I found these in #6793 - Adds partyState to BattleStruct by @AlexOn1ine in #6783
- Rename
GetPartyBattlerDatatoGetBattlerMonby @AsparagusEduardo and @ghoulslash, @klemniops, whose’ code I was using for comparison when I found these in #6800 - Added JSON as the preferred data format by @hedara90 in #6801
- Remove non-existent functions from header files by @Bassoonian in #6825
- Added
IsOnPlayerSideby @AsparagusEduardo in #6832 - Battle TV expansion by @AsparagusEduardo in #6826
- Prevent scaninc touching tests when
make-ing non-test builds by @mudskipper13 in #6812 - Reword move and ability descriptions to improve clarity by @jfb1337 in #6861
- Updated move and ability descriptions to increase clarity.
- Optimized
PokemonUseItemEffectsfunction by @AsparagusEduardo in #6878 - Expand trainerproc to support additional battle types by @AsparagusEduardo in #6770
- Debug menu cleanup by @AsparagusEduardo in #6881
- Commenting in config files to explain limits of map popups and wild AI flags by @surskitty in #6923
- Documented usage of
createsprite gSimplePaletteBlendSpriteTemplateby @AsparagusEduardo in #6956 - Documented usage of
createsprite gDirtPlumeSpriteTemplateby @AsparagusEduardo in #6954 - Updated CONTRIBUTING.md and Merge Freeze definition by @pkmnsnfrn in #6952
- Documented usage of
createsprite gBasicHitSplatSpriteTemplateby @AsparagusEduardo in #6950 - Documented usage of
createsprite gSparkElectricitySpriteTemplateby @AsparagusEduardo in #6955 - Documented usage of
createsprite gSlideMonToOffsetSpriteTemplateby @AsparagusEduardo in #6953 - Remove trailing whitespace by @AsparagusEduardo in #6968
- Beefing up the DNS tutorial for some of the common questions/errors. by @surskitty in #6922
- Clarifies when to use each merge type for maintainers by @pkmnsnfrn in #6999
- Moved time constants to dedicated files by @pkmnsnfrn in #7019
Fixed
- fix: missing break statement by @khbsd in #6572
- Fix dynamax message by @hedara90 in #6589
- Fix pc mon pic by @hedara90 in #6709
- Fixed upcoming not compiling in gcc 11.4.0 by @AsparagusEduardo in #6710
- Fix the Move Item option in the PC still expecting compressed palettes by @hedara90 in #6739
- Fix upcoming compile by @AsparagusEduardo in #6804
- Added missing root folder check in trainer battle type migration script by @AsparagusEduardo in #6944
- Fixed forfeit money for
B_WHITEOUT_MONEY <= GEN_3by @AsparagusEduardo in #6942 - Fix UB when using time menu by @cawtds in #7023
🗺️ Overworld 🗺️
Added
- Add OW_DEFOG_FIELD_MOVE to allow players to clear overworld Fog by @pkmnsnfrn in #6477
This behavior is enabled by setting
OW_DEFOG_FIELD_MOVEtoTRUE. - Add Time-Based Encounters by @khbsd and @Pawkkie, @Artrios, @GriffinRichards, @ravepossum, @ghoulslash, @lhearachel probably more so tag me somewhere and ill add you! in #6454
- Comes with a new conversion script,
wild_encounters_to_header.py. On my machine i timed it out to about .02s, hopefully it wont add too much to the compile time on anyone elses computers - The conversion script can handle an unchanged
wild_encounters.jsonjust fine, but also plays nice with edited ones as far as I can tell - The migration script takes one optional argument,
--copy --copywill copy over all of the encounter tables (land_mons,water_mons, etc). default behavior just adds thebase_labeland if applicable, themap.
- Comes with a new conversion script,
- Add B_RUN_TRAINER_BATTLE - players can run from Trainer Battles by @pkmnsnfrn and @wiz1989 wrote the original feature. in #6456
- Integrated merrp’s lighting branch (Day/Night System) by @hedara90, @AsparagusEduardo for doing most of this PR and @aarant for the original implementation and feature branch, @Greenphx9 for their help merging to current expansion. in #6562
- Changes from the base branch:
- Uses Expansion’s Fake RTC and updates its tinting refresh rate alongside with it.
- Uses Expansion’s constants (
TIME_NIGHTinstead ofTIME_OF_DAY_NIGHT). This allows it to: - Use different tinting for Morning vs Evening compared to the original branch.
- Use Expansion’s
OW_TIMES_OF_DAYconfig that allows users to set their own times by generation. - Added option to disable object event shadows
- Added option to turn DNS on or off,
OW_ENABLE_DNS - Added option to for vanilla shadow behaviour,
OW_OBJECT_VANILLA_SHADOWS - Scripts containing consecutive
removeobject <object>andaddobject <object>needs adelay 1between the commands.
removeobject MY_OBJECT + delay 1 addobject MY_OBJECT- Changes to base Hoenn to integrate DNS can be enabled by reverting commit a5b079d
- Other changes:
- Changed the BW Map Popup to update its time while active.
- Follower NPCs (follow-me) by @Bivurnum, @ghoulslash Much of their original code is still present. and @grintoul1 Invaluable play testing and feedback. in #6500
- Turn any NPC into a follower.
- Specify a battle partner to turn all trainer battles into multi battles automatically while an NPC follower is present.
Changed
- Add Time-Based Encounter Tutorial by @khbsd and @Pawkkie (ty for reviewing!!) in #6568
- Remove vestigial AdvanceScript function used for testing by @RubyRaven6 in #6664
- Rename follower npc macros for better specificity and to match documentation by @Bivurnum in #6742
- Add follower NPC documentation by @Bivurnum in #6704
Fixed
- Fixed DNS off config sometimes breaking palettes on map change by @hedara90 in #6603
- Fixed objects not getting unloaded properly when event flags are set by @Bivurnum in #6715
- Bug fix: add proper elevation handling for npc followers by @Bivurnum in #6871
- fix: avoid unexpected data shifting by removing preproc’d array size by @khbsd in #6916
- Fix OW_POPUP_BW_TIME_MODE burning a lot of cycles due to RTC queries. by @SBird1337 in #6974
- Fixed an issue that causes the game to lag in some configurations that involve
OW_POPUP_BW_TIME_MODE.
- Fixed an issue that causes the game to lag in some configurations that involve
- Make setobjextxy work with npc followers during ON_WARP map script by @Bivurnum in #6913
removeobjectandremoveobjectatmacros work properly with npc followers by @Bivurnum in #6889- Fixes follower NPC not changing state with player after warp by @Bivurnum in #7009
- Fixed follower NPC changing to surf sprite when choosing not to surface from dive by @Bivurnum in #7010
- Fix follower NPC not reappearing after Mossdeep gym warp by @Bivurnum in #7014
- Fixed surf blob binding to invisible follower NPC on map reload by @Bivurnum in #7013
- fix: better area mons handling, no longer duplicates
hiddenMonsfield by @khbsd in #6945 - Bug fix: setfollowernpc macro no longer runs when FNPC_ENABLE_NPC_FOLLOWERS is FALSE by @Bivurnum in #6755
🐉 Pokémon 🐉
Added
- Configuration to scale Critical Capture odds based on local Pokedex or estimated National Pokedex by @surskitty in #6250
- Add B_ANIMATE_MON_AFTER_KO - mons animate after scoring a KO by @pkmnsnfrn and @NicoSwag wrote the original feature. in #6451
- This can be disabled by setting
B_ANIMATE_MON_AFTER_KOtoFALSE.
- This can be disabled by setting
- Add OW_DEFOG_FIELD_MOVE to allow players to clear overworld Fog by @pkmnsnfrn in #6477
This behavior is enabled by setting
OW_DEFOG_FIELD_MOVEtoTRUE. - Add “Move Item” option in party menu by @AsparagusEduardo in #6758
Changed
- Implemented Alcremie Evolution Method by @AsparagusEduardo in #6530
- Make form change methods into enum + type checking by @Bassoonian in #6631
- Remove hardcoded values from wild_encounter.h generation by @khbsd and @moostoet and @/Nopinou on discord for reporting bugs and dealing with my ping spam <3 in #6640
- Evolution Refactor by @khbsd, @AsparagusEduardo for everything he did, including #6530! and @AlexOn1ine for writing the migration script! in #6556
- make sure to back up your alcremie evolution data if you have it implemented already: pulling this will overwrite it
- Disable
P_TUTOR_MOVES_ARRAYconfig by @PCG06 in #6693P_TUTOR_MOVES_ARRAYset toFALSEby default.
Fixed
- Change HasTwoFramesAnimation to take into account species with 1 frame by @hedara90 in #6655
- Fix Rage Fist evolution method by @AsparagusEduardo in #6937
- Fixed
CreateMonparam order inCreateFacilityMonby @PCG06 in #6989
⚔️ Battle General ⚔️
Added
- Gen 1’s Special base stat by @AsparagusEduardo in #6330
- Add B_RUN_TRAINER_BATTLE - players can run from Trainer Battles by @pkmnsnfrn and @wiz1989 wrote the original feature. in #6456
- Add B_LEVEL_UP_NOTIFICATION to improve player QoL when performing multiple level ups by @pkmnsnfrn in #4901
- “Aerilate”-esque Ability Tests and Config by @Pawkkie and @hedara90 in #6313
- Adds new
B_ATE_MULTIPLIERconfig inconfig/battle.h
- Adds new
- Gen 1 no recharge on KO by @spindrift64 in #6869
- Add no-whiteout feature by @Bassoonian and @/Gudf in #6795
Changed
- “no additional effect” text for status Z moves without effects by @wiz1989 in #6368
- Configuration to make all Hail moves summon Snow or vis versa, to have only one ice weather by @surskitty in #6149
- Added a config to homogenize Ice weathers between Hail, Snow, or both.
- Create move end Sheer Force by @AlexOn1ine in #6411
- Added Dynamax/Gigantamax battle messages by @wiz1989 in #6440
- Refactor HasWeatherEffect and IsUnnerveAbilityOnOpposingSide by @AlexOn1ine in #6441
- Refactor the function IsAbilityPreventingEscape by @AlexOn1ine in #6439
- Unifies dynamic move category checks by @AlexOn1ine in #6443
- Refactors faint target abilities and adds Battle Bond config by @AlexOn1ine in #6519
- Refactor protect to allow at least 126 different types of protect eff… by @AlexOn1ine in #6506
- Refactor / Simlify Cmd_adjustdamage and remove redundancy by @AlexOn1ine in #6499
- Refactors Move absorb / block function calls to remove redundancy by @AlexOn1ine in #6490
- Refactor fixed damage moves by @AlexOn1ine in #6449
- Turn battle string ids into enums by @Bassoonian in #6594
- Remove redundant bit for Throat Spray by @AlexOn1ine in #6593
- Add type checking for hold item effects by @Bassoonian in #6619
- Adds move effect type checking by @Bassoonian in #6618
- Refactor hit escape moves to use moveend by @AlexOn1ine in #6671
- Fix party access in NoAliveMonsForBattlerSide by @AlexOn1ine in #6677
- Some Me First tests plus minor clean up by @AlexOn1ine in #6678
- Centralizes non volatile status effect checks by @AlexOn1ine in #6533
- Use
GetPartyBattlerDatawhere appropiate by @AsparagusEduardo and @ghoulslash, @klemniops, whose’ code I was using for comparison when I found these in #6779 - Refactor battler message ids by @AlexOn1ine in #6765
- General MoveEnd clean up and Fell Stinger adjustments by @AlexOn1ine in #6674
- Adds partyState to BattleStruct by @AlexOn1ine in #6783
- Refactor stockpile resets by @AlexOn1ine in #6810
- Changed White Herb hold effect name by @AlexOn1ine in #6815
- Fixes a mistake made by me by @AlexOn1ine in #6828
- Combined type-enhancing hold effects by @AsparagusEduardo in #6846
- The following hold effects have been combined into
HOLD_EFFECT_TYPE_POWER: HOLD_EFFECT_BUG_POWERHOLD_EFFECT_STEEL_POWERHOLD_EFFECT_GROUND_POWERHOLD_EFFECT_ROCK_POWERHOLD_EFFECT_GRASS_POWERHOLD_EFFECT_DARK_POWERHOLD_EFFECT_FIGHTING_POWERHOLD_EFFECT_ELECTRIC_POWERHOLD_EFFECT_WATER_POWERHOLD_EFFECT_FLYING_POWERHOLD_EFFECT_POISON_POWERHOLD_EFFECT_ICE_POWERHOLD_EFFECT_GHOST_POWERHOLD_EFFECT_PSYCHIC_POWERHOLD_EFFECT_FIRE_POWERHOLD_EFFECT_DRAGON_POWERHOLD_EFFECT_NORMAL_POWERHOLD_EFFECT_FAIRY_POWER
- The following hold effects have been combined into
- Removed multiple instances of hardcoded move IDs by @AsparagusEduardo in #6856
- New animations for Mega Evolution, Primal Reversion, Ultra Burst, and Power Construct by @LinathanZel in #6834
- Consolidates a bunch of battle controller functions by @Bassoonian in #6838
- Further moveend changes (move blocks) by @AlexOn1ine in #6820
- Added weather accuracy move flags by @AsparagusEduardo in #6857
- Removed
EFFECT_THUNDER,EFFECT_BLIZZARDandEFFECT_RAIN_ALWAYS_HITeffects in favor ofalwaysHitsInRain,alwaysHitsInHailSnowandaccuracy50InSunmove flags.
- Removed
- Consolidated HasMoveFlagX functions by @AlexOn1ine in #6874
Fixed
- Fix declaration after label for Psywave switch by @hedara90 in #6595
- Fix regression from EndTurnRefactor by @AlexOn1ine in #6616
- Fixes Z and Max moves dmg reduction against side protection - upcoming by @AlexOn1ine in #6698
- Illusion struct cleanup and many Illusion fixes by @PhallenTree in #6798
- Fixes wrongly usage of arguments without checking effect by @AlexOn1ine in #6859
- Fixes Magic Guard causing Wrap to end immediately by @PhallenTree in #6876
- Mugshot Transitions 2v1 fix by @grintoul1 in #6911
- Fixes Ice Body healing HP regardless of weather by @PhallenTree in #6939
- Fixes global usage in super fang effect. by @AlexOn1ine in #6941
- Fixes Knock Off/Smack Down effect on immune target/protect by @PhallenTree in #6958
- Fixes weather anim damage being applied to the wrong mon by @AlexOn1ine in #6973
- Fixes repeated learning of level up moves by @AlexOn1ine in #6981
- Fixes Gen3 berry activation timing by @AlexOn1ine in #6993
- Fix Eiscue not resetting back to Ice Face form after battle. by @DarkVexon in #6997
- Fixes spread move fire types not defrosting all targets by @AlexOn1ine in #6998
- Update Supersweet Syrup with eject pack fix by @AlexOn1ine in #7015
- fix battle controller macros by @cawtds in #7021
🤹 Moves 🤹
Added
- Add B_ANIMATE_MON_AFTER_KO - mons animate after scoring a KO by @pkmnsnfrn and @NicoSwag wrote the original feature. in #6451
- This can be disabled by setting
B_ANIMATE_MON_AFTER_KOtoFALSE.
- This can be disabled by setting
- Add OW_DEFOG_FIELD_MOVE to allow players to clear overworld Fog by @pkmnsnfrn in #6477
- This behavior is enabled by setting
OW_DEFOG_FIELD_MOVEtoTRUE.
- This behavior is enabled by setting
Changed
- Minor Recoil Effect refactor by @AlexOn1ine in #6409
- Replaced Blue Sky background for Rock Field by @SundayMoonday in #6516
- Use missing constants with GetBattlerSpriteCoord by @AsparagusEduardo in #6778
InitSpritePosToAnimAttackerdocumentation by @AsparagusEduardo and @ghoulslash, @klemniops, whose’ code I was using for comparison when I found these in #6781- Document battler side in anim code by @AlexOn1ine in #6780
- New animations for Mega Evolution, Primal Reversion, Ultra Burst, and Power Construct by @LinathanZel in #6834
Fixed
- Fix to warnings pertaining to Mega Evolution and Ultra Burst RGB values by @LinathanZel in #6883
🤖 Battle AI 🤖
Added
- Improve AI’s handling of player’s Encore by @Pawkkie and @iriv24 in #6305
- Switch AI will factor in player’s choice lock when determining hits to KO by @Pawkkie in #6343
- Switch AI considers Wind Rider by @innocenthedgehog in #6391
- Fix AI using Scald / fire moves against frozen / frostbitten targets by @Pawkkie in #6442
- Improve “all moves bad” switching by @Pawkkie and @wiz1989 in #6453
- Fix Choice’d AI not switching if player immune to move by @Pawkkie in #6464
- Add basic Unaware check bad move scoring by @Pawkkie in #6524
- AI smarter status handling by @Pawkkie in #6550
- Improve AI’s defense against Focus Punch by @Pawkkie in #6713
- Add AI_FLAG_PP_STALL_PREVENTION by @hedara90 in #6743
- Chance to trigger and score modifier can be changed in
include/config/ai.hunder the “AI PP Stall detection” section
- Chance to trigger and score modifier can be changed in
- Adjust switch AI based on move scoring by @Pawkkie and @ghoulslash, @AlexOn1ine in #6615
- Change
AI_BAD_SCORE_THRESHOLDandAI_GOOD_SCORE_THRESHOLDto modify whatShouldSwitchIfAllScoresBadconsiders, found inconfig/ai.h
- Change
- Add AI for Zero to Hero Palafin by @Pawkkie and @kittenchilly in #6791
- Add AI_FLAG_PREDICT_MOVES by @Pawkkie in #6551
- Use AI_FLAG_PREDICT_MOVES to enable behaviour
- Works best when used with AI_FLAG_OMNISCIENT
Changed
- Minor Clean up for AI_CalcDamage to remove some duplicate code by @AlexOn1ine in #6397
- Moved some AI stuff out of the battlestruct by @hedara90 in #6405
- AI data in
gBattleStructhas been moved togAiBattleStructData.
- AI data in
- Allow the AI to see the second hit of Parental Bond by @AlexOn1ine in #6403
- Split ai function IsBattlerTrapped by @AlexOn1ine in #6438
- Optimization / Clean up of AI move usability by @AlexOn1ine in #6332
- Clean up AI code duplication and unify checks by @AlexOn1ine in #6348
- Ability access cleanup for #6550 by @Pawkkie in #6565
- Adjust enum AIScore by @AlexOn1ine in #6598
- Refactor battler flee and watch options + clean up by @AlexOn1ine in #6724
- Add AI_FLAG_PP_STALL_PREVENTION to
ai_flags.mdby @Pawkkie in #6756 - Refactor AI flags to u64 by @Pawkkie and @DizzyEggg, @AlexOn1ine, @hedara90 in #6753
- Move out ai structs out of BattleResources by @AlexOn1ine in #6741
- Add prediction function by @AlexOn1ine in #6858
- AI double battle friendly fire logic improvements by @surskitty and @Pawkkie in #6766
- Remove non-volatile status EFFECTs by @AsparagusEduardo in #6772
- Fix misleading name by @AlexOn1ine in #6865
- Fix HasBattlerSideMoveWithEffect comment by @Pawkkie in #6965
Fixed
- Fix damage roll order for AI calcs by @AlexOn1ine in #6356
- Fix roll handling in AI damage calcs by @Pawkkie in #6396
- fixed damage calculations in CanTargetFaintAiWithMod() by @wiz1989 in #6446
- Fix bracket typo in AI_CheckBadMove conditional by @Pawkkie in #6695
- Fix party data assignment by @Pawkkie in #6712
- Fix Wonder Guard potential double switching by @Pawkkie in #6737
- Fix roll handling in AI party damage calcs by @Pawkkie in #6733
- Fix AI function table to match new u64 flags by @Pawkkie in #6796
- Fix FindMonThatAbsorbsOpponentsMove not seeing Mold Breaker or choice items by @Pawkkie in #6864
- Fix AI_FLAG_PREDICT_MOVES scoring bug by @Pawkkie and @innocenthedgehog for test in #6867
- Switch AI considers Bulletproof ability by @innocenthedgehog in #6872
- Fix AI boosting stats into mon with Haze by @Pawkkie in #6894
- Fix switch AI considering non-choiced SE moves when choiced by @Pawkkie in #6892
- Fix bad odds / defensive switchin double switch cases by @Pawkkie in #6927
🧹 Other Cleanup 🧹
- Moved Pokémon Jump types to gSpeciesInfo by @AsparagusEduardo in #5602
- Change ability to abilityNum in CreateTrainerMon by @AlexOn1ine in #6370
- Small Code clean up in GetBattlerAbility (removes duplication) by @AlexOn1ine in #6362
- Minor Clean up for AI_CalcDamage to remove some duplicate code by @AlexOn1ine in #6397
- Create move end Sheer Force by @AlexOn1ine in #6411
- Rename absentBattlerFlags to absent by @AlexOn1ine in #6432
- Split ai function IsBattlerTrapped by @AlexOn1ine in #6438
- Optimization / Clean up of AI move usability by @AlexOn1ine in #6332
- Clean up AI code duplication and unify checks by @AlexOn1ine in #6348
- Removed unused debug EWRAM variables by @hedara90 in #6468
- Removes unused Special Status members by @AlexOn1ine in #6479
- Remove potential pitfall with saved damage for recoil moves by @AlexOn1ine in #6485
- Update maintainer list by @AsparagusEduardo in #6521
- Alcremie Evolution clean up follow up by @AlexOn1ine in #6557
- Ability access cleanup for #6550 by @Pawkkie in #6565
- Fix broken links in merge_checklist.md by @pkmnsnfrn and @grintoul1 in #6570
- Converts some defines to enums by @Bassoonian in #6592
- Turn battle string ids into enums by @Bassoonian in #6594
- Remove redundant bit for Throat Spray by @AlexOn1ine in #6593
- Adjust enum AIScore by @AlexOn1ine in #6598
- Add type checking for hold item effects by @Bassoonian in #6619
- Adds move effect type checking by @Bassoonian in #6618
- Remove hardcoded values from wild_encounter.h generation by @khbsd and @moostoet and @/Nopinou on discord for reporting bugs and dealing with my ping spam <3 in #6640
- Sky Drop clean up and tests by @AlexOn1ine in #6218
- Remove vestigial AdvanceScript function used for testing by @RubyRaven6 in #6664
- Fix party access in NoAliveMonsForBattlerSide by @AlexOn1ine in #6677
- Some Me First tests plus minor clean up by @AlexOn1ine in #6678
- Removes vestigial EWRAM variable from debug menu. by @RubyRaven6 in #6686
- Disable
P_TUTOR_MOVES_ARRAYconfig by @PCG06 in #6693P_TUTOR_MOVES_ARRAYset toFALSEby default.
- Remove compressed palettes by @hedara90 in #6455
- All handling for compressed palettes has been removed, use
u16 *for palettes instead. - Has migration script to convert palettes to
u16,struct SpritePaletteand palette loading calls from their compressed variants.
- All handling for compressed palettes has been removed, use
- Rename follower npc macros for better specificity and to match documentation by @Bivurnum in #6742
- Use missing constants with GetBattlerSpriteCoord by @AsparagusEduardo in #6778
- Use
GetPartyBattlerDatawhere appropiate by @AsparagusEduardo and @ghoulslash, @klemniops, whose’ code I was using for comparison when I found these in #6779 InitSpritePosToAnimAttackerdocumentation by @AsparagusEduardo and @ghoulslash, @klemniops, whose’ code I was using for comparison when I found these in #6781- General MoveEnd clean up and Fell Stinger adjustments by @AlexOn1ine in #6674
- Better handling of battle coords by @AsparagusEduardo and @ghoulslash, @klemniops for the original code. in #6787
battle_mainenum cleanup by @AsparagusEduardo and @ghoulslash, @klemniops, whose’ code I was using for comparison when I found these in #6788- Add missing uses of
IsBattlerAllyby @AsparagusEduardo and @ghoulslash, @klemniops, whose’ code I was using for comparison when I found these in #6793 - Rename
GetPartyBattlerDatatoGetBattlerMonby @AsparagusEduardo and @ghoulslash, @klemniops, whose’ code I was using for comparison when I found these in #6800 - Changed White Herb hold effect name by @AlexOn1ine in #6815
- Fixes a mistake made by me by @AlexOn1ine in #6828
- Remove non-existent functions from header files by @Bassoonian in #6825
- Added
IsOnPlayerSideby @AsparagusEduardo in #6832 - Battle TV expansion by @AsparagusEduardo in #6826
- Removed multiple instances of hardcoded move IDs by @AsparagusEduardo in #6856
- Add prediction function by @AlexOn1ine in #6858
- Reword move and ability descriptions to improve clarity by @jfb1337 in #6861
- Updated move and ability descriptions to increase clarity.
- Consolidated HasMoveFlagX functions by @AlexOn1ine in #6874
- Optimized
PokemonUseItemEffectsfunction by @AsparagusEduardo in #6878 - Fix misleading name by @AlexOn1ine in #6865
- Debug menu cleanup by @AsparagusEduardo in #6881
- Updated CONTRIBUTING.md and Merge Freeze definition by @pkmnsnfrn in #6952
- Fix HasBattlerSideMoveWithEffect comment by @Pawkkie in #6965
- Documented usage of
createsprite gSlideMonToOffsetSpriteTemplateby @AsparagusEduardo in #6953 - Remove trailing whitespace by @AsparagusEduardo in #6968
- Moved time constants to dedicated files by @pkmnsnfrn in #7019
🧪 Test Runner 🧪
Added
- “Aerilate”-esque Ability Tests and Config by @Pawkkie and @hedara90 in #6313
- Adds new
B_ATE_MULTIPLIERconfig inconfig/battle.h
- Adds new
Changed
- Tests for checking all move animations by @hedara90 and @AsparagusEduardo wrote the original tests that I updated in #6297
- Set
T_SHOULD_RUN_MOVE_ANIMtoTRUEto run these tests, they take a long time to run.
- Set
- Update the All Move Animations test by @hedara90 in #6460
- Updated move animation tests by @hedara90 in #6554
Fixed
- Fix out-of-bounds in Heal Bell Cures Entire Party test by @rayrobdod in #7011
📚 Documentation 📚
- Add CONTRIBUTING.md and STYLEGUIDE.md by @pkmnsnfrn and @Pawkkie, @garakmon in #6340
- Update maintainer list by @AsparagusEduardo in #6521
- Fix broken links in merge_checklist.md by @pkmnsnfrn and @grintoul1 in #6570
- Turn battle string ids into enums by @Bassoonian in #6594
- Add Time-Based Encounter Tutorial by @khbsd and @Pawkkie (ty for reviewing!!) in #6568
- Add type checking for hold item effects by @Bassoonian in #6619
- Adds move effect type checking by @Bassoonian in #6618
- Make form change methods into enum + type checking by @Bassoonian in #6631
- Add AI_FLAG_PP_STALL_PREVENTION to
ai_flags.mdby @Pawkkie in #6756 - Document battler side in anim code by @AlexOn1ine in #6780
- Added JSON as the preferred data format by @hedara90 in #6801
- Commenting in config files to explain limits of map popups and wild AI flags by @surskitty in #6923
- Documented usage of
createsprite gSimplePaletteBlendSpriteTemplateby @AsparagusEduardo in #6956 - Documented usage of
createsprite gDirtPlumeSpriteTemplateby @AsparagusEduardo in #6954 - Updated CONTRIBUTING.md and Merge Freeze definition by @pkmnsnfrn in #6952
- Documented usage of
createsprite gBasicHitSplatSpriteTemplateby @AsparagusEduardo in #6950 - Documented usage of
createsprite gSparkElectricitySpriteTemplateby @AsparagusEduardo in #6955 - Beefing up the DNS tutorial for some of the common questions/errors. by @surskitty in #6922
- Add follower NPC documentation by @Bivurnum in #6704
- Clarifies when to use each merge type for maintainers by @pkmnsnfrn in #6999
📦 Branch Synchronisation 📦
pret
- 27th of May, 2025 in #6995
- Fix defines in MAP_NUM and MAP_GROUP by @Bassoonian in pret#2023
- Change metatile behaviors to enum by @pkmnsnfrn in pret#2027
- Move heal locations data to their associated map.json by @GriffinRichards in pret#2034
- Generate local IDs from map.json files by @GriffinRichards in pret#2047
- Generate MAPSEC constants from JSON by @GriffinRichards in pret#2063
- Generate heal location constants automatically by @GriffinRichards in pret#2101
- Update for Porymap 6 by @GriffinRichards in pret#2141
- 29th of May, 2025 in #7012
- Update for Porymap 6 by @GriffinRichards in pret#2141
New Contributors
- @SundayMoonday made their first contribution in #6516
- @agsmgmaster64 made their first contribution in #6559
- @grintoul1 made their first contribution in #6567
- @LinathanZel made their first contribution in #6834
- @mudskipper13 made their first contribution in #6812
Full Changelog: https://github.com/rh-hideout/pokeemerald-expansion/compare/expansion/1.11.3...expansion/1.12.0
Version 1.11.4
## How to update
- If you haven't set up a remote, run the command `git remote add RHH https://github.com/rh-hideout/pokeemerald-expansion`.
- Once you have your remote set up, run the command `git pull RHH expansion/1.11.4
`.
🐉 Pokémon 🐉
Fixed
- Fixed
CreateMonparam order inCreateFacilityMonby @PCG06 in #6989- Fixed
CreateMonparam order inCreateFacilityMon.
- Fixed
⚔️ Battle General ⚔️
Fixed
- Fix Eiscue not resetting back to Ice Face form after battle. by @DarkVexon in #6997
- Fixes spread move fire types not defrosting all targets by @AlexOn1ine in #6998
- Update Supersweet Syrup with eject pack fix by @AlexOn1ine in #7015
- fix battle controller macros by @cawtds in #7021
🧪 Test Runner 🧪
Fixed
- Fix out-of-bounds in Heal Bell Cures Entire Party test by @rayrobdod in #7011
📦 Branch Synchronisation 📦
pret
- 27th of May, 2025 in #6995
- Fix defines in MAP_NUM and MAP_GROUP by @Bassoonian in pret#2023
- Change metatile behaviors to enum by @pkmnsnfrn in pret#2027
- Move heal locations data to their associated map.json by @GriffinRichards in pret#2034
- Generate local IDs from map.json files by @GriffinRichards in pret#2047
- Generate MAPSEC constants from JSON by @GriffinRichards in pret#2063
- Generate heal location constants automatically by @GriffinRichards in pret#2101
- Update for Porymap 6 by @GriffinRichards in pret#2141
- 29th of May, 2025 in #7012
- Update for Porymap 6 by @GriffinRichards in pret#2141
Full Changelog: https://github.com/rh-hideout/pokeemerald-expansion/compare/expansion/1.11.3...expansion/1.11.4
Version 1.11.3
## How to update
- If you haven't set up a remote, run the command `git remote add RHH https://github.com/rh-hideout/pokeemerald-expansion`.
- Once you have your remote set up, run the command `git pull RHH expansion/1.11.3
`.
🧬 General 🧬
Changed
- Remove old slide workaround by @hedara90 in #6754
- Changed github CI to use arm-none-eabi-gcc by @hedara90 in #6829
- Add move description data for Z-Moves and Max/G-Max moves by @kittenchilly in #6852
- Add CREDITS.md & FEATURES.md, rewrite README.md & INSTALL.md by @pkmnsnfrn in #6700
- Fixed URL for contributors badge on README.md by @pkmnsnfrn in #6897
- Fix typo in the readme by @Bassoonian in #6908
- Cleanup identical if blocks by @malad1211 in #6988
Fixed
- Add AUTO_GEN_TARGETS for .party files and map_groups_count, but on master by @hedara90 and @mrgriffin in #6824
- Make make clean work again by @hedara90 in #6848
- Fix trainers.party parser failing on apostrophes by @jfb1337 in #6938
- Explicit -std=gnu17 in CPPFLAGS to mirror CFLAGS by @mrgriffin in #6839
- Missed ItemId_GetDescription change by @AlexOn1ine in #6992
🐉 Pokémon 🐉
Changed
- New Lurantis animation by @Cafeei in #6725
- Added Egg Moves for Basculin White Striped by @PCG06 in #6769
- Added Egg Moves for Basculin White Striped.
- PokeCommunity sprites batch (April 2025) by @kittenchilly in #6840
- Improve a few Gen 9 Pokemon sprites by @kittenchilly in #6885
Fixed
- Fix rerolls overwriting Fixed Personality by @i0brendan0 in #6774
⚔️ Battle General ⚔️
Changed
- Remove redundant script declaration in
battle_scripts.hby @Bassoonian and @i0brendan0 in #6837 - BattleScript_BerryStatRaiseRet Ripen checks berry and cleanup by @ghoulslash in #6835
Fixed
- Bugfixes batch by @AlexOn1ine in #6750
- Fix Life Orb inflicting self damage when using status moves (#6767) by @spindrift64 in #6773
- Fixes Stomping Tantrum not boosting damage when missed due to Accuracy by @AlexOn1ine in #6762
- Fixes Symbiosis not triggering when a weakness berry was consumed by @AlexOn1ine in #6782
- Fix gems activating for moves that don’t deal type damage by @spindrift64 in #6789 (reverted in #6806)
- Fix Iron Ball type effectiveness check by @spindrift64 in #6794
- Toxic Spikes print whether the target is poisoned or badly poisoned by @spindrift64 in #6814
- Fixes Berserk Gene infinite loop by @AlexOn1ine in #6813
- Fixes restoretarget on empty stack when using G-Max Gravitas by @PhallenTree in #6827
- Fixed double battles send out breaking by @cawtds in #6822
- Fix potential bug in BattleScript_FriskActivates by @AlexOn1ine in #6850
- Reverts wrongly done gem fix and renames struggle effect by @AlexOn1ine in #6806
- add fail ptr arg to JumpIfMoveFailed, fix tryworryseed by @ghoulslash in #6925
- Fixes Life Orb damage still happening after attacker was unable to at… by @AlexOn1ine in #6940
- Fixes Dazzling abilities activating on all multi hit move hits by @AlexOn1ine in #6943
- Fixes ate type being ignored after checking summary screen by @AlexOn1ine in #6888
- Fixes Unnerve activation not limited to 1 per switch-in by @AlexOn1ine in #6960
- Fixes checking wrong move’s Dynamic Move Type in Summary Screen by @PhallenTree in #6975
- Fix Wish healing even if the target is Heal Blocked by @DarkVexon in #6979
- Fixed Heal Block not applying to Wish moves that had already been used
- Prankster block check was missng the IsStatusMove check by @AlexOn1ine in #6987
🤖 Battle AI 🤖
Fixed
- Fixes ai moves being recorded without correct index by @AlexOn1ine in #6803
- Fixes AI repeated use of weather set up moves by @AlexOn1ine in #6963
- Fixes AI not seeing primal weather and partner absorbing abilities by @AlexOn1ine in #6936
🧹 Other Cleanup 🧹
- Remove old slide workaround by @hedara90 in #6754
- Remove redundant script declaration in
battle_scripts.hby @Bassoonian and @i0brendan0 in #6837 - BattleScript_BerryStatRaiseRet Ripen checks berry and cleanup by @ghoulslash in #6835
- Consolidated stat-priority ability tests by @AsparagusEduardo in #6863
- Fix typo in the readme by @Bassoonian in #6908
- add fail ptr arg to JumpIfMoveFailed, fix tryworryseed by @ghoulslash in #6925
- Rename AI test by @AlexOn1ine in #6977
- Missed ItemId_GetDescription change by @AlexOn1ine in #6992
- Cleanup identical if blocks by @malad1211 in #6988
🧪 Test Runner 🧪
Changed
- Changed Tackle for Scratch in tests by @AsparagusEduardo and @Pawkkie, @PurrfectDoodle, @hedara90 in #6730
- Tackle’s power varies too much across generations. When writing new tests, please use Scratch instead.
- Adds RNG tags and tests for Moody and Starf Berry by @PhallenTree in #6718
- A lot of tests by @hedara90 in #6734
- Added Ability TODO tests - Volume B by @AsparagusEduardo in #6836
- Consolidated stat-priority ability tests by @AsparagusEduardo in #6863
- Create missing ability and move effect test files by @AsparagusEduardo in #6845
- Fix
KNOWN_FAILINGBestow tests by @AsparagusEduardo in #6947 - Added check for gBattleStringsTable by @AsparagusEduardo in #6948
- Rename AI test by @AlexOn1ine in #6977
- Fix heal bell test, add sparkly swirl test by @ghoulslash in #6262
Fixed
- Fix test not referencing AI_TRAINER_NAME by @Pawkkie in #6926
- Backport #6712 Fix party data assignment by @Pawkkie in #6980
📚 Documentation 📚
- Fixed URL for contributors badge on README.md by @pkmnsnfrn in #6897
📦 Branch Synchronisation 📦
pret
- 2nd of May 2025 in #6752
- Added missing include due to g++ changes by @hedara90 in pret#2131
- 15th of May, 2025 in #6870
- Identified task and sprite fields related to battle weather animations by @DavidJCobb in pret#2128
- Battle link reverse-engineering by @DavidJCobb in pret#2125
InitSpritePosToAnimAttackerdocumentation by @AsparagusEduardo in pret#2132- Rename battlerId to battler for consistency by @AlexOn1ine in pret#2126
- Replace: moveId -> move, moveIdx -> moveIndex by @AlexOn1ine in pret#2134
- Add BattlerId enum and document by @AlexOn1ine in pret#2135
- Remove files that should not have been committed in #2126 by @mrgriffin in pret#2136
- 24th of May, 2025 in #6978
- Warn on suspicious setvar usages by @mrgriffin in pret#2137
- Streamline pointer notation by @Bassoonian in pret#2139
- Fixes for C23 Support by @Kurausukun in pret#2138
- Update header files to match source files by @Bassoonian in pret#2143
- Correct C23 Checks by @Kurausukun in pret#2144
- Rename ItemId_GetX to GetItemX by @AlexOn1ine in pret#2116
- Remove files that were wrongly commited by @AlexOn1ine in pret#2146
New Contributors
- @i0brendan0 made their first contribution in #6774
- @allcontributors made their first contribution in #6896
- @DarkVexon made their first contribution in #6979
Full Changelog: https://github.com/rh-hideout/pokeemerald-expansion/compare/expansion/1.11.2...expansion/1.11.3
Version 1.11.2
## How to update
- If you haven't set up a remote, run the command `git remote add RHH https://github.com/rh-hideout/pokeemerald-expansion`.
- Once you have your remote set up, run the command `git pull RHH expansion/1.11.2
`.
🧬 General 🧬
Changed
- 1.11.1 Release by @hedara90 in #6503
- Add General Merge to label check by @hedara90 in #6512
- Added AI switch display to the battle debug by @hedara90 in #6529
- Consolidated “How to add Pokémon” tutorials by @AsparagusEduardo in #6541
- Fixed Behemoth Blade/Bash handler not using form change tables by @AsparagusEduardo in #6558
- Documentation by @hedara90 in #6576
- Corrected Dexnav config related comment by @LOuroboros in #6610
- Make generated files match the current formatting by @hedara90 in #6636
Fixed
- Mark RTC/Flash save hint string as used by @aronson in #6507
- Fix move names in learnset helper by @malad1211 in #6510
- Fix no eligible mons when only the partner wins in multi battle by @Bivurnum in #6626
- Fixed broken palette load for shiny followers in the sprite visualizer by @hedara90 in #6683
- Fix
FORM_CHANGE_ITEM_HOLDbug manifested duringgivemonby @AsparagusEduardo in #6702
🗺️ Overworld 🗺️
Fixed
- Added call to ItemId_GetDescription by @pkmnsnfrn in #6582
🐉 Pokémon 🐉
Changed
- Add clarification for EVO_SCRIPT_TRIGGER_DMG by @Bassoonian in #6579
Fixed
- Capped Exp from Daycare to level cap by @hedara90 in #6622
⚔️ Battle General ⚔️
Changed
- Fixes Thermal Exchange not curing existing burn by @PhallenTree in #6545
- Add clarification for underlying math in EV caps by @Bassoonian and @i0brendan0 in #6580
- Added missing
gMovesInfoencapsulation by @AsparagusEduardo in #6656 - Remove misleading comment by @AlexOn1ine in #6684
Fixed
- Fixes Tera Type not being carried over to during form change / evolution by @AlexOn1ine in #6502
- Fixes Hone Claws checking the wrong stats for its stat change animation and Stockpile drops being stopped by stat reduction prevention effects by @PhallenTree in #6522
- Fixes Red Card against Dynamaxed mons by @AlexOn1ine in #6526
- Fixes transformed mon being able to use tera on Terapagos by @AlexOn1ine in #6528
- Fixes Will-O-Wisp not being blocked by Thermal Exchange by @AlexOn1ine in #6534
- Add hold effects for PLA Origin Trio items by @Bassoonian in #6578
- Ability imposter by @wiz1989 and @AlexOn1ine in #6552
- Fixes Dynamax reversion animation when fainting by @PhallenTree in #6597
- Fix potential compile error caused by sTeraIndicatorDataPtrs by @AlexOn1ine in #6599
- Revert wrongly done Embody Aspect fix by @AlexOn1ine in #6607
- Fixes wrong battler’s Illusion wearing off when the Attacker faints and fixes Illusion tests by @PhallenTree in #6596
- Fixes Gulp Missile freezing the game if when attacker fainted by @AlexOn1ine in #6639
- Fixes Big Root Leech Seed heal amount by @AlexOn1ine in #6638
- Fix Mirror Armor and Obstruct interaction by @AlexOn1ine in #6630
- Fixes some restore issues by @AlexOn1ine in #6629
- Fixes Ally Switch cancelling partner’s moves targeting that side of the field by @PhallenTree and @hedara90 made the Ally Switch test in #6646 in #6647
- Fixes commander activation on a fainted mon by @AlexOn1ine in #6632
- Fix captivate-oblivious interaction and related test by @cawtds in #6653
- Fix gBattlerTarget OOB for Gravity and Perish Song by @AlexOn1ine in #6662
- Fixes Intimidate / Eject Pack interaction by @AlexOn1ine in #6645
- Fixes Neutralizing Gas activating again after switch-in by @PhallenTree in #6667
- Fixes Bug Bite eaten berry not ignoring Unnerve by @AlexOn1ine in #6666
- Fixes Mirror Armor stat drops not being stopped by Substitute by @PhallenTree in #6675
- Fixes Magician Life Orb interaction by @AlexOn1ine in #6676
- Fixes Unburden doubling speed when affected by Neutralizing Gas by @PhallenTree in #6691
- Fix various Toxic Spikes interactions by @hedara90 in #6690
- Fixes Z and Max moves dmg reduction against side protection by @AlexOn1ine in #6697
- Fixes Stomping Tantrum not doubling power if asleep or frozen by @AlexOn1ine in #6719
🤹 Moves 🤹
Fixed
- Gimmick Indicator refactor by @hedara90 in #6553
- This frees up a lot of VRAM in battles.
- Animation fixes from lucky adapted to expansion by @hedara90 and @/luckytyphlosion in #6452
- Fix Magma Storm getting stuck by @hedara90 in #6605
- Fix VRAM load for Black Hole Eclipse by @hedara90 in #6635
- Fixes some moves trying to load too much VRAM by @hedara90 in #6633
🧶 Items 🧶
Fixed
- Fix using items to heal partner in battle by @hedara90 in #6517
🤖 Battle AI 🤖
Changed
- Add AI thinking cycle count display to frame count by @aronson in #6509
- Remove redundant AI defines by @Bassoonian in #6590
🧹 Other Cleanup 🧹
- Added call to ItemId_GetDescription by @pkmnsnfrn in #6582
- Remove redundant AI defines by @Bassoonian in #6590
- Corrected Dexnav config related comment by @LOuroboros in #6610
- Added missing
gMovesInfoencapsulation by @AsparagusEduardo in #6656 - Remove HitmarkerSwapAttackerTarget by @AlexOn1ine in #6627
- Remove misleading comment by @AlexOn1ine in #6684
🧪 Test Runner 🧪
Changed
- Support make check on macOS by @aronson in #6513
- The new test runner binary will not support macOS versions older than 10.7 or 11 (for Intel and Apple Silicon respectively).
- macOS users running
make checkmay need to confirm with an OS dialog they’re willing to openmgba-rom-test-macwhen run for the first time. - macOS users running
make checkmust havestdbufinstalled throughbrew’scoreutilspackage.
- Thermal exchange tests by @hedara90 in #6536
- Air Balloon AI tests by @Pawkkie in #6604
- Big Root tests by @Bassoonian in #6601
- Test for Freeze vs Scald thaw by @AlexOn1ine in #6658
- Adds a whole bunch of new tests by @Bassoonian in #6685
Fixed
- Fixed Color Change test referring to the wrong mon by @hedara90 in #6644
- Fixed LGPE move test fail with
B_UPDATED_MOVE_DATAtoGEN_7by @AsparagusEduardo in #6657 - Use correct define for moves in test runner by @AsparagusEduardo in #6711
📚 Documentation 📚
- Consolidated “How to add Pokémon” tutorials by @AsparagusEduardo in #6541
- Documentation by @hedara90 in #6576
- Add clarification for underlying math in EV caps by @Bassoonian and @i0brendan0 in #6580
- Add clarification for EVO_SCRIPT_TRIGGER_DMG by @Bassoonian in #6579
📦 Branch Synchronisation 📦
pret
New Contributors
- @malad1211 made their first contribution in #6510
Full Changelog: https://github.com/rh-hideout/pokeemerald-expansion/compare/expansion/1.11.1...expansion/1.11.2
Version 1.11.1
## How to update
- If you haven't set up a remote, run the command `git remote add RHH https://github.com/rh-hideout/pokeemerald-expansion`.
- Once you have your remote set up, run the command `git pull RHH expansion/1.11.1
`.
🧬 General 🧬
Added
- Added workflow for labels check by @hedara90 in #6488
Changed
- metaprogram.h without global.h by @mrgriffin in #6469
- Rename removelishtscreenreflect to removescreens by @AlexOn1ine in #6495
Fixed
- Fix Melmetal’s weight by @kittenchilly in #6382
- B_FAST_INTRO_PKMN_TEXT fix by @hedara90 in #6395
- remove/replace IsAlly leftovers by @cawtds in #6399
- Increase dex no digits from 3 to 4 by @PCG06 in #6484
🗺️ Overworld 🗺️
Changed
- Replace Incorrect Slow Stairs Movement with Correct One by @Deokishisu in #6275
Fixed
- Fix compile errors with OW_BATTLE_ONLY_FORMS set to FALSE by @hedara90 in #6400
- Include Missed
GetInteractedMetatileScriptEntries for Mart & Center Signs by @Deokishisu in #6269 - Fix DexNav search level by @cawtds in #6421
- Hide in-battle types from Union Room trade request by @aronson in #6489
🐉 Pokémon 🐉
Fixed
- Fixed Zacian/Zamazenta learning Iron head while already knowing by @hedara90, @wiz1989 reported the issue, in #6365
- Fix roamers having 0 hp on repeat encounters by @danaYatsuta in #6366
- Fixed unfusion of traded materials by @hedara90, @mrgriffin found the issue, in #6415
⚔️ Battle General ⚔️
Changed
- Fix Red Card overwriting gBattlerAttacker by @ghoulslash in #6376
- Fixes Magic Coat message when move is bounced back by @AlexOn1ine in #6419
Fixed
- Reorder Dancer activation by @PhallenTree in #6379
- Fixes crash damage move against absorbing abilities by @AlexOn1ine in #6361
- Fixes gimmick icon flying off the screen by @PhallenTree in #6401
- Fixed Parental Bond with two-turn attacks by @hedara90 in #6408
- Wrong argument usage in
CalcCritChanceStageby @AlexOn1ine in #6429 - Fixes Neutralizing Gas Exits, Weather Abilities and Terrain Effects order by @PhallenTree in #6435
- Fixes hazards not respecting tera types by @AlexOn1ine in #6431
- Fixes dynamax reversion when ejected out + anim fix by @AlexOn1ine in #6416
- Fixes negative priority being blocked by dazzling abilities by @AlexOn1ine in #6433
- Fixes Cotton Spore failing if one of the targets blocks it by @AlexOn1ine in #6418
- Fixes Toxic Spikes Absorbed message by @PhallenTree in #6448
- Fixes Cheek Pouch mutating damage by @AlexOn1ine in #6466
- Fixes choice move locking at the wrong time by @AlexOn1ine in #6467
- Fixes protective pads against Protects secondary effects by @AlexOn1ine in #6474
- Fixes clear body type effect and clear amulet against protect effects by @AlexOn1ine in #6482
- Fixes Aftermath ability popup message by @AlexOn1ine in #6491
- Fixes Emergency Exit and Eject Pack by @AlexOn1ine in #6459
- Fixes Hospitality not being blocked by Heal Block by @AlexOn1ine in #6494
- Fixes timesGotHit not increasing on forced switch out by @AlexOn1ine in #6493
- Fixes Destiny Bond against Dynamax no failing by @AlexOn1ine in #6501
🤹 Moves 🤹
Fixed
- Fixed Ivy Cudgel types with type changes by @hedara90 in #6369
- Adds move description battle config by @AlexOn1ine in #6364
- Fix Jet Punch in isolated tests by @hedara90 in #6461
- Sucker punch vs struggle by @hedara90 in #6475
🤖 Battle AI 🤖
Changed
- Update Battle Debug menu with new AI flags by @kittenchilly in #6444
Fixed
- Fixed AI_FLAG_CHECK_VIABILITY changing the toxic counter in some cases by @hedara90, @iriv24 discovered the issue, in #6402
- Fix Focus Sash being considered in switch AI’s hits to KO calcs by @Pawkkie in #6436
- AI gimmick check changed from checking trainer data to a BattleStruct field by @hedara90 in #6478
- Fix hit escape ace mon switching by @Pawkkie and @wiz1989, @AlexOn1ine in #6498
🧹 Other Cleanup 🧹
- Update AI_TryTo2HKO comment by @Pawkkie in #6349
- Fixing grammar of Berry Tree strings by @surskitty in #6355
- Berry trees berries are no longer erroneously plural.
- Move category test cleanup by @hedara90 in #6447
- Fixes Magic Coat message when move is bounced back by @AlexOn1ine in #6419
- Update Battle Debug menu with new AI flags by @kittenchilly in #6444
- Rename removelishtscreenreflect to removescreens by @AlexOn1ine in #6495
🧪 Test Runner 🧪
Changed
- Fix Red Card overwriting gBattlerAttacker by @ghoulslash in #6376
- Move category test cleanup by @hedara90 in #6447
- Changed KNOWN_FAILING test by @hedara90 in #6492
Fixed
- Fixes Known Failing Mold Breaker Sleep Clause test by @PhallenTree in #6434
- Made memory integrity checks run betweeen PARAMETRIZE runs by @hedara90 and @mrgriffin in #6462
📚 Documentation 📚
- Fixed a missing ) in trainers.party comment block. by @RubyRaven6 in #6367
- Update README.md for contest src link by @lwelyk in #6375
New Contributors
- @RubyRaven6 made their first contribution in #6367
- @lwelyk made their first contribution in #6375
- @danaYatsuta made their first contribution in #6366
Full Changelog: https://github.com/rh-hideout/pokeemerald-expansion/compare/expansion/1.11.0...expansion/1.11.1
Version 1.11.0
## How to update
- If you haven't set up a remote, run the command `git remote add RHH https://github.com/rh-hideout/pokeemerald-expansion`.
- Once you have your remote set up, run the command `git pull RHH test
`.
🌋 REFACTORS 🌋
📜 = Uses a migration script.
- Pursuit refactor by @PhallenTree in #5707
- Atk Canceller refactor / reorder / clean up by @AlexOn1ine in #5885
- Battle Weather Refactor by @AlexOn1ine in #5833
- Replace WEATHER_HAS_EFFECT with HasWeatherEffect by @AlexOn1ine in #6069
- Cleaned up Trainer Slides, added automated Trainer Slide tests, add new Enemy Critical Hit Slide by @pkmnsnfrn and @AlexOn1ine, @hedara90, @AsparagusEduardo, @mrgriffin in #6018
- If users created new entries in sTrainerSlides, they will need to be ported to the new system.
- Introduces BattleTurnCounter to simplify timer checks by @AlexOn1ine in #6080
- Convert max effects to normal move effects by @AlexOn1ine in #6143
- Redefine IsBattlerAlive in battle.h as a static inline by @AlexOn1ine in #6211
- Consolidated Frontier teams into battle_frontier_trainers.h by @fdeblasio in #5892
🧬 General 🧬
Added
- Add Script Cmd for Forcing Save Game by @ghoulslash in #6090
- Trainer Party Pools by @hedara90 in #5731
- Documentation on how to use this can be found under
docs/tutorials/how_to_trainer_party_pool.md
- Documentation on how to use this can be found under
- Add Code Entry functionality by @Pawkkie and @PCG06 for the Mystery Gift iteration in #5951
Changed
- Added “Game Clear” flag toggle to debug menu by @AsparagusEduardo in #5929
- Initialize m4a and IRQ handler in a loaded section by @SBird1337 in #5912
- Debug menu and
createmonadditions/cleanup by @AsparagusEduardo in #5994- Added Tera Type, Dynamax Level, and Gigantamax Factor to the “Give Pokémon (complex)” debug menu option.
- Added
dmaxLeveloption togivemonandcreatemon. - Added
WEATHER_COUNT. - Cleaned up repeated code instances in debug menu.
- Fixed mislabel of
ggMaxFactoringivemonandcreatemon. Now it’sgmaxFactor.
- Introduces BattlerState struct for the Battle Engine by @AlexOn1ine and @mrgriffin provided the framework for this change in #5954
- Reorder Makefile rules so that pokeemerald-test.elf builds in build/test by @mrgriffin in #6004
- Use SET8 and SET32 consistently by @AZero13 in #5544
- Ewram and unused function cleanup sweep by @hedara90 in #6019
- Re-removed trainers.h trailing whitespace by @fdeblasio in #6048
- Add Steven Multi to debug menu by @Pawkkie in #6064
- Remove gDecompressionBuffer by @DizzyEggg in #6029
- Trainer Battle Parameter Consolidation by @u8-Salem in #5982
Breaking: raw uses of
trainerbattleneed to be adjusted to provide all possible parameter. Unused parameter musst be 0 or an alias. already parameterized macros liketrainerbattle_singlework out of the box. - Consolidated contest opponent filters into gContestOpponents by @fdeblasio in #6119
- Don’t use SeedRng some places where it isn’t necessary by @tertu-m in #6156
- Removed Trainer Slides footgun by @AsparagusEduardo in #6205
- Consolidate duplicate dialogue of nature girl in Battle Frontier by @fdeblasio in #6195
- Prevented fanfares from playing in headless mode by @pkmnsnfrn and @hedara90, @AsparagusEduardo in #6219
Fixed
- Don’t write to NULL in TryFindHiddenPokemon by @DizzyEggg in #5983
- Allow Party Menu with 0 Pokemon by @DizzyEggg in #5997
- Revert map related enum conversion by @hedara90 in #6078
- Revert “Revert map related enum conversion” by @hedara90 in #6079
- Revert “Converts a bunch of defines to enums” by @Bassoonian in #6082
- Fix upcoming not working on no cash by @DizzyEggg in #6121
- Add the header required for TPP tags to work by @hedara90 in #6162
- Fixed regression from master/upcoming merge by @AsparagusEduardo and @hedara90 , for doing the original merge when I couldn’t in #6199
- Fix Using a Safari Ball crashes the game #6206 by @ExMingYan in #6220
- Fixed typo in requests_effects by @hedara90 and @purrfectdoodle in #6215
- Try a new solution to Fix Safari #6206 by @ExMingYan in #6228
- Remove obsolete check for steven when retrieving partner name by @u8-Salem and @hedara90 in #6283
- Fix spit up getting skipped by @cawtds in #6295
🗺️ Overworld 🗺️
Added
- Adds Dexnav by @ghoulslash in #4818
- Fly from Pokenav by @khbsd in #5679
- Expanded Pokémon Follower transformation functionality by @AsparagusEduardo in #5048
Changed
- Arbitrary trainer scripts + on frame/trigger softlock prevention by @mrgriffin in #5033
- Removed OW_AUTO_SIGNPOST by @pkmnsnfrn in #5974
- Fix leftover test change from #5033 by @mrgriffin in #5987
- Match current gen behavior for battle environment after fishing by @kittenchilly in #6099
- Add Mega Evolution, Primal Reversion, and Ultra Necrozma overworld sprites by @khbsd in #5874
- Replaced hardcoded numbers in DexNav with variables by @fdeblasio in #6241
- Merrp merge (12th of February) by @hedara90 in #6244
- Adds a follower flag define to disable followers on the fly by @AlexOn1ine in #6174
Fixed
- Fix Trainer Hill OOB array access by @SBird1337 in #5930
- Revert #5033 change to MapHeaderRunScriptType by @mrgriffin in #5975
- Restore lock/lockall/locktrainer/release/releaseall in triggers by @mrgriffin in #5976
- Follower Object Event refactor by @hedara90 and @AsparagusEduardo in #6129
- Fixes
OBJ_EVENT_GFX_SPECIES_SHINY - Adds
OBJ_EVENT_GFX_SPECIES_FEMALEandOBJ_EVENT_GFX_SPECIES_SHINY_FEMALE
- Fixes
- Fixes Static Assert from pr #6174 by @AlexOn1ine in #6258
- Fixed Kecleon Shiny palette by @hedara90 in #6298
🐉 Pokémon 🐉
Added
- IV/EV Info on Summary Screen by @khbsd in #6027
- Add caught mon to full party by sending a different mon to the Box by @fakuzatsu in #6058
Changed
- Remove form change function footguns by @AsparagusEduardo and @AlexOn1ine for letting me know of this potential issue. in #5995
GetBattleFormChangeTargetSpecies,GetFormChangeTargetSpeciesandGetFormChangeTargetSpeciesBoxMonnow return the current species of the Pokémon instead ofSPECIES_NONEas a precaution to avoid accidental deletions of Pokémon when using these functions.
- Remove redundant calls to GetMonData in pokemon.c by @AZero13 in #5545
- Rename Furfrou Species tags to match Pokemon Showdown exports by @moostoet in #6041
- Add Mega Evolution, Primal Reversion, and Ultra Necrozma overworld sprites by @khbsd in #5874
- Add Poltchageist family form data by @Bassoonian and @wiz1989 in #6163
Fixed
- Evolution level 1 learn by @hedara90 in #5791
- Fixed non-regional forms breeding incorrectly by @AsparagusEduardo and @cawtds in #4985
- Fixed compilation error when turning P_GENDER_DIFFERENCES off by @AsparagusEduardo in #6223
- Reverted compound literal OW mon pic tables by @AsparagusEduardo in #6216
⚔️ Battle General ⚔️
Added
- Add B_FLAG_SLEEP_CLAUSE by @Pawkkie, @Pawkkie and @iriv24 in #5566
- Based on Smogon’s sleep clause [philosophy](https://www.smogon.com/xy/articles/clauses#:~:text=Sleep%20Clause,t%20be%20put%20to%20sleep.)
- Toggleable per-battle by setting / unsetting the flag assigned to B_FLAG_SLEEP_CLAUSE
- Variadic IS_BATTLER_OF_TYPE and GetBattlerTypes by @mrgriffin in #5708
- Simultaneous HP Reduction (CFRU Port) by @AsparagusEduardo and @AlexOn1ine for the port to expansion. @Skeli789 for the CFRU implementation. in #5770
- Destiny Bond fails on repeated use in Gen 7+ by @Pawkkie in #5652
- Adds Pledge Side Statuses as Starting Statuses by @AlexOn1ine in #5899
- Adds B_VAR_DIFFICULTY and related functions READ DESC by @pkmnsnfrn in #5337
- Config for move slot rearrangement in battle by @hedara90 and @ghoulslash for pointing out the exact point in the code where move slot rearrangement is handled. in #6017
- Move slot rearrangement is disabled by default in battle, set
B_MOVE_REARRANGEMENT_IN_BATTLEtoGEN_3to enable rearrangement again.
- Move slot rearrangement is disabled by default in battle, set
Changed
- Sleep Clause global config by @Pawkkie in #5762
- Pursuit refactor by @PhallenTree in #5707
- Changes Various defines to an Enum by @AlexOn1ine in #5839
- move overwrittenAbilities field to DisableStruct by @ghoulslash in #5946
- Battle Weather Refactor by @AlexOn1ine in #5833
- Easy customizable Hidden Move types by @AsparagusEduardo in #5872
gTypesInfonow has aisHiddenPowerTypefield that inserts them into the Hidden Power type calculation.- Warning: Changing this from the vanilla settings will change any existing Hidden Power’s type, and external calculators will not work either.
- Introduces BattlerState struct for the Battle Engine by @AlexOn1ine and @mrgriffin provided the framework for this change in #5954
- Cleaned up Trainer Slides, added automated Trainer Slide tests, add new Enemy Critical Hit Slide by @pkmnsnfrn and @AlexOn1ine, @hedara90, @AsparagusEduardo, @mrgriffin in #6018
- If users created new entries in sTrainerSlides, they will need to be ported to the new system.
- Introduces BattleTurnCounter to simplfy timer checks by @AlexOn1ine in #6080
- Replace BattleStruct members quickClawRandom/quickDrawRandom with locals by @AlexOn1ine in #6136
- Added Difficulty Fallback for Trainer Slides by @pkmnsnfrn in #6088
- CanAbilityX Function Cleanup by @ghoulslash in #6183
- Unify setreflect/setlightscreen and MOVE_EFFECT_REFLECT/LIGHT_SCREEN by @ghoulslash in #6196
Fixed
- Fix Sleep Clause AI handling of partner sleeping moves by @Pawkkie in #5761
- Fix fixed point damage calculation off-by-1s by @SBird1337 in #5775 Fixes a bunch of rounding errors that cause wrong outputs in the damage calculation.
- Fixes simu hp reduction when no partner was on field by @AlexOn1ine in #5799
- Fixes Regenerator healing past maxHP by @PhallenTree in #5861
- Fixes Pursuit + Emergency Exit causing double switches and Pursuit user fainting causing target to not finish switch by @PhallenTree in #5849
- Fixes regression caused by argument refactor by @AlexOn1ine in #5870
- Fixes Sparkling Aria Shield Dust / Covert Cloak interaction by @AlexOn1ine in #5911
- Battle Weather Refactor oversight by @AlexOn1ine in #5960
- Shell Bell Clean up / Simplification and Tests by @AlexOn1ine in #5924
- Dynamic move type was ignored in doubles for spread moves by @AlexOn1ine in #5984
- Fixes self effect moves not procing for spread moves when battler 3 w… by @AlexOn1ine in #6020
- Fix UB when accessing move result flags by @cawtds in #6030
- Fix Powder (status) config and some terrain timers not using gBattleTurnCounter by @PhallenTree in #6109
- Fix Powder config not checking for Powder status by @PhallenTree in #6113
- Fixes battler mutation during the intim script by @AlexOn1ine in #6151
- Fixes Dynamic Moves types in SumScreen while in Battle by @AlexOn1ine in #6145
- Fixes Dragon Tail missing timing against Rocky Helmet / Iron Barbs by @AlexOn1ine in #6154
- Prevent sameMoveTurns from incrementing when unable to use move by @moostoet in #6167
- Fixes Suction Cups ability popup and Red Card + Guard Dog interaction by @PhallenTree in #6171
- Fixed Unnerve message and wrote tests by @hedara90 in #6192
- Fixes Spectral Thief stealing boost at the wrong time by @AlexOn1ine in #6197
- Fixes BATTLER_TURN_DAMAGED battler id by @AlexOn1ine in #6236
- Fixed multi battle forced switches by @hedara90 in #6243
- Fixes ability Embody Aspect triggering multiple times by @AlexOn1ine in #6259
- Fixes Called moves ignoring redirection by @PhallenTree in #6267
- Fixes Protean not restoring types after ai damage calcs by @AlexOn1ine in #6280
- Restoretarget in Rototiller script + Tests by @AlexOn1ine in #6296
- Fixes inconsistency for Kings rock. by @AlexOn1ine in #6302
- Fixes Shell Bell for Spread Moves by @AlexOn1ine in #6303
- Fixes Brick Break/Psychic Fangs/Raging Bull breaking screens if target is immune by @PhallenTree in #6308
- Fixes doesnt effect message for Thunder Wave by @AlexOn1ine in #6304
- Fixes Tera Shell activating on moves that have no effect on target by @AlexOn1ine in #6271
- Fixes fainted battler being able to select an action by @PhallenTree in #6339
🤹 Moves 🤹
Added
- Added missing in-battle “Move Info” button prompt by @AsparagusEduardo and @TeamAquasHideout from who I got the source from and @BelialClover from who Archie got the source from. in #6155
Changed
- New Volt Switch Animation by @AlexOn1ine in #5729
- Refactors argument into a union by @AlexOn1ine in #5853
- Encapsulate move data by @AsparagusEduardo in #5852
- Removes Resource Flags and moves fields to DisableStruct by @AlexOn1ine in #5945
- Tera starstorm by @hedara90 in #6073
- Tachyon Cutter and Salt Cure animations by @hedara90 in #6182
- Heal Bell/Aromatherapy/Sparkly Swirl improvements and fixes by @AsparagusEduardo in #6210
- Removed
EFFECT_SPARKLY_SWIRLin favor ofMOVE_EFFECT_AROMATHEROPY.
- Removed
- Moved sValidApprenticeMove into gMovesInfo by @fdeblasio in #6254
- Fixes non-Ghost type Curse animation by @PhallenTree in #6299
- Remove pursuitSwitchByMove and additional if statement by @PhallenTree in #6326
Fixed
- Fixes moves based on Dragon Darts with strikeCount > 2 always hitting the same battler from the second hit onwards by @PhallenTree in #5830
- Last fix for Sparkling Aria / Covert Cloak / Shield Dust interaction by @AlexOn1ine in #5956
- Added WEATHER_DOWNPOUR to Weather Ball’s dynamic type by @fdeblasio in #6100
- Fixed Future Sight not being affected by Electrify by @AsparagusEduardo in #6213
- Fixes Expanding Force and Spectral Thief move animations by @PhallenTree in #6185
- Made some move animations fit in VRAM by @hedara90 in #6289
🧶 Items 🧶
Fixed
- Adds missing Friend Ball friendship bonus upon catching by @PhallenTree in #5795
🤖 Battle AI 🤖
Added
- Smart Switching handles Soundproof by @Pawkkie and @Robdeezy for the idea! in #5703
- Add Revival Blessing AI by @Pawkkie in #5704
- Add AI_FLAG_WEIGH_ABILITY_PREDICTION by @Pawkkie and @khbsd and @ghoulslash for the idea, @AlexOn1ine and @mrgriffin for getting it working :) in #5636
- Add AI_FLAG_PREFER_HIGHEST_DAMAGE_MOVE by @Pawkkie in #6025
- Add AI_FLAG_PREDICT_SWITCH by @Pawkkie and @kithr1 in #6028
- Add AI_FLAG_PREDICT_INCOMING_MON: AI will score against predicted switchin if predicting switch by @Pawkkie in #6037
- Switch trapping AI will consider Trace by @Pawkkie in #6059
- AI adds score to Pursuit if it OHKOs by @Pawkkie in #6166
- Switch chance config support by @Pawkkie in #6187
- Config can be changed in config/ai.h
- Add function to adjust AI scoring for generalized item effects by @moostoet and @AlexOn1ine and @Pawkkie for the input on slight changes to make to the logic (config, no magic numbers…) in #6247
Changed
- Fixed AI not handling type effectiveness beyond x8 by @AsparagusEduardo and @/sshadowzkmao in #6127
- Removed the use of
AI_EFFECTIVENESS_in favor of storing the actual type effectiveness. - Renamed
AI_GetTypeEffectivenesstoAI_GetMoveEffectiveness, removing the original one.
- Removed the use of
- Remove global sBattler_AI by @AlexOn1ine in #6128
- SwitchType enum to clean up GetMostSuitableMonToSwitchInto by @Pawkkie in #6184
Fixed
- Eject item ace flag switch AI fixes by @Pawkkie and @wiz1989 for reporting the bug in #6098
- Fix Choice’d mons referring to incorrect move when switching by @Pawkkie and @/capncrunch in #6204
- Fix AI switching in absorbing mon incorrectly by @Pawkkie in #6227
- Improve Yawn and Status Switching by @Pawkkie and @/Chape for finding this behaviour in #6202
- Fix AI wrongly thinking it strikes first with priority even if player is using priority themselves by @moostoet in #6274
- Fix AI hazard move handling, minor AI tweaks by @Pawkkie and @ShadowzLmao2 in #6311
- Fix Overzealous Absorber Switching by @Pawkkie and @iriv24 and @ravepossum for squinting at a conditional for nearly 30mins with me to find a semicolon in #6318
- Fix Substitute / Shed Tail Switch AI by @Pawkkie in #6334
🧹 Other Cleanup 🧹
- Split “Do nothing” move effects by @AsparagusEduardo in #5613
- Sleep Clause global config by @Pawkkie in #5762
- Converts multi-choice options to COMPOUND_STRINGs by @fdeblasio in #5686
- Converted item-related variables to COMPOUND_STRINGs by @fdeblasio in #5714
- Adds SleepClauseBlock enum to CanBeSlept by @Pawkkie and @AlexOn1ine in #5773
- Swapped DESELECT and CHECK_TAG to be in right places by @fdeblasio in #5794
- Changes target TURN_DAMAGED and MAX_HP to inlines by @AlexOn1ine in #5822
- Changes Various defines to an Enum by @AlexOn1ine in #5839
- Remove fno-toplevel-reorder by @DizzyEggg in #5809
- Refactors argument into a union by @AlexOn1ine in #5853
- Clean up redundancy for mugshots by @AlexOn1ine in #5906
- Encapsulate move data by @AsparagusEduardo in #5852
- Initialize m4a and IRQ handler in a loaded section by @SBird1337 in #5912
- Remove EWRAM gHpDealt (not needed anymore) by @AlexOn1ine in #5925
- Fix DexNav static asserts by @Bassoonian in #5944
- Move overwrittenAbilities field to DisableStruct by @ghoulslash in #5946
- Converted 2 various to callnative by @AsparagusEduardo in #5950
- Removed
VARIOUS_SWAP_SIDE_STATUSESandVARIOUS_SWAP_STATS.
- Removed
- Shell Bell Clean up / Simplification and Tests by @AlexOn1ine in #5924
- Removed OW_AUTO_SIGNPOST by @pkmnsnfrn, @doejohn126 discovered the issue in #5974
- Fix leftover test change from #5033 by @mrgriffin in #5987
- Multiple removals of hardcoded move IDs by @AsparagusEduardo in #5964
- Missed two uses of new hazard type enum by @Pawkkie in #5996
- Debug menu and
createmonadditions/cleanup by @AsparagusEduardo in #5994- Added Tera Type, Dynamax Level, and Gigantamax Factor to the “Give Pokémon (complex)” debug menu option.
- Added
dmaxLeveloption togivemonandcreatemon. - Added
WEATHER_COUNT. - Cleaned up repeated code instances in debug menu.
- Fixed mislabel of
ggMaxFactoringivemonandcreatemon. Now it’sgmaxFactor.
- Free some IWRAM by @DizzyEggg in #6000
- Removes Resource Flags and moves fields to DisableStruct by @AlexOn1ine in #5945
- Future Sight Innards Out follow up for upcoming by @AlexOn1ine in #5998
- Remove redundant calls to GetMonData in pokemon.c by @AZero13 in #5545
- Use SET8 and SET32 consistently by @AZero13 in #5544
- Rename Furfrou Species tags to match Pokemon Showdown exports by @moostoet in #6041
- Rename DexNav flags and vars by @Bassoonian in #6044
- Re-removed trainers.h trailing whitespace by @fdeblasio in #6048
- Moved front animations frames to gSpeciesInfo by @AsparagusEduardo in #5605
- Clean up array access by using index instead of dereferencing the value by @AlexOn1ine in #6057
- Add a uniquely striking pair of brackets by @Pawkkie in #6068
- Replace WEATHER_HAS_EFFECT with HasWeatherEffect by @AlexOn1ine in #6069
- Converts a bunch of defines to enums by @Bassoonian in #6071
- Replaced
BATTLE_TERRAIN#defines with theBattleTerrainenum - Replaced
MAP_TYPE#defines with theMapTypeenum - Replaced
MAP_BATTLE_SCENE#defines with theMapBattleSceneenum - Replaced
BACK_ANIM#defines with theBackAnimenum - Replaced
ANIM#defines with theAnimFunctionIDsenum - Replaced
INGAME_TRADE#defines with theInGameTradeIDenum - Replaced
TRAINER_CLASS#defines with theTRAINER_CLASSenum
- Replaced
- Return the universe to a state of balanced quilibrium by @Pawkkie in #6074
- Cleaned up Debug Menu by @AsparagusEduardo in #6070
- Remove gDecompressionBuffer by @DizzyEggg in #6029
- Cleaned up Trainer Slides, added automated Trainer Slide tests, add new Enemy Critical Hit Slide by @pkmnsnfrn and @AlexOn1ine, @hedara90, @AsparagusEduardo, @mrgriffin in #6018
- If users created new entries in sTrainerSlides, they will need to be ported to the new system.
- Terrain function standarization by @fdeblasio in #6097
- Updated trainer pic tutorial by @fdeblasio in #6049
- Remove UnusedBattleInit from battle_bg.c by @DizzyEggg in #6116
- Consolidated contest opponent filters into gContestOpponents by @fdeblasio in #6119
- Replace BattleStruct members quickClawRandom/quickDrawRandom with locals by @AlexOn1ine in #6136
- Updated Trainer Ids used in Trainer Slides tests by @pkmnsnfrn and @AlexOn1ine found the original bug, @AsparagusEduardo confirmed it in #6138
- Added Difficulty Fallback for Trainer Slides by @pkmnsnfrn in #6088
- Clean up follow up for Simultaneous Reduction HP by @AlexOn1ine in #6139
- Remove global sBattler_AI by @AlexOn1ine in #6128
- Clarify MOVE_EFFECT_SLEEP sleep clause handling by @Pawkkie in #6161
- Remove unused PainSplit scripting global by @AlexOn1ine in #6164
- Don’t use SeedRng some places where it isn’t necessary by @tertu-m in #6156
- Cleaned up party data access GetPartyBattlerData by @AsparagusEduardo in #6172
- Changed two LocalRandom calls to new LocalRandom32 by @hedara90 in #6173
- Cleanup some global battler ID usage by @ghoulslash in #6181
- Clean up - Add ability args instead of calcing the ability again by @AlexOn1ine in #6186
- CanAbilityX Function Cleanup by @ghoulslash in #6183
- SwitchType enum to clean up GetMostSuitableMonToSwitchInto by @Pawkkie in #6184
- Unify setreflect/setlightscreen and MOVE_EFFECT_REFLECT/LIGHT_SCREEN by @ghoulslash in #6196
- Removed Trainer Slides footgun by @AsparagusEduardo in #6205
- Fix typo in Nuzzle’s description by @Bassoonian in #6209
- Consolidate duplicate dialogue of nature girl in Battle Frontier by @fdeblasio in #6195
- Fixed missing move encapsulation in upcoming by @AsparagusEduardo in #6226
- Consolidated Frontier teams into battle_frontier_trainers.h by @fdeblasio in #5892
- Add abstraction layer for battler positions by @AlexOn1ine in #6212
- Revert unintentional change by @AlexOn1ine in #6239
- Remove whitespace from trainers data file by @AsparagusEduardo in #6234
- Replaced hardcoded numbers in DexNav with variables by @fdeblasio in #6241
- fix for battle ui for add to party menu (#6229) by @fakuzatsu in #6240
- Changed bit order for follower graphicsId creation by @hedara90 in #6249
- Minor Clean up for CanAbilityX. Follow up for #6183 by @AlexOn1ine in #6252
- Moved sValidApprenticeMove into gMovesInfo by @fdeblasio in #6254
- Use more accurate count in MovesInfo by @AlexOn1ine in #6260
- Fix Extra
task->tState++andbreakinTask_DrawFieldMessageBoxby @Deokishisu in #6261 - Expand usage of IsBattlerAlly (rename from IsAlly) by @AlexOn1ine in #6251
- Rename SetPhotonGeyser to a more general use and clean up by @AlexOn1ine in #6272
- Fix padding amount in MoveInfo by @AlexOn1ine in #6307
- Refactor testing flags and vars to not conflict with user ones by @hedara90 in #6301
- Clean up leftover from simu hp reduction development by @AlexOn1ine in #6323
- Remove pursuitSwitchByMove and additional if statement by @PhallenTree in #6326
🧪 Test Runner 🧪
Changed
- New Ally Switch test fails on CI by @AlexOn1ine in #5896
- Added final Sparkling Aria+Shield Dust interaction test by @hedara90 in #5923
- Converted 2 various to callnative by @AsparagusEduardo in #5950
- Removed
VARIOUS_SWAP_SIDE_STATUSESandVARIOUS_SWAP_STATS.
- Removed
- Cleaned up Trainer Slides, added automated Trainer Slide tests, add new Enemy Critical Hit Slide by @pkmnsnfrn and @AlexOn1ine, @hedara90, @AsparagusEduardo, @mrgriffin in #6018
- If users created new entries in sTrainerSlides, they will need to be ported to the new system.
- Tests for Big Pecks by @hedara90 in #6158
- Water Compaction tests by @hedara90 in #6159
- Wrote tests for Electrify by @hedara90 in #6179
- Sheer Force Test Fixes by @ghoulslash in #6198
- Minor Terrain Seed Test Improvement by @ghoulslash in #6207
- Fix Liquid Ooze + Leech Seed Test by @ghoulslash in #6217
- Prevented fanfares from playing in headless mode by @pkmnsnfrn and @hedara90, @AsparagusEduardo in #6219
- Added test support for 5 battle configs by @AsparagusEduardo in #5914
- Added missing Dream Eater and Reflect Type tests by @AsparagusEduardo in #6245
- Refactor testing flags and vars to not conflict with user ones by @hedara90 in #6301
Fixed
- Fix ASSUMPTIONS not working by @DizzyEggg in #5869
- Updated Trainer Ids used in Trainer Slides tests by @pkmnsnfrn and @AlexOn1ine found the original bug, @AsparagusEduardo confirmed it in #6138
- Adjusted G-Max Depletion test by @AsparagusEduardo and @AlexOn1ine for being a cool dude being patient with me during the PR. in #6201
- Do not add TRAINER_FLAG_DOUBLE_BATTLE to recorded battles by @mrgriffin in #6285
- Fixes Brick Break/Psychic Fangs/Raging Bull breaking screens if target is immune by @PhallenTree in #6308
📚 Documentation 📚
- Updating install instructions by @hedara90 in #5610
- Install instructions have been moved into individual files under
docs/install/
- Install instructions have been moved into individual files under
- Documentation for DisableStruct by @AlexOn1ine in #6066
- Cleaned up Trainer Slides, added automated Trainer Slide tests, add new Enemy Critical Hit Slide by @pkmnsnfrn and @AlexOn1ine, @hedara90, @AsparagusEduardo, @mrgriffin in #6018
- If users created new entries in sTrainerSlides, they will need to be ported to the new system.
- Updated trainer pic tutorial by @fdeblasio in #6049
- Update how_to_testing_system.md by @hedara90 in #6281
📦 Branch Synchronisation 📦
pret
- 11th of February in #6231
New Contributors
- @khbsd made their first contribution in #5679
- @ExMingYan made their first contribution in #6220
- @Deokishisu made their first contribution in #6261
Full Changelog: https://github.com/rh-hideout/pokeemerald-expansion/compare/expansion/1.10.2...test
Version 1.10.3
## How to update
- If you haven't set up a remote, run the command `git remote add RHH https://github.com/rh-hideout/pokeemerald-expansion`.
- Once you have your remote set up, run the command `git pull RHH test
`.
🧬 General 🧬
Fixed
- Fix Using a Safari Ball crashes the game #6206 by @ExMingYan in #6220
- Try a new solution to Fix Safari #6206 by @ExMingYan in #6228
- Remove obsolete check for steven when retrieving partner name by @u8-Salem and @hedara90 in #6283
- Fix spit up getting skipped by @cawtds in #6295
🗺️ Overworld 🗺️
Changed
- Merrp merge (12th of February) by @hedara90 in #6244
Fixed
- Follower Object Event refactor by @hedara90 and @AsparagusEduardo in #6129
- Adds
OBJ_EVENT_GFX_SPECIES_FEMALEandOBJ_EVENT_GFX_SPECIES_SHINY_FEMALE
- Adds
- Fixed Kecleon Shiny palette by @hedara90 in #6298
- Shifted the follower graphicsIds by @hedara90 in #6329
🐉 Pokémon 🐉
Changed
- Add Poltchageist family form data by @Bassoonian and @wiz1989 in #6163
Fixed
- Fixed non-regional forms breeding incorrectly by @AsparagusEduardo and @cawtds in #4985
- Fixed compilation error when turning P_GENDER_DIFFERENCES off by @AsparagusEduardo in #6223
⚔️ Battle General ⚔️
Fixed
- Fixes battler mutation during the intim script by @AlexOn1ine in #6151
- Fixes Dynamic Moves types in SumScreen while in Battle by @AlexOn1ine in #6145
- Fixes Dragon Tail missing timing against Rocky Helmet / Iron Barbs by @AlexOn1ine in #6154
- Prevent sameMoveTurns from incrementing when unable to use move by @moostoet in #6167
- Fixes Suction Cups ability popup and Red Card + Guard Dog interaction by @PhallenTree in #6171
- Fixed Unnerve message and wrote tests by @hedara90 in #6192
- Fixes Spectral Thief stealing boost at the wrong time by @AlexOn1ine in #6197
- Fixes BATTLER_TURN_DAMAGED battler id by @AlexOn1ine in #6236
- Fixed multi battle forced switches by @hedara90 in #6243
- Fixes ability Embody Aspect triggering multiple times by @AlexOn1ine in #6259
- Fixes Called moves ignoring redirection by @PhallenTree in #6267
- Fixes Protean not restoring types after ai damage calcs by @AlexOn1ine in #6280
- Restoretarget in Rototiller script + Tests by @AlexOn1ine in #6296
- Fixes Brick Break/Psychic Fangs/Raging Bull breaking screens if target is immune by @PhallenTree in #6308
- Fixes intimidate missing timing during a mega evo / switch by @AlexOn1ine in #6322
- Fixes Coaching on semi-invulnerable ally, Air Balloon being stolen, Immunity abilities being ignored by Mold Breaker by @PhallenTree in #6327
- Fixes effect paralyze not being absorbed by absorbing abilities by @AlexOn1ine in #6338
- Added MOVE_TARGET_OPPONENT and added it to Me First, by @hedara90 in #6336
- Fixes recoil moves causing recoil when absorbed by @AlexOn1ine in #6341
- Fixed protect not resetting the counter in earlier gens by @hedara90 in #6342
🤹 Moves 🤹
Added
- Added missing in-battle “Move Info” button prompt by @AsparagusEduardo and @TeamAquasHideout from who I got the source from and @BelialClover from who Archie got the source from. in #6155
Changed
- Fixes non-Ghost type Curse animation by @PhallenTree in #6299
Fixed
- Fixed Future Sight not being affected by Electrify by @AsparagusEduardo in #6213
- Fixes Expanding Force and Spectral Thief move animations by @PhallenTree in #6185
🧶 Items 🧶
Fixed
- Fixed curing status2 with items in double battles by @hedara90 and @wiz1989 in #6335
🤖 Battle AI 🤖
Fixed
- Fix AI wrongly thinking it strikes first with priority even if player is using priority themselves by @moostoet in #6274
- Big Root AI Fix by @Pawkkie in #6309
- Fix AI hold effect considerations by @Pawkkie in #6310
- fix for multi 2vs1 opponent sends out too many mons bug by @Bivurnum in #6324
🧹 Other Cleanup 🧹
- Cleanup some global battler ID usage by @ghoulslash in #6181
- Fix typo in Nuzzle’s description by @Bassoonian in #6209
- Remove whitespace from trainers data file by @AsparagusEduardo in #6234
- Changed bit order for follower graphicsId creation by @hedara90 in #6249
- Use more accurate count in MovesInfo by @AlexOn1ine in #6260
- Fix Extra
task->tState++andbreakinTask_DrawFieldMessageBoxby @Deokishisu in #6261 - Resized gimmick indicators to reduce VRAM usage by @hedara90 in #6319
🧪 Test Runner 🧪
Changed
- Tests for Big Pecks by @hedara90 in #6158
- Water Compaction tests by @hedara90 in #6159
- Wrote tests for Electrify by @hedara90 in #6179
- Sheer Force Test Fixes by @ghoulslash in #6198
- Minor Terrain Seed Test Improvement by @ghoulslash in #6207
- Added test support for 5 battle configs by @AsparagusEduardo in #5914
- Added missing Dream Eater and Reflect Type tests by @AsparagusEduardo in #6245
Fixed
- Fixes Brick Break/Psychic Fangs/Raging Bull breaking screens if target is immune by @PhallenTree in #6308
📚 Documentation 📚
- Update how_to_testing_system.md by @hedara90 in #6281
- Update SCOPE.md with Intergenerational Feature Compatibility by @Pawkkie in #6325
📦 Branch Synchronisation 📦
pret
- 11th of February in #6231
New Contributors
- @ExMingYan made their first contribution in #6220
- @Deokishisu made their first contribution in #6261
- @Bivurnum made their first contribution in #6324
Full Changelog: https://github.com/rh-hideout/pokeemerald-expansion/compare/expansion/1.10.2...test
Version 1.10.2
## How to update
- If you haven't set up a remote, run the command `git remote add RHH https://github.com/rh-hideout/pokeemerald-expansion`.
- Once you have your remote set up, run the command `git pull RHH expansion/1.10.2`.
🧬 General 🧬
Changed
- Add manual breaking back to “What will (mon) do?” message by @kittenchilly in #5908
Fixed
- Explicitly specify dependencies for teachable learnset helper by @ravepossum in #6015
- Add dependency on json files to learnset helper by @ravepossum in #6083
🗺️ Overworld 🗺️
Fixed
- Field effect for cutting grass is missing setfieldeffectargument. Issue #5766 by @shachar700 and @kasenn for finding the source of the issue, @hedara90 for the help with github in #5952
- Fix Match Call Behavior (#5931) by @MercedesCL in #6033
- Fixes HGSS dex not compiling currently by @hedara90 in #6051
- Fixed Liquid Voice’s dynamic type for normal moves by @fdeblasio in #6092
- Fix Crash if something costs 0 in shop by @DizzyEggg in #6106
- Fixed Hoenn dex off by 1 issues by @fdeblasio in #6104
🐉 Pokémon 🐉
Changed
- Add Clodsire second frame and fixed Grookey backsprite + overworld by @kittenchilly in #6047
- Duraludon battle animation by @Cafeei in #6086
Fixed
- Fix Enamorus not changing forms by @Bassoonian in #6093
⚔️ Battle General ⚔️
Changed
- Adds static assert for
DamageCalculationDataby @AlexOn1ine in #6063
Fixed
- Fixes Trainer Slide messages causing corruption for recoil damage by @AlexOn1ine in #5926
- Fixes broken link battles by @hedara90 and @AsparagusEduardo for finding out that the
gBitTableremoval was the source of the bug. in #5940 - fixed interaction between Innards Out and Future Sight by @wiz1989 in #5966
- Fixes various Dynamax HP conversions/calculations by @PhallenTree in #5933
- Fixes Parting Shot / Eject Pack interaction by @AlexOn1ine in #5963
- Fixes Shell Bell including heal amount from Future Sight when triggered by @AlexOn1ine in #5962
- Fixes Tera giving boost to dynamic bp moves by @AlexOn1ine in #6008
- Fixes Z-Move trigger sprite on B button exit by @AlexOn1ine in #6009
- Fixed multiple transform/form change graphical issues by @AsparagusEduardo in #6005
- Dynamax and Tera color tinting now stays during Transform/Form Change animations.
- Dynamax no longer resets Transformed mon sprites.
- Transform no longer transforms into a Gigantamax Pokémon unless the transformee has Gigantamax Factor and transforms into a base form with a Gigantamax Form.
- Fixes defrosting if frozen mon is not damaged by opponent by @AlexOn1ine in #6016
- Fix Redirection Abilities Not Drawing in Ally Moves by @ghoulslash in #6026
- fixed bug giving immunity to full-paralysis when B_MAGIC_GUARD is >= GEN_4 by @AERDU in #6032
- Fixes large battle messages being cut off instead of being prompted to advance by @PhallenTree in #6052
- Fixes Rapid Spin / Toxic Debris interaction by @AlexOn1ine in #6023
- Fixes Eject Pack triggering twice on Intimidate by @AlexOn1ine in #6072
- Trainerslide animation fix by @hedara90 in #6040
B_ENEMY_MON_SHADOW_STYLEset toGEN_LATESTsince that setting no longer interferes with trainerslides. Set it toGEN_3to use regular Gen 3 shadow style.
- Fixes Charge effect not boosting and tests by @AlexOn1ine in #6102
- Fix seeds softlocking the game when a battler with a Surge ability enters the field by @PhallenTree in #6110
- Fix MindBlown crash on MyBoy/No Cash by @DizzyEggg in #6112
- Fix Double Iron Bash move animation crash on MyBoy/No$ by @DizzyEggg in #6114
- Fix safari zone crash on No Cash by @DizzyEggg in #6132
🤹 Moves 🤹
Fixed
- Fixed a bunch of move anims by @hedara90 in #5936
🧶 Items 🧶
Changed
- Added the Gen. 4+ berries to gBerryCrush_BerryData by @LOuroboros in #5937
Fixed
- Reverts wrongly done partial Eject Pack fix by @AlexOn1ine in #5928
🤖 Battle AI 🤖
Fixed
- Fix Entrainment AI scoring bug by @Pawkkie in #6056
- Removed stray semi-colon in AI code by @hedara90 in #6134
🧹 Other Cleanup 🧹
- Clear unneeded braces from 5922 by @Pawkkie in #5927
- Removed references to
HANDLE_EXPANDED_MOVE_NAMEin docs by @AsparagusEduardo in #5955 - Rename
AI_FLAG_PREFER_STRONGEST_MOVEby @Pawkkie in #5972 - Removed
OW_AUTO_SIGNPOSTby @AlexOn1ine in #5978 CreateFacilityMonerror:'personality' may be used uninitializedby @DizzyEggg in #5981- PlayerHandleStatusXor - change
u8tou32by @DizzyEggg in #5988 - Follow up for Innards Out / Future Sight interaction by @AlexOn1ine in #5967
- Remove out of bounds
gSpritesaccess in move relearner by @DizzyEggg in #5991 - Use
gCurrentMoveinstead of checking0xFFmove by @AlexOn1ine in #5999 - Wrong undefs by @AlexOn1ine in #6024
- Fixed whitespace issue with trainerproc by @AsparagusEduardo in #6042
- Remove redundant line in
Cmd_setchargeby @AlexOn1ine in #6053 - Put Identifier and smol in gitignore by @DizzyEggg in #6105
- Move flag fixes by @fdeblasio in #6107
- Remove
formToChangeInto(Unused) by @AlexOn1ine in #6137
🧪 Test Runner 🧪
Changed
- Insomnia test used the wrong move in Turn section by @AlexOn1ine in #5939
- Updated Makefile to allow for the creation of specific tests by @pkmnsnfrn and @mrgriffin in #5993
- Adds Liquid Ooze and Aromatic Mist test by @AlexOn1ine in #6012
- Improved Hidden Power test by @AsparagusEduardo and @hedara90, who recommended this implementation. in #6014
- Add known failing learnset cap test by @Bassoonian in #6046
- Fix Symbiosis Needing battler Argument + Tests by @ghoulslash in #6039
- Added some
TO_DOtests by @hedara90 in #6140
Fixed
- Fixed Gimmick tests failing when running first by @AsparagusEduardo in #6001
- Ported Makefile fix from upcoming by @hedara90 and @mrgriffin Wrote the fix on upcoming in #6007
📚 Documentation 📚
- Fix formatting in
WSL.mdby @Cafeei in #5942 - Update scope.md by @Pawkkie in #5948
- Removed references to
HANDLE_EXPANDED_MOVE_NAMEin docs by @AsparagusEduardo in #5955 - Update scope.md (again) by @Pawkkie and @kithr1 in #5971
- Codify new expansion release schedule by @pkmnsnfrn and @Pawkkie in #5916
- Workflow for Scope Discussion by @Pawkkie in #6022
- Update
constants/pokemon.hwith nature comments by @bassforte123 in #6133
📦 Branch Synchronisation 📦
pret
- 17 of January in #6045
- Slight contest documentation by @AsparagusEduardo in pret#2078
- Update vars.h (cleanup) by @shachar700 in pret#2082
- missing const in extern gBasicHitSplatSpriteTemplate by @DizzyEggg in pret#2083
- extern gAncientPowerRockSpriteTemplate fix by @DizzyEggg in pret#2084
- remove undef TASK_NONE from list_menu by @DizzyEggg in pret#2085
- Fix CaveTransition pals by @DizzyEggg in pret#2095
- Define field script opcode constants by @rayrobdod in pret#2005
- Document bard music by @GriffinRichards in pret#2053
- Extern gSprites and gOamMatrices with known array size by @DizzyEggg in pret#2090
- Fix conflicting types for rotating gate functions by @DizzyEggg in pret#2087
New Contributors
- @shachar700 made their first contribution in #5952
- @MercedesCL made their first contribution in #6033
- @bassforte123 made their first contribution in #6133
Full Changelog: https://github.com/rh-hideout/pokeemerald-expansion/compare/expansion/1.10.1...expansion/1.10.2
Version 1.10.1
## How to update
- If you haven't set up a remote, run the command `git remote add RHH https://github.com/rh-hideout/pokeemerald-expansion`.
- Once you have your remote set up, run the command `git pull RHH expansion/1.10.1`.
🧬 General 🧬
Added
- Added
FONT_SHORT_NARROWERby @AsparagusEduardo (commit originally by @agsmgmaster64) in #5101- Narrower font tweaks and font fitting fixes by @kittenchilly in #5782
Changed
- Adds Thief/Covet config to send stolen item to bag and Pickup config to pickup user’s item in wild battles by @PhallenTree in #5829
Fixed
- trainerproc: Fix showing incorrect error context by @mrgriffin in #5769
- Fixes UB in caps.c by @AlexOn1ine in #5878
🗺️ Overworld 🗺️
Fixed
- Fix Off-by-One Error in Move Relearner by @iriv24 and @luckytyphlosion in #5778
- Fix HGSS dex sort orders working incorrectly by @ravepossum in #5790
- Egg cycle length fix by @hedara90 and @/BolaDeQueijo on discord discovered the issue. in #5828
- Fixed givemon not respecting perfect IVs for species by @AsparagusEduardo in #5873
- Also removed redundant
RemoveIVIndexFromListfunction insrc/daycare.c, so it usessrc/pokemon.c’s instead
- Also removed redundant
- Fix Script Scrollable Multichoice Arrow Positions by @ghoulslash in #5884
🐉 Pokémon 🐉
Changed
- Updated Ogerpon, Enamorus and Sinistcha sprites by @kittenchilly in #5793
- New Enamorus-Incarnate sprite by @kittenchilly in #5797
Fixed
- Fixes Wormadam define for teachable learnset script by @AlexOn1ine in #5783
- Fix “PlantCloak” references by @AsparagusEduardo in #5821
- Misc pokemon sprite fixes by @Cafeei in #5846
⚔️ Battle General ⚔️
Changed
- Adds Thief/Covet config to send stolen item to bag and Pickup config to pickup user’s item in wild battles by @PhallenTree in #5829
Fixed
- Fixes items preventing other switch in effects by @AlexOn1ine in #5732
- Fix Pokemon with No Guard failing OHKO Moves into Semi-Invulnerable Pokemon by @iriv24 and @Cafeei in #5779
- Fix move category and category icon when PSS is off by @ravepossum in #5786
- Added the missing config to use new terrains by @hedara90 in #5792
- Fixes Shed Tail substitute health by @AlexOn1ine in #5826
B_LAST_USED_BALLand.importanceby @AERDU in #5834- prevents
B_LAST_USED_BALLfrom removing balls with.importance = 1
- prevents
- Fixes Quash-affected battlers having the wrong order for End Turn effects by @PhallenTree in #5838
- Fixes Cotton Down and Gulp Missile not interacting correctly with stat reduction prevention effects by @PhallenTree in #5841
- Fix Hit Escape moves giving Exp to the mon that switches in by @kittenchilly in #5844
- Fixed Wish triggering Disguise by @AsparagusEduardo in #5860
- Fixed
MOVE_EFFECT_FREEZE_OR_FROSTBITEnot being usable in battle scripts by @AsparagusEduardo in #5859 - Fixed Ally Switch breaking Illusion by @AsparagusEduardo in #5879
- Fixes gen3 Style Shadows out of place by @AlexOn1ine in #5880
- Fix Salt Cure script by @ghoulslash in #5895
- Fixes Eject Pack / Intimidate issue by @AlexOn1ine in #5902
- Adds Generational config for Magic Guard (Fix for Gen4+) by @AlexOn1ine in #5893
- Fixes Stance Change, Sleep Talk interaction by @AlexOn1ine in #5909
- Fixes Round doubling it’s BP if previous Round failed by @AlexOn1ine in #5907
🤹 Moves 🤹
Fixed
- Fixes absorb still draining HP when flinched by @AlexOn1ine in #5814
- Fixes Tidy Up by @AlexOn1ine in #5819
- Ally Switch extra battlerId tracking by @ghoulslash in #5823
- Sheer Force fix and move effect cleanup by @AlexOn1ine in #5812
- New U-turn animation to fix visibility by @AlexOn1ine in #5910
🧶 Items 🧶
Fixed
- Prevent Key Items that open other menus from causing a crash if registered and used from the field by @iriv24 in #5810
- Fixes Clear Amulet displaying the wrong battler and Starting Status displaying the wrong message by @PhallenTree in #5831
- Fixes Room Service lowering the opposite mon in specific scenario by @AlexOn1ine in #5827
🤖 Battle AI 🤖
Fixed
- Fixed ace switching bugs by @Pawkkie and @iriv24 for their diligent testing and debugging support in #5922
🧹 Other Cleanup 🧹
- Converted Stance Change to proper Form Change + Tests by @AsparagusEduardo in #5749
- Removed testing strings for automatic line breaks by @hedara90 in #5757
- Added NBSP and up+down arrows to all fonts by @hedara90 in #5767
- Use
~or{NBSP}to insert a non-breaking space into a string.
- Use
- Palette cleanup by @hedara90 in #5661
- Resized some move anim palettes from 256 to 16
- Replace power checks with IS_MOVE_STATUS by @Bassoonian and @AsparagusEduardo in #5820
- Changes Various defines to an Enum by @AsparagusEduardo in #5840
- Fix
IS_MOVE_STATUSregression by @Bassoonian in #5848 - Remove unused various by @Bassoonian in #5851
- Removed redundant call to FillPalBufferBlack in FRLG whiteout sequence by @AsparagusEduardo in #5854
- Improve README.md by @AsparagusEduardo in #5640
- Fix wrong value for NUM_MOVE_EFFECTS by @Bassoonian in #5913
- Renamed OW type effectiveness function for clarity by @AsparagusEduardo in #5917
- Renamed
GetTypeEffectivenesstoGetOverworldTypeEffectiveness.
- Renamed
🧪 Test Runner 🧪
Changed
- Gravity fix + Sky Drop Test by @ghoulslash in #5780
- Added missing Belch tests by @AsparagusEduardo in #5881
- Added missing Move Effect TODO tests - Volume D by @AsparagusEduardo in #5887
- Comment out Ally Switch Illusion test by @AsparagusEduardo in #5901
- Fixed leaking tasks not showing up in summary by @AsparagusEduardo in #5890
- Setting Battle configs during tests by @AsparagusEduardo and @SBird1337, @mrgriffin in #5803
- Speed up tests in headless mode by @AsparagusEduardo and @SBird1337 for the original fast intro code. in #5889
- This introduced the config option
B_FAST_INTRO_NO_SLIDEwhich removes the sliding into for battles.
- This introduced the config option
- Added missing Move Effect TODO tests - Volume E by @AsparagusEduardo in #5915
Fixed
- Fix test
TIMEOUTmessaging in summary by @AsparagusEduardo in #5772 - Fix octolock + defiant by @ghoulslash in #5781
- Added missing tests + Fix Coaching/Crafty Shield interaction by @AsparagusEduardo in #5796
- Fixed TODO tests not showing up when filtering by name by @AsparagusEduardo in #5894
📚 Documentation 📚
- Fixed changelog links to changelog 1.10 by @AsparagusEduardo in #5758
- Added scope document and made changes to pull request template by @pkmnsnfrn and @Pawkkie and arguably the entire senate in #5706
- Added instructions in PR template to make crediting people more clear by @pkmnsnfrn and @AsparagusEduardo made changes to my text in #5755
- Fix website not showing the “How to add mon” 1.10 tutorial by @AsparagusEduardo in #5813
- Install instructions by @hedara90 in #5876
- Change install.md to mention make debug instead of DINFO=1 by @ravepossum in #5882
- Backport changes from the wiki by @AsparagusEduardo in #5900
- Improve README.md by @AsparagusEduardo in #5640
📦 Branch Synchronisation 📦
pret
- 20th of December in #5845
- Fix recorded battle link player loops by @AsparagusEduardo in pret#2071
- Added
POKEMART_LIST_ENDto avoid users accidentally removing it by @AsparagusEduardo in pret#1947 - Fixed brace style inconsistencies by @AsparagusEduardo in pret#2072
- remove
sBirchSpeechPlatformBlackPalby @DizzyEggg in pret#2075
Full Changelog: https://github.com/rh-hideout/pokeemerald-expansion/compare/expansion/1.10.0...expansion/1.10.1
Version 1.10.0
## How to update
- If you haven't set up a remote, run the command `git remote add RHH https://github.com/rh-hideout/pokeemerald-expansion`.
- Once you have your remote set up, run the command `git pull RHH expansion/1.10.0`.
🌋 REFACTORS 🌋
📜 = Uses a migration script.
- Changes Evolution methods to Enums by @AlexOn1ine in #4977
- Turn item hold effects into an enum by @Bassoonian in #5498
- Change
GET_MOVE_TYPEto a function by @AlexOn1ine in #5090 - Created
COMPOUND_STRINGs for default player names by @fdeblasio in #5037 - Removed agbcc by @mrgriffin in #4994
- Refactor Frontier Brains by @fdeblasio in #5027
- Removed all instances of
gBitTable[x]by @hedara90 in #5123 - Made
BuildColorMapsredundant by using static tables by @pkmnsnfrn in #5289 - Removed
FRONTIER_BRAIN_SPRITESand updatedTRAINER_SPRITE,TRAINER_BACK_SPRITE, andTRAINER_CLASSby @fdeblasio in #5166 - Added
ShouldSwitchresult toAiLogicDataby @Pawkkie and @AlexOn1ine had the idea! in #5440 - Switch AI refactor + considers free switches by @Pawkkie in #5379
- Refactor
ShouldSwitchIfAllBadMovesby @Pawkkie in #5452 - Updated Wring Out effects to match Eruption effects by @AsparagusEduardo in #5549
- Changed Wring Out/Crush Grip/Hard Press to use
powerinstead ofargumentto determine its max power, just like how Eruption/Water Spout/Dragon Energy do it. - Also:
- Renamed
EFFECT_VARY_POWER_BASED_ON_HPtoEFFECT_POWER_BASED_ON_TARGET_HP - Renamed
EFFECT_ERUPTIONtoEFFECT_POWER_BASED_ON_USER_HP
- Renamed
- Changed Wring Out/Crush Grip/Hard Press to use
- Update battle messages to Gen 5+ standards by @kittenchilly in #3240
- Should switch refactor to facilitate switch prediction by @Pawkkie in #5466
- Unwind
TRAINER_CLASSmacro by @SBird1337 in #5611 - Refactors Absorb to use
Moveendby @AlexOn1ine in #5670- For new absorbing moves an argument should be added in
moves_info.h
- For new absorbing moves an argument should be added in
- Changes name of
B_SCR_NAME_WITH_PREFIXby @AlexOn1ine in #5675
🧬 General 🧬
Added
- Added performance counter by @hedara90 and @SBird1337 provided the actual code in #5284
- Added debug build target by @u8-Salem in #4817
- Added
AUTO_SCROLL_TEXTandNUM_FRAMES_AUTO_SCROLL_DELAYby @pkmnsnfrn in #5054 - Adds
SAVE_TYPE_ERROR_SCREENby @pkmnsnfrn in #5188 - Move Relearner and Renaming From Summary Screen by @ravepossum in #5513
- Automatic Line Breaks, somewhat even lines by @hedara90 and @AsparagusEduardo in #5689
- Automatically insert line breaks into a string with
BreakStringAutomatic. - This function does not modify strings with existing line breaks.
- Remove existing line breaks from a string with
StripLineBreaks.
- Automatically insert line breaks into a string with
Changed
- Removed agbcc by @mrgriffin in #4994
- Removed all instances of
gBitTable[x]by @hedara90 in #5123 - Converted Mechadoll text to
COMPOUND_STRINGs by @fdeblasio in #5276 - New terrain bgs by @TheTrueSadfish in #5162
- Removed agbcc screenshots from
.gitignoreby @Bassoonian in #5538 - Set default battle shadow to Gen3 by @hedara90 in #5632
- Note: Trainerslides don’t work properly with Gen4 shadows.
- Convert 3 variouses to
callnativesby @AlexOn1ine in #5646
🗺️ Overworld 🗺️
Added
- FRLG+ whiteout message by @cawtds in #4967
- Dynamic Move Types in Summary Screen/Battle by @Galaxeeh in #5084
- Adds
OW_BERRY_IMMORTALby @pkmnsnfrn in #5187 - (Default Off) Item Description Headers by @ghoulslash in #4767
- RTC-based wild encounters by @hjk321 in #5313
- Added
MB_X_Y_STAIR_WARPmetatile behaviors by @pkmnsnfrn in #5278 - Added Sideways Stairs by @ghoulslash in #4836
- Added
OW_UNION_DISABLE_CHECKandOW_FLAG_MOVE_UNION_ROOM_CHECKby @pkmnsnfrn in #5448 - Adds new scripting macros to increase developer quality of life by @pkmnsnfrn in #5177
- Added more later gen fishing mechanics by @kittenchilly in #5518
Changed
- Created PokeNav
COMPOUND_STRINGs by @fdeblasio in #4983 - Added
I_REPEL_INCLUDE_FAINTEDconfig and behavior by @kittenchilly in #5239 - RTC-based wild encounters follow up by @AlexOn1ine in #5328
- Revert rtc based encounters by @AlexOn1ine in #5331
- Made BuildColorMaps redundant by using static tables by @pkmnsnfrn in #5289
- Added
OW_AUTO_SIGNPOSTand associated metatile behaviors by @pkmnsnfrn in #5044 - Added support for overworld sprite gender differences + add all the sprites by @kittenchilly in #5394
Fixed
- Added some null pointer checks by @tertu-m in #5130
- Reset item flags on new game by @ghoulslash in #5363
- Follower female fix by @hedara90 in #5475
🐉 Pokémon 🐉
Added
- Added config to change Vivillon’s breeding form by @kittenchilly in #4813
- Added back GBA sprites via config by @AsparagusEduardo and @AlexOn1ine for their help with script to migrate data from vanilla to our current
gSpeciesInfoin #5206 - Added config to disable gender differences by @AsparagusEduardo in #5595
Changed
- Made perfect IV count into a granular setting by @AsparagusEduardo in #5115
- Updated species defines by @pkmnsnfrn in #5075
- Added support for overworld sprite gender differences + add all the sprites by @kittenchilly in #5394
- Renamed folders and symbols to match species defines by @AsparagusEduardo in #5581
- Burmy and Wormadam footprints were in a
plantsubfolder. They have been moved to the species root folder - Paldean Wooper’s subfolder was named
wooper_paldeaninstead of justpaldean. This has been corrected. - Zen Mode Galarian Darmanitan’s folder was located in
darmanitan/galarian/zen_mode. This has been corrected todarmanitan/galar_zen, alongside Galarian Standard Mode’sdarmanitan/galar_standard. - Also updated Ogerpon’s folders similarly.
- Renamed
SPECIES_PIKACHU_PARTNER_CAPtoSPECIES_PIKACHU_PARTNER.
- Burmy and Wormadam footprints were in a
- Changing
EVO_NONEfrom0xFFFEto0by @GhoulMage in #5547- There could be a case for out of bounds errors if arrays or iterations are happening where you’re using + 1 or - 1, as
EVO_FRIENDSHIPused to be the first index although it started with 1.
- There could be a case for out of bounds errors if arrays or iterations are happening where you’re using + 1 or - 1, as
Fixed
⚔️ Battle General ⚔️
Added
- FRLG+ whiteout message by @cawtds in #4967
- Added B_SHOW_TYPES and cleaned up IsDoubleBattle by @pkmnsnfrn in #5131
- EV Caps and EV Items by @Flash1Lucky and @AlexOn1ine in #5269
- Added in-battle shadows underneath all enemy battlers by @lhearachel in #5178
- Added Gen 1 Crit Chance by @Pawkkie in #5439
- Added battle flag that prevents running from wild Pokémon by @SarnPoke in #5502
Changed
- Refactor Frontier Brains by @fdeblasio in #5027
- Removed some hardcoding of move IDs + Gen4/5 Defog by @AsparagusEduardo in #5156
- Convert 8 various to
callnativesby @AsparagusEduardo in #5172 - Anger Shell use
saveattackerby @ghoulslash in #5409 - Clean up Unseen Fist Check by @AlexOn1ine in #5420
- Updated species defines by @pkmnsnfrn in #5075
- Removes Crit Chance preproc by @AlexOn1ine in #5520
- Update battle messages to Gen 5+ standards by @kittenchilly in #3240
- More post-#3240 cleanup by @kittenchilly in #5593
- Unwind
TRAINER_CLASSmacro by @SBird1337 in #5611 - Removes redundant Decorate check by @AlexOn1ine in #5696
- Changes target bit of Flower Shield by @AlexOn1ine in #5698
Fixed
- Fixed a sprite issue with
B_SHOW_TYPESby @pkmnsnfrn in #5157 - Dynamic Move Display fixes by @Galaxeeh in #5251
- Fixed a display issue with
B_SHOW_TYPESby @pkmnsnfrn and @iriv24 in #5201 - Fixed Gen 3 foreseen and Beat Up damage type by @hedara90 in #5323
- Fixes Defog used by the wrong side when there is a Substitue and Screen by @AlexOn1ine in #5381
- Fixes Hidden Power dynamic type bug by @AlexOn1ine in #5463
- Display the correct shadow size when sending out a new Pokemon by @lhearachel in #5618
- Fixed text wrap obtaining the incorrect glyph width by @AsparagusEduardo and @AlexOn1ine for their help verifying that the fix works with one of his custom strings in #5620
- Improve line breaks/scrolls by @cawtds in #5641
- Fixed Order Up + Tera Stellar breaking each other with Commander by @PhallenTree in #5667
- Fixes wrong Id when AI chooses mon to switch in by @AlexOn1ine in #5684
- Fixes Absorb regression caused by #5670 by @AlexOn1ine in #5688
- Fixes heal blocked leeach seed in tests by @AlexOn1ine in #5700
- Trainer class+name expansion fix for Battle Frontier by @hedara90 in #5699
🤹 Moves 🤹
Changed
- Added Population Bomb animation by @kittenchilly in #5194
- Move battle anim arrays to C by @cawtds in #5306
- Grass/Water Pledge Swamp Animation + Sea of Fire animation tweak by @SonikkuA-DatH in #5325
- New animations for many moves more details in description by @TheTrueSadfish in #5367
- Use move effect for some moves instead of ids by @AlexOn1ine in #5433
- Adds Commander and Order Up by @AlexOn1ine in #5246
- Heart Swap Move Animation by @SonikkuA-DatH in #5460
- Update
shed_tail.cby @Bassoonian in #5494 - Added Ion Deluge animation by @kittenchilly in #5467
- Updated Wring Out effects to match Eruption effects by @AsparagusEduardo in #5549
- Changed Wring Out/Crush Grip/Hard Press to use
powerinstead ofargumentto determine its max power, just like how Eruption/Water Spout/Dragon Energy do it. Also: - Renamed
EFFECT_VARY_POWER_BASED_ON_HPtoEFFECT_POWER_BASED_ON_TARGET_HP - Renamed
EFFECT_ERUPTIONtoEFFECT_POWER_BASED_ON_USER_HP
- Changed Wring Out/Crush Grip/Hard Press to use
- Refactors Absorb to use Moveend by @AlexOn1ine in #5670
- For new absorbing moves an argument should be added in
moves_info.h
- For new absorbing moves an argument should be added in
Fixed
- Dark Void, Clangorous Soulblaze, vortex animation fixes by @TheTrueSadfish in #5650
🎭 Abilities 🎭
Changed
- Adds Commander and Order Up by @AlexOn1ine in #5246
🧶 Items 🧶
Added
- Adds
OW_BERRY_IMMORTALby @pkmnsnfrn in #5187 - Added functionality to Poké Flute and Town Map by @kittenchilly and @LOuroboros basically did the Town Map implementation in #5405
- Decouple Poke Ball ids from item ids by @AlexOn1ine in #5560
Changed
- Consolidated the values of Rotom’s moves and added Gen9 base form effect by @fdeblasio in #5186
- Added
I_REPEL_INCLUDE_FAINTEDconfig and behavior by @kittenchilly in #5239
Fixed
- Replace hardcoded flute check with consumability check by @Bassoonian in #5508
🤖 Battle AI 🤖
Added
- Adds config to show target of ingame partner by @AlexOn1ine in #5307
- Switch AI refactor + considers free switches by @Pawkkie in #5379
- New AI flag for marking the two last Pokémon as Ace Pokémon by @GhoulMage in #5587
Changed
- Chilly Reception AI by @kittenchilly in #5271
- Shed Tail AI by @SarnPoke and @AlexOn1ine, @Pawkkie in #5275
- More missing AI logic by @kittenchilly in #5279
- Adds basic trainer and smart trainer flags by @AlexOn1ine in #5298
AI_FLAG_SETUP_FIRST_TURNrename and clarifications by @Pawkkie in #5310- Added Composite AI Flags to Docs by @Pawkkie in #5349
- AI frostbite score fixes and improvements by @Pawkkie and @kittenchilly for the suggestion! in #5362
- Switch AI
hitsToKOconsiders one shot prevention by @Pawkkie in #5371 - Adds
CanEndureHitAI function by @AlexOn1ine in #5373 - Switch AI
hitsToKOconsiders Disguise by @Pawkkie in #5375 - Added
ShouldSwitchresult toAiLogicDataby @Pawkkie and @AlexOn1ine had the idea! in #5440 - Removes duplicate code in AI functions by @AlexOn1ine in #5457
- Unify
GetBattlerAbility/TerrainAffectedto remove duplicate ai function by @AlexOn1ine in #5497 ShouldSwitchIfGameStatePromptTests by @Pawkkie in #5462AI_FLAG_ACE_POKEMONtakes into account separate trainers by @GhoulMage and @/uvula on Discord noted the weird behaviour. in #5608- Fix for the AI not considering both trainers Ace Pokémons in double battles with
AI_FLAG_ACE_POKEMON.
- Fix for the AI not considering both trainers Ace Pokémons in double battles with
- Moves that deal a Fixed amount don’t need AI handling by @AlexOn1ine in #5614
- Combines
CalculateMoveDamagearguments into a struct by @AlexOn1ine in #5570
Fixed
- AI burn score fixes and improvements by @Pawkkie and @iriv24 and @AlexOn1ine in #5356
- Improve AI’s Skill Swap handling in double battles by @Pawkkie in #5360
- Refactor
ShouldSwitchIfAllBadMovesby @Pawkkie in #5452 - Should switch refactor to facilitate switch prediction by @Pawkkie in #5466
- Fixes Switch in flag not restoring mons properly with test by @Pawkkie and @iriv24 for finding, @AlexOn1ine for fixing in #5746
🧹 Other Cleanup 🧹
- Removed metadata in AIF files by @SombrAbsol in #4958
- Removed
gPaletteDecompressionBufferand unused palette functions/vars by @DizzyEggg in #4841 - Changes Evolution methods to
enums by @AlexOn1ine in #4977 - Doesn’t compile on some compilers by @AlexOn1ine in #5099
- Update
event.incto accomodate newgDecompressionBuffername by @Bassoonian in #5100 - Created
COMPOUND_STRINGs for default player names by @fdeblasio in #5037 - Changed single-use berry blender strings to be
COMPOUND_STRINGs by @fdeblasio in #4963 - Made perfect IV count into a granular setting by @AsparagusEduardo in #5115
- Dynamic move type clean up by @AlexOn1ine in #5132
- Refactor Frontier Brains by @fdeblasio in #5027
- Removed some hardcoding of move IDs + Gen4/5 Defog by @AsparagusEduardo in #5156
- Teatime animations use
B_WAIT_TIME_LONGby @AsparagusEduardo in #5173 - Created PokeNav
COMPOUND_STRINGs by @fdeblasio in #4983 - Removed
gBitTableusage again by @hedara90 in #5193 - Removed support for the original LCG random number generator by @tertu-m in #5078
- Deprecate MMBN Names by @pkmnsnfrn in #5240
- Convert 8 various to
callnativesby @AsparagusEduardo in #5172 - Converted PC strings to
COMPOUND_STRINGs by @fdeblasio in #5314 - Cleaned up duplicate dynamic type functions by @AsparagusEduardo in #5338
- Removes redundant
moveTargetTypeai function by @AlexOn1ine in #5354 - Made
BuildColorMapsredundant by using static tables by @pkmnsnfrn in #5289 - Some strings were switched by @AlexOn1ine in #5374
- Switch AI hitsToKO considers Disguise by @Pawkkie in #5375
- Cleaned up a bit of code with
GetBattlerPartyDataby @AlexOn1ine in #5378 - Minor Gem check optimazation by @AlexOn1ine in #5401
- Simplify HP Logic by @AreaZR in #5403
- Anger Shell use
saveattackerby @ghoulslash in #5409 - Converted berry and PokeBlock strings to
COMPOUND_STRINGs by @fdeblasio in #5324 - Merge item description branch history by @Bassoonian in #5419
- Clean up Unseen Fist Check by @AlexOn1ine in #5420
- Merge level_caps and ev_caps into one caps file by @kittenchilly in #5429
- Removed trailing whitespace pass 10-2-2024 (Upcoming) by @kittenchilly in #5456
- Fixed Commander test name by @Bassoonian in #5458
- Updated species defines by @pkmnsnfrn in #5075
- Adds padding in
AiLogicDataby @AlexOn1ine in #5468 - Simplify
BS_FAINTED_MULTIPLE_1double battle logic in openpartyscreen by @ghoulslash in #5435 - Removes duplicate code in AI functions by @AlexOn1ine in #5457
ShouldPivottype cleanup by @Pawkkie in #5441- Turn item hold effects into an enum by @Bassoonian in #5498
- Unify
GetBattlerAbility/TerrainAffectedto remove duplicate ai function by @AlexOn1ine in #5497 - Clean up Shedinja code by @Bassoonian in #5501
- Clean up
scrcmdPR by @Bassoonian in #5511 - Removes Crit Chance preproc by @AlexOn1ine in #5520
- Removed agbcc screenshots from gitignore by @Bassoonian in #5538
- Removed unnecessary
gBattlerAttackerusage by @AlexOn1ine in #5554 - Removed remaining line breaks from #3240 + Prefix wrap fix by @AsparagusEduardo in #5556
- More post-#3240 cleanup by @kittenchilly in #5593
- Renamed folders and symbols to match species defines by @AsparagusEduardo in #5581
- Also:
- Burmy and Wormadam footprints were in a
plantsubfolder. They have been moved to the species root folder - Paldean Wooper’s subfolder was named
wooper_paldeaninstead of justpaldean. This has been corrected. - Zen Mode Galarian Darmanitan’s folder was located in
darmanitan/galarian/zen_mode. This has been corrected todarmanitan/galar_zen, alongside Galarian Standard Mode’sdarmanitan/galar_standard. - Also updated Ogerpon’s folders similarly.
- Renamed
SPECIES_PIKACHU_PARTNER_CAPtoSPECIES_PIKACHU_PARTNER.
- Minor
BattleStructclean up by @AlexOn1ine in #5585 - Fixed a ball update oversight by @Bassoonian in #5609
AI_FLAG_ACE_POKEMONtakes into account separate trainers by @GhoulMage and @/uvula on Discord noted the weird behaviour in #5608- Fix for the AI not considering both trainers Ace Pokémons in double battles with
AI_FLAG_ACE_POKEMON.
- Fix for the AI not considering both trainers Ace Pokémons in double battles with
- Moves that deal a Fixed amount don’t need AI handling by @AlexOn1ine in #5614
- Combines
CalculateMoveDamagearguments into a struct by @AlexOn1ine in #5570 - Follow up for #5570 by @AlexOn1ine in #5625
AI_CalcDamageclean up by @AlexOn1ine in #5629- Convert 3 variouses to
callnativesby @AlexOn1ine in #5646 - Convert
gBattleStringsTabletoCOMPOUND_STRINGs by @AsparagusEduardo in #5649 - Added merged placeholder text for trainer name with class by @kittenchilly in #5622
- Cleans up Primal Reversion code by @AlexOn1ine in #5659
- Critical Hit documentation and distorted match up struct switch by @AlexOn1ine in #5665
- Changes name of
B_SCR_NAME_WITH_PREFIXby @AlexOn1ine in #5675 - Removes redundant Decorate check by @AlexOn1ine in #5696
- Changes taget bit of Flower Shield by @AlexOn1ine in #5698
- Changing
EVO_NONEfrom0xFFFEto0by @GhoulMage in #5547- There could be a case for out of bounds errors if arrays or iterations are happening where you’re using + 1 or - 1, as
EVO_FRIENDSHIPused to be the first index although it started with 1.
- There could be a case for out of bounds errors if arrays or iterations are happening where you’re using + 1 or - 1, as
🧪 Test Runner 🧪
Changed
- Fixed Commander test name by @Bassoonian in #5458
ShouldSwitchIfGameStatePromptTests by @Pawkkie in #5462- Added various tests, add
RNG_RANDOM_TARGETby @ghoulslash in #5438 - Added Costar Tests, Download Test for Doubles by @ghoulslash in #5526
- Updated Wring Out effects to match Eruption effects by @AsparagusEduardo in #5549
- Changed Wring Out/Crush Grip/Hard Press to use
powerinstead ofargumentto determine its max power, just like how Eruption/Water Spout/Dragon Energy do it. Also: - Renamed
EFFECT_VARY_POWER_BASED_ON_HPtoEFFECT_POWER_BASED_ON_TARGET_HP - Renamed
EFFECT_ERUPTIONtoEFFECT_POWER_BASED_ON_USER_HP
- Changed Wring Out/Crush Grip/Hard Press to use
- Healer ability tests by @Pawkkie in #5559
- Mark all tests as used by @mrgriffin in #5531
Fixed
- Should switch refactor to facilitate switch prediction by @Pawkkie in #5466
📚 Documentation 📚
DoBattleIntrostate documentation by @AsparagusEduardo and @ShinyDragonHunter in #5231- Deprecate MMBN Names by @pkmnsnfrn in #5240
AI_FLAG_SETUP_FIRST_TURNRename and Clarifications by @Pawkkie in #5310- Added Composite AI Flags to Docs by @Pawkkie in #5349
- Updated the new pokemon tutorial for 1.10 by @hedara90 in #5721
- Some changes compared to previous.
New Contributors
- @SombrAbsol made their first contribution in #4958
- @Galaxeeh made their first contribution in #5084
- @Flash1Lucky made their first contribution in #5269
- @GhoulMage made their first contribution in #5547
Full Changelog: https://github.com/rh-hideout/pokeemerald-expansion/compare/expansion/1.9.4...expansion/1.10.0
Megaman Battle Network Style Names
Prior to 1.10, names in expansion that were too long for the game’s UIs were truncated to fit using the naming conventions from the Megaman Battle Network series.
These were removed as part of https://github.com/rh-hideout/pokeemerald-expansion/pull/5240. They are stored here for users that may want to refer back to them or restore them.
Table
| Attribute | MMBN | Official |
|---|---|---|
| Item | PewtrCrnches | Pewter Crunchies |
| Item | RageCandyBar | Rage Candy Bar |
| Item | LumioseGlete | Lumiose Galette |
| Item | ShalourSable | Shalour Sable |
| Item | HealthFeather | Health Feather |
| Item | MuscleFeather | Muscle Feather |
| Item | ResistFeather | Resist Feather |
| Item | GeniusFeather | Genius Feather |
| Item | CleverFeather | Clever Feather |
| Item | SwiftFeather | Swift Feather |
| Item | AbilityCapsle | Ability Capsule |
| Item | AbilityPatch | Ability Patch |
| Item | AbilityPatches | Ability Patches |
| Item | Exp.Candy XS | Exp. Candy XS |
| Item | Exp.Candies XS | Exp. Candies XS |
| Item | Exp.Candy S | Exp. Candy S |
| Item | Exp.Candies S | Exp. Candies S |
| Item | Exp.Candy M | Exp. Candy M |
| Item | Exp.Candies M | Exp. Candies M |
| Item | Exp.Candy L | Exp. Candy L |
| Item | Exp.Candies L | Exp. Candies L |
| Item | Exp.Candy XL | Exp. Candy XL |
| Item | Exp.Candies XL | Exp. Candies XL |
| Item | DynamaxCandy | Dynamax Candy |
| Item | DynamaxCandies | Dynamax Candies |
| Item | MaxMushrooms | Max Mushrooms |
| Item | GoldBottlCap | Gold Bottle Cap |
| Item | PrettyFeather | Pretty Feather |
| Item | StrngeSouvnr | Strange Souvenir |
| Item | FosslzedBird | Fossilized Bird |
| Item | FosslzedFish | Fossilized Fish |
| Item | FosslzedFishes | Fossilized Fishes |
| Item | FosslzedDrke | Fossilized Drake |
| Item | FosslzedDino | Fossilized Dino |
| Item | SurprseMulch | Surprise Mulch |
| Item | YellwApricorn | Yellow Apricorn |
| Item | GreenApricorn | Green Apricorn |
| Item | WhiteApricorn | White Apricorn |
| Item | BlackApricorn | Black Apricorn |
| Item | WishingPiece | Wishing Piece |
| Item | GalaricaTwig | Galarica Twig |
| Item | GalaricaCuff | Galarica Cuff |
| Item | GalrcaWreath | Galarica Wreath |
| Item | GalrcaWreathes | Galarica Wreathes |
| Item | StrwbrySweet | Strawberry Sweet |
| Item | ElectrcMemory | Electric Memory |
| Item | ElectrcMemories | Electric Memories |
| Item | FightngMemory | Fighting Memory |
| Item | FightngMemories | Fighting Memories |
| Item | PsychicMemory | Psychic Memory |
| Item | PsychicMemories | Psychic Memories |
| Item | RustedSword | Rusted Sword |
| Item | RustedShield | Rusted Shield |
| Item | CharizarditeX | Charizardite X |
| Item | CharizarditeY | Charizardite Y |
| Item | U-Necrozium Z | Ultranecrozium Z |
| Item | DeepSeaScale | Deep Sea Scale |
| Item | DeepSeaTooth | Deep Sea Tooth |
| Item | Never-MeltIce | Never-Melt Ice |
| Item | WeaknssPolicy | Weakness Policy |
| Item | WeaknssPolicies | Weakness Policies |
| Item | SafetyGoggles | Safety Goggles |
| Item | AdrenalineOrb | Adrenaline Orb |
| Item | TerainExtendr | Terrain Extender |
| Item | ProtectvePads | Protective Pads |
| Item | Heavy-DtyBts | Heavy-Duty Boots |
| Item | BlundrPolicy | Blunder Policy |
| Item | BlundrPolicies | Blunder Policies |
| Item | UtltyUmbrlla | Utility Umbrella |
| Item | CatchngCharm | Catching Charm |
| Item | RotomCatalog | Rotom Catalog |
| Item | ReinsOfUnity | Reins of Unity |
| Item | Dowsing MCHN | Dowsing Machine |
| Item | AbilityShield | Ability Shield |
| Item | PunchingGlove | Punching Glove |
| Item | AuspciousArmr | Auspicious Armor |
| Item | BoosterEnergy | Booster Energy |
| Item | BoosterEnergies | Booster Energies |
| Item | BigBmbooShoot | Big Bamboo Shoot |
| Item | GimighoulCoin | Gimmighoul Coin |
| Item | Leader’sCrest | Leader’s Crest |
| Item | MaliciousArmr | Malicious Armor |
| Item | ScrllOfDrknss | Scroll of Darkness |
| Item | ScrllsOfDrknss | Scrolls of Darkness |
| Item | ScrollOfWatrs | Scroll of Waters |
| Item | ScrollsOfWatrs | Scrolls of Waters |
| Item | TinyBmbooShot | Tiny Bamboo Shoot |
| Item | Bug TeraShard | Bug Tera Shard |
| Item | DarkTeraShard | Dark Tera Shard |
| Item | DragnTeraShrd | Dragon Tera Shard |
| Item | EltrcTeraShrd | Electric Tera Shard |
| Item | FairyTeraShrd | Fairy Tera Shard |
| Item | FghtngTerShrd | Fighting Tera Shard |
| Item | FireTeraShard | Fire Tera Shard |
| Item | FlyngTeraShrd | Flying Tera Shard |
| Item | GhostTeraShrd | Ghost Tera Shard |
| Item | GrassTeraShrd | Grass Tera Shard |
| Item | GrondTeraShrd | Ground Tera Shard |
| Item | Ice TeraShard | Ice Tera Shard |
| Item | NormlTeraShrd | Normal Tera Shard |
| Item | PoisnTeraShrd | Poison Tera Shard |
| Item | PschcTeraShrd | Psychic Tera Shard |
| Item | RockTeraShard | Rock Tera Shard |
| Item | SteelTeraShrd | Steel Tera Shard |
| Item | WaterTeraShrd | Water Tera Shard |
| Item | AdamantCrystl | Adamant Crystal |
| Item | LustrousGlobe | Lustrous Globe |
| Item | BlackAugurite | Black Augurite |
| Item | UnrmkblTeacup | Unremarkable Teacup |
| Item | MstrpceTeacup | Masterpiece Teacup |
| Item | CornrstneMask | Cornerstone Mask |
| Item | WellsprngMask | Wellspring Mask |
| Item | HrthflameMask | Hearthflame Mask |
| Item | FrshStrtMochi | Fresh Start Mochi |
| Item | GlmmringCharm | Glimmering Charm |
| Item | StllrTeraShrd | Stellar Tera Shard |
| Item | JublifeMuffin | Jubilife Muffin |
| Item | AuxPowerguard | Aux Powerguard |
| Item | ChoiceDumplng | Choice Dumpling |
| Item | 2xSpicedRadsh | Twice-Spiced Radish |
| Move | ThunderPunch | Thunder Punch |
| Move | PoisonPowder | Poison Powder |
| Move | ThunderShock | Thunder Shock |
| Move | SelfDestruct | Self-Destruct |
| Move | HighJumpKick | High Jump Kick |
| Move | DynamicPunch | Dynamic Punch |
| Move | DragonBreath | Dragon Breath |
| Move | ExtremeSpeed | Extreme Speed |
| Move | AncientPower | Ancient Power |
| Move | SmellngSalts | Smelling Salts |
| Move | FeatherDance | Feather Dance |
| Move | GrassWhistle | Grass Whistle |
| Move | PhantomForce | Phantom Force |
| Move | TrickOrTreat | Trick-or-Treat |
| Move | ParabolcChrg | Parabolic Charge |
| Move | Forest’sCurs | Forest’s Curse |
| Move | PetalBlizzrd | Petal Blizzard |
| Move | DisrmngVoice | Disarming Voice |
| Move | DrainingKiss | Draining Kiss |
| Move | CraftyShield | Crafty Shield |
| Move | FlowerShield | Flower Shield |
| Move | GrssyTerrain | Grassy Terrain |
| Move | MistyTerrain | Misty Terrain |
| Move | King’sShield | King’s Shield |
| Move | DiamondStorm | Diamond Storm |
| Move | SteamErption | Steam Eruption |
| Move | HyprspceHole | Hyperspace Hole |
| Move | WatrShuriken | Water Shuriken |
| Move | MysticalFire | Mystical Fire |
| Move | AromaticMist | Aromatic Mist |
| Move | EerieImpulse | Eerie Impulse |
| Move | MagneticFlux | Magnetic Flux |
| Move | ElctrcTrrain | Electric Terrain |
| Move | DazzlngGleam | Dazzling Gleam |
| Move | BabyDollEyes | Baby-Doll Eyes |
| Move | PowerUpPunch | Power-Up Punch |
| Move | OblivionWing | Oblivion Wing |
| Move | ThousndArrws | Thousand Arrows |
| Move | ThousndWaves | Thousand Waves |
| Move | LightOfRuin | Light Of Ruin |
| Move | PrcipceBldes | Precipice Blades |
| Move | DragonAscent | Dragon Ascent |
| Move | HyprspceFury | Hyperspace Fury |
| Move | FrstImpressn | First Impression |
| Move | BanefulBunkr | Baneful Bunker |
| Move | SpiritShackl | Spirit Shackle |
| Move | DarkstLariat | Darkest Lariat |
| Move | SparklngAria | Sparkling Aria |
| Move | FloralHealng | Floral Healing |
| Move | HighHorsepwr | High Horsepower |
| Move | PsychcTrrain | Psychic Terrain |
| Move | RvlationDnce | Revelation Dance |
| Move | CoreEnforcer | Core Enforcer |
| Move | ClngngScales | Clanging Scales |
| Move | DragonHammer | Dragon Hammer |
| Move | PsychicFangs | Psychic Fangs |
| Move | StmpngTantrm | Stomping Tantrum |
| Move | PrsmaticLasr | Prismatic Laser |
| Move | SpectrlThief | Spectral Thief |
| Move | SnsteelStrke | Sunsteel Strike |
| Move | MoongestBeam | Moongeist Beam |
| Move | Natur’sMadns | Nature’s Madness |
| Move | PhotonGeyser | Photon Geyser |
| Move | SplishySplsh | Splishy Splash |
| Move | BouncyBubble | Bouncy Bubble |
| Move | SparklySwirl | Sparkly Swirl |
| Move | VeeveeVolley | Veevee Volley |
| Move | DublIronBash | Double Iron Bash |
| Move | DynamxCannon | Dynamax Cannon |
| Move | FishiousRend | Fishious Rend |
| Move | ClngrousSoul | Clangorous Soul |
| Move | BehemthBlade | Behemoth Blade |
| Move | BehemothBash | Behemoth Bash |
| Move | BreakngSwipe | Breaking Swipe |
| Move | StrangeSteam | Strange Steam |
| Move | FalsSurrendr | False Surrender |
| Move | MeteorAssalt | Meteor Assault |
| Move | ExpandngForc | Expanding Force |
| Move | ShellSideArm | Shell Side Arm |
| Move | MstyExplsion | Misty Explosion |
| Move | RisngVoltage | Rising Voltage |
| Move | TerrainPulse | Terrain Pulse |
| Move | SkitterSmack | Skitter Smack |
| Move | BrningJelosy | Burning Jealousy |
| Move | CorrosiveGas | Corrosive Gas |
| Move | DualWingbeat | Dual Wingbeat |
| Move | ScorchngSnds | Scorching Sands |
| Move | JungleHealng | Jungle Healing |
| Move | SurgngStrkes | Surging Strikes |
| Move | DragonEnergy | Dragon Energy |
| Move | FreezngGlare | Freezing Glare |
| Move | ThnderusKick | Thunderous Kick |
| Move | GlacialLance | Glacial Lance |
| Move | AstrlBarrage | Astral Barrage |
| Move | PsyshieldBsh | Psyshield Bash |
| Move | SprngtdeStrm | Springtide Storm |
| Move | MystcalPower | Mystical Power |
| Move | MountainGale | Mountain Gale |
| Move | VictoryDance | Victory Dance |
| Move | HeadlongRush | Headlong Rush |
| Move | BitterMalice | Bitter Malice |
| Move | TripleArrows | Triple Arrows |
| Move | InfrnlParade | Infernal Parade |
| Move | CeaslessEdge | Ceaseless Edge |
| Move | BlekwndStorm | Bleakwind Storm |
| Move | WildbltStorm | Wildbolt Storm |
| Move | SndsearStorm | Sandsear Storm |
| Move | LunarBlessng | Lunar Blessing |
| Move | LastRespects | Last Respects |
| Move | SpicyExtract | Spicy Extract |
| Move | PoplatinBomb | Population Bomb |
| Move | RevivlBlesng | Revival Blessing |
| Move | KowtowCleave | Kowtow Cleave |
| Move | ColisinCours | Collision Course |
| Move | ElectroDrift | Electro Drift |
| Move | ChilReceptin | Chilly Reception |
| Move | ChillingWatr | Chilling Water |
| Move | GigatonHammr | Gigaton Hammer |
| Move | BlazngTorque | Blazing Torque |
| Move | WickedTorque | Wicked Torque |
| Move | NoxiusTorque | Noxious Torque |
| Move | CombatTorque | Combat Torque |
| Move | MagiclTorque | Magical Torque |
| Move | MatchaGotcha | Matcha Gotcha |
| Move | TeraStarstrm | Tera Starstorm |
| Move | BurnngBulwrk | Burning Bulwark |
| Move | MightyCleave | Mighty Cleave |
| Move | TachyonCuttr | Tachyon Cutter |
| Move | AllurngVoice | Alluring Voice |
| Move | SuprcellSlam | Supercell Slam |
| Move | PsychicNoise | Psychic Noise |
| Move | MalignntChan | Malignant Chain |
| Species | Dudunsprce | Dudunsparce |
| Species | Corvisquir | Corvisquire |
| Species | Corviknigh | Corviknight |
| Species | Barraskewd | Barraskewda |
| Species | Centiskorc | Centiskorch |
| Species | Polteageis | Polteageist |
| Species | Stonjourne | Stonjourner |
| Species | Meowscarad | Meowscarada |
| Species | Sqawkabily | Squawkabilly |
| Species | Kilowatrel | Kilowattrel |
| Species | Brmblghast | Brambleghast |
| Species | ScreamTail | Scream Tail |
| Species | BruteBonet | Brute Bonnet |
| Species | FluttrMane | Flutter Mane |
| Species | SlithrWing | Slither Wing |
| Species | SndyShocks | Sandy Shocks |
| Species | IronTreads | Iron Treads |
| Species | IronBundle | Iron Bundle |
| Species | IronJuguls | Iron Jugulis |
| Species | IronThorns | Iron Thorns |
| Species | RoarngMoon | Roaring Moon |
| Species | IronVliant | Iron Valiant |
| Species | WalkngWake | Walking Wake |
| Species | IronLeaves | Iron Leaves |
| Species | Ptchageist | Poltchageist |
| Species | Fezndipiti | Fezandipiti |
| Species | GouginFire | Gouging Fire |
| Species | RagingBolt | Raging Bolt |
| Species | IronBouldr | Iron Boulder |
| Species | Crabminabl | Crabominable |
| Species | Blacephaln | Blacephalon |
| Species | Bsculegion | Basculegion |
| Species | Flechinder | Fletchinder |
| Type | Fight | Fighting |
| Type | Electr | Electric |
| Type | Psychc | Psychic |
| Type | Stellr | Stellar |
Version 1.9.4
## How to update
- If you haven't set up a remote, run the command `git remote add RHH https://github.com/rh-hideout/pokeemerald-expansion`.
- Once you have your remote set up, run the command `git pull RHH expansion/1.9.4`.
🌋 IMPORTANT 🌋
- This update integrates pret’s latest Makefile changes, which rearranges the entire file in order to speed up compilation times overall. If you did any changes to it (such as installing Poryscript) and are having issues resolving the conflicts, keep expansion’s version of Makefile and reapply your changes afterwards.
🧬 General 🧬
Fixed
- Fixed alignment errors in
EWRAM_INITand friends when using u8, u16, etc. by @aronson in #5512 - Update test LD script to respect 4 byte data section alignment by @aronson in #5517
- Fixed Missing
string_util.hinclude inmini_printf.cby @mrgriffin in #5572 - Fixed unnecessary dependency scanning for test build and test rom names by @ravepossum in #5594
- Fixed makefile: dependencies for
map_group_count.hby @SBird1337 in #5648- Fixes an issue that caused the build to fail on updates to
src/debug.cdue to mismatched dependency.
- Fixes an issue that caused the build to fail on updates to
🗺️ Overworld 🗺️
Changed
- Followers sprite fixes by @Cafeei in #5669
- Follower fixes, Melmetal, Patrat, Woobat by @hedara90 in #5685
- Fixed Farfetch’d overworld sprite by @hedara90 in #5711
Fixed
- Fixed Berry mutations always generating a Persim Berry by @Bassoonian in #5504
🐉 Pokémon 🐉
Changed
- Changing
EVO_NONEfrom0xFFFEto0by @GhoulMage in #5547- There could be a case for out of bounds errors if arrays or iterations are happening where you’re using + 1 or - 1, as
EVO_FRIENDSHIPused to be the first index although it started with 1.
- There could be a case for out of bounds errors if arrays or iterations are happening where you’re using + 1 or - 1, as
- PokeCommunity sprites batch (October) by @kittenchilly in #5655
- Followers sprite fixes by @Cafeei in #5669
- Follower fixes, Melmetal, Patrat, Woobat by @hedara90 in #5685
- Fixed Farfetch’d overworld sprite by @hedara90 in #5711
Fixed
- Fixed
P_FRIENDSHIP_EVO_THRESHOLDnot checking for Gen 8 by @kittenchilly in #5503 - Fixed HGSS dex search printing wrong mon after selecting evos by @ravepossum in #5552
- Fixed 64px uncompressed followers by @hedara90 in #5601
- Deoxys Sprite/Animation Fixes by @SarnPoke in #5603
- Fixes Aegislash not reverting back by @AlexOn1ine in #5734
⚔️ Battle General ⚔️
Changed
- Fixed damage calc modifiers by @AlexOn1ine in #5604
Fixed
- Fixed Shiny Pokemon not being shiny after transforming with a gimmick by @hedara90 in #5573
- Handle showdowns apostrophe the same way as ASCII apostrophe by @cawtds in #5712
- Fixes Misty Terrain displaying wrong message by @AlexOn1ine in #5742
- Fixes Dynamax dynamic move type by @AlexOn1ine in #5739
🤹 Moves 🤹
Changed
- Fixed damage calc modifiers by @AlexOn1ine in #5604
- Updated ability popups for Skill Swap, Mummy/Lingering Aroma, Worry Seed, Simple Beam, fix Doodle/Role Play bugs by @PhallenTree in #5493
Fixed
- Fixed Follow Me failing in Single Battles for Gen 6/7 config by @AsparagusEduardo in #5542
- Fixed
AnimTask_HorizontalShakeuses for shaking screen in battle anims by @ghoulslash in #5562 - Fixed weather genie move anims and Springtide Storm targets by @ravepossum in #5553
- Fixes Magic Guard not preventing Salt Cure by @AlexOn1ine in #5583
- Fixes Dragon Tail using the effect twice during a Parental Bond attack by @AlexOn1ine in #5630
- Fixes Magic Coat message by @AlexOn1ine in #5645
- Fixes Take heart by @AlexOn1ine in #5658
- Fixed Floral Healing anim by @AlexOn1ine in #5733
- Fixes Population Bomb / Triple Kick missing message by @AlexOn1ine in #5747
- Changes Max Phantasm move anim script call by @AlexOn1ine in #5737
- Fixes Partner targeting and Acupressure/Ally Switch interaction by @AlexOn1ine in #5446
- Revival Blessing fixes + Using Lunar Blessing’s animation by @ghoulslash in #5490
- Fixed curse + Protean interaction by @hedara90 in #5663
- Added Minimize interaction to Supercell Slam by @hedara90 in #5713
🎭 Abilities 🎭
Changed
- Fixed damage calc modifiers by @AlexOn1ine in #5604
Fixed
- Adds tests and Costar fix from PR #5526 by @AlexOn1ine in #5529
- Fixes Red Card / Eject Pack interaction with Emergency Exit by @AlexOn1ine in #5657
- Fixed curse + Protean interaction by @hedara90 in #5663
- Mimicry updates typing with
RemoveAllTerrains()by @AERDU in #5666 - Updated ability popups for Skill Swap, Mummy/Lingering Aroma, Worry Seed, Simple Beam, fix Doodle/Role Play bugs by @PhallenTree in #5493
- Fixed curse + Protean interaction by @hedara90 in #5663
- Fixes Ice Face regression by @AlexOn1ine in #5678
- Fixes Neutralizing Gas crashes + adds missing interaction, Regenerator small fix by @PhallenTree in #5694
🧶 Items 🧶
Changed
- Removes duplicate Booster Energy code by @AlexOn1ine in #5656
Fixed
- Fixes Red Card / Eject Pack interaction with Emergency Exit by @AlexOn1ine in #5657
- Fixes Red Card / Eject Pack interaction by @AlexOn1ine in #5724
- Fixes gems triggering on confusion damage by @AlexOn1ine in #5723
- Fixes Kee Maranga and Enigma Berry by @AlexOn1ine in #5727
- Fixes Blunder Policy by @AlexOn1ine in #5722
- Fixes Rusted Shield/Sword allowed to be Knocked Off from Zamazenta/Zacian by @iriv24 in #5750
🤖 Battle AI 🤖
Fixed
- Fixed certain move data being cleared on turn end by @Pawkkie and @AlexOn1ine in #5488
- Global is used instead of passed var by @AlexOn1ine in #5546
- Fixes
dynamicMoveTypeglobal not being reset during AI calcs by @AlexOn1ine in #5628
🧹 Other Cleanup 🧹
- Remove one redundant call of
SetAiLogicDataForTurninDoBattleIntroby @AlexOn1ine in #5491 - Cleanup extraneous function in
battle_anim.hby @hedara90 in #5506 - Add newline to move relearner string by @Bassoonian in #5523
- Fixed 10,000,000 Volt Thunderbolt name by @AsparagusEduardo in #5533
- Added constant to expansion inclusive copyright magic number by @pkmnsnfrn in #5413
- Centralise AI Tests trainer name by @Bassoonian in #5532
- Remove now outdated information from readme by @Bassoonian in #5548
- Changing
EVO_NONEfrom0xFFFEto0by @GhoulMage in #5547- There could be a case for out of bounds errors if arrays or iterations are happening where you’re using + 1 or - 1, as
EVO_FRIENDSHIPused to be the first index although it started with 1.
- There could be a case for out of bounds errors if arrays or iterations are happening where you’re using + 1 or - 1, as
- Shed Skin chance fix by @Pawkkie in #5558
- Restore test file dependencies so they’re rebuilt properly by @ravepossum in #5617
- Improve
SEND_OUTerror message; require Speed for all battlers by @mrgriffin in #5631 - Removes duplicate Booster Energy code by @AlexOn1ine in #5656
- Wrong assumtion in dauntless_shield.c by @AlexOn1ine in #5692
🧪 Test Runner 🧪
Added
Changed
- Add text width tests for move, ability, item, and pokedex descriptions by @kittenchilly in #5505
- Centralise AI Tests trainer name by @Bassoonian in #5532
- Add basic Steam Engine, Guard Dog Tests by @ghoulslash in #5569
- Fixed damage test by @GhoulMage and @mrgriffin for teaching me pokeemerald-expansion tests in #5574
- Fallback
memmemimplementation by @mrgriffin in #5561 - Hydra: Support
%pin test summaries by @mrgriffin in #5626 - Improve
SEND_OUTerror message; require Speed for all battlers by @mrgriffin in #5631 - Check that
PASSES_RANDOMLYaffected aRandomcall by @mrgriffin in #5635 - Wrong assumtion in dauntless_shield.c by @AlexOn1ine in #5692
Fixed
- Update test LD script to respect 4 byte data section alignment by @aronson in #5517
- Adds tests and Costar fix from PR #5526 by @AlexOn1ine in #5529
- Fixed broken Starting Terrain test by @hedara90 in #5582
📚 Documentation 📚
- Add changelog header in PR template to aid automation by @AsparagusEduardo in #5539
- Added compressed OW mon VRAM notice in config file by @AsparagusEduardo in #5599
- Update
README.mdto link toINSTALL.mdby @Pawkkie in #5720 - Fixes minor move desc errors by @AlexOn1ine in #5728
📦 Branch Synchronisation 📦
pret
- 15th of October in #5527
- Slight storage system documentation by @luckytyphlosion in pret#2024
- Clean up defines lacking spaces by @Bassoonian in pret#2025
- UB fix in battle_transition.c by @cawtds in pret#2007
- preproc: support arbitrary expressions in enums by @mrgriffin in pret#2026
- [Build System Rewrite] Refactored
Makefileby @Icedude907 in pret#1950 - Fixed incorrect point macros in contest_ai_script.inc by @NTx86 in pret#2028
- [Build System Rewrite] Massive build speed improvement via scaninc changes by @Icedude907 in pret#1954
- [Build System Rewrite] Improved audio rules by @Icedude907 in pret#1957
- Update INSTALL.md to state that Windows 8 is no longer supported by Microsoft by @luciofstars in pret#2029
- Update pull_request_template.md to include Discord username update by @luciofstars in pret#2030
- remove ScriptContext_Enable from secret_base.h by @DizzyEggg in pret#2032
- Remove gflib by @Kurausukun in pret#2033
- Minor toolchain fixes by @GriffinRichards in pret#2031
- Bugfix for cable car hikerGraphicsIds array by @Scyrous in pret#2039
- Remove explicit symbol sizes in sym_common.txt by @GriffinRichards in pret#2038
- Ignore mGBA screenshots by @Jaizu in pret#2041
- Replaced copyright magic numbers in intro.c with constants by @pkmnsnfrn in pret#2035
- Fixed typo: | should be || in Task_TryFieldPoisonWhiteOut by @AreaZR in pret#2044
- [preproc] support C23 enum underlying type syntax by @mrgriffin in pret#2043
- Fixed deleting files with dependency files by @mid-kid in pret#2045
- Remove unnecessary looping for rule generation and unroll macros by @mid-kid in pret#2046
- Get rid of common syms by @luckytyphlosion in pret#2040
- Bugfix for cable car hikerGraphicsIds array by @Scyrous in pret#2039
- UB fix in battle_transition.c by @cawtds in pret#2007
- Fixed typo: | should be || in Task_TryFieldPoisonWhiteOut by @AreaZR in pret#2044
- Get rid of common syms by @luckytyphlosion in pret#2040
- Fixed incorrect point macros in contest_ai_script.inc by @NTx86 in pret#2028
- 5th of November in #5644
- 29 of November in #5736
- Remove usage of gHeap in sSpritePalettes_ContestantsTurnBlinkEffect by @Lactozilla in pret#2064
- BUGFIX: Fix Counter and Mirror Coat checking the wrong category by @surtr-games in pret#2066
- Add TRY_DRAW_SPOT_PIXEL by @GriffinRichards in pret#2055
- Added extra encoded character support by @AsparagusEduardo in pret#2050
merrp’s followers
- Merrp merge (12th of October) by @Bassoonian in #5514
- d80190fe105eee12bbf74ae29647ac909084d35c fix: Dig in Sealed Chamber no longer freezes follower.
New Contributors
- @AERDU made their first contribution in #5666
Full Changelog: https://github.com/rh-hideout/pokeemerald-expansion/compare/expansion/1.9.3...expansion/1.9.4
Version 1.9.3
## How to update
- If you haven't set up a remote, run the command `git remote add RHH https://github.com/rh-hideout/pokeemerald-expansion`.
- Once you have your remote set up, run the command `git pull RHH expansion/1.9.3`.
🌋 REFACTORS 🌋
📜 = Uses a migration script.
- Converted
settotemboostcommand tocallnativein #5418 - Removed unused
RESOURCE_FLAG_TRACEDin #5430 - Changed
MOVEEND_defines to an enum in #5449
✨ Feature Branches ✨
merrp/aarant’s Followers
Fixed
- Fixed Expansion-exclusive issue that caused trainers to not play their “pointing” animation when Followers were out during battle intro by @kittenchilly in #5406
⚔️ Battle General ⚔️
Changed
- Improved Mega evolution animation to make it a little smoother by @kleenxfeu in #4816
Fixed
- Fixed affection check for exp multiplier by @Bassoonian in #5421
- Fixed multiple Primal Reversions not occurring if multiple battlers fainted on the previous turn by @PhallenTree in #5430
🤹 Moves 🤹
Added
- Added missing
B_AFTER_YOU_TURN_ORDERconfig by @PhallenTree in #5400- Gen 5-7: After You fails if the order remains the same after using After You.
- Gen 8+: After You no longer fails if the turn order remains the same after using After You.
- Added missing
B_QUASH_TURN_ORDERconfig by @PhallenTree in #5400- Gen 5-7: If multiple Pokémon are affected by Quash, they move in the order they were affected by Quash.
- Gen 8+: If multiple Pokémon are affected by Quash, they now move fastest to slowest.
- Added missing updated
B_UPDATED_CONVERSION_2by @wiz1989 in #5453- Gens 2-4: Conversion 2 changes the user’s type to a type that is resistant/immune to the last move the user was hit by.
- Gen 5+: Conversion 2 changes the user’s type to a type that resists the last move used by the selected target.
Fixed
- Fixed Scale Shot corrupting the move used on the next turn by @AlexOn1ine in #5397
- Fixed Growth’s description not being updated based on
B_GROWTH_STAT_RAISEby @nescioquid in #5398 - Fixed Quash not updating the battlers’ actions correctly by @PhallenTree in #5400
- Cleanup by @PhallenTree in #5430
- Fixed Snatched Swallow not recovering HP if the Snatcher is not under the effect of Stockpile (should still heal) by @PhallenTree in #5430
- Fixed Counter users being damaged by Spiky Shield by @AlexOn1ine in #5402
- Fixed Electrified Dragon Darts not correctly avoiding targets with ability immunity (Volt Absorb, Motor Drive) by @PhallenTree in #5430
- Fixed Trace not activating a switch-in ability it traces (eg. Intimidate) by @PhallenTree in #5430
- Removed unused
RESOURCE_FLAG_TRACED.
- Removed unused
- Fixed recoil damage not triggering healing berries by @AlexOn1ine in #5449
- Also changed
MOVEEND_defines to an enum.
- Also changed
🎭 Abilities 🎭
Fixed
- Fixed Dancer activating even if the dance move is stolen by Snatch by @PhallenTree in #5430
- Fixed Ability popup when multiple Pokémon faint at the same time by @PhallenTree in #5430
- Multiple ability fixes by @PhallenTree in #5447
- Fixed Protosynthesis/Quark Drive sometimes not activating ability popup despite still gaining the boost as they should.
- Fixed Protosynthesis/Quark Drive activating on Transformed battlers.
- Fixed Protosynthesis activating despite Cloud Nine being present on the field.
- Fixed Quark Drive not activating if the battler is not grounded.
- Fixed Protosynthesis/Quark Drive/Beast Boost stat raise priority when multiple stats are tied for the highest one.
- Before:
Attack, Defense, Speed, Special Attack, Special Defense. - After:
Attack, Defense, Special Attack, Special Defense, Speed.
- Before:
🧶 Items 🧶
Fixed
- Fixed Ogerpon’s Masks not increasing the power of moves by 20% by @AlexOn1ine in #5391
- Fixed Jubilife Muffin not working by @kittenchilly in #5444
- Fixed duplicating flute bug in double battles by @ghoulslash in #5436
🤖 Battle AI 🤖
Fixed
- Fixed Trick/Switcheroo giving AI score even if the opponent has no held item by @kittenchilly in #5412
- Various AI fixes in
AI_CalcMoveEffectScoreby @ghoulslash in #5474- Missing break from
EFFECT_ABSORBswitch case. - Using last used move for Mirror Move instead of predicted move.
- Missing break from
🧹 Other Cleanup 🧹
Changed
- Converted
settotemboostcommand tocallnativeby @ghoulslash in #5418 - Removed trailing whitespace by @kittenchilly in #5455
- Removed binary match workaround for Rayquaza’s tail in Sootopolis’ cutscene by @hedara90 in https://github.com/rh-hideout/pokeemerald-expansion/pull/5480
Fixed
- Fixed potential uninitialized behavior in
ChangeOrderTargetAfterAttackerby @AlexOn1ine in #5393 - Fallback on default BW map pop-up theme to reduce potential for error by @ravepossum in #5392
- Multiple typo fixes by @nescioquid in #5398
- VS Seeker documentation fix by @Bassoonian in #5415
🧪 Test Runner 🧪
Added
- Added missing After You and Quash tests by @PhallenTree in #5400
Changed
- Improved Tangling Hair test to make sure that chained effects do not overwrite relevant battler IDs by @ghoulslash in #5423
- Improved Full Heal item tests by @kittenchilly in #5444
Fixed
- Fixed Wake-Up Slap test typo by @Pawkkie in #5442
- Fixed test assumption fail summary fields using more memory than needed by @AsparagusEduardo in #5443
- Fixed issue with
PASSES_RANDOMLYin AI tests by @Pawkkie in https://github.com/rh-hideout/pokeemerald-expansion/pull/5486
New Contributors
- @nescioquid made their first contribution in #5398
- @kleenxfeu made their first contribution in #4816
- @wiz1989 made their first contribution in #5453
Full Changelog: https://github.com/rh-hideout/pokeemerald-expansion/compare/expansion/1.9.2...expansion/1.9.3
Version 1.9.2
## How to update
- If you haven't set up a remote, run the command `git remote add RHH https://github.com/rh-hideout/pokeemerald-expansion`.
- Once you have your remote set up, run the command `git pull RHH expansion/1.9.2`.
🌋 REFACTORS 🌋
📜 = Uses a migration script.
- Remove unused
BattleScript_WindPowerActivatesEnd2in #5257 - Refactored in-battle disobedience to fix bug in #5245
💥 Hardlock/Softlock/Crash/Compiling fixes 💥
- Fixed hardlock when Hyperspace Fury is used by Hoopa Unbound by @AlexOn1ine in #5237
- Fixed compile error when
OW_POKEMON_OBJECT_EVENTSisTRUEbutP_HISUIAN_FORMSisFALSEaround Basculin by @hjk321 in #5256 - Fixed hardlock when the AI cannot choose moves due to its opponent having Wonder Guard by @Pawkkie and Wiz in #5317
- Fixed multiple Pledge move hardlocks
- Fixed potential hardlock when attempting to use Pledge moves on the same turn that the user would wake up by @PhallenTree in #5330
- Fixed hardlock when the opponent’s combo doesn’t happen when cancelled by sleep by @hedara90 and @PhallenTree in #5339
- Fixes hardlock when the opponent’s combo doesn’t happen when cancelled by freeze by @PhallenTree in #5340
- Fixed hardlock when the opponent’s combo doesn’t happen when cancelled by Powder by @hedara90 in #5341
🧬 General 🧬
Fixed
- Fixed loading into the wrong version of a map after saving in areas with multiple layouts by @hedara90 in #5347
🐉 Pokémon 🐉
Added
- Added
OVERWORLD_SET_ANIMmacro to allow using custom animation tables for Overworld Pokémon by @hedara90 in #5309- Added asymetrical Farfetch’d sprites using a previously unused table from merrp’s followers branch.
- Added unique sprites for overworld Pumpkaboo and Gourgeist forms by @hedara90 in #5390
- Added missing Sirfetch’d competitive alias (
SPECIES_SIRFETCH_D) by @cawtds in #5283 - Added Paldean Wooper and Clodsire overworld sprites by @Cafeei in #5277
- Added missing Gen 9 Overworld sprites by @Liamjd14 in #5304
- Original sprites by Darkus_Shadow, Princess-Phoenix, shaderr31, Molfang62, CarmaNekko, EduarPokeN, Larryturbo, TyranitarDark and Anarlaurendil
- Sources:
- Added missing overworld sprites by @Liamjd14 in #5336
- New Sprites:
- Oricorio Pom Pom/Pa’U/Sensu, Zygarde 10%/Complete and Original Color Magearna
- Credits to: Princess-Phoenix, Larryturbo, Kidkatt, Zender1752 and SageDeoxys.
- Black/White Kyurem
- Credits to: Larryturbo.
- Shaymin Sky and Therian Tornadus/Thundurus/Landorus
- Credits to: @Liamjd14
- Oricorio Pom Pom/Pa’U/Sensu, Zygarde 10%/Complete and Original Color Magearna
- Using their base form’s sprites
- Totem Raticate/Mimikyu/Marowak and Partner Pikachu/Eevee
- New Sprites:
- Added Added asymmetrical overworld sprites by @Liamjd14 in #5336
- Slowbro (Galarian), Tinkatink, Tinkatuff, Tinkaton and Scovillain
- Enabled in
gSpeciesInfoby @Liamjd14 in #5385
Changed
- Improved Garganacl and Naclstack battle sprites by using the ones from @CyanSMP64’s repo by @kittenchilly in #5142
- Improved both shiny Indeedee by @Cafeei in #5285
- Shiny Combusken now uses its Gen8+ palette by @Cafeei in #5333
Fixed
- Reenabled unused female Indeedee overworld sprite by @Cafeei in #5285
- Fixed G-Max Corviknight and Centiskorch’s expanded names by @PhallenTree in #5296
- Fixed G-Max Cinderace back sprite by @hedara90 in #5295
- Fixed Shiny Mothim’ by @Cafeei in #5333
- Fixed multiple battle sprite issues by @kittenchilly in #5142
- Sprite issues:
- Bombirdier, Mega Absol/Aerodactyl/Latias/Latios/Salamence, Orthworm and Veluza.
- Shiny issues:
- Bombirdier, Kilowattrel, Landorus, Magearna, Mega Diancie/Medicham, Galarian Ponyta, Shroodle, Spidops and Wattrel.
- Sprite issues:
- Fixed multiple overworld Pokémon sprites - Part 1 by @Cafeei in #5241
- “Blinking pixels”:
- Dwebble, Krookodile, Servine, Throh and Vulpix.
- Shiny Palettes
- Crustle, Excadrill, Lillipup, Serperior, Servine, Sigilyph, Swoobat, Tranquil and Venipede.
- Misc fixes:
- Archen, Basculin, Blitzle, Crustle, Escavalier, Krokorok, Krookodile, Sawsbuck, secondary, Serperior, Snivy, Throh, Woobat, Zebstrika
- “Blinking pixels”:
- Fixed multiple overworld Pokémon sprites - Part 2 by @Cafeei in #5333
- Palette Fixes:
- Shiny Riolu/Snover, Oshawott, Kabutops, Shieldon, Kingler and Groudon.
- Fixed “Blinking pixels”:
- Abomasnow, Aggron, Alakazam, Ariados, Articuno, Azumarill, Barboach, Bayleef, Bibarel, Blastoise, Celebi, Charmeleon, Cherrim, Chinchou, Cloyster, Corphish, Corsola, Crawdaunt, Cubone, Dewott, Doduo, Dusknoir, Electabuzz, Espeon, Exeggcute, Farfetch’d, Feraligatr, Flaafy, Flareon, Floatzel, Furret, Gastly, Girafarig, Giratina, Gligar, Gloom, Golbat, Grumpig, Hariyama, Heatran (just reduced), Hoppip, Jolteon, Jumpluff, Kricketot, Larvitar, Leafeon, Lileep, Lumineon, Luxio, Luxray, Machamp, Magneton, Mantine, Mantyke, Marowak, Meowth, Mesprit, Mew, Mewtwo, Mime Jr, Moltres, Numel, Oshawott, Phione, Pinsir, Politoed, Porygon-Z, Probopass, Quilava, Qwilfish, Rampardos, Rapidash, Regirock, Sceptile, Scizor, Seel, Shieldon, Shiftry, Slowking, Smoochum, Sneasel, Spheal, Steelix, Sudowoodo, Suicune, Swellow, Swinub, Tentacruel, Togekiss, Togepi, Vaporeon, Vibrava, Wartortle, Wooper, Yanma, Yanma, Yanmega, Zangoose, Zapdos, Zubat
- Misc. Sprite Fixes: Dewott, Misdreavus, Oshawott, Torkoal and Victini.
- Palette Fixes:
- Overworld sprite fixes by @Liamjd14 (with help from @hedara90 to solve conflicts) in #5334
- Palette Fixes: Shieldon.
- Misc. Sprite Fixes Torkoal.
- “Blinking pixels”:
- Ambipom, Armaldo, Crawdaunt, Crobat, Donphan, Flaaffy, Flygon, Grovyle, Hoppip, Igglybuff, Illumise, Jumpluff, Ledian, Ledyba, Mamoswine, Mantine, Marshtomp, Meganium, Mightyena, Miltank, Numel, Prinplup, Raikou, Roserade, Skarmory, Skiploom, Spinarak, Staraptor, Stunky, Torkoal, Wooper, Xatu, Yanma
- Overworld Pokémon sprite changes by @Liamjd14 in #5336
- Fixed “blinking pixels”: * Alolan Graveler/Golem/Alolan/Ninetales * Dawn Wings Necrozma * Hisuian Growlithe/Arcanine * Winter Sawsbuck
- Added missing Shiny Palettes
- Calyrex Ice/Shadow Rider, Origin Dialga/Palkia, White-Striped Basculin, Therian Enamorus and Low-Key Toxtricity.
- Removed Gigantamax Low-Key Toxtricity using base Low-Key follower sprites.
- Fixed Shiny palettes
- Alolan Marowak/Raichu, Eternal Flower Floette, Flabébé (All), Galarian Ponyta/Rapidash
- Typhlosion-Hisui follower shiny stomach color wrong - done
- Other sprite/palette fixes
- Alolan Exeggutor/Marowak/Persian/Raichu/Sandshrew, Hisuian Sligoo/Goodra and Winter Sawsbuck.
⚔️ Battle General ⚔️
Changed
- Updated Damage Category icons to match Gen6+ colors by @kittenchilly in #5080
Fixed
- Fixed Slateport Battle Tent/Battle Factory issues by @SarnPoke in #5281
- Choosing the “SWAP” option no longer shows invalid Pokémon (“??????????”).
- Reloading after choosing “REST” no longer resets the player’s challenge party to invalid Pokémon (“??????????”).
- Fixed Starting Status happening Wild Battles from a previous Trainer Battle by @PhallenTree in #5248
- Fixed bugged behavior caused by Z-Moves and disobedience by @hedara90 in #5245
- Fixed Entry Hazards targeting wrong side of the field if the opponent fainted by @PhallenTree in #5262
- Fixed being able to use multiple of the same Gimmick in Double Battles by @AgustinGDLV in #5235
- Fixed Terastallization not granting immunity to Tar Shot by @AlexOn1ine in #5302
- Fixed
Cmd_trainerslidein/outusing the incorrect function by @ghoulslash in #5326- Cleanup by @hedara90 in #5344
🤹 Moves 🤹
Added
- Added Charge’s Gen 9 behavior via
B_CHARGEconfig by @AlexOn1ine in #5274 - Added Powder’s Gen 7+ behavior of not causing damage when under Heavy Rain via
B_POWDER_RAINby @PhallenTree in #5370
Fixed
- Fixed move descriptions missing periods (Decorate, Collision Course, Electro Drift) by @Pawkkie and Kasen in #5221
- Fixed Confide not being blocked by Crafty Shield interaction by @hedara90 in #5202
- Fixed message for switch out moves by @kittenchilly in #5258
- Fixed Ice Fang’s descriptions using the opposite of what they’re supposed to do based on
B_USE_FROSTBITEby @laserXdolphin in #5273 - Fixes to Instruct by @PhallenTree in #5262
- Fixed Instruct bypassing AtkCanceler checks (Instruct allowed the target to act while asleep, flinched, etc.) and its interaction with First Turn Only moves (Fake Out, First Impression, Mat Block).
- Fixed Instruct’s animation using the attacker and target of the called move.
- Fixed Scale Shot’s effect not activating if the opponent fainted before all hits finished by @AlexOn1ine in #5292
- Fixed Round not preserving turn order for non-Round users if there’s a switch out at the beginning of the turn by @AlexOn1ine in #5292
- Fixed Max Moves ignoring absorbing abilities (+ test) by @PhallenTree in #5296
- Fixed attack string for Max Moves not being printed if it’s blocked by Max Guard by @hedara90 in #5312
- Fixed some Pledge move combo issues by @PhallenTree in #5330
- Fixed Pledge move combos attempting to be executed multiple times in a turn, causing mons to decrement sleep timer multiple times during the turn or causing infinite loops.
- Fixed potential issue with custom non-sound moves that use
EFFECT_ATTACK_UP_USER_ALLYorEFFECT_PERISH_SONGbeing blocked by Soundproof anyway by @AlexOn1ine in #5301 - Fixed Pledge combinations not being absorbed by absorption Abilities (Sap Sipper, Storm Drain, etc.) by @hedara90 in #5364
- Fixed Toxic Thread decreasing speed by 2 stages instead of 1 by @AsparagusEduardo in #5369
- Fixed Destiny Bond not working if the user was fainted by a multi-Hit move’s non-first hit by @AlexOn1ine in #5377
- Fixed Powder interactions by @PhallenTree in #5370
- Fixed Magic Guard not protecting against Powder’s secondary damage when using a Fire-type move.
- Fixed Fire/Water Pledge combination being cancelled by Powder.
- Fixed Fire Z-Moves not playing their animations and not granting their secondary effects when the user is under Powder’s effect
- Fixed After You/Shell Trap not updating battlers’ actions correctly by @PhallenTree in #5384
🎭 Abilities 🎭
Fixed
- Fixed weather abilities not activating when Cloud Nine user leaves the field by @AlexOn1ine in #5209
- Fixed missing
breakfor Poison Puppeteer’s code by @u8-Salem in #5243 - Fixed Pokémon with Purifying Salt being poisoned by Toxic Spikes by @AlexOn1ine in #5252
- Fixed Parental Bond not affecting Snore by @hedara90 in #5264
- Fixed Tera Shift’s description by @AsparagusEduardo in #5351
🧶 Items 🧶
Fixed
- Fixed berries missing their timing after passive damage by @AlexOn1ine in #5300
- Fixed Micle Berry not increasing accuracy on the next turn by @AlexOn1ine in #5358
🤖 Battle AI 🤖
Changed
- AI is encouraged to use “always crit” moves on partner with Anger Point by @SarnPoke in #5244
Fixed
- Fixed AI not seeing the power of Max Moves by @AlexOn1ine in #5299
- Fixed minor wrong order in
AI_CalcDamagethat made Nature Power not be considered for Z-Moves by @AlexOn1ine in #5155 - Fixed AI not considering Tera Blast/Tera Storm by @AlexOn1ine in #5155
- Fixed
AI_IsMoveEffectInPlusreading the incorrect stat for secondary effects that reduce stats by 2 stages by @ghoulslash and @Pawkkie in #5366
🧹 Other Cleanup 🧹
Changed
- Remove unused
BattleScript_WindPowerActivatesEnd2signature by @u8-Salem in #5257 - Replaced all usages of tabs in C files with spaces by @hedara90 in #5261
- Fixed missing
breaks in twoENDTURNcases by @ghoulslash in #5350 ShouldSwitchIfWonderGuardcleanup by @Pawkkie in #5383
🧪 Test Runner 🧪
Added
- Added missing Adaptability, Aerilate, Aftermath tests by @kittenchilly in #5242
- Added missing Disguise tests by @hedara90 in #5249
- Added some missing Instruct tests by @PhallenTree in #5262
- Added missing Powder tests by @PhallenTree in #5370
- Added
ShouldSwitchIfWonderGuardAI tests by @Pawkkie in #5383
Changed
- Moved
ASSUMEs to insideGIVENblocks to prevent them from being added correctly to the totals in the test summary by @AsparagusEduardo in #5308
📚 Documentation 📚
Fixed
- Fixed test system documentation saying that
make check TESTS="Spikes"could be done with single quotes instead of double quotes by @AsparagusEduardo in #5266
📦 Branch Synchronisation 📦
pret’s base pokeemerald
- N/A
merrp/aarant’s followers
- Merrp merge (September 9th) by @AsparagusEduardo in #5359
- aarant#40 (discarded, as it was already part of the expansion)
- New features:
- Static OW pokemon now bob while walking in place
- Toggled by
OW_FOLLOWERS_BOBBING.
- Toggled by
- Added
OW_MON_WANDER_WALKconfig option- If true, OW pokemon with
MOVEMENT_TYPE_WANDER*will walk-in-place in between steps.
- If true, OW pokemon with
- Static OW pokemon now bob while walking in place
New Contributors
- @laserXdolphin made their first contribution in #5273
- @Liamjd14 made their first contribution in #5304
Full Changelog: https://github.com/rh-hideout/pokeemerald-expansion/compare/expansion/1.9.1...expansion/1.9.2
Version 1.9.1
## How to update
- If you haven't set up a remote, run the command `git remote add RHH https://github.com/rh-hideout/pokeemerald-expansion`.
- Once you have your remote set up, run the command `git pull RHH expansion/1.9.1`.
🌋 REFACTORS 🌋
- Removed
ENDTURN_RETALIATEin #5182 - Removed
ENDTURN_WEATHER_FORMandallowedToChangeFormInWeatherin #5171
🧬 General 🧬
Added
- Move Relearner UI now displays move category by @kittenchilly in #5081
Fixed
- Fixes wrong padding field in
SpeciesInfostruct by @AlexOn1ine in #5139 - Fixed specific tiles changing to PC tiles when using Box Link/Debug PC option by @cawtds in #5141
🐉 Pokémon 🐉
Fixed
- Fixed stray transparent pixels in Urshifu sprites by @hedara90 in #5071
- Fixed
bufferspeciesnamenot working for species IDs over 1023 by @SBird1337 in #5088 - Fixed overworld Pokémon breaking for species IDs above 1535 by @hedara90, @mrgriffin and @SarnPoke in #5179
- Fixed overworld palettes for multiple species by @hedara90 in #5107
- Dialga Origin (Normal and Shiny)
- Palkia Origin (Normal and Shiny)
- Giratina Origin (shiny palette fixed by @hedara90 in #5108)
- Xerneas Neutral/Active (Normal and Shiny)
- Enamorus Incarnate/Therian (Normal and Shiny)
- Fixed/added missing Pokémon sprites and palettes by @Cafeei in #5126
- Overworld:
- Shiny Sneasler, Morelul, Bounsweet, Bruxish, Guzzlord, Regieleki, Zacian, Zamazenta
- Hisuian Zorua sprite
- Shiny Summer Sawsbuck
- Shiny Galarian Yamask, Darumaka, Zigzagoon, Zapdos, Ponyta, Rapidash, Slowpoke, Farfetch’d, Weezing, Mr. Mime, Articuno, Moltres, Slowking, Stunfisk, Darmanitan
- Shiny Hisuian Sneasel, Qwilfish, Samurott,
- Battle sprites:
- Shiny Sneasler, Cursola, Pincurchin, Runerigus
- Shiny Galarian Yamask, Darumaka
- Overworld:
- Fixed Unown Overworld follower sprites by Sarn by @hedara90 in #5146
⚔️ Battle General ⚔️
Changed
- Set new animation particles by default to off by @AlexOn1ine in #5161
Fixed
- Fixed speed ties by @mrgriffin in #4780
- Cleanup by @hedara90 in #5092
- Fixed Defiant/Competitive not working after the battler enters the field with a Court Changed Sticky Web on its side of the field by @PhallenTree in #5093
- Fixed
trainerprocnot properly parsing line markers, which caused erroring lines to be offset by @mrgriffin in #5122 - Fixed initial Zigzagoon battle being able to use a Gimmick by @AlexOn1ine in #5129
- Fixed incorrect rounding when
maxHPis lower than 16 by @hedara90 in #5183- This caused these Pokémon to not be hurt by Sandstorm/Hail.
- Fixes UB in
Cmd_averagestatsby @mrgriffin and @AlexOn1ine in #5191
🤹 Moves 🤹
Added
- Added move animations for multiple moves by @TheTrueSadfish in #5159
- Spin Out, Mortal Spin, Fillet Away, Flower Trick, Make It Rain, Shed Tail, Hyper Drill, Twin Beam, Comeuppance, Blood Moon, Fickle Beam, Thunder Clap, Hard Press, Dragon Cheer, Malignant Chain.
- Purple chains by ogwon on Discord, beam by @TheTrueSadfish and livra on Discord.
Changed
- Adjusted Raging Bull’s animation to include Brick Break’s wall break effect by @TheTrueSadfish in #5159
Fixed
- Fixed non-grass Ivy Cudgel breaking battle UI by @hedara90 in #5117
- Fixes Stomping Tantrum effect not doubling power in certain situations by @AlexOn1ine in #5140
- Fixed Fickle Beam’s description by @PhallenTree in #5093
- Fixed Revelation Dance interactions with Z-Move, Roost and typeless mons by @PhallenTree in #5133
- Fixes Poltergeist missing its accuracy check by @AlexOn1ine in #5168
- Fixed Fickle Beam not showing its message by @TheTrueSadfish in #5159
- Fixed Retaliate not working correctly if the party member fainted via passive damage during end of turn by @hedara90 in #5182
- Fixed Flame Burst’s passive damage being based off current HP rather than Max HP by @hedara90 in #5182
- Fixed using Population Bomb with Loaded Dice printing garbage text by @kittenchilly in #5195
🎭 Abilities 🎭
Added
- Added in-battle effect of Pickup by @PhallenTree in #5170
Fixed
- Fixes Purifying Salt not halving damage for dynamic move types by @AlexOn1ine in #5145
- Fixed Dancer-called moves not changing their type based on the new user by @PhallenTree in #5133
- Fixed Ice Face not regenerating after switching in during Hail/Snow by @hedara90 in #5171
- Fixed Wind Rider not activating when switched in while Tailwind is active on the user’s side of the field activation and tests by @PhallenTree in https://github.com/rh-hideout/pokeemerald-expansion/pull/5207
🧶 Items 🧶
Added
- Added Dowsing Machine’s expanded name by @kittenchilly in #5134
Fixed
- Fixes Booster Energy not increasing speed by @AlexOn1ine in #5167
🤖 Battle AI 🤖
Changed
- Adjusted AI calculation for Triple Kick Effect by @AlexOn1ine in #5127
Fixed
- Fix Switch AI Bug: AI never switching out when it could be OHKO’d by @Pawkkie in #5089
- Adds missing AI checks for poltergeist by @AlexOn1ine in #5189
🧹 Other Cleanup 🧹
IsValidForBattlefunction formatting by @AlexOn1ine in #5085- Opportunist/Mirror Herb cleanup by @AlexOn1ine in #5120
- Cleanup by @AlexOn1ine in #5158
- Remove trailing whitespace (master) by @AsparagusEduardo in #5174
🧪 Test Runner 🧪
Added
- Added missing Move Effect TODO tests - Volume C by @AsparagusEduardo in #5094
- Added multiple missing ability TODO tests by @AsparagusEduardo in #5163
- Added missing Guard/Power split tests by @mrgriffin and @AlexOn1ine in #5191
- Added missing Harvest and Pickup tests by @PhallenTree in #5170
- Added missing Round tests by @hedara90 in https://github.com/rh-hideout/pokeemerald-expansion/pull/5196
- Added missing Wind Rider tests by @PhallenTree in https://github.com/rh-hideout/pokeemerald-expansion/pull/5207
Changed
- Fixed G-Max Replenish not considering Gen 5+ Pickup by @PhallenTree in #5170
Fixed
- Fixed
RandomUniformExceptnot being exclusive on the higher boundary by @PhallenTree in #5170
📚 Documentation 📚
- Added guide to running documentation website locally by @AsparagusEduardo in #5059
- How to docs and fixes to be added to the mdbook documentation site by @anrichtait in #5070
- Improved 1.8 ⇒ 1.9 non-Competitive syntax migration instructions by @mrgriffin in #5079
📦 Branch Synchronisation 📦
pret’s base pokeemerald
- 5th of August in #5098
- Fixed bottom half of Mt. Pyre not being labeled in PokeNav by @fdeblasio in pret#2018
- 7th of August in #5116
- Changed type1 and type2 to be consistent by @pkmnsnfrn in pret#2021
- 14th of August in #5165
- Fix type for offset in MapConnection by @GriffinRichards in pret#2011
merrp/aarant’s followers
- 7th of August in #5110
Full Changelog: https://github.com/rh-hideout/pokeemerald-expansion/compare/expansion/1.9.0...expansion/1.9.1
New Contributors
- @TheTrueSadfish made their first contribution in https://github.com/rh-hideout/pokeemerald-expansion/pull/5159
Version 1.9.0
## How to update
- If you haven't set up a remote, run the command `git remote add RHH https://github.com/rh-hideout/pokeemerald-expansion`.
- Once you have your remote set up, run the command `git pull RHH expansion/1.9.0`.
🌋 REFACTORS 🌋
📜 = Has a migration script.
- agbcc has been deprecated
- Added migration script README
- Removed Gen 9 settings for out-of-battle abilities
- 📜Customizable Frontier Pokémon sets
- Replaced VARARG_8 uses with recursive macros
- 📜Competitive-formatted parties
- Terastallization
- Combined weather set commands
- Full official GF names for species/items/moves/types
- Automatically display TM/HM icons based on their move
- Set
GiveBoxMonIntialMoveset_Fastas default - Changed Battle Frontier validation to species flag
- Replaced HP checks with
IsBattlerAlive - Removed redundant
MOVE_EFFECT_SP_ATK_TWO_DOWN - 📜Removed
gItemIconTable - 📜Egg Move Refactor
- Adjusted Ate-Ability code a bit to make it more readable
- Type Info refactors
- merrp/aarant’s Followers
- Refactored residual damage to be more readable and less prone to bugs
🧬 General 🧬
Added
-
Added migration script README by @Bassoonian in https://github.com/rh-hideout/pokeemerald-expansion/pull/4719
-
Customizable Frontier Pokémon sets by @ghoulslash in https://github.com/rh-hideout/pokeemerald-expansion/pull/4313
FacilityMonhas been removed in favor of using regularTrainerMon.- Removed
BATTLE_FRONTIER_ITEM_xitem constants in favor of using regularITEM_xconstants. - New
CreateFacilityMonto handle duplicated code.- Added
FLAG_FRONTIER_MON_FACTORYthat replaces Return for Frustration and sets frienship to 0. Used in the Battle Factory.
- Added
- Converted data in
src/data/battle_frontier/battle_frontier_mons.handsrc/data/battle_frontier/battle_tent.h, for example:.itemTableId = BATTLE_FRONTIER_ITEM_CHOICE_BAND,->.heldItem = ITEM_CHOICE_BAND,.evSpread = F_EV_SPREAD_SPEED | F_EV_SPREAD_ATTACK,->.ev = TRAINER_PARTY_EVS(0, 252, 0, 252, 0, 0),
- Migration script available in
migration_scripts/egg_move_refactor.pyby @AlexOn1ine in https://github.com/rh-hideout/pokeemerald-expansion/pull/5040
- Added documentation to
STATIC_ASSERTSused by theBoxPokemonafter 1.8.0 by @pkmnsnfrn in https://github.com/rh-hideout/pokeemerald-expansion/pull/4294 -
Competitive-formatted parties by @mrgriffin in https://github.com/rh-hideout/pokeemerald-expansion/pull/3545
- Can be disabled by setting
COMPETITIVE_PARTY_SYNTAXtoFALSEininclude/config/general.h. If migrating from 1.8, remove the first and last lines fromsrc/data/trainers.h(const struct Trainer gTrainers[] = {and};respectively). - Introduces
trainerproc, a tool which converts Competitive-formatted parties into Trainer Control-formatted parties. - If you made custom changes to the following files and want to use this new format, Do not accept the incoming changes for them. Instead, use the migration script present in
migration_scripts/convert_parties.py:src/data/trainers.hsrc/data/trainer_parties.hsrc/data/battle_partners.hsrc/data/partner_parties.h
- Before:
After:static const struct TrainerMon sTestParty1[] = { { .species = SPECIES_WOBBUFFET, .ball = ITEM_MASTER_BALL, .ability = ABILITY_TELEPATHY, .friendship = 42, .gender = TRAINER_MON_FEMALE, .heldItem = ITEM_ASSAULT_VEST, .isShiny = TRUE, .iv = TRAINER_PARTY_IVS(25,26,27,28,29,30), .ev = TRAINER_PARTY_EVS(252, 0, 0, 252, 4, 0), .lvl = 67, .moves = {MOVE_AIR_SLASH, MOVE_BARRIER, MOVE_SOLAR_BEAM, MOVE_EXPLOSION}, .nature = NATURE_HASTY, .nickname = COMPOUND_STRING("Bubbles") }, { .species = SPECIES_WOBBUFFET, .ability = ABILITY_SHADOW_TAG, .lvl = 5, }, }; static const struct Trainer sTestTrainer1 = { .trainerName = _("Test1"), .party = TRAINER_PARTY(sTestParty1), };=== 0 === Name: Test1 Bubbles (Wobbuffet) (F) @ Assault Vest Hasty Nature Level: 67 Ability: Telepathy IVs: 25 HP / 26 Atk / 27 Def / 29 SpA / 30 SpD / 28 Spe EVs: 252 HP / 4 SpA / 252 Spe Happiness: 42 Shiny: Yes Ball: Master Ball - Air Slash - Barrier - Solar Beam - Explosion Wobbuffet Level: 5 Ability: Shadow Tag - You can add comments by using
//or/* ... */, like in C. - You’re allowed to write
SPECIES_PIKACHUinstead ofPikachu(etc etc) if you want. - In addition to the migration script described above, you can add the following to at the top of the
src/data/trainers.partyfile to change how the tool interprets the file:#pragma trainerproc ivs explicit— requires anIVs:line for every Pokémon instead of defaulting to 31s.#pragma trainerproc ivs <IVs>— changes the default IVs.#pragma trainerproc level explicit— requires aLevel:line for every Pokémon instead of defaulting to 100.#pragma trainerproc level <level>— changes the default level.- During the merge you could choose to keep your original
src/data/trainers.handsrc/data/trainer_parties.hand then run the conversion script to update thesrc/data/trainers.party,make, then check in all three files. Alternatively don’t run the conversion script and turn offCOMPETITIVE_PARTY_SYNTAXininclude/config.h.
- Added synonyms for competitive/CFRU species defines, eg:
SPECIES_PONYTA_GALARforSPECIES_PONYTA_GALARIANSPECIES_MAUSHOLD_FOURforSPECIES_MAUSHOLD_FAMILY_OF_FOURSPECIES_CHARIZARD_GMAXforSPECIES_CHARIZARD_GIGANTAMAX- And so.
- TODO:
- Support
Hidden Power:to set IVs appropriate for a particular Hidden Power type. - Consider case-insensitivity in the parser.
- Support
- Cleanup and bugfixes:
- By @mrgriffin in https://github.com/rh-hideout/pokeemerald-expansion/pull/4362
- By @AsparagusEduardo in https://github.com/rh-hideout/pokeemerald-expansion/pull/4366
- By @Bassoonian in https://github.com/rh-hideout/pokeemerald-expansion/pull/4374
- By @LOuroboros in https://github.com/rh-hideout/pokeemerald-expansion/pull/4397
- By @Bassoonian in https://github.com/rh-hideout/pokeemerald-expansion/pull/4421
- By @AlexOn1ine in https://github.com/rh-hideout/pokeemerald-expansion/pull/4431
- By @mrgriffin in https://github.com/rh-hideout/pokeemerald-expansion/pull/4442
- By @fdeblasio in https://github.com/rh-hideout/pokeemerald-expansion/pull/4830
- By @mrgriffin in https://github.com/rh-hideout/pokeemerald-expansion/pull/4969
- By @hedara90 in https://github.com/rh-hideout/pokeemerald-expansion/pull/4734
- By @innocenthedgehog in https://github.com/rh-hideout/pokeemerald-expansion/pull/4988
- By @mrgriffin in https://github.com/rh-hideout/pokeemerald-expansion/pull/4990
- By @mrgriffin in https://github.com/rh-hideout/pokeemerald-expansion/pull/5035
- Can be disabled by setting
- Added
OW_PC_MOVE_ORDERconfig to use future generation’s menu order for the Pokémon Storage System by @pkmnsnfrn and @AsparagusEduardo in https://github.com/rh-hideout/pokeemerald-expansion/pull/4348GEN_1/2/3: Widthraw -> Deposit -> Move.GEN_4/5/6_XY: Deposit -> Widthraw -> Move.GEN_6_ORAS/7/8/9: Move -> Deposit -> Widthraw.
- Added
OW_HIDE_REPEAT_MAP_POPUPconfig that doesn’t show the Map Popup when transitioning bewteen maps within the same Map Section by Anon822 from Pokécommunity and @pkmnsnfrn in https://github.com/rh-hideout/pokeemerald-expansion/pull/4370 - Multiple Fishing Enhancements by @ghoulslash and @pkmnsnfrn in https://github.com/rh-hideout/pokeemerald-expansion/pull/4343
- Added
I_FISHING_CHAINconfig to enable XY’s chain fishing. - Added
I_FISHING_PROXIMITYconfig to enable XY’s proximity mechanic, where fishing away from NPCs increases the chance of a Pokémon being hooked. - Added
I_FISHING_MINIGAMEconfig to change between minigame versions.GEN_1/2will not require a minigame, and instead automatically hook the Pokémon.- All other settings use RSE’s minigame. FRLG/Gen4+’s minigame will be implemented in the future.
- Cleanup and bugfixes:
- By @AsparagusEduardo in https://github.com/rh-hideout/pokeemerald-expansion/pull/4412
- By @cawtds in https://github.com/rh-hideout/pokeemerald-expansion/pull/4906
- By @AlexOn1ine in https://github.com/rh-hideout/pokeemerald-expansion/pull/4718
- By @cawtds and @pkmnsnfrn in https://github.com/rh-hideout/pokeemerald-expansion/pull/5031
- Added
-
Full official GF names for species/items/moves/types by @mrgriffin, @ZnogyroP and @cfmnephrite in https://github.com/rh-hideout/pokeemerald-expansion/pull/4241
- 8-character type names.
- 12-character Pokémon names (and nicknames)
- 16-character Move names.
- 20-character item names.
- This is done by introducing 3 new fonts that automatically change the size of the name in vanilla interfaces:
FONT_NARROWER,FONT_SMALL_NARROWERandFONT_SHORT_NARROW.
- If the hack has changed fonts—e.g. to the FrLg ones—then they probably want to create their own versions of the new fonts.
- If the hack has introduced more UIs that render names they probably want to use
GetFontIdToFit—see this PR’s changes for examples of that. - If the hack has introduced names in list menus they can use
.fontIdMayNarrow = TRUEon the list template. - Types, species, moves, and items all have individual commits which enable support in the UI and turn on longer names by default. These can be reverted by downstream projects if they really want to.
- Cleanup
- By @Nopinou in https://github.com/rh-hideout/pokeemerald-expansion/pull/4473
- By @kittenchilly in https://github.com/rh-hideout/pokeemerald-expansion/pull/4588
- By @iriv24 in https://github.com/rh-hideout/pokeemerald-expansion/pull/4979
- Added
OW_PC_RELEASE_ITEMconfig that gives back items from released Pokémon by @Bassoonian in https://github.com/rh-hideout/pokeemerald-expansion/pull/4577- If the bag is full, the item is lost, however.
- Cleanup by @Bassoonian in https://github.com/rh-hideout/pokeemerald-expansion/pull/4844
- Added
P_EGG_CYCLE_LENGTHconfig that updates the amount of steps required to complete an egg cycle by @Bassoonian in https://github.com/rh-hideout/pokeemerald-expansion/pull/4596 - Added
trainerbattle_two_trainersmacro to trigger a 1 player vs 2 NPC battle by @aarant and @AlexOn1ine in https://github.com/rh-hideout/pokeemerald-expansion/pull/4741 - Added
createmonScript Command and macro by @ghoulslash in https://github.com/rh-hideout/pokeemerald-expansion/pull/4688- This allows to set up wild enemy parties with the same versatility as
givemon(IVs, EVs, abilities, moves, etc).
- This allows to set up wild enemy parties with the same versatility as
- Added
setwilddoubleflagmacro to setsIsScriptedWildDoubleand allow 2 player vs 1 enemy wild battles by @ghoulslash in https://github.com/rh-hideout/pokeemerald-expansion/pull/4688 - Added support for multiple Roaming Pokémon at once by @Bassoonian in https://github.com/rh-hideout/pokeemerald-expansion/pull/4762
- By default,
ROAMER_COUNTis set to 1 to keep save compatibility. Increase it to add more roamers (though this breaks saves).
- By default,
- Added
OW_IGNORE_EGGS_ON_HEAL, which makes it such that eggs are not counted in the Pokémon Center’s heal animation by @ghoulslash @pkmnsnfrn in https://github.com/rh-hideout/pokeemerald-expansion/pull/4888 - Added support for fake RTC by Anon822 from PokéCommunity and @pkmnsnfrn in https://github.com/rh-hideout/pokeemerald-expansion/pull/4910
- When
OW_USE_FAKE_RTCisTRUE, time runs at a different rate from real time, like in Legends: Arceus or Scarlet and Violet. - Use
OW_ALTERED_TIME_RATIOto set the amount of “time” passing every 60 frames (1 real time second):GEN_8_PLA: 1 minute.GEN_9: 20 seconds.- All other settings make the game synced with real life.
- You may also set a flag to pause the RTC (
OW_FLAG_PAUSE_TIME), and the script commandspausefakertc,resumefakertcandtogglefakertcby @pkmnsnfrn in https://github.com/rh-hideout/pokeemerald-expansion/pull/4954 - Cleanup by @Bassoonian in https://github.com/rh-hideout/pokeemerald-expansion/pull/4965
- When
- Added B2W2-style map pop-Ups by @ravepossum, @nielsmittertreiner and @pkmnsnfrn in https://github.com/rh-hideout/pokeemerald-expansion/pull/4396
- Change
OW_POPUP_GENERATIONtoGEN_5to switch existing map popups. - You may choose between Black or White themes via
OW_POPUP_BW_COLOR(OW_POPUP_BW_COLOR_BLACKorOW_POPUP_BW_COLOR_WHITE). - You may choose to display the current time in the pop-up using
OW_POPUP_BW_TIME_MODE.OW_POPUP_BW_TIME_NONE: Disables time in pop-up.OW_POPUP_BW_TIME_12_HR: Shows 12-hour time in pop-upOW_POPUP_BW_TIME_24_HR: Shows 24-hour time in pop-up
- You may enable alpha blending via
OW_POPUP_BW_ALPHA_BLEND(mainly designed around the Black theme). - Cleanup by @AsparagusEduardo in https://github.com/rh-hideout/pokeemerald-expansion/pull/4752
- Change
- Allowed flags to be used in trigger scripts instead of vars by @DizzyEggg in https://github.com/rh-hideout/pokeemerald-expansion/pull/4900
Changed
-
agbcc has been deprecated by @mrgriffin in https://github.com/rh-hideout/pokeemerald-expansion/pull/4989
- You technically still use
make agbccby disabling the error thrown when using it, but it will be removed completely for version 1.10.
- You technically still use
-
Moved general config file to the config folder by @AsparagusEduardo in https://github.com/rh-hideout/pokeemerald-expansion/pull/4805
config.h->config/general.h- Cleanup by @hedara90 in https://github.com/rh-hideout/pokeemerald-expansion/pull/5026
-
Set
GiveBoxMonIntialMoveset_Fastas default by @AlexOn1ine in https://github.com/rh-hideout/pokeemerald-expansion/pull/4470 -
Changed Battle Frontier validation to species flag by @kittenchilly in https://github.com/rh-hideout/pokeemerald-expansion/pull/4341
- Added
isFrontierBannedflag and removedgFrontierBannedSpecies. - Renamed
isParadoxForm->isParadox.
- Added
-
Unified Nature info by @fdeblasio in https://github.com/rh-hideout/pokeemerald-expansion/pull/4562
- All data is now found on
gNaturesInfoinsrc/pokemon.c - Names, Stat Up/Down, Back Sprite animation, Pokéblock animation, Nature Girl message and Battle Palace data.
- Cleanup by @Sneed69 in https://github.com/rh-hideout/pokeemerald-expansion/pull/4598
- All data is now found on
-
Type Info refactors by @AsparagusEduardo in https://github.com/rh-hideout/pokeemerald-expansion/pull/4462
- Added
src/data/types_info.hfile forgTypesInfoinstead ofsrc/battle_main.c.- Moved
sTypeEffectivenessTablehere file as well (and renamed it togTypeEffectivenessTable)
- Moved
TYPE_NONEduplicates graphics fromTYPE_MYSTERYdue to limitations withgraphics_file_rules.mk.- Damage Categories for
B_PHYSICAL_SPECIAL_SPLIT’s pre-Gen4 setting can now be specified in thisgTypesInfo’sdamageCategoryfield instead of depending on the type’s order.
- Added
- Consolidated Lilycove Contest Lady’s values into one struct (
sContestLadyValues) by @fdeblasio in https://github.com/rh-hideout/pokeemerald-expansion/pull/4951 - Applied the Pokémon Sprite Visualizer name officially by @Bassoonian in https://github.com/rh-hideout/pokeemerald-expansion/pull/4745
- Don’t specify
sDexSearchTypeOptionsarray size by @Sneed69 in https://github.com/rh-hideout/pokeemerald-expansion/pull/4820- Prevents Type search in the dex from breaking when non-conventional types are added.
- Only call RNG once when generating IVs in some cases by @tertu-m in https://github.com/rh-hideout/pokeemerald-expansion/pull/4876
Fixed
- Fixed potential Wireless Adapter desynchronization by @AtariDreams in https://github.com/rh-hideout/pokeemerald-expansion/pull/3730
- Fixed
ListItemTemplateUB in the Pokémon Center by @Bassoonian in https://github.com/rh-hideout/pokeemerald-expansion/pull/4725 - Fixed
src/data/map_group_count.hnot being ignored in.gitignoreproperly by @rayrobdod in https://github.com/rh-hideout/pokeemerald-expansion/pull/4727 - Fixed double battles not occuring with only one Pokemon by talking to the trainers despite
OW_DOUBLE_APPROACH_WITH_ONE_MONbeing setTRUEby @fdeblasio in https://github.com/rh-hideout/pokeemerald-expansion/pull/4848 - Fixed unused
B_TRANSITION_SHRED_SPLITfrom softlocking the game by @Lunos, @griffinr and @pkmnsnfrn in https://github.com/rh-hideout/pokeemerald-expansion/pull/4919
✨ Feature Branches ✨
merrp/aarant’s Followers
- Integrated @aarant’s followers branch by @AsparagusEduardo in https://github.com/rh-hideout/pokeemerald-expansion/pull/4022
- This includes Dynamic Overworld Palettes and Expanded Overworld IDs.
- This does not include the
lightingbranch yet, but will be included in a future version. - Updated up to the latest version of the branch (11th of July) by @Bassoonian in https://github.com/rh-hideout/pokeemerald-expansion/pull/4944
- Cleanup
- By @Bassoonian in https://github.com/rh-hideout/pokeemerald-expansion/pull/4782
- By @AsparagusEduardo in https://github.com/rh-hideout/pokeemerald-expansion/pull/4937
Changes from the original branch
- Follower Pokémon can be enabled using the
OW_FOLLOWERS_ENABLEDconfig. - Pokémon NPCs can be added to a map independently from the Followers config. Keep in mind, this requires
OW_POKEMON_OBJECT_EVENTSto be enabled in order to add the graphics to the ROM.- Eg: use
OBJ_EVENT_GFX_SPECIES(CHARIZARD)where the graphic ID would go (OBJ_EVENT_GFX_SPECIES_SHINY()for shiny version). - May also use
OBJ_EVENT_GFX_SPECIES_SHINY(CHARIZARD)to make them shiny by @AsparagusEduardo in https://github.com/rh-hideout/pokeemerald-expansion/pull/5049
- Eg: use
- Moved original configs from
include/constants/event_objects.htoinclude/config/overworld.hand renamed them:OW_MON_BOBBING->OW_FOLLOWERS_BOBBINGLARGE_OW_SUPPORT->OW_LARGE_OW_SUPPORTOW_MON_POKEBALLS->OW_FOLLOWERS_POKEBALLS
- Added follower Pokémon sprites from Gen 4-8
- Credits to @Eemeliri and Gerben BSc
- Moved
OW_GFX_COMPRESSfrominclude/global.htoinclude/config/overworld.h. - Added
OW_SUBSTITUTE_PLACEHOLDERconfig to hide followers if they don’t have a follower sprite instead of using a placeholder Substitute sprite by @Bassoonian in https://github.com/rh-hideout/pokeemerald-expansion/pull/4765 - Follower graphics are shown in the Pokémon Sprite Visualizer.
- Follower graphics have been moved to the respective species graphics folder instead of all being grouped in
graphics/object_events/pics/pokemon.- Eg:
graphics/object_events/pics/pokemon/abomasnow.pngwas moved tographics/pokemon/abomasnow/follower.png.
- Eg:
- Follower data has been moved to
gSpeciesInfo- Their palettes are separate from the battle sprite palettes
- Can be enabled using
OW_FOLLOWERS_SHARE_PALETTE, but requires manual sprite adjustements. For now, it’s recommended to keep thisFALSE. (They don’t use much space anyway)
- Can be enabled using
- Their palettes are separate from the battle sprite palettes
- Updated
GetTypeEffectivenessused by follower messages to account for new abilities with type immunities. - Cleaned up code style to match pret/expansion’s.
- Reverted Regi’s sprite to vanilla’s.
- Follower PicTables use
overworld_ascending_framesmacro. - Removed unneeded calls to
bufferspeciesname. - Removed
MON_DATA_NATURE. - Removed debug functions like
IsAccurateGBA. - Removed
ScrCmd_callfuncto usecallnatives instead
🐉 Pokémon 🐉
Added
- Added
EVO_ITEM_COUNT_999evolution method (used by Gimmighoul) by @kittenchilly in https://github.com/rh-hideout/pokeemerald-expansion/pull/4261- Requires level up while carrying 999 of the specified item in the bag, which will be consumed.
- Uses new
EVO_MODE_CANT_STOPmode, which is a clone ofEVO_MODE_NORMALbut prevents evolution from being canceled.
- Added
EVO_DEFEAT_THREE_WITH_ITEMevolution method (used by Bisharp) by @Bassoonian in https://github.com/rh-hideout/pokeemerald-expansion/pull/4768- Requires level up after defeating 3 Pokémon of the same species holding the specified item.
- Eg: Bisharp defeating 3 other Bisharp holding Leader Crests.
- Cleanup by @AsparagusEduardo in https://github.com/rh-hideout/pokeemerald-expansion/pull/5046
- Requires level up after defeating 3 Pokémon of the same species holding the specified item.
- Added
EVO_OVERWORLD_STEPSevolution method (used by Pawmo, Bramblin and Rellor) by @Bassoonian in https://github.com/rh-hideout/pokeemerald-expansion/pull/4758- Requires level up after walking the specified amount of steps with that Pokémon as the first member in the party without switching.
- Switching the party leader resets the steps.
- Cleanup by @AsparagusEduardo in https://github.com/rh-hideout/pokeemerald-expansion/pull/5047
- Added
FORM_CHANGE_DAYS_PASSEDform change (used by Furfrou and Hoopa) by @Bassoonian in https://github.com/rh-hideout/pokeemerald-expansion/pull/4778- Adds
MON_DATA_DAYS_SINCE_FORM_CHANGE, which is a timer to automatically changes forms at midnight once it runs out. It is set after a different form change has been made (currently only added to Form Change items, including Prison Bottle)
- Adds
- Added unique icons for all of Arceus’s forms via config (
P_ARCEUS_UNIQUE_FORM_ICONS) by @kittenchilly in https://github.com/rh-hideout/pokeemerald-expansion/pull/4329 - Added
P_TWO_FRAME_FRONT_SPRITESconfig to allow disabling 2-frame front animations by @Bassoonian in https://github.com/rh-hideout/pokeemerald-expansion/pull/4750 - Added
P_CRIES_ENABLEDconfig to disable species cries and stop them from being included in the ROM by @AsparagusEduardo in https://github.com/rh-hideout/pokeemerald-expansion/pull/4791 - Added configs to prevent unobtainable Pokemon from being shiny by @fdeblasio in https://github.com/rh-hideout/pokeemerald-expansion/pull/4735
P_ONLY_OBTAINABLE_SHINIES: Prevents shinies from generating in the Battle Pyramid.P_NO_SHINIES_WITHOUT_POKEBALLS: Prevents shinies from generating if the player has no Poké Balls.
- Added
P_CAN_FORGET_HIDDEN_MOVEconfig allow Pokémon to forget HM moves by @pkmnsnfrn and @Lunos in https://github.com/rh-hideout/pokeemerald-expansion/pull/4968
Changed
- Renamed evolution methods the were labeled as evo level by @AlexOn1ine in https://github.com/rh-hideout/pokeemerald-expansion/pull/4607
EVO_LEVEL_MOVE_TWENTY_TIMES->EVO_MOVE_TWENTY_TIMESEVO_LEVEL_RECOIL_DAMAGE_MALE->EVO_RECOIL_DAMAGE_MALEEVO_LEVEL_RECOIL_DAMAGE_FEMALE->EVO_RECOIL_DAMAGE_FEMALE- Cleanup by @AsparagusEduardo in https://github.com/rh-hideout/pokeemerald-expansion/pull/4644
- Evolution tracker is now by @Bassoonian in https://github.com/rh-hideout/pokeemerald-expansion/pull/4758
-
Replaced VARARG_8 uses with recursive macros by @cfmnephrite in https://github.com/rh-hideout/pokeemerald-expansion/pull/4232
-
Egg Move Refactor by @Bassoonian in https://github.com/rh-hideout/pokeemerald-expansion/pull/4534
- Egg Moves are now formatted like Teachable learnsets and their pointers are stored in
gSpeciesInfo, as opposed to having one big array.- Only offspring require these tables.
- Migration script available in
migration_scripts/egg_move_refactor.py.
- Egg Moves are now formatted like Teachable learnsets and their pointers are stored in
⚔️ Battle General ⚔️
Added
- Added option to increase Experience bar speed via
B_FAST_EXP_GROWby @SonikkuA-DatH and @pkmnsnfrn in https://github.com/rh-hideout/pokeemerald-expansion/pull/4335 - Added Gen 4’s Fog battle weather by @kittenchilly in https://github.com/rh-hideout/pokeemerald-expansion/pull/4359
- Uses Haze’s animation.
- Changes
B_FOG_TERRAIN(TRUE/FALSE config) intoB_OVERWORLD_FOG(Generational config).GEN_4: Uses this battle weather in maps withWEATHER_FOG_DIAGONALandWEATHER_FOG_HORIZONTAL.GEN_8onwards: Sets permanent Misty Terrain.- All others disable them.
-
Terastallization by @AgustinGDLV in https://github.com/rh-hideout/pokeemerald-expansion/pull/4110
- Tera Type automatically assigned to existing Pokémon based on their personality value.
- Can get and set Tera Types in scripts for party members using
checkteratypeandsetteratypeby @Bassoonian in https://github.com/rh-hideout/pokeemerald-expansion/pull/4460
- Can get and set Tera Types in scripts for party members using
- To activate, it requires:
ITEM_TERA_ORBto be in the player’s bag.B_FLAG_TERA_ORB_CHARGEDto be set up to an unused flag. It¿s automatically set whenHealPlayerPartyis called.
- Added
ignoreTeraargument added toGetBattlerType - Added Tera Blast’s effect.
- Changes type shown in battle screen if the mon is Terastalized or about to by @kittenchilly in https://github.com/rh-hideout/pokeemerald-expansion/pull/4447
- Added Stellar Type.
- Added
teraTypeoption for Trainers (also supported by Competitive Format Parties) - Added Tera Starstorm’s effect by @kittenchilly in https://github.com/rh-hideout/pokeemerald-expansion/pull/4447
- Terastallization animation by @Pokabbie in https://github.com/rh-hideout/pokeemerald-expansion/pull/4507
- Added
forceTeraTypefield forgSpeciesInfo, which forces the Pokémon to have a specific Tera Type (used by Terapagos and Ogerpon) by @kittenchilly in https://github.com/rh-hideout/pokeemerald-expansion/pull/4438 - Added
FORM_CHANGE_BATTLE_TERASTALLIZATIONby @kittenchilly in https://github.com/rh-hideout/pokeemerald-expansion/pull/4438- It uses a Pokémon’s Tera Type to choose which form to switch to upon Terastallizing.
- Bugfixes:
- By @AgustinGDLV in https://github.com/rh-hideout/pokeemerald-expansion/pull/4435
- By @AgustinGDLV in https://github.com/rh-hideout/pokeemerald-expansion/pull/4440
- By @Sneed69 in https://github.com/rh-hideout/pokeemerald-expansion/pull/4513
- By @Sneed69 in https://github.com/rh-hideout/pokeemerald-expansion/pull/4515
- By @WillKolada in https://github.com/rh-hideout/pokeemerald-expansion/pull/4529
- By @iriv24 in https://github.com/rh-hideout/pokeemerald-expansion/pull/4975
- Tera Type automatically assigned to existing Pokémon based on their personality value.
- Added Gen 1 type matchups by @AsparagusEduardo in https://github.com/rh-hideout/pokeemerald-expansion/pull/4508
- Renamed
B_STEEL_RESISTANCES->B_UPDATED_TYPE_MATCHUPSto reflect this change. - Added defines to cleanup
sTypeEffectivenessTable.
- Renamed
- Added Move Descriptions in battle by @Bassoonian, @TheXaman, @Pawkkie and @ravepossum in https://github.com/rh-hideout/pokeemerald-expansion/pull/4152
- Press L before selecting a move to see their category, power, accuracy and description.
- This can be changed to R by using the
B_MOVE_DESCRIPTION_BUTTONconfig by @fakuzatsu in https://github.com/rh-hideout/pokeemerald-expansion/pull/4860
- This can be changed to R by using the
- Cleanup
- By @AGSMGMaster64 and @Sneed69 in https://github.com/rh-hideout/pokeemerald-expansion/pull/4678
- Press L before selecting a move to see their category, power, accuracy and description.
- Added ball throwing configs by セケツ from PokéCommunity and @pkmnsnfrn in https://github.com/rh-hideout/pokeemerald-expansion/pull/4953
B_ENEMY_THROW_BALLS: When set toGEN_6or higher, it changes the opposing trainer’s ball animation so they throw their Pokéballs instead of already starting on the floor.B_PLAYER_THROW_BALLS_SOUND: When set toGEN_5or higher, it playsSE_BALL_THROWas part of the player’s ball throw animation.B_ENEMY_THROW_BALLS_SOUND: When set toGEN_5or higher, it playsSE_BALL_THROWas part of the enemy’s ball throw animation.
- Added
RandomChancemacro for battle/test randomization by @Sneed69 in https://github.com/rh-hideout/pokeemerald-expansion/pull/4829 -
Gimmick Refactor by @AgustinGDLV in https://github.com/rh-hideout/pokeemerald-expansion/pull/4449
- Unifies generational mechanics into
gGimmicksInfostruct (Mega, Z-Moves, Ultra Burst, Dynamax, Terastallization).- Contains triggers, indicator, condition and function to execute when triggered.
- Around ~500-1000 lines of redundant / duplicate code removed!
- Cleanup
- By @Bassoonian in https://github.com/rh-hideout/pokeemerald-expansion/pull/4927
- By @AlexOn1ine in https://github.com/rh-hideout/pokeemerald-expansion/pull/4962
- By @AlexOn1ine in https://github.com/rh-hideout/pokeemerald-expansion/pull/4863
- By @Bassoonian in https://github.com/rh-hideout/pokeemerald-expansion/pull/4960
- Unifies generational mechanics into
- Allow users to increase
MAX_MONEYdynamically by @DizzyEggg and @pkmnsnfrn in https://github.com/rh-hideout/pokeemerald-expansion/pull/4943 - Added
AUTO_LOWERCASE_KEYBOARDby @Jaizu and @pkmnsnfrn in https://github.com/rh-hideout/pokeemerald-expansion/pull/4976- Automatically changes to to lowercase if the first character inputted is uppercase.
Changed
- Improved HP drain when enabling
B_FAST_HP_DRAINby @pkmnsnfrn and @SonikkuA-DatH in https://github.com/rh-hideout/pokeemerald-expansion/pull/4335 -
Combined weather set commands by @AlexOn1ine in https://github.com/rh-hideout/pokeemerald-expansion/pull/4434
setrain->setfieldweather ENUM_WEATHER_RAIN.setsandstorm->setfieldweather ENUM_WEATHER_SANDSTORM.setsunny->setfieldweather ENUM_WEATHER_SUN.sethail->setfieldweather ENUM_WEATHER_HAIL.setsnow->setfieldweather ENUM_WEATHER_SNOW.
-
Replaced HP checks with
IsBattlerAliveby @ghoulslash in https://github.com/rh-hideout/pokeemerald-expansion/pull/4429 -
Removed redundant
MOVE_EFFECT_SP_ATK_TWO_DOWNby @Sneed69 in https://github.com/rh-hideout/pokeemerald-expansion/pull/4557 - Added stack for saved targets and attackers by @ghoulslash in https://github.com/rh-hideout/pokeemerald-expansion/pull/4061
- This avoids the need to overwriting battler IDs during scripts and cause potential issues.
- Several scripts have been updated to use these.
- Cleanup and fixes
- By @AlexOn1ine in https://github.com/rh-hideout/pokeemerald-expansion/pull/4653
- By @AlexOn1ine in https://github.com/rh-hideout/pokeemerald-expansion/pull/4668
-
Adjusted Ate-Ability code a bit to make it more readable by @AlexOn1ine in https://github.com/rh-hideout/pokeemerald-expansion/pull/4640
- Added global constants for damage rolls by @Sneed69 in https://github.com/rh-hideout/pokeemerald-expansion/pull/4663
// Lowest and highest percentages used for damage roll calculations #define DMG_ROLL_PERCENT_LO 85 #define DMG_ROLL_PERCENT_HI 100 -
Refactored residual damage to be more readable and less prone to bugs by @AlexOn1ine in https://github.com/rh-hideout/pokeemerald-expansion/pull/4945
- Cleanup by @AlexOn1ine in https://github.com/rh-hideout/pokeemerald-expansion/pull/4993
- Clarified some cases of
ChangeStatBuffsusage by @Sneed69 in https://github.com/rh-hideout/pokeemerald-expansion/pull/4826 - Moved EWRAM variables from battle controller player file to gBattleStruct by @DizzyEggg in https://github.com/rh-hideout/pokeemerald-expansion/pull/4840
sDescriptionSubmenu,sAckBallUseBtnandsBallSwapped.
Fixed
- Fixed Dynamax data not clearing when a battler faints by @WillKolada in https://github.com/rh-hideout/pokeemerald-expansion/pull/4672
- Multiple Z-Move fixes by @AgustinGDLV in https://github.com/rh-hideout/pokeemerald-expansion/pull/4449
- Fixed Z-Moves not working in Link Battles, recorded battles and tests.
- Fixed
Z_EFFECT_ALL_STATS_UPfunctionality. - Fixed Z-Nature Power, Z-Copycat, Z-Me First, and Z-Sleep Talk incorrectly using a normal move and not a Z-Move,
which had not been raised as an issue yet.(some of these were caught recently!) - Fixed Breakneck Blitz incorrectly being affected by -ate abilities, which had not been raised as an issue yet.
- Fixed Instruct incorrectly not failing if the target last used a Z-Move, which had not been raised as an issue yet.
- Fixed Guardian of Alola incorrectly doing 50% of the target’s HP instead of 75%.
- Fixed Enemy Data not clearing at the end of battles by @ghoulslash in https://github.com/rh-hideout/pokeemerald-expansion/pull/4867
🤹 Moves 🤹
Added
- Expanded Freeze Dry’s effect to use
argumentfield and allow custom moves to use the effect to be super effective to any specific type by @AlexOn1ine in https://github.com/rh-hideout/pokeemerald-expansion/pull/4312- Renamed
EFFECT_FREEZE_DRYtoEFFECT_SUPER_EFFECTIVE_ON_ARG.
- Renamed
- Expanded
EFFECT_BODY_PRESSto use category of defense stats for calculation based on the move’s own damage category by @AlexOn1ine in https://github.com/rh-hideout/pokeemerald-expansion/pull/4312- Eg: In vanilla, Body Press uses the user’s Defense and its stat changes instead of Attack. Now, if we were to change its
categoryingMovesInfo, it’ll use Sp. Defense and its stat changes instead of Sp. Attack.
- Eg: In vanilla, Body Press uses the user’s Defense and its stat changes instead of Attack. Now, if we were to change its
- Expanded Photon Geyser and Shell Side Arm (restored) effects so that they also work for physical moves by @Sneed69 in https://github.com/rh-hideout/pokeemerald-expansion/pull/4923
- Added Knock Off’s Gen 5+ effect with config (
B_KNOCK_OFF_REMOVAL) by @AgustinGDLV in https://github.com/rh-hideout/pokeemerald-expansion/pull/4333- Items are removed outright instead of making them unusable.
- Added Heal Bell/Soundproof Gen 5-8+ interactions with
B_HEAL_BELL_SOUNDPROOFconfig by @Sneed69 in https://github.com/rh-hideout/pokeemerald-expansion/pull/4732- Cleanup by @AsparagusEduardo in https://github.com/rh-hideout/pokeemerald-expansion/pull/5060
- Added Spicy Extract’s effect by @AlexOn1ine, @Skeli789, @kittenchilly and @ZnogyroP in https://github.com/rh-hideout/pokeemerald-expansion/pull/4211
- Added
B_RETURN_STOLEN_NPC_ITEMSconfig for Covet/Thief not being able to steal from NPCs by @moostoet and @Sneed69 in https://github.com/rh-hideout/pokeemerald-expansion/pull/4605 - Added Dragon Darts effect (CFRU port) by @AlexOn1ine, @Skeli789 and @BuffelSaft in https://github.com/rh-hideout/pokeemerald-expansion/pull/4612
- Animation by @hedara90 in https://github.com/rh-hideout/pokeemerald-expansion/pull/4620
Changed
EFFECT_TRIPLE_KICK’s base power uses the move’sstrikeCountinstead of a constant by @Sneed69 in https://github.com/rh-hideout/pokeemerald-expansion/pull/4608- This allows users to create “Quadruple Kick” and similar moves.
- Migrated move animation pointers to
gMovesInfoby @cawtds in https://github.com/rh-hideout/pokeemerald-expansion/pull/4683- This removes the need for
gBattleAnims_Moveswhich had potential ordering issues if not kept in line with move IDs.- If
battleAnimScriptis not defined for a move, it defaults to Tackle’s animation.
- If
- Migration script available in
migration_scripts/battle_anim_moves_refactor.py
- This removes the need for
Fixed
- Multiple Ally Switch fixes by @ghoulslash in https://github.com/rh-hideout/pokeemerald-expansion/pull/4451
- Shadows no longer disappear + safety checks.
- Corrected animation for opponents.
- Fixed Avalanche’s target by @TheLastMudkip in https://github.com/rh-hideout/pokeemerald-expansion/pull/4581
- Fixed Feint and Feint Attack’s descriptions by @lhearachel in https://github.com/rh-hideout/pokeemerald-expansion/pull/4617
- Fixed Mud Sport/Water Sport reducing damage by 77% instead of 67% in Gen5+ by @fdeblasio in https://github.com/rh-hideout/pokeemerald-expansion/pull/4874
🎭 Abilities 🎭
Added
- Added Poison Puppeteer’s effect by @AlexOn1ine in https://github.com/rh-hideout/pokeemerald-expansion/pull/4416
- Added Tera Shift, Tera Shell, and Teraform Zero by @kittenchilly in https://github.com/rh-hideout/pokeemerald-expansion/pull/4418
FORM_CHANGE_BATTLE_SWITCHnow has ability as optional parameter.- Cleanup by @AlexOn1ine in https://github.com/rh-hideout/pokeemerald-expansion/pull/4742
- Added Toxic Chain’s effect by @PhallenTree in https://github.com/rh-hideout/pokeemerald-expansion/pull/4823
- Cleanup by @AlexOn1ine in https://github.com/rh-hideout/pokeemerald-expansion/pull/4843
- Added
B_ABILITY_TRIGGER_CHANCEconfig to update trigger chances of abilities to Gen4+ by @Sneed69 in https://github.com/rh-hideout/pokeemerald-expansion/pull/4829- Shed Skin, Cute Charm, Flame Body, Static and Poison Point have a 30% chance to trigger in Gen4+ instead of 1/3 in Gen3.
- Effect Spore has an 11%, 10% and 9% chance of triggering Sleep, Paralysis and Poison in Gen4+ instead of equal 10% each in Gen3.
Changed
-
Removed Gen 9 settings for out-of-battle abilities by @AsparagusEduardo in https://github.com/rh-hideout/pokeemerald-expansion/pull/4282
- These configs no longer disable out-of-battle ability effects when set to
GEN_9.OW_SUPER_LUCK.OW_INFILTRATOR.OW_HARVEST.OW_LIGHTNING_ROD.OW_STORM_DRAIN.OW_FLASH_FIRE.
- These configs have been removed
OW_COMPOUND_EYES.OW_CUTE_CHARM.OW_ILLUMINATE.OW_MAGNET_PULL.OW_STATIC.
- These configs no longer disable out-of-battle ability effects when set to
Fixed
- Fixed Mirror Armor bouncing Sticky Web’s stat reduction to the opponent by @Sneed69 in https://github.com/rh-hideout/pokeemerald-expansion/pull/4713
- Effect Spore now uses
B_POWDER_GRASSto toggle Grass-type Pokémon immunity to it by @Sneed69 in https://github.com/rh-hideout/pokeemerald-expansion/pull/4829
🧶 Items 🧶
Added
- Added Booster Energy’s effect by @AlexOn1ine in https://github.com/rh-hideout/pokeemerald-expansion/pull/4337
- Cleanup
- By @PCG06 in https://github.com/rh-hideout/pokeemerald-expansion/pull/4354
- By @kittenchilly in https://github.com/rh-hideout/pokeemerald-expansion/pull/4804
- Cleanup
Changed
-
Removed
gItemIconTableby @kittenchilly in https://github.com/rh-hideout/pokeemerald-expansion/pull/4579- Sprite and palette pointers have been moved to
gItemsInfoasiconPicandiconPaletterespectively. - Migration script available in
migration_scripts/convert_item_icons.py - Cleanup
- By @AlexOn1ine in https://github.com/rh-hideout/pokeemerald-expansion/pull/4591
- By @AlexOn1ine in https://github.com/rh-hideout/pokeemerald-expansion/pull/4658
- Sprite and palette pointers have been moved to
-
Automatically display TM/HM icons based on their move by @Sneed69 in https://github.com/rh-hideout/pokeemerald-expansion/pull/4452
- TM palettes are now stored in
gTypesInfoin thepaletteTMHMfield. - Cleanup by @Sneed69 in https://github.com/rh-hideout/pokeemerald-expansion/pull/4487
- TM palettes are now stored in
🤖 Battle AI 🤖
Added
- Added
AI_GetBattlerAbilityby @AlexOn1ine in https://github.com/rh-hideout/pokeemerald-expansion/pull/4555 - Added
AI_FLAG_CONSERVATIVEflag by @Pawkkie and @iriv24 in https://github.com/rh-hideout/pokeemerald-expansion/pull/4615- AI will assume low damage rolls for its
calculationsDamageroll selection inAI_CalcDamage - Cleanup
- AI will assume low damage rolls for its
- Added
AI_FLAG_SEQUENCE_SWITCHINGflag by @Pawkkie, Kasen, @pkmnsnfrn and @DizzyEggg in https://github.com/rh-hideout/pokeemerald-expansion/pull/4878- AI will keep their party order consistently with switches.
- Added
setdynamicaifunc, which allows to setup custom AI functions before a battle besides the predetermined ones used by AI Flags @ghoulslash in https://github.com/rh-hideout/pokeemerald-expansion/pull/4908- Eg:
Wheresetdynamicaifunc AI_TagBattlePreferFoe multi_2_vs_2 TRAINER_MAXIE_MOSSDEEP, MossdeepCity_SpaceCenter_2F_Text_JustWantToExpandLand, TRAINER_TABITHA_MOSSDEEP, MossdeepCity_SpaceCenter_Text_TabithaDefeat, PARTNER_STEVENAI_TagBattlePreferFoeprioritizes attacking the opposite battler index.
- Eg:
Changed
- AI now calculates and stores minimum possible move damage and uses it with
AI_FLAG_TRY_TO_FAINTby @Sneed69 in https://github.com/rh-hideout/pokeemerald-expansion/pull/4760- This allows AI to prefer guaranteed KO moves over highest expected damage move.
- Cleanup by @Sneed69 in https://github.com/rh-hideout/pokeemerald-expansion/pull/4808
- AI Revenge Killer switching factors in Trick Room by @Shadowzlmao and @Pawkkie in https://github.com/rh-hideout/pokeemerald-expansion/pull/4794
- AI Smarter Choice AI for Status Moves by @Pawkkie in https://github.com/rh-hideout/pokeemerald-expansion/pull/4872
- Better behavior for AI under Choice Item effects.
- Cleanup by @Pawkkie in https://github.com/rh-hideout/pokeemerald-expansion/pull/4911
- AI Smarter Focus Punch and Substitute handling by @Pawkkie, @Kasenn and @AlexOn1ine in https://github.com/rh-hideout/pokeemerald-expansion/pull/4952
- Moved
RestoreBattlerDataout ofAi_CalcDmgand addedSaveBattlerDataProtections by @ghoulslash in https://github.com/rh-hideout/pokeemerald-expansion/pull/4156- Cleanup
- By @ghoulslash in https://github.com/rh-hideout/pokeemerald-expansion/pull/4586
- Cleanup
- Made AI see Loaded Dice hold effect for multi hit moves that strike 5 times by @AlexOn1ine in https://github.com/rh-hideout/pokeemerald-expansion/pull/4622
AI_FLAG_RISKYImprovements by @Pawkkie, @AlexOn1ine and @iriv24 in https://github.com/rh-hideout/pokeemerald-expansion/pull/4648- Check the PR for in depth details.
- Cleanup
- By @AsparagusEduardo in https://github.com/rh-hideout/pokeemerald-expansion/pull/4790
- By @Pawkkie in https://github.com/rh-hideout/pokeemerald-expansion/pull/5032
- Removed temporary scores in
AI_CalcMoveEffectScoresby @AlexOn1ine in https://github.com/rh-hideout/pokeemerald-expansion/pull/4655 - Changed
AI_IS_SLOWERandAI_IS_FASTERcomparisons intoAI_IsFasterandAI_IsSlowerfunctions by @AlexOn1ine in https://github.com/rh-hideout/pokeemerald-expansion/pull/4671AI_STRIKES_FIRSTis also replaced byAI_IsFaster.
- Switch AI uses trapping abilities aggressively by @Pawkkie in https://github.com/rh-hideout/pokeemerald-expansion/pull/4669
- Use 9th roll instead of average in AI calcs by @AlexOn1ine in https://github.com/rh-hideout/pokeemerald-expansion/pull/4679
- Use
AI_DATA->abilitiesin more places by @Sneed69 in https://github.com/rh-hideout/pokeemerald-expansion/pull/4729 - Minor switch AI cleanup by @Pawkkie, @DizzyEggg, @AlexOn1ine and @Sneed69 in https://github.com/rh-hideout/pokeemerald-expansion/pull/4849
- Removed
SetBattlerDatafromAI_CalcDamageby @AlexOn1ine in https://github.com/rh-hideout/pokeemerald-expansion/pull/4881 - Removed unused
AI_FLAG_HELP_PARTNERby @pkmnsnfrn and @Pawkkie in https://github.com/rh-hideout/pokeemerald-expansion/pull/4918 - Added missing
ADJUST_SCOREs by @AlexOn1ine in https://github.com/rh-hideout/pokeemerald-expansion/pull/4925 - Reduced
AI_WhoStrikesFirstto the most essential parts by @AlexOn1ine in https://github.com/rh-hideout/pokeemerald-expansion/pull/4978 - Changed score adjustments to
tempScoreincreases by @AlexOn1ine in https://github.com/rh-hideout/pokeemerald-expansion/pull/4987
Fixed
- Minor AI flag fixes/cleanup by @Pawkkie, @AlexOn1ine and @pkmnsnfrn in https://github.com/rh-hideout/pokeemerald-expansion/pull/4924
🧹 Other Cleanup 🧹
Changed
- Corrected species info struct hex comments by @AlexOn1ine in https://github.com/rh-hideout/pokeemerald-expansion/pull/4798
- Cleanup by @AlexOn1ine in https://github.com/rh-hideout/pokeemerald-expansion/pull/4800
🧪 Test Runner 🧪
Added
- Added missing weather tests by @AlexOn1ine in https://github.com/rh-hideout/pokeemerald-expansion/pull/4434
- Added missing Gale Wings test by @Pawkkie in https://github.com/rh-hideout/pokeemerald-expansion/pull/4694
- Added
SWITCH_OUT_MESSAGEandSEND_IN_MESSAGEmacros to avoid tests from failing based on changing switch out/in messages by @Sneed69 in https://github.com/rh-hideout/pokeemerald-expansion/pull/4717- Usage:
SEND_IN_MESSAGE("Wobbuffet"); - Tests have been updated to use these new macros.
- Usage:
- Added missing Hidden Power test by @AsparagusEduardo in https://github.com/rh-hideout/pokeemerald-expansion/pull/4462
- Added some Terastallization tests by @hedara90 in https://github.com/rh-hideout/pokeemerald-expansion/pull/5020
Changed
- Cleaned up Frisk test by @mrgriffin in https://github.com/rh-hideout/pokeemerald-expansion/pull/4441
- Renamed
MgbaPrintf_toTest_MgbaPrintfby @Bassoonian in https://github.com/rh-hideout/pokeemerald-expansion/pull/4642 - AI tests have been moved to their own folder by @Pawkkie in https://github.com/rh-hideout/pokeemerald-expansion/pull/4898
- Species are now always included in tests by @AlexOn1ine in https://github.com/rh-hideout/pokeemerald-expansion/pull/4810
- Added Battle Anim Debug Check to see if animations aren’t cleared by @ghoulslash in https://github.com/rh-hideout/pokeemerald-expansion/pull/4930
- Test battlers always have their forced abilities to prevent them from changing during a test by @Sneed69 in https://github.com/rh-hideout/pokeemerald-expansion/pull/4707
Fixed
- Test runner uses Set mode to avoid an issue where tests prompted switching and caused a timeout by @Pawkkie in https://github.com/rh-hideout/pokeemerald-expansion/pull/4661
New Contributors
- @Pokabbie made their first contribution in https://github.com/rh-hideout/pokeemerald-expansion/pull/4507
- @TheLastMudkip made their first contribution in https://github.com/rh-hideout/pokeemerald-expansion/pull/4581
- @moostoet made their first contribution in https://github.com/rh-hideout/pokeemerald-expansion/pull/4605
- @rayrobdod made their first contribution in https://github.com/rh-hideout/pokeemerald-expansion/pull/4727
- @innocenthedgehog made their first contribution in https://github.com/rh-hideout/pokeemerald-expansion/pull/4988
Full Changelog: https://github.com/rh-hideout/pokeemerald-expansion/compare/expansion/1.8.6...expansion/1.9.0
Version 1.8.6
## How to update
- If you haven't set up a remote, run the command `git remote add RHH https://github.com/rh-hideout/pokeemerald-expansion`.
- Once you have your remote set up, run the command `git pull RHH expansion/1.8.6`.
🌋 REFACTORS 🌋
- Opportunist/Mirror Herb Refactor
- Removed unused Battle Script labels
- Fixed Trace not respecting the speed order like other switch-in abilities
🧬 General 🧬
Fixed
- Fixed Battle Frontier ineligibility blocking the entire party if it encountered a disabled species by @Bassoonian in https://github.com/rh-hideout/pokeemerald-expansion/pull/4997
- Fixed random IVs given when using
givemononly giving values from 1-31 by @cawtds in https://github.com/rh-hideout/pokeemerald-expansion/pull/5021 - Fixed
givemonnot giving Cherish Ball by @Sneed69 in https://github.com/rh-hideout/pokeemerald-expansion/pull/5022
🐉 Pokémon 🐉
Added
- Added missing Terapagos Stellar sprite by @hedara90 in https://github.com/rh-hideout/pokeemerald-expansion/pull/5008
- Added missing Ogerpon Tera sprites by @hedara90 in https://github.com/rh-hideout/pokeemerald-expansion/pull/4996
Changed
- Temporarely reverted regional form inheritance to fix issue with non-regional forms by @AsparagusEduardo in https://github.com/rh-hideout/pokeemerald-expansion/pull/5004
- Updated level up learnsets up to Indigo Disk by @kittenchilly in https://github.com/rh-hideout/pokeemerald-expansion/pull/5023
Fixed
- Fixed Basculegion learning Dire Claw in Gen9’s level up learnset by @Bassoonian in https://github.com/rh-hideout/pokeemerald-expansion/pull/4948
- Fixed Sandile’s sprite by @hedara90 in https://github.com/rh-hideout/pokeemerald-expansion/pull/5038
⚔️ Battle General ⚔️
Fixed
- Fixed Debug Menu not properly updating the corresponding flags + general cleanup by @kittenchilly in https://github.com/rh-hideout/pokeemerald-expansion/pull/4643
- Fixed spread damage in double battles by @AlexOn1ine in https://github.com/rh-hideout/pokeemerald-expansion/pull/5064
- In double battles when
B_POSITION_OPPONENT_LEFTfainted from the first hit of a spread move, the second hit dealt 100% of damage toB_POSITION_OPPONENT_RIGHT.
- In double battles when
-
Removed unused Battle Script labels by @Bassoonian in https://github.com/rh-hideout/pokeemerald-expansion/pull/4839
data/battle_scripts_1.sBattleScript_OctolockTryLowerDefBattleScript_OctolockTurnDmgPrintMsgBattleScript_StuffCheeksEatBerryBattleScript_StrengthSapTryHpand its contents.BattleScript_PartingShotEndand its contents.BattleScript_RototillerAffectedBattleScript_AutotomizeDoAnimBattleScript_TryTailwindAbilitiesLoop_RetBattleScript_HitFromAtkCancelerBattleScript_EffectMultiHitBattleScript_BattleScript_EffectParalyzeNoTypeCalcBattleScript_EffectTeleportTryToRunAwayBattleScript_WindPowerActivates_RetBattleScript_CottonDownReturnBattleScript_ActivateWeatherAbilities_IncrementBattleScript_IntimidateEndBattleScript_SupersweetSyrupEndBattleScript_ActivateTerrainEffects_IncrementBattleScript_GrassyTerrainHpChangeBattleScript_GrassyTerrainLoopEndBattleScript_AbilityNoSpecificStatLossPrintBattleScript_ArenaNothingDecidedBattleScript_ExtremeEvoboostAtkBattleScript_BerserkGeneRet_Anim
data/battle_scripts_2.sBattleScript_PrintCaughtMonInfo
-
Opportunist/Mirror Herb Refactor by @AlexOn1ine in https://github.com/rh-hideout/pokeemerald-expansion/pull/4928
- Multiple fixes:
- Opportunist stacking multiple boosts in one turn from opposing mons.
- Increasing the stat by the wrong amount when copying opposing boost (eg. +6 boosts).
- Opportunist no longer has a message.
- Opportunist only play animations once for every stat boost.
- Changes:
switchInBattlerCounterreplaces bothswitchInAbilitiesCounterandswitchInItemsCounter.- Removed
STRINGID_OPPORTUNISTCOPIEDandsText_OpportunistCopied. - Altered
TryDoEventsBeforeFirstTurnto use a state switch (gBattleStruct->eventsBeforeFirstTurnState)FIRST_TURN_EVENTS_START.FIRST_TURN_EVENTS_OVERWORLD_WEATHER.FIRST_TURN_EVENTS_TERRAIN.FIRST_TURN_EVENTS_STARTING_STATUS.FIRST_TURN_EVENTS_TOTEM_BOOST.FIRST_TURN_EVENTS_NEUTRALIZING_GAS.FIRST_TURN_EVENTS_SWITCH_IN_ABILITIES.FIRST_TURN_EVENTS_OPPORTUNIST_1.FIRST_TURN_EVENTS_ITEM_EFFECTS.FIRST_TURN_EVENTS_OPPORTUNIST_2.FIRST_TURN_EVENTS_END.
- Multiple fixes:
🤹 Moves 🤹
Added
- Added missing Ivy Cudgel animation by @hedara90 in https://github.com/rh-hideout/pokeemerald-expansion/pull/5034
- Cleanup by @hedara90 in https://github.com/rh-hideout/pokeemerald-expansion/pull/5063
- Added missing Axe Kick animation by @kittenchilly in https://github.com/rh-hideout/pokeemerald-expansion/pull/5039
Fixed
- Fixed Diamond Storm’s Defense increase applying to the target instead of the user by @Bassoonian in https://github.com/rh-hideout/pokeemerald-expansion/pull/4947
- Fixed Psycho Shift check for Frostbite using
CanBeFrozeninstead ofCanGetFrostbiteby @Bassoonian in https://github.com/rh-hideout/pokeemerald-expansion/pull/4995 - Fixed Sleep Talk failing on repeated attempts by @PhallenTree in https://github.com/rh-hideout/pokeemerald-expansion/pull/5009
- Fixed Fury Cutter considering Parental Bond’s second hit for its damage multiplier by @PhallenTree in https://github.com/rh-hideout/pokeemerald-expansion/pull/5030
- Fixed Hidden Power damage category when
B_PHYSICAL_SPECIAL_SPLIT < GEN_4by @hedara90 in https://github.com/rh-hideout/pokeemerald-expansion/pull/5053 - Fixed
MoveEffectRemoveStatus(Sparkling Aria, Wake-Up Slap, …) that cure Freeze/Frostbite using the other status’ battlescript. by @PhallenTree in https://github.com/rh-hideout/pokeemerald-expansion/pull/5061
🎭 Abilities 🎭
Fixed
- Fixed Toxic Debris incorrect side check by @PhallenTree in https://github.com/rh-hideout/pokeemerald-expansion/pull/5009
- Fixed Snow Warning’s description not being updated based on
B_SNOW_WARNINGby @kittenchilly in https://github.com/rh-hideout/pokeemerald-expansion/pull/5018 - Fixed Mold Breaker abilities not properly checking battler actions in double battles causing them to not work by @PhallenTree in https://github.com/rh-hideout/pokeemerald-expansion/pull/5030
- Fixed
cantBeSurpressedability check for breakable abilities by @AlexOn1ine in https://github.com/rh-hideout/pokeemerald-expansion/pull/5043 - Fixed Stalwart and Propeller Tail not ignoring redirection from Storm Drain/Lightning Rod + tests by @PhallenTree in https://github.com/rh-hideout/pokeemerald-expansion/pull/5061
-
Fixed Trace not respecting the speed order like other switch-in abilities by @AlexOn1ine in https://github.com/rh-hideout/pokeemerald-expansion/pull/4941
- Changes:
- Removed:
ABILITYEFFECT_TRACE1,ABILITYEFFECT_TRACE2and moved their handling toABILITYEFFECT_ON_SWITCHIN. - Removed
gSpecialStatuses’stracedfield.
- Removed:
- Changes:
🧶 Items 🧶
Fixed
- Jaboca/Rowap Berry recording the wrong item effects by @PhallenTree in https://github.com/rh-hideout/pokeemerald-expansion/pull/5009
- Fixed Life Orb damaging its holder if it hits itself in confusion. by @PhallenTree in https://github.com/rh-hideout/pokeemerald-expansion/pull/5061
🤖 Battle AI 🤖
Documentation
- Added AI Flags documentation to directory for new documentation site by @anrichtait in https://github.com/rh-hideout/pokeemerald-expansion/pull/5057
Fixed
- Fixed typo that caused AI to use Upper Hand when it shouldn’t by @Pawkkie in https://github.com/rh-hideout/pokeemerald-expansion/pull/4973
- Fixed AI using U-Turn when only the Ace Pokémon is left in the party (#4748) by @Pawkkie in https://github.com/rh-hideout/pokeemerald-expansion/pull/4972
- Fixed AI not being aware during calculations by @AlexOn1ine in https://github.com/rh-hideout/pokeemerald-expansion/pull/4992
- Fixed
AI_SetMoveAccuracygetting the wrong battler’s ability by @PhallenTree in https://github.com/rh-hideout/pokeemerald-expansion/pull/5030
🧹 Other Cleanup 🧹
Fixed
- Fixed version displayed in
README.mdby @Bassoonian in https://github.com/rh-hideout/pokeemerald-expansion/pull/4966 - Removes unnecessary checks for Shield Dust and Covert Cloak by @AlexOn1ine in https://github.com/rh-hideout/pokeemerald-expansion/pull/5073
🧪 Test Runner 🧪
Added
- Added AI Upper Hand test by @Pawkkie in https://github.com/rh-hideout/pokeemerald-expansion/pull/4973
- Added test to make sure that Trainer Class balls apply to every member of the party by @Bassoonian in https://github.com/rh-hideout/pokeemerald-expansion/pull/4999
- Added missing Sleep Talk tests by @PhallenTree in https://github.com/rh-hideout/pokeemerald-expansion/pull/5009
Changed
- Improved Test Runner Summary by @AsparagusEduardo in https://github.com/rh-hideout/pokeemerald-expansion/pull/4641
- Totals are now separated from the erroring test list.
- Assumption Fails and Passing
KNOWN_FAILINGs now have their own lists.
Fixed
- Fixed tests failing when
B_USE_FROSTBITEis set toTRUEby @fakuzatsu in https://github.com/rh-hideout/pokeemerald-expansion/pull/4986 - Fixed tests not compiling outside of CI after incoming pret merge by @Bassoonian in https://github.com/rh-hideout/pokeemerald-expansion/pull/4998
- Fixed Covert Cloak tests being in
item_effectfolder instead ofhold_effectfolder by @AlexOn1ine in https://github.com/rh-hideout/pokeemerald-expansion/pull/5073
📦 Pret merges 📦
- Pret Merge (13th of July) by @Bassoonian in https://github.com/rh-hideout/pokeemerald-expansion/pull/4964
- Adds the new C-style enums in preproc commit by @SBird1337 (550e668)
- Pret Merge (27th of July) by @Bassoonian in https://github.com/rh-hideout/pokeemerald-expansion/pull/5045
Full Changelog: https://github.com/rh-hideout/pokeemerald-expansion/compare/expansion/1.8.5...expansion/1.8.6
Version 1.8.5
## How to update
- If you haven't set up a remote, run the command `git remote add RHH https://github.com/rh-hideout/pokeemerald-expansion`.
- Once you have your remote set up, run the command `git pull RHH expansion/1.8.5`.
🌋 IMPORTANT CHANGES AND REFACTORS 🌋
- Small
ABILITYEFFECT_MOVES_BLOCKrefactor for readability by @AlexOn1ine in https://github.com/rh-hideout/pokeemerald-expansion/pull/4635 - Removed redundant
partnerPicIdarguments in macros by @Bassoonian in https://github.com/rh-hideout/pokeemerald-expansion/pull/4736 - Renamed some labels from “critical hit chance” to “critical hit odds” by @Sneed69 in https://github.com/rh-hideout/pokeemerald-expansion/pull/4751
sCriticalHitChance=>sCriticalHitOdds.GetCritHitChance=>GetCritHitOdds.
- Renamed
BS_FAINTED_LINK_MULTIPLE_1/2toBS_FAINTED_MULTIPLE_1/2by @DizzyEggg in https://github.com/rh-hideout/pokeemerald-expansion/pull/4851 - Remove Duplicate ai code from battle_ai_util.c by @AlexOn1ine in https://github.com/rh-hideout/pokeemerald-expansion/pull/4883
AI_CanBeBurnedis now handled byCanBeBurned.CanSleeprenamed toCanBeSlept.AI_CanSleepis now handled byCanBeSleptand addeddefAbilityargument.
- Added
defAbilityargument forCanBePoisoned. - Added
defAbilityargument forCanBeBurned. - Added
defAbilityargument forCanBeParalyzed.
- Got rid of hardcoded stat raise anim values by @DizzyEggg in https://github.com/rh-hideout/pokeemerald-expansion/pull/4825
- Added parentheses to
SPECIES_EGGmacro to avoid issues by @DizzyEggg in https://github.com/rh-hideout/pokeemerald-expansion/pull/4899 IsFinalStrikeEffectuses effect instead of move by @Sneed69 in https://github.com/rh-hideout/pokeemerald-expansion/pull/4917
💥 Softlock/Crash fixes 💥
- Fixed Baton Pass hardlocking on Memento by @DizzyEggg in https://github.com/rh-hideout/pokeemerald-expansion/pull/4773
- Fixed Revive in Double Battles causing a softlock by @DizzyEggg in https://github.com/rh-hideout/pokeemerald-expansion/pull/4784
- Fixed Tectonic Rage causing a freeze after leveling up by @DizzyEggg in https://github.com/rh-hideout/pokeemerald-expansion/pull/4787
- Fixed Smack Down’s animation softlocking the game after around 13 uses by @DizzyEggg in https://github.com/rh-hideout/pokeemerald-expansion/pull/4774
- Fixed softlock caused by using Covet/Thief on a Pokémon with Sticky Hold by @Sneed69 in https://github.com/rh-hideout/pokeemerald-expansion/pull/4885
🧬 General 🧬
Added
- Added regional form breeding mechanics by @cawtds in https://github.com/rh-hideout/pokeemerald-expansion/pull/4695
- Convert docs/ folder to mdBook by @leo60228 in https://github.com/rh-hideout/pokeemerald-expansion/pull/4684
- Go here to see the new documentation page. Feel free to contribute via PRs!
- Cleanup by @leo60228 in:
- Added forbidden status parameter to
FORM_CHANGE_ITEM_USEby @Bassoonian in https://github.com/rh-hideout/pokeemerald-expansion/pull/4738- Used for Shaymin’s form change via Gracidea being prevented if it’s frozen or frostbitten.
Fixed
- Fixed Poké Ball inheritance into actually working by @cawtds in https://github.com/rh-hideout/pokeemerald-expansion/pull/4695
- Daycare fixes by @Sneed69 in https://github.com/rh-hideout/pokeemerald-expansion/pull/4479
- Fixed Evolved mons not copying moves as they do not have their own egg move table.
- Fixed forms of the same species not copying egg moves from each other.
- Fixed Roamer Frostbite status not carrying over between battles by @Sneed69 in https://github.com/rh-hideout/pokeemerald-expansion/pull/4822
- Fixed Partners getting the wrong nature defined by @AlexOn1ine in https://github.com/rh-hideout/pokeemerald-expansion/pull/4926
- Fixed Shop menu lists not properly displaying 6-digit item prices by @DizzyEggg in https://github.com/rh-hideout/pokeemerald-expansion/pull/4929
🐉 Pokémon 🐉
Changed
- PokeCommunity sprites batch (May) by @kittenchilly in https://github.com/rh-hideout/pokeemerald-expansion/pull/4714
- Pawmi (Front by KingOfThe-X-Roads, back by Vent, QC by leParagon)
- Pawmo (By vent, qc by leParagon)
- Okidogi (Front by KingOfThe-X-Roads + by leParagon, back by Lykeron + QC by Alexandrev2. 0)
- Backported @hedara90’s Terapagos from https://github.com/rh-hideout/pokeemerald-expansion/pull/4691
- Updated wild held items to Gen 9 by @kittenchilly in https://github.com/rh-hideout/pokeemerald-expansion/pull/4769
- Teddiursa (Common: None_> Honey)
- Bisharp (Rare: None -> Leader’s Crest)
- All Oricorio: (Rare: Honey -> Corresponding Nectar)
- Toedscool, Toedscruel: (Common: Tiny Mushroom, Rare: Big Mushroom)
- All Paradox Mon: (Rare: Booster Energy)
Fixed
- Fixed Tandemaus being able to evolve via Rare and Exp. Candies by @Bassoonian in https://github.com/rh-hideout/pokeemerald-expansion/pull/4759
- Fixed Poltchageist not always producing Counterfeit form offspring by @kittenchilly in https://github.com/rh-hideout/pokeemerald-expansion/pull/4812
- Fixed missing Minior Pokédex Entry by @cawtds in https://github.com/rh-hideout/pokeemerald-expansion/pull/4858
- Multiple Pokemon sprite fixes by @cafei-uh in https://github.com/rh-hideout/pokeemerald-expansion/pull/4887
- Fixed Charjabug shiny + cleaned up its front sprite
- Changed Lurantis back sprite to better match its ingame model
- Fixed Bounsweet shiny not changing the color of its lower body
- Brightened the white color of Bruxish shiny + tweaked its sprites to accommodate the change
- Fixed
P_UPDATED_ABILITIESnot reverting newly gained abilities in Gens 4/6/7 by @AsparagusEduardo in https://github.com/rh-hideout/pokeemerald-expansion/pull/4922
⚔️ Battle General ⚔️
Fixed
- Fixed Dynamax HP not reverting upon fainting by @WillKolada in https://github.com/rh-hideout/pokeemerald-expansion/pull/4681
- Fixed the partner’s palette from shifting when throwing a Poké Ball by @Bassoonian in https://github.com/rh-hideout/pokeemerald-expansion/pull/4736
- Fixed shiny value not being updated in battle, causing the palette to reset when reloading the sprites by @DizzyEggg in https://github.com/rh-hideout/pokeemerald-expansion/pull/4788
- Fixed
B_VAR_STARTING_STATUSevery following terrains infinite by @DizzyEggg in https://github.com/rh-hideout/pokeemerald-expansion/pull/4795 - Fixed Gen 7+ confusion self hurt chance from
1 in 3to33%by @Sneed69 in https://github.com/rh-hideout/pokeemerald-expansion/pull/4831 - Fixed caught wild pokemon not restoring their used held item by @kittenchilly in https://github.com/rh-hideout/pokeemerald-expansion/pull/4803
- Fixed AI’s right slot switching-in too early by @DizzyEggg in https://github.com/rh-hideout/pokeemerald-expansion/pull/4851
- Ported post-KO test improvements from closed PR by @AlexOn1ine in https://github.com/rh-hideout/pokeemerald-expansion/pull/4859
- Fixed how switch-in effects are played out after multiple faints in the same turn by @DizzyEggg in https://github.com/rh-hideout/pokeemerald-expansion/pull/4864
- Fixed Megas gaining abilities after fainting by @DizzyEggg in https://github.com/rh-hideout/pokeemerald-expansion/pull/4873
🤹 Moves 🤹
Fixed
- Added missing
ignoreSubstituteflags for Defog (only in Gen 4), Torment and Powder by @AlexOn1ine in https://github.com/rh-hideout/pokeemerald-expansion/pull/4623 - Fixed Grassy Glide granting priority if it’s converted to Max Move by @PhallenTree in https://github.com/rh-hideout/pokeemerald-expansion/pull/4659
- Fixed Rampage moves not confusing the user if it’s canceled by Protect and Type immunity by @Sneed69 in https://github.com/rh-hideout/pokeemerald-expansion/pull/4722
- Fixed Tar shot the target always be to Fire regardless of existing types by @Sneed69 in https://github.com/rh-hideout/pokeemerald-expansion/pull/4756
- Fixed Shell Side Arm by @AlexOn1ine in https://github.com/rh-hideout/pokeemerald-expansion/pull/4753
- Cleanup by @Sneed69 in https://github.com/rh-hideout/pokeemerald-expansion/pull/4806
- Fixed Body press using physical Defense stat changes instead of Sp. Defense stat stages in Wonder Room (still uses physical defense stat) by @DizzyEggg in https://github.com/rh-hideout/pokeemerald-expansion/pull/4792
- Fixed Relic Song playing the transforming animation for species other than Meloetta by @DizzyEggg in https://github.com/rh-hideout/pokeemerald-expansion/pull/4799
- Fixed Pursuit not being locked by Choice Items when used on an opponent switching out by @DizzyEggg in https://github.com/rh-hideout/pokeemerald-expansion/pull/4801
- Fixed Encore’s effect lasting only 2 turns if it was used after the opponent uses the move in the same turn by @DizzyEggg in https://github.com/rh-hideout/pokeemerald-expansion/pull/4802
- Fixed Spectral Thief playing stat raise animation when the user has Contrary by @DizzyEggg in https://github.com/rh-hideout/pokeemerald-expansion/pull/4824
- Fixed Fury Cutter scaling up to 640 power by @Sneed69 in https://github.com/rh-hideout/pokeemerald-expansion/pull/4846
- Fixed moves with the
ignoresTargetAbilityflag ignoring the attacker’s own ability by @Sneed69 in https://github.com/rh-hideout/pokeemerald-expansion/pull/4855 - Fixed incorrect move names by @AlexOn1ine in https://github.com/rh-hideout/pokeemerald-expansion/pull/4854
- Floral Healing
- Jungle Healing
- Oceanic Operetta
- Fixed Grassy Terrain not healing on the final turn of its duration by @AlexOn1ine in https://github.com/rh-hideout/pokeemerald-expansion/pull/4903
- Fixed Shed Tail’s HP reduction rounding down instead of up by @kleeenexfeu in https://github.com/rh-hideout/pokeemerald-expansion/pull/4913
- Fixed Bitter Malice’s description, which used to imply that it didn’t always lower the opponent’s Attack by @kleeenexfeu in https://github.com/rh-hideout/pokeemerald-expansion/pull/4933
- Fixed Flame Burst’s adjacent damage not bypassing Substitute by @hedara90 in https://github.com/rh-hideout/pokeemerald-expansion/pull/4939
🎭 Abilities 🎭
Added
- Added missing Gen 3-4 config for Lightning Rod/Storm Drain (
B_REDIRECT_ABILITY_IMMUNITY) by @AsparagusEduardo in https://github.com/rh-hideout/pokeemerald-expansion/pull/4920
Fixed
- Fixed Dancer issues @PhallenTree in https://github.com/rh-hideout/pokeemerald-expansion/pull/4638
- Fixed Dancer triggering if the move user flinches when it was going to use a dance move
- Fixed Dancer not triggering if a previous Dancer flinches.
- Fixed Dazzling, Queenly Majesty and Armor Tail not protecting partners from priority moves by @AlexOn1ine in https://github.com/rh-hideout/pokeemerald-expansion/pull/4635
- Cleanup by @AlexOn1ine in https://github.com/rh-hideout/pokeemerald-expansion/pull/4647
- Fixed Burning Bulwark’s incorrect message by @PhallenTree in https://github.com/rh-hideout/pokeemerald-expansion/pull/4659
- Fixed Disguise’s
breakableflag (ignorable by Mold Breaker) by @AgustinGDLV in https://github.com/rh-hideout/pokeemerald-expansion/pull/4666 - Fixed redundant call to
IsBattlerWeatherAffectedDry Skin’s checks by @Sneed69 in https://github.com/rh-hideout/pokeemerald-expansion/pull/4675 - Fixed Guard Dog blocking U-Turn/Volt Switch/Flip Turn instead of Roar/Circle Throw/Dragon Tail by @PhallenTree in https://github.com/rh-hideout/pokeemerald-expansion/pull/4690
- Fixed some abilities preventing stat dropping move effects when used on self by @Sneed69 in https://github.com/rh-hideout/pokeemerald-expansion/pull/4696
- Hyper Cutter (Attack)
- Big Pecks (Defense)
- Keen Eye/Illuminate (Accuracy)
- Fixed Mummy and Lingering Aroma not working at all by @Sneed69 in https://github.com/rh-hideout/pokeemerald-expansion/pull/4731
- Fixed Berserk, Anger Shell, Wimp Out, Emergency Exit HP threshold (more than half HP instead of half HP and more) by @Sneed69 in https://github.com/rh-hideout/pokeemerald-expansion/pull/4724
- Fixed Mycelium Might affecting every battler on the field instead of just the ability holder by @Sneed69 in https://github.com/rh-hideout/pokeemerald-expansion/pull/4740
- Fixed Skill Link ignoring Gastro Acid/Neutralizing Gas by @Sneed69 in https://github.com/rh-hideout/pokeemerald-expansion/pull/4746
- Fixed Own Tempo ignoring Gastro Acid/Neutralizing Gas when checking for Berserk Gene by @Sneed69 in https://github.com/rh-hideout/pokeemerald-expansion/pull/4746
- Fixed Soul-Heart changing stats of wrong battler, which caused Mirror Herb to behave incorrectly by @DizzyEggg in https://github.com/rh-hideout/pokeemerald-expansion/pull/4785
- Fixed Poison Touch trigger chance from
1 in 3to30%by @Sneed69 in https://github.com/rh-hideout/pokeemerald-expansion/pull/4831 - Fixed Cursed Body trigger chance from
1 in 3to30%by @Sneed69 in https://github.com/rh-hideout/pokeemerald-expansion/pull/4831 - Fixed Comatose not being supressed if it’s obtained by a Pokémon Transforming by @DizzyEggg in https://github.com/rh-hideout/pokeemerald-expansion/pull/4852
- Fixed Supersweet Syrup0s description by @AlexOn1ine in https://github.com/rh-hideout/pokeemerald-expansion/pull/4902
🧶 Items 🧶
Changed
- Allowed rematches to occur if I_VS_SEEKER_CHARGING isn’t enabled by @fdeblasio in https://github.com/rh-hideout/pokeemerald-expansion/pull/4866
Fixed
- Fixed Honey altering tiles when used by @cawtds in https://github.com/rh-hideout/pokeemerald-expansion/pull/4703
- Fixed potential undefined behaviour when using escape rope by @cawtds in https://github.com/rh-hideout/pokeemerald-expansion/pull/4705
- Fixed Hyper Potion’s price not respecting
I_PRICEby @Bassoonian in https://github.com/rh-hideout/pokeemerald-expansion/pull/4737 - Fixed Ability Shield not protecting against multiple effects by @Sneed69 in https://github.com/rh-hideout/pokeemerald-expansion/pull/4740
- Mold Breaker-type abilities.
- Mycelium Might.
- Moves that bypass abilities (eg. Sunsteel Stike).
🤖 Battle AI 🤖
Changed
- Add checks for
EFFECT_POLTERGEISTandEFFECT_FIRST_TURN_ONLYtoIsDamageMoveUnusableby @iriv24 in https://github.com/rh-hideout/pokeemerald-expansion/pull/4693
Fixed
- Fixed AI going for speed control even when it’s faster than the opponet by @AlexOn1ine in https://github.com/rh-hideout/pokeemerald-expansion/pull/4630
- Fixed AI not considering
EFFECT_RAGING_BULLsimilarly toEFFECT_BRICK_BREAKby @AsparagusEduardo in https://github.com/rh-hideout/pokeemerald-expansion/pull/4682 - Fixed AI getting incorrect calculations due to using
gCurrentMoveinCalcCritChanceStageArgsby @AlexOn1ine in https://github.com/rh-hideout/pokeemerald-expansion/pull/4687 - Fixed AI not recording Battle Armor or Shell Armor by @Sneed69 in https://github.com/rh-hideout/pokeemerald-expansion/pull/4751
- Fixed AI not considering guaranteed crits by @Sneed69 in https://github.com/rh-hideout/pokeemerald-expansion/pull/4751
- Fixed AI not properly avoiding contact against Rocky Helmet/Rough Skin by @Sneed69 in https://github.com/rh-hideout/pokeemerald-expansion/pull/4779
- Fixed AI not recognising Volt Absorb/Flash Fire by @DizzyEggg in https://github.com/rh-hideout/pokeemerald-expansion/pull/4781
- Fixed AI thinking that Defiant/Competitive triggers off partner’s moves in doubles by @Sneed69 in https://github.com/rh-hideout/pokeemerald-expansion/pull/4786
- Fixed AI using
TRUE(Stench) when calculating if it’s worth using Swagger or Flatter on its partner by @Sneed69 in https://github.com/rh-hideout/pokeemerald-expansion/pull/4786 - Fixed passing hold effect instead of ability in one call of ShouldSetSandstorm by @Sneed69 in https://github.com/rh-hideout/pokeemerald-expansion/pull/4789
🧪 Test Runner 🧪
Added
- Added
FORCE_MOVE_ANIMmacro to force an animation to run in headless mode by @DizzyEggg in https://github.com/rh-hideout/pokeemerald-expansion/pull/4774- Usage:
FORCE_MOVE_ANIM(TRUE)at the beginning of the test andFORCE_MOVE_ANIM(FALSE)at the end.
- Usage:
- Added test to prevent species from having different evolution tracker methods by @Bassoonian in https://github.com/rh-hideout/pokeemerald-expansion/pull/4771
- Added test for missing Pokédex Entries by @cawtds in https://github.com/rh-hideout/pokeemerald-expansion/pull/4858
- Added missing Move Effect TODO tests - Volume B by @AsparagusEduardo in https://github.com/rh-hideout/pokeemerald-expansion/pull/4682
- Added missing tests
- Berserk by @Sneed69 in https://github.com/rh-hideout/pokeemerald-expansion/pull/4724
- Clear Body by @Pawkkie in https://github.com/rh-hideout/pokeemerald-expansion/pull/4685
- Anger Point and Moxie by @Sneed69 in https://github.com/rh-hideout/pokeemerald-expansion/pull/4811
- Cursed Body, Poison Touch and Confusion status by @Sneed69 in https://github.com/rh-hideout/pokeemerald-expansion/pull/4831
- Corrosion, Acrobatics, Hone Claws and Hurricane by @Pawkkie in https://github.com/rh-hideout/pokeemerald-expansion/pull/4708
- Added AI tests for avoiding using status moves on Pokémon with abilities that prevent them by @AlexOn1ine in https://github.com/rh-hideout/pokeemerald-expansion/pull/4883
- Added Own Tempo/Mold Breaker test by @AlexOn1ine in https://github.com/rh-hideout/pokeemerald-expansion/pull/4883
Changed
- Multiple changes by @AsparagusEduardo in https://github.com/rh-hideout/pokeemerald-expansion/pull/4682
- Renamed some Baton Pass-related tests so that their prefix becomes Baton Pass.
- Eg.
Aqua Ring can be Baton PassedbecomesBaton Pass passes Aqua Ring's effect.
- Eg.
- Expanded Belch’s test to show that it doesn’t need to eat a berry before each use of the move.
- Unconfirmed interactions added to the specific files.
- Split
EFFECT_RAGING_BULLfromEFFECT_BRICK_BREAK’s file. - Moved Grassy Terrain/Earthquake test to Earthquake file.
- Renamed some Baton Pass-related tests so that their prefix becomes Baton Pass.
- Write new/Fix old tests for post-ko switch scenarios by @DizzyEggg in https://github.com/rh-hideout/pokeemerald-expansion/pull/4856
Fixed
- Fixed issues when building tests with agbcc by @u8-Salem in https://github.com/rh-hideout/pokeemerald-expansion/pull/4689
- Fixed incorrect
ASSUMEs in 2 test rampage tests by @Sneed69 in https://github.com/rh-hideout/pokeemerald-expansion/pull/4722 - Fixed AI ability guessing in tests by @cawtds in https://github.com/rh-hideout/pokeemerald-expansion/pull/4764
- Fixed Pokemon in tests not being male by default by @kittenchilly in https://github.com/rh-hideout/pokeemerald-expansion/pull/4766
- Fixed Plasma Fists/Pixilate interaction test by @Sneed69 in https://github.com/rh-hideout/pokeemerald-expansion/pull/4865
- Fixed wrong palette in player backsprite in recorded battle by @DizzyEggg in https://github.com/rh-hideout/pokeemerald-expansion/pull/4875
📦 Pret merges 📦
- Merge in pret 189d542 by @Bassoonian in https://github.com/rh-hideout/pokeemerald-expansion/pull/4832
- Fix Steven partner battle post-battle script by @Jaizu in https://github.com/pret/pokeemerald/pull/2001
- Pret merge (20th of June) by @Bassoonian in https://github.com/rh-hideout/pokeemerald-expansion/pull/4845
- Pret Merge (5th of July) by @Bassoonian in https://github.com/rh-hideout/pokeemerald-expansion/pull/4915
Full Changelog: https://github.com/rh-hideout/pokeemerald-expansion/compare/expansion/1.8.4...expansion/1.8.5
Version 1.8.4
## How to update
- If you haven't set up a remote, run the command `git remote add RHH https://github.com/rh-hideout/pokeemerald-expansion`.
- Once you have your remote set up, run the command `git pull RHH expansion/1.8.4`.
🌋 IMPORTANT CHANGES 🌋
Reverted Guillotine feature branch by @AsparagusEduardo:
- This was a runtime decapitalization branch introduced silently in version 1.8.0. We didn’t properly announce as it was hastily merged and we were hoping that future versions of it would have fixed issues that we encountered after the merge. However, issues kept piling on and we felt the need to revert it as it was also silently breaking other features as well.
- We will work on an alternate decapitalization option in the future.
💥 Softlock/Crash fixes 💥
- Fixed softlock caused by Destiny Bond triggering after Explosion by @AlexOn1ine in https://github.com/rh-hideout/pokeemerald-expansion/pull/4516
- Fixed softlock caused by Future Sight trying to hit a fainted target by @AlexOn1ine in https://github.com/rh-hideout/pokeemerald-expansion/pull/4543
- Fixed softlock caused by Galvanized Explosion being absorbed by Volt Absorb by @AlexOn1ine in https://github.com/rh-hideout/pokeemerald-expansion/pull/4601
- Fixed softlock caused by Flinging a Razor Fang when the target had already moved by @hedara90 in https://github.com/rh-hideout/pokeemerald-expansion/pull/4625
🧬 General 🧬
Fixed
- Fixed instances of Level Caps causing absurd amounts of Exp. by @Nopinou in https://github.com/rh-hideout/pokeemerald-expansion/pull/4505
- Fixed
GetBoxMonDataevolution tracker reading garbage data if compiled withagbccby @cawtds in https://github.com/rh-hideout/pokeemerald-expansion/pull/4510 - Fixed potential Berry Tree mutation corruptions when compiling with
agbccby @Bassoonian in https://github.com/rh-hideout/pokeemerald-expansion/pull/4535 - Added missing EOF newlines to
species_infofiles by @Bassoonian in https://github.com/rh-hideout/pokeemerald-expansion/pull/4584 - Fixed
EVO_MODE_BATTLE_SPECIALevolutions (only Sirfetch’d currently) triggering twice under certain situations by @cawtds in https://github.com/rh-hideout/pokeemerald-expansion/pull/4553- As a side effect, these evolutions no longer happen before other ones, instead being triggered in party order alongside
EVO_MODE_NORMAL.
- As a side effect, these evolutions no longer happen before other ones, instead being triggered in party order alongside
✨ Feature Branches ✨
TheXaman’s Debug Menu:
Fixed
- Fixed abilities past ID 255 not being properly being given to Pokémon using the debug menu’s Give Pokémon option by @Bassoonian in https://github.com/rh-hideout/pokeemerald-expansion/pull/4576
SBird/Karathan’s Dynamic Multichoices:
Changed
- Dynamic Multichoice no longer plays sound on init by @Sneed69 in https://github.com/rh-hideout/pokeemerald-expansion/pull/4480
TheXaman’s HGSS Pokédex Plus:
Fixed
- Multiple evolution page fixes by @Sneed69 in https://github.com/rh-hideout/pokeemerald-expansion/pull/4514
- Fixed duplicate icons when 2 or more evolution methods share the same target species (eg. Magnezone evolution via Thunder Stone or Electromagnetic field).
- Fixed arrow not loading when there are multiple evolution methods to the same target species that hadn’t been caught.
- Fixed wonky D-Pad inconsistency when scrolling down.
- Fixed regression from #3562 (1.7.0) that caused non-evolving Pokémon to not show their “X has no evolution” text.
- Change from the original branch: The message no longer shows for Pokémon that are part of an evolutionary family, even if they don’t evolve themselves (eg. Venusaur).
- Added failsafe for Egg Groups without text defined by @AsparagusEduardo in https://github.com/rh-hideout/pokeemerald-expansion/pull/4628
ghoulslash’s Saveblock Cleansing:
Changed
- Adjusted description of
FREE_MATCH_CALLconfig to clarify that the VS Seeker also utilizes that data by @Pawkkie in https://github.com/rh-hideout/pokeemerald-expansion/pull/4590
🐉 Pokémon 🐉
Added
- Added missing Gen 9 and PLA footprints + update some footprints by @kittenchilly in https://github.com/rh-hideout/pokeemerald-expansion/pull/4621
- Credits to Caruban for creating the sprites: eeveeexpo.com/resources/1101 https://eeveeexpo.com/resources/1101/
Changed
- Update various sprites to ones from PokeCommunity by @kittenchilly in https://github.com/rh-hideout/pokeemerald-expansion/pull/4554
- Updated footprints to Gen 4/5 designs, being more accurate to their designs @kittenchilly in https://github.com/rh-hideout/pokeemerald-expansion/pull/4621
- Golem, Ludicolo, Shroomish and Mawile.
- Also updated Origin Giratina to have an empty footprint.
- Explicitly define Gengar’s 3rd ability slot (Hidden Ability) by @lhearachel in https://github.com/rh-hideout/pokeemerald-expansion/pull/4633
Fixed
- Fixed animation errors by adding missing 2nd frames:
- Keldeo Resolute and Meloetta Pirouette by @TheJamesLJ in https://github.com/rh-hideout/pokeemerald-expansion/pull/4541
- White-Striped Basculin and Neutral Xerneas @cafei-uh in https://github.com/rh-hideout/pokeemerald-expansion/pull/4552
- Summer, Autumn and Winter Sawsbuck by @cafei-uh in https://github.com/rh-hideout/pokeemerald-expansion/pull/4592
- Fixed Unown B-Z and Punctuation Marks entry animations by @cafei-uh in https://github.com/rh-hideout/pokeemerald-expansion/pull/4546
- Fixed Iron Hands and Iron Bundle incorrect backsprite palettes @cafei-uh in https://github.com/rh-hideout/pokeemerald-expansion/pull/4552
- Fixed transparent pixel in Mega Mewtwo Y’s backsprite eye by @TheJamesLJ in https://github.com/rh-hideout/pokeemerald-expansion/pull/4541
- Fixed floating Munkidori backsprite @cafei-uh in https://github.com/rh-hideout/pokeemerald-expansion/pull/4552
- Fixed Salandit’s sprite and palettes by @BlueAnthem37510 in https://github.com/rh-hideout/pokeemerald-expansion/pull/4614
- Fixed regression from #4230 (1.8.0) that caused Mr. Mime’s typing to ignore
P_UPDATED_TYPESby @PhallenTree in https://github.com/rh-hideout/pokeemerald-expansion/pull/4547 - Fixed silent Oricorio Pom-Pom cry by @cafei-uh in https://github.com/rh-hideout/pokeemerald-expansion/pull/4551
- Fixed regression from #4360 (1.8.2) that caused Shaymin to changing form with the incorrect status + receiving damage upon form change by @TheJamesLJ in https://github.com/rh-hideout/pokeemerald-expansion/pull/4559
⚔️ Battle General ⚔️
Fixed
- Fixed Imposter and Transform causing the user to look shiny until screen is refreshed if they’re not in the first party slot by @Sneed69 in https://github.com/rh-hideout/pokeemerald-expansion/pull/4486
- Fixed regression in #4307 (1.8.2) that caused special battle types to not finish correctly by @ghoulslash in https://github.com/rh-hideout/pokeemerald-expansion/pull/4536
- Fixed multiple Speed ignoring effects by @Sneed69 in https://github.com/rh-hideout/pokeemerald-expansion/pull/4613
- Fixed Quick Draw always outspeeding Quick Claw and Custap Berry.
- Fixed Myceleum Might always outspeeding Stall.
🤹 Moves 🤹
Changed
- Ported Explosion/Mind Blown/Steel Beam implementation from CFRU (with tweaks) by @AlexOn1ine in https://github.com/rh-hideout/pokeemerald-expansion/pull/4516
Fixed
- Fixes Thief and Covet used by an opponent not stealing items by @PhallenTree in https://github.com/rh-hideout/pokeemerald-expansion/pull/4506
- Fixed Substitute, Fillet Away, Shed Tail and Belly Drum missing their
HITMARKER_PASSIVE_DAMAGE, which weretriggering effects where they shouldn’t by @hedara90 in https://github.com/rh-hideout/pokeemerald-expansion/pull/4533- Cleanup by @AsparagusEduardo in https://github.com/rh-hideout/pokeemerald-expansion/pull/4629
- Fixed Copycat issues by @PhallenTree in https://github.com/rh-hideout/pokeemerald-expansion/pull/4549
- Copycat can no longer call Z-Moves.
- 2-turn moves no longer play their animation twice when called by Copycat.
- Fixed Substitute issues by @hedara90 in https://github.com/rh-hideout/pokeemerald-expansion/pull/4558
- The following secondary effects no longer occur if the target is behind a Substitute.
- Knock Off
- Salt Cure
- Smack Down/Thousand Arrows
- Wake-Up Slap/Smelling Salts, including doubling in damage, unless they have the
ignoresSubstitutelike Sparkling Aria.
- The following secondary effects no longer occur if the target is behind a Substitute.
- Fixed move animations by @Sneed69 in https://github.com/rh-hideout/pokeemerald-expansion/pull/4560
- Animations using
AnimTask_ShakeMonInPlace: Last Resort,, Aqua Tail, Earth Power, Giga Impact, Zen Headbutt, Rock Climb, Stone Edge and Attack Order - Animations using
AnimTask_HorizontalShake: Sunsteel Strike and Chloroblast
- Animations using
- Fixed Future Sight/Doom Desire triggering Focus Sash but not consuming the item moves by @hedara90 in https://github.com/rh-hideout/pokeemerald-expansion/pull/4625
🎭 Abilities 🎭
Fixed
- Fixed Gulp Missile not triggering before fainting by @BlueAnthem37510 in https://github.com/rh-hideout/pokeemerald-expansion/pull/4502
- Fixed Parental Bond converting Multi-Hit moves into in two-hit moves by @iriv24 in https://github.com/rh-hideout/pokeemerald-expansion/pull/4570
- Fixed Magic Guard not preventing recoil damage by @iriv24 in https://github.com/rh-hideout/pokeemerald-expansion/pull/4578
- Fixed Inner Focus, Scrappy, Oblivious and Own Temp granting immunity to all stat drops if the attacker has Intimidate by @kittenchilly in https://github.com/rh-hideout/pokeemerald-expansion/pull/4606
- Fixed Moxie-like abilities not triggering when fainting the target with G-Max/Max Moves by @hedara90 in https://github.com/rh-hideout/pokeemerald-expansion/pull/4625
🧶 Items 🧶
Added
- Added missing Stellar Tera Shard sprite by @kittenchilly in https://github.com/rh-hideout/pokeemerald-expansion/pull/4595
Fixed
- Fixed overflowing item descriptions for Dubious Disc and for Ice Beam and Blizzard TMs when
B_USE_FROSTBITEis set toTRUEby @WillKolada in https://github.com/rh-hideout/pokeemerald-expansion/pull/4540 - Fixed plural of “Exp. Candy XL” by @Bassoonian in https://github.com/rh-hideout/pokeemerald-expansion/pull/4574
- Fixed Elixir only being usable if the first move was missing PP by @hedara90 in https://github.com/rh-hideout/pokeemerald-expansion/pull/4594
- Fixed Full Restore not curing statuses when used on party member that’s not in battle by @cawtds in https://github.com/rh-hideout/pokeemerald-expansion/pull/4603
- Fixed Sceptilite using Tyranitarite’s palette by @BlueAnthem37510 in https://github.com/rh-hideout/pokeemerald-expansion/pull/4614
- Fixed Dire Hit being used on incorrect targets by @cawtds in https://github.com/rh-hideout/pokeemerald-expansion/pull/4626
🤖 Battle AI 🤖
Changed
- AI is now aware that Dynamaxed targets are immune to Heat Crash’s effect by @WillKolada in https://github.com/rh-hideout/pokeemerald-expansion/pull/4521
- AI now ignores resistances that don’t actually apply when checking for bad moves by @Sneed69 in https://github.com/rh-hideout/pokeemerald-expansion/pull/4524
- For example: Super Fang, Counter and Endeavor.
- Stat stage related AI improvements by @Sneed69 in https://github.com/rh-hideout/pokeemerald-expansion/pull/4548
- Contrary is now properly checked.
- Some evasion and accuracy checks that were incorrectly handled are now fixed.
- Updated AI scores for Status moves that Dynamax Pokémon are immune to by @WillKolada in https://github.com/rh-hideout/pokeemerald-expansion/pull/4523
- Roar, One-Hit KO moves, Disable, Encore, Torment, Destiny Bond, Skill Swap, Entrainment, Instruct and Skill Swappokeemerald-expansion/pull/4518
Fixed
- Various AI switching logic fixes by @Sneed69 in https://github.com/rh-hideout/pokeemerald-expansion/pull/4571
- Weather-based healing was treated as damage
- Damage and healing from multiple sources overwrote each other
- Utility Umbrella and Magic Guard were ignored.
- Max G-Steelsurge was ignored.
- Sitrus Berry’s Gen 4+ effect was ignored.
- Removed item ID hardcoding for confuse berries.
- Various AI switching logic fixes Part 2 by @Sneed69 in https://github.com/rh-hideout/pokeemerald-expansion/pull/4572
- AI now calculates damage from the badly poisoned status.
- AI now removes weather damage from current AI instead of adding it.
- Cleanup for #4571
- AI respects partner when using spread moves in double battles by @AlexOn1ine in https://github.com/rh-hideout/
- Fixed AI not properly reading that Belch could be used after eating a berry by @Pawkkie in https://github.com/rh-hideout/pokeemerald-expansion/pull/4616
🧹 Other Cleanup 🧹
Fixed
- Fixed
BS_SetGlaiveRushformatting by @AlexOn1ine in https://github.com/rh-hideout/pokeemerald-expansion/pull/4610
🧪 Test Runner 🧪
Added
- Added tests to verify Parental Bond doesn’t affect
EFFECT_MULTI_HITmoves by @iriv24 in https://github.com/rh-hideout/pokeemerald-expansion/pull/4573 - Added missing Move Effect TODO tests - Volume A by @AsparagusEduardo in https://github.com/rh-hideout/pokeemerald-expansion/pull/4569
- Handles all
EFFECTS_xthat start with A, other effects will follow. Once all TODO tests are added, tests can begin to be written to assure that all current functionalities are fully functional.
- Handles all
Fixed
- Fixed incorrect Quick Claw test name by @Sneed69 in https://github.com/rh-hideout/pokeemerald-expansion/pull/4613
📦 Pret merges 📦
- Pre-1.8.4 pret merge (2024/05/26) (v2) by @SBird1337 in https://github.com/rh-hideout/pokeemerald-expansion/pull/4637
- Fix poison projectile array being incorrectly combined into three separate arrays by @NTx86 in https://github.com/pret/pokeemerald/pull/1989
- Fix hoenn pokedex palette being split in two by @NTx86 in https://github.com/pret/pokeemerald/pull/1990
- Fix Pokeblock script missing a releaseall by @Jaizu in https://github.com/pret/pokeemerald/pull/1996
- Fix Pokeblock script missing a releaseall by @Jaizu in https://github.com/pret/pokeemerald/pull/1996
- Make AdjustFriendship more readable by @Jaizu in https://github.com/pret/pokeemerald/pull/1995
- Move POKE_ICON_BASE_PAL_TAG to a header by @Sneed69 in https://github.com/pret/pokeemerald/pull/1998
New Contributors
- @BlueAnthem37510 made their first contribution in https://github.com/rh-hideout/pokeemerald-expansion/pull/4502
- @TheJamesLJ made their first contribution in https://github.com/rh-hideout/pokeemerald-expansion/pull/4541
- @iriv24 made their first contribution in https://github.com/rh-hideout/pokeemerald-expansion/pull/4570
Full Changelog: https://github.com/rh-hideout/pokeemerald-expansion/compare/expansion/1.8.3...expansion/1.8.4
Version 1.8.3
## How to update
- If you haven't set up a remote, run the command `git remote add RHH https://github.com/rh-hideout/pokeemerald-expansion`.
- Once you have your remote set up, run the command `git pull RHH expansion/1.8.3`.
💥 Softlock/Crash fixes 💥
- Fixed AI bug that caused an infinite loop when player mon has only status moves by @Pawkkie and @AlexOn1ine in https://github.com/rh-hideout/pokeemerald-expansion/pull/4403
- Temporarely disabled
AI_FLAG_SMART_MON_CHOICESflag in double battles to prevent a softlock by @Sneed69 in https://github.com/rh-hideout/pokeemerald-expansion/pull/4405 - Fixed debug option “Fill PC Boxes Fast” softlocking the game by @mrgriffin in https://github.com/rh-hideout/pokeemerald-expansion/pull/4428
- Fixed infinite loop caused by Leftovers with
AI_FLAG_SMART_MON_CHOICESby @Pokabbie and @AlexOn1ine in https://github.com/rh-hideout/pokeemerald-expansion/pull/4453
🧬 General 🧬
Changed
- Updated outdated macOS instructions in
INSTALL.mdby @jschoeny in https://github.com/rh-hideout/pokeemerald-expansion/pull/4407 - Made filepath links in
README.mdrelative by @lolbinarycat in https://github.com/rh-hideout/pokeemerald-expansion/pull/4509
Fixed
- Fixed abilities not being properly inherited via breeding for species/abilities with IDs over 255 by @AsparagusEduardo in https://github.com/rh-hideout/pokeemerald-expansion/pull/4411
- Fixed Hard Level Caps issues by @AlexOn1ine in https://github.com/rh-hideout/pokeemerald-expansion/pull/4420
- Fixed Pokémon being able to surpass cap if they gained enough experience at once.
- Fixed Exp. Candies ignoring hard caps.
- Fixed Pokémon gaining 1 experience if they are at the level cap.
- Fixed evolution tracker issues by @cawtds in https://github.com/rh-hideout/pokeemerald-expansion/pull/4503
EVO_LEVEL_MOVE_TWENTY_TIMESno longer increases with every move.EVO_LEVEL_RECOIL_DAMAGE_MALE/FEMALEis no longer updated twice than intended.
✨ Feature Branches ✨
TheXaman’s HGSS Pokédex Plus:
Fixed
- Fixed Pokémon data page not properly handling
u16Exp. Yields by @Sneed69 in https://github.com/rh-hideout/pokeemerald-expansion/pull/4432- Cleanup by @Bassoonian in https://github.com/rh-hideout/pokeemerald-expansion/pull/4445
🐉 Pokémon 🐉
Changed
- Further Gen 9 Pokémon icon improvements by @kittenchilly in https://github.com/rh-hideout/pokeemerald-expansion/pull/4413
- Original sprites by ezerart on DeviantArt. Palette assignments and 2nd frames by kittenchilly.
- Cyclizar, Dipplin, Farigiraf, Glimmet, Glimmora, Greavard, Iron Moth, Revavroom, Tadbulb, Paldean Tauros (all three of them), Tinkaton and Paldean Wooper.
- Further Gen 9 Pokémon front/back sprite improvements by @AlexOn1ine in https://github.com/rh-hideout/pokeemerald-expansion/pull/4414
- Source: PokéCommunity
- Dolliv, Arboliva, Charcadet, Mabosstiff, Tinkatink, Tinkatuff, Tinkaton and Chien-Pao.
Fixed
- Fixed Lycanroc Dusk and Midnight forms using Midday’s backsprite by @Eemeliri in https://github.com/rh-hideout/pokeemerald-expansion/pull/4430
- Fixed Tatsugiri Droopy back sprite palette by @cafei-uh in https://github.com/rh-hideout/pokeemerald-expansion/pull/4455
⚔️ Battle General ⚔️
Changed
- Turned
B_RESTORE_HELD_BATTLE_ITEMSinto a generational config by @LOuroboros in https://github.com/rh-hideout/pokeemerald-expansion/pull/4402
Fixed
- Fixed battle Partner trainer class and potential OOB-related issues by @Bassoonian in https://github.com/rh-hideout/pokeemerald-expansion/pull/4422
🤹 Moves 🤹
Fixed
- Fixed Quash not properly working when
B_RECALC_TURN_AFTER_ACTIONSis set toGEN_8or greater by @AlexOn1ine in https://github.com/rh-hideout/pokeemerald-expansion/pull/4419 - Fixed Will-O-Wisp’s name capitalization in gMovesInfo by @LOuroboros in https://github.com/rh-hideout/pokeemerald-expansion/pull/4425
- Fixed Thunder Cage not printing the right battle message by @Sneed69 in https://github.com/rh-hideout/pokeemerald-expansion/pull/4426
- Fixed Diamond Storm missing its effect by @PhallenTree in https://github.com/rh-hideout/pokeemerald-expansion/pull/4489
- Fixed Mortal Spin’s description by @PhallenTree in https://github.com/rh-hideout/pokeemerald-expansion/pull/4489
- Fixed Assist being able to call
MOVE_NONEby @PhallenTree in https://github.com/rh-hideout/pokeemerald-expansion/pull/4491
🎭 Abilities 🎭
Changed
- Changed the Embody Aspect defines to use the full form name, to be in line with the species define by @kittenchilly in https://github.com/rh-hideout/pokeemerald-expansion/pull/4439
- Eg.
ABILITY_EMBODY_ASPECT_TEAL->ABILITY_EMBODY_ASPECT_TEAL_MASK.
- Eg.
Fixed
- Fixed Intimidate/Supersweet Syrup playing their animation and not printing the right message for battlers at -6 stage Attack/Evasion by @Sneed69 in https://github.com/rh-hideout/pokeemerald-expansion/pull/4406
- Fixed ability pop ups not respecting
abilityPopupOverwritein tests by @kittenchilly in https://github.com/rh-hideout/pokeemerald-expansion/pull/4423 - Fixed Dancer copying multi-target moves by @AlexOn1ine in https://github.com/rh-hideout/pokeemerald-expansion/pull/4437
- Fixed Hospitality triggering on a fainted mon by @AlexOn1ine in https://github.com/rh-hideout/pokeemerald-expansion/pull/4450
- Fixed Embody Aspect (Teal Mask) boosting Sp. Attack instead of Speed by @kittenchilly in https://github.com/rh-hideout/pokeemerald-expansion/pull/4439
- Fixed lingering long ability popup names by @Sneed69 in https://github.com/rh-hideout/pokeemerald-expansion/pull/4456
- Fixed Fur Coat not being skipped by Mold Breaker abilities by @Bassoonian in https://github.com/rh-hideout/pokeemerald-expansion/pull/4459
- Fixed Color change not being triggered by Future Sight or Doom Desire by @AlexOn1ine and @hedara90 in https://github.com/rh-hideout/pokeemerald-expansion/pull/4472
- Fixes Magic Bounce only working for battlers in certain positions by @AlexOn1ine in https://github.com/rh-hideout/pokeemerald-expansion/pull/4464
- Fixed Costar, Zero to Hero, Supreme Overlord and Ruin abilities’ switch-in battle messages showing sometimes incorrectly by @PhallenTree in https://github.com/rh-hideout/pokeemerald-expansion/pull/4500
- Cleanup by @AsparagusEduardo in https://github.com/rh-hideout/pokeemerald-expansion/pull/4511
🧶 Items 🧶
Fixed
- Fixed typo in Rotom Catalogue description by @mrgriffin in https://github.com/rh-hideout/pokeemerald-expansion/pull/4433
- Eject item fixes (Eject Button/Pack):
- Fixed regression from 1.8.2 that caused Eject Pack to not trigger upon self-inflicted stat decreases by @AlexOn1ine in https://github.com/rh-hideout/pokeemerald-expansion/pull/4463
- Fixed Eject Items causing wrong Pokémon taking damage by entry hazards by @PhallenTree in https://github.com/rh-hideout/pokeemerald-expansion/pull/4465
- Cleanup by @AsparagusEduardo in https://github.com/rh-hideout/pokeemerald-expansion/pull/4497
- Fixed Flute Items being consumed in battle by @AsparagusEduardo in https://github.com/rh-hideout/pokeemerald-expansion/pull/4496
- Fixed Red Card activating if the holder was switched in in the same turn (eg. via Endure) by @AlexOn1ine in https://github.com/rh-hideout/pokeemerald-expansion/pull/4482
🤖 Battle AI 🤖
Changed
AI_FLAG_SMART_SWITCHINGflag now automatically setsAI_FLAG_SMART_MON_CHOICESas well by @Sneed69 in https://github.com/rh-hideout/pokeemerald-expansion/pull/4405- Cleanup by @AlexOn1ine in https://github.com/rh-hideout/pokeemerald-expansion/pull/4409
- Corrected
IsDamageMoveUsable’s name toIsDamageMoveUnusableby @WillKolada in https://github.com/rh-hideout/pokeemerald-expansion/pull/4476 - Fixed AI not knowing that Steam Roller fails when there’s no terrain by @WillKolada in https://github.com/rh-hideout/pokeemerald-expansion/pull/4476
- Cleanup by @AsparagusEduardo in https://github.com/rh-hideout/pokeemerald-expansion/pull/4498
🧪 Test Runner 🧪
Added
- Added missing Color change tests by @hedara90 in https://github.com/rh-hideout/pokeemerald-expansion/pull/4472
Changed
Fixed
- Fixed AI test error messages by @mrgriffin in https://github.com/rh-hideout/pokeemerald-expansion/pull/4404
- The error messages for
EXPECT_MOVEandEXPECT_SWITCHwere backwards, saying, e.g.Expected MOVE, got SWITCHwhen it should sayExpected SWITCH, got MOVE.
- The error messages for
- Fixed typos in Embody Aspect tests by @kittenchilly in https://github.com/rh-hideout/pokeemerald-expansion/pull/4439
- Fixed Battle Test organization by @AsparagusEduardo in https://github.com/rh-hideout/pokeemerald-expansion/pull/4504
- Fixed Cud Chew’s file being in the move effect folder.
- Fixed Cud Chew’s file name and test names (Cud Chuw).
- Fixed Gastro Acid and Role Play’s files being in the ability folder.
- Moved Recoil file to move flags folder.
- Renamed White Herb’s file to
restore_stats.c. - Renamed Techno Blast’s file to
change_type_on_item.c. semi_invulnerable_moves.ctosemi_invulnerable.c.two_turn_moves.ctotwo_turns_attack.c.- Combined Burn Up/Double Shock to a single file
fail_if_not_arg_type.c - Added Spit Up/Swallow files that point Stockpile’s file.
- Moved secondary effect files to their own folder.
- Combinations of secondary effects moved to their own folder
- Split
hit_set_entry_hazards.cto separate files for Spikes/Stealth Rock. - Grouped Hex/Venoshock to the same file
double_power_on_arg_status.c
New Contributors
- @jschoeny made their first contribution in https://github.com/rh-hideout/pokeemerald-expansion/pull/4407
- @Eemeliri made their first contribution in https://github.com/rh-hideout/pokeemerald-expansion/pull/4430
- @cafei-uh made their first contribution in https://github.com/rh-hideout/pokeemerald-expansion/pull/4455
- @PhallenTree made their first contribution in https://github.com/rh-hideout/pokeemerald-expansion/pull/4465
- @WillKolada made their first contribution in https://github.com/rh-hideout/pokeemerald-expansion/pull/4476
- @cawtds made their first contribution in https://github.com/rh-hideout/pokeemerald-expansion/pull/4503
- @lolbinarycat made their first contribution in https://github.com/rh-hideout/pokeemerald-expansion/pull/4509
Full Changelog: https://github.com/rh-hideout/pokeemerald-expansion/compare/expansion/1.8.2...expansion/1.8.3
Version 1.8.2
## How to update
- If you haven't set up a remote, run the command `git remote add RHH https://github.com/rh-hideout/pokeemerald-expansion`.
- Once you have your remote set up, run the command `git pull RHH expansion/1.8.2`.
🌋 Important changes 🌋
- Added check during compilation to make sure that the code is inside a git directory before building by @SBird1337 in https://github.com/rh-hideout/pokeemerald-expansion/pull/4363
- If you downloaded the code using the “Download ZIP” option on GitHub, you will not be able to update your expansion version or merge any other feature brances, which is why we added this check to make sure that users don’t fall into this trap.
💥 Softlock/Crash fixes 💥
- Fixed Battle Pyramid freeze when
BATTLE_PYRAMID_RANDOM_ENCOUNTERSis set toTRUEby @AlexOn1ine in https://github.com/rh-hideout/pokeemerald-expansion/pull/4326 - Fixed switch-in AI infinite loop when calculating amount of hits to faint the opponent by @Pawkkie and @AlexOn1ine in https://github.com/rh-hideout/pokeemerald-expansion/pull/4338
- Fixed softlock with weather-triggered form changes and Cloud Nine by @skolgrahd in https://github.com/rh-hideout/pokeemerald-expansion/pull/4382
- Fixes Eject Pack softlock when there are no other party members left to switch to by @skolgrahd and @AlexOn1ine in https://github.com/rh-hideout/pokeemerald-expansion/pull/4387
🧬 General 🧬
Changed
- Changed Frostbite’s abbreviation from
FSBtoFRBby @kittenchilly in https://github.com/rh-hideout/pokeemerald-expansion/pull/4355
Fixed
- Fixed
BATTLE_PYRAMID_RANDOM_ENCOUNTERSnot including species pastFORMS_START, including Gen 9 Pokémon by @AlexOn1ine in https://github.com/rh-hideout/pokeemerald-expansion/pull/4326 - Fixed potential compile issue that occurs when
gba/types.his included beforegba/defines.hby @mrgriffin in https://github.com/rh-hideout/pokeemerald-expansion/pull/4364 - Fixed
givemonsetting every move despite only specifying a couple by @AlexOn1ine in https://github.com/rh-hideout/pokeemerald-expansion/pull/4377- Level up moves will be used when no move is specified.
- Rewrite
GiveBoxMonInitialMoveset_Fastto matchGiveBoxMonInitialMovesetresults (but still faster) by @Sneed69 in https://github.com/rh-hideout/pokeemerald-expansion/pull/4373 - Fixed Teachable Learnset helper crashing in some environments by @Bassoonian in https://github.com/rh-hideout/pokeemerald-expansion/pull/4389
✨ Feature Branches ✨
TheXaman’s Debug Menu:
Fixed
- Fixed compile issue when disabling Debug Menu by @damon-murdoch in https://github.com/rh-hideout/pokeemerald-expansion/pull/4372
TheXaman’s HGSS Pokédex Plus:
Changed
- Male icons and front pics are now the default by @Sneed69 in https://github.com/rh-hideout/pokeemerald-expansion/pull/4390
Fixed
- Fixed showing graphical errors for icons by @Sneed69 in https://github.com/rh-hideout/pokeemerald-expansion/pull/4390
- Fixed disabled forms appearing in form list by @Sneed69 in https://github.com/rh-hideout/pokeemerald-expansion/pull/4395
🐉 Pokémon 🐉
Added
- Added missing Pecharunt sprite from PokéCommunity by @AlexOn1ine in https://github.com/rh-hideout/pokeemerald-expansion/pull/4324
- Added missing icons for multiple Pokémon by @kittenchilly in https://github.com/rh-hideout/pokeemerald-expansion/pull/4290
- Archaludon
- Partner Eevee
- Gouging Fire
- Iron Boulder
- Iron Crown
- Cornerstone Ogerpon
- Hearthflame Ogerpon
- Wellspring Ogerpon
- Pecharunt
- Partner Pikachu
- Raging Bolt
- Terapagos (all forms)
- Bloodmoon Ursaluna
Changed
- Updated almost all Gen 9 icon sprites to cleaner ones by @kittenchilly in https://github.com/rh-hideout/pokeemerald-expansion/pull/4290
- Original Source (there were some tweaks): https://www.deviantart.com/ezerart/art/Pokemon-Gen-9-Icon-sprites-3DS-Style-944211258
- GBA Pal sprites source: https://whackahack.com/foro/threads/9-gen-sprites.67492/page-46#post-493662
- Further tweaks were made after that.
Fixed
- Fixed Gengar’s missing cries by @AsparagusEduardo in https://github.com/rh-hideout/pokeemerald-expansion/pull/4385
- Fixed silent Klefki cry by @AsparagusEduardo in https://github.com/rh-hideout/pokeemerald-expansion/pull/4392
⚔️ Battle General ⚔️
Fixed
- Level Cap issues
- Fixed Soft Level Caps not properly working by @AlexOn1ine in https://github.com/rh-hideout/pokeemerald-expansion/pull/4327
- Fixed issue that caused Level Caps to give 0 Exp when below the cap and
B_LEVEL_CAP_EXP_UPset toFALSEby @ravepossum in https://github.com/rh-hideout/pokeemerald-expansion/pull/4305
- Fixed graphical bug in Battle Arena windows by @Bassoonian and @DizzyEggg in https://github.com/rh-hideout/pokeemerald-expansion/pull/4307
- Fixed Totem Boosts not triggering by @AlexOn1ine in https://github.com/rh-hideout/pokeemerald-expansion/pull/4328
- Fixed Trainer Slide message for Low HP appearing when the HP was above 25% HP instead of below by @MelonSpeedruns and @Bassoonian in https://github.com/rh-hideout/pokeemerald-expansion/pull/4353
- Fixed Pokémon Mega Evolving/Gigantamaxing/Fusing into
SPECIES_NONEwhen the respective form toggles are set toFALSEby @Sneed69 in https://github.com/rh-hideout/pokeemerald-expansion/pull/4395
🤹 Moves 🤹
Fixed
- Fixed Z-Mirror Move’s base power being set to 0 instead of the mirrored move’s base power by @DizzyEggg in https://github.com/rh-hideout/pokeemerald-expansion/pull/4308
- Fixed Searing Sunraze Smash, Menacing Moonraze Maelstrom and Light That Burns The Sky not bypassing abilities by @AlexOn1ine in https://github.com/rh-hideout/pokeemerald-expansion/pull/4360
- Fixed multiple Future Sight issues by @AlexOn1ine in https://github.com/rh-hideout/pokeemerald-expansion/pull/4350
- Fixed Future Sight using the active Pokémon’s stats if the original user switches out.
- Fixed Future Sight not being boosted by the user’s item when the user is active when the move hits.
- Fixed Future Sight not failing when the target of the attack faints before it hits.
- Fixed Belch not being usable even if a berry was eating via Stuff Cheeks by @AlexOn1ine in https://github.com/rh-hideout/pokeemerald-expansion/pull/4376
🎭 Abilities 🎭
Added
- Added missing Disguise Gen8+ HP loss behavior by @AlexOn1ine in https://github.com/rh-hideout/pokeemerald-expansion/pull/4360
Fixed
- Fixed No Guard checking the wrong battler by @GraionDilach in https://github.com/rh-hideout/pokeemerald-expansion/pull/4320
- Fixed Intimidate’s ability pop up appearing even when
B_ABILITY_POP_UPis set toFALSEby @AlexOn1ine in https://github.com/rh-hideout/pokeemerald-expansion/pull/4339 - Fixed Guts preventing Frostbite’s Sp. Attack reduction by @Sneed69 in https://github.com/rh-hideout/pokeemerald-expansion/pull/4351
- Fixed Iron Barbs/Rough Skin and confusion self-damage breaking Disguise by @AlexOn1ine in https://github.com/rh-hideout/pokeemerald-expansion/pull/4360
- Fixed Gulp Missile not changing Cramorant’s form when Dive is triggered in a single turn using Power Herb by @AlexOn1ine in https://github.com/rh-hideout/pokeemerald-expansion/pull/4371
- Fixed Cud Chew showing its ability pop up but not triggering its berry again by @AlexOn1ine in https://github.com/rh-hideout/pokeemerald-expansion/pull/4379
- Fixed Ability flags by @AlexOn1ine in https://github.com/rh-hideout/pokeemerald-expansion/pull/4381
- Gulp Missle can’t be copied.
- Commander can’t be supressed.
🧶 Items 🧶
Fixed
- Fixed multiple White Herb Known issues by @DizzyEggg in https://github.com/rh-hideout/pokeemerald-expansion/pull/4258
- Fixed White Herb not activating after Intimidade.
- Fixed White Herb not activating after all hits of a multi-hit move.
- Fixed White Herb activating when Knocked Off on the same turn as the lowering of the stat (eg. via Weak Armor)
- Fixed White Herb activating even if Magician steals it
- Fixed White Herb activating before Defiant and Competitive.
- Fixed Protective Pads ignoring Fluffy by @AlexOn1ine in https://github.com/rh-hideout/pokeemerald-expansion/pull/4340
- Fixed Ability Shield not preventing Neutralizing Gas from supressing the holder’s ability by @AlexOn1ine in https://github.com/rh-hideout/pokeemerald-expansion/pull/4391
🤖 Battle AI 🤖
Fixed
- Fixed AI not considering Earth Eater by @Bassoonian in https://github.com/rh-hideout/pokeemerald-expansion/pull/4352
- Fixed AI not considering Memento an effect that reduces stats by adding it to
IsStatLoweringEffectby @PCG06 in https://github.com/rh-hideout/pokeemerald-expansion/pull/4386
🧹 Other Cleanup 🧹
Added
- Clarify in
README.mdto not use the “Download ZIP” option by @AsparagusEduardo in https://github.com/rh-hideout/pokeemerald-expansion/pull/4336
Fixed
- Fixed formatting of plate items in type table by @Bassoonian in https://github.com/rh-hideout/pokeemerald-expansion/pull/4318
- Fixed style of some bit definitions by @Bassoonian in https://github.com/rh-hideout/pokeemerald-expansion/pull/4319
🧪 Test Runner 🧪
Added
- Added missing Defiant tests by @AlexOn1ine in https://github.com/rh-hideout/pokeemerald-expansion/pull/4331
- Added missing parametrized Gastro Acid tests by @AlexOn1ine in https://github.com/rh-hideout/pokeemerald-expansion/pull/4381
- Added missing parametrized Role Play tests by @AlexOn1ine in https://github.com/rh-hideout/pokeemerald-expansion/pull/4381
📦 Pret merges 📦
- Pret merge (2024/03/24) by @AsparagusEduardo in https://github.com/rh-hideout/pokeemerald-expansion/pull/4304
- Simplify weirdly matching division/substraction code by @DizzyEggg in https://github.com/pret/pokeemerald/pull/1982
- Document camera sprite functions by @GriffinRichards in https://github.com/pret/pokeemerald/pull/1961
- Renamed “fateful encounter” commands for consistency reasons by @LOuroboros in https://github.com/pret/pokeemerald/pull/1983
- Mid-April pret merge (2024/04/12) by @Bassoonian in https://github.com/rh-hideout/pokeemerald-expansion/pull/4380
- Incorporated @ghoulslash’s Surfing Dismount graphical fix by @pkmnsnfrn in https://github.com/pret/pokeemerald/pull/1985
- Updated value of
gMain.inBattleatOpponentHandleEndLinkBattleby @LOuroboros in https://github.com/pret/pokeemerald/pull/1986 - Added fix to Keep the Camera from Making Waves by @pkmnsnfrn in https://github.com/pret/pokeemerald/pull/1987
New Contributors
- @skolgrahd made their first contribution in https://github.com/rh-hideout/pokeemerald-expansion/pull/4382
Full Changelog: https://github.com/rh-hideout/pokeemerald-expansion/compare/expansion/1.8.1...expansion/1.8.2
Version 1.8.1
## How to update
- If you haven't set up a remote, run the command `git remote add RHH https://github.com/rh-hideout/pokeemerald-expansion`.
- Once you have your remote set up, run the command `git pull RHH expansion/1.8.1`.
🌋 IMPORTANT CHANGES 🌋
- CRITICAL FIX: Fixed a softlock when looking at an Egg in the summary screen by @AsparagusEduardo in https://github.com/rh-hideout/pokeemerald-expansion/pull/4301
🧬 General 🧬
Added
- Added pre-1.6.2 changelogs by @AsparagusEduardo in https://github.com/rh-hideout/pokeemerald-expansion/pull/4296
Changed
- Disabled Tera Type on summary screen by default, since Terastallization is not implemented yet by @AsparagusEduardo in https://github.com/rh-hideout/pokeemerald-expansion/pull/4289
Fixed
- Small fixes to Python install instructions by @ravepossum in https://github.com/rh-hideout/pokeemerald-expansion/pull/4288
- Fixed unintended Pokédex form behavior by @AsparagusEduardo in https://github.com/rh-hideout/pokeemerald-expansion/pull/4299
🧹 Other Cleanup 🧹
Changed
- Actually removed unused
STATUS3_CANT_SCORE_A_CRITby @AsparagusEduardo in https://github.com/rh-hideout/pokeemerald-expansion/pull/4293
Fixed
- Fixed species flag padding by @AsparagusEduardo in https://github.com/rh-hideout/pokeemerald-expansion/pull/4291
Full Changelog: https://github.com/rh-hideout/pokeemerald-expansion/compare/expansion/1.8.0...expansion/1.8.1
Version 1.8.0
## How to update
- If you haven't set up a remote, run the command `git remote add RHH https://github.com/rh-hideout/pokeemerald-expansion`.
- Once you have your remote set up, run the command `git pull RHH expansion/1.8.0`.
🌋 IMPORTANT CHANGES 🌋
-
Python is now a required for the Expansion.
- Run the
command -v python3command to see if you have it. If you don’t, please check INSTALL.md to see how to install it.
- Run the
-
Support for PoryMap v5.1.1 and lower has been dropped.
- Please update your PoryMap version.
- Specifically, we have removed the commented-out
gMonIconTabletable used to associate species IDs with icon images by @Bassoonian in https://github.com/rh-hideout/pokeemerald-expansion/pull/3896- From PoryMap v5.2.0 onwards, these icons are autodetected based on file/directory names instead.
- To continue using older versions of PoryMap, you may restore the commented-out table, though you’ll need to keep it up to date with any new items you add.
-
Backwards-compatible
BoxPokemonRefactor by @mrgriffin in https://github.com/rh-hideout/pokeemerald-expansion/pull/3438- HP and Status is now kept when depositing Pokémon in the PC
- Previous behavior can be restored by setting
OW_PC_HEAL.
- Previous behavior can be restored by setting
- Nature Mints are now fully functional.
- Nature colors in summary screen are based on the changed nature by @Bassoonian in https://github.com/rh-hideout/pokeemerald-expansion/pull/3898
- Gigantamax Factor and Dynamax Level fully supported.
- Cannot be seen in summary screen.
- Dynamax Candy effect added.
- Gigantamax Factor prevents Duraludon from evolving, like Pikachu, Eevee and Meowth beforehand.
- Added
hasgigantamaxfactorandtogglegigantamaxfactoroverworld script commands.- Gigantamax Factor cannot be toggled for Mythical Pokémon (vanilla behavior).
- Hyper Training is now fully supported.
- Cannot be seen in summary screen.
- Added
canhypertrainandhypertrainoverworld script commands.
- Shininess can be toggled with
MON_DATA_IS_SHINY. - Added Tera Type field is added for future-proofing.
- It can be seen in the summary screen by turning
P_SHOW_TERA_TYPEon.
- It can be seen in the summary screen by turning
- Added
isShadowfield for future-proofing. - Added options for Tera Type, Dynamax Level, Gigantamax Factor and Shadow flag in tests.
- Cleanup by
- @fdeblasio in https://github.com/rh-hideout/pokeemerald-expansion/pull/3832
- @AsparagusEduardo in https://github.com/rh-hideout/pokeemerald-expansion/pull/4017
- HP and Status is now kept when depositing Pokémon in the PC
-
Move Refactors:
- Move data unification by @LOuroboros, with help from @Bassoonian, @cfmnephrite and @AsparagusEduardo in https://github.com/rh-hideout/pokeemerald-expansion/pull/3999
- Renamed
gBattleMovestogMovesInfo. - Moved move names to
gMovesInfo.- Added
GetMoveNameto get all move names, removing the need forGetMaxMoveNameandGetZMoveName.
- Added
- Moved move descriptions to
gMovesInfo. - Moved contest data to
gMovesInfo.
- Renamed
- Secondary/primary effects overhaul by @cfmnephrite in https://github.com/rh-hideout/pokeemerald-expansion/pull/3577
- Secondary effects such as stat stage modifiers and status via are now set via
additionalEffectsfield. - Eg.
Now becomes:[MOVE_THUNDER_FANG] = { .effect = EFFECT_FLINCH_STATUS, .secondaryEffectChance = 10, .argument = STATUS1_PARALYSIS, ... },
With customizable independent chances for each effect. Because of this,[MOVE_THUNDER_FANG] = { .effect = EFFECT_HIT, .additionalEffects = ADDITIONAL_EFFECTS( { .moveEffect = MOVE_EFFECT_PARALYSIS, .chance = 10, }, { .moveEffect = MOVE_EFFECT_FLINCH, .chance = 10, } ), ... },secondaryEffectChancehas been removed. - For more info, check the wiki article on How to add a new move.
- Cleanup by:
- @GraionDilach in https://github.com/rh-hideout/pokeemerald-expansion/pull/3986
- @AlexOn1ine in https://github.com/rh-hideout/pokeemerald-expansion/pull/4003
- By @cfmnephrite in https://github.com/rh-hideout/pokeemerald-expansion/pull/4137
- By @AlexOn1ine in https://github.com/rh-hideout/pokeemerald-expansion/pull/4277
- Secondary effects such as stat stage modifiers and status via are now set via
- Renamed Battle Move “Split” to the proper “Category” term by @AsparagusEduardo in https://github.com/rh-hideout/pokeemerald-expansion/pull/3774
-.split = SPLIT_PHYSICAL, +.category = DAMAGE_CATEGORY_PHYSICAL, - Z-move power override (eg. Mega Drain) was moved from a switch in
GetZMovePowerto move data. It’s part of an union alongsize with Z-move status effect by @cfmnephrite in https://github.com/rh-hideout/pokeemerald-expansion/pull/3575- Cleanup by @AsparagusEduardo in https://github.com/rh-hideout/pokeemerald-expansion/pull/4201
- Removed
EFFECT_RECOIL_xeffects in favor of newrecoilfield by @cfmnephrite in https://github.com/rh-hideout/pokeemerald-expansion/pull/3575 - Removed critical-hit move effects in favor of new
criticalHitStageby @cfmnephrite in https://github.com/rh-hideout/pokeemerald-expansion/pull/3779- Added
alwaysCriticalHitmove flag.
- Added
- Converted
EFFECT_xdefines to an enum by @cfmnephrite in https://github.com/rh-hideout/pokeemerald-expansion/pull/3975 - Move data now uses ternaries for data that was changed only once across generations by @AsparagusEduardo in https://github.com/rh-hideout/pokeemerald-expansion/pull/3987
[MOVE_SWORDS_DANCE] = { - #if B_UPDATED_MOVE_DATA >= GEN_6 - .pp = 20, - #else - .pp = 30, - #endif .effect = EFFECT_ATTACK_UP_2, .power = 0, .type = TYPE_NORMAL, .accuracy = 0, + .pp = B_UPDATED_MOVE_DATA >= GEN_6 ? 20 : 30, - Moved effect script array to
src/data/battle_move_effects.hby @cfmnephrite in https://github.com/rh-hideout/pokeemerald-expansion/pull/3994- AI’s
sEncouragedEncoreEffectsand Battle TV’ssPoints_MoveEffectare now handled in this struct. - Some move flags were moved to this array instead
- Semi-invulnerable flag (
semiInvulnerableEffect) in https://github.com/rh-hideout/pokeemerald-expansion/pull/4062- Cleanup by @cfmnephrite in https://github.com/rh-hideout/pokeemerald-expansion/pull/4150
- Flag to define Two-turn effects (
twoTurnEffect) in https://github.com/rh-hideout/pokeemerald-expansion/pull/4062 - Flag for increasing the protection counter (
usesProtectCounter) in https://github.com/rh-hideout/pokeemerald-expansion/pull/4062
- Semi-invulnerable flag (
- AI’s
- Removed
sheerForceBoostin favor of checking their actual secondary effects by @cfmnephrite in https://github.com/rh-hideout/pokeemerald-expansion/pull/4096- To force Sheer Boost acting for a move without secondary effect, you can add
SHEER_FORCE_HACKin theadditionalEffectsfield.
- To force Sheer Boost acting for a move without secondary effect, you can add
- Move data unification by @LOuroboros, with help from @Bassoonian, @cfmnephrite and @AsparagusEduardo in https://github.com/rh-hideout/pokeemerald-expansion/pull/3999
-
Learnset refactors
- Level up learnsets can now be switched by generational config by @MartyKen in https://github.com/rh-hideout/pokeemerald-expansion/pull/4049
- Adds a file for each generation with data for all species.
- Gen 1: Yellow
- Gen 2: Crystal
- Gen 3: RSE
- Gen 4: HGSS
- Gen 5: B2W2
- Gen 6: ORAS
- Gen 7: USUM
- Gen 8:
- Species from Gens 1-4: BDSP
- Species from Legends: Arceus: Use that game’s data.
- Species from Gens 5-8: SwSh if they exist there. Otherwise, default to Gen 7’s data.
- Gen 9:
- If they exist in SV, use that game’s data.
- Otherwise, default to Gen 8’s data.
- If a Pokémon doesn’t exist in the respective generation, it uses the first instance it appears in.
- Eg. Chikorita uses its Gen 2 learnset if the config is set to Gen 1.
- IMPORTANT: Since the expansion’s default had most movesets correspond to USUM’s, conflicts will arise in
data/pokemon/level_up_learnsets/gen_7.hif you modified the level learnsets. Be sure to backup yourdata/pokemon/level_up_learnsets.hbefore merging and then do the following after merging to keep your changes:+#include "data/pokemon/level_up_learnsets.h" +#if FALSE + #if P_LVL_UP_LEARNSETS >= GEN_9 #include "data/pokemon/level_up_learnsets/gen_9.h" #elif P_LVL_UP_LEARNSETS >= GEN_8 #include "data/pokemon/level_up_learnsets/gen_8.h" #elif P_LVL_UP_LEARNSETS >= GEN_7 #include "data/pokemon/level_up_learnsets/gen_7.h" #elif P_LVL_UP_LEARNSETS >= GEN_6 #include "data/pokemon/level_up_learnsets/gen_6.h" #elif P_LVL_UP_LEARNSETS >= GEN_5 #include "data/pokemon/level_up_learnsets/gen_5.h" #elif P_LVL_UP_LEARNSETS >= GEN_4 #include "data/pokemon/level_up_learnsets/gen_4.h" #elif P_LVL_UP_LEARNSETS >= GEN_3 #include "data/pokemon/level_up_learnsets/gen_3.h" #elif P_LVL_UP_LEARNSETS >= GEN_2 #include "data/pokemon/level_up_learnsets/gen_2.h" #elif P_LVL_UP_LEARNSETS >= GEN_1 #include "data/pokemon/level_up_learnsets/gen_1.h" #endif +#endif
- Cleanup by
- @MartyKen in https://github.com/rh-hideout/pokeemerald-expansion/pull/4267
- @AsparagusEduardo in https://github.com/rh-hideout/pokeemerald-expansion/pull/4275
- Adds a file for each generation with data for all species.
- Added
sUniversalMoves, a near-universal teachable move array by @Bassoonian in https://github.com/rh-hideout/pokeemerald-expansion/pull/4052- This removes the need to add moves such as Hidden Power to almost every species.
- Adds
tmIlliterateflag that controls when specific species cannot learn these moves, such as Magikarp, Caterpie and Ditto.
- Auto-generate teachable learnset data from JSON data by @Bassoonian in https://github.com/rh-hideout/pokeemerald-expansion/pull/3856
- Scans the repository for TMs and tutor moves.
- Checks JSON files (same format as PoryMoves, with minor label adjustments for an easier time) for compatibility.
- Creates a
teachable_learnsets.hfile with the smallest size possible by only including the moves found in the scan. - Users can easily delete/add JSON files to reference less/more data as they see fit.
- Eg. they can remove hgss.json to remove those games’ compatibility list from being considered.
- Any changes in
teachable_learnsets.hmade before this tool runs for the first time will be saved incustom.jsonfor flawless migration.
- Updated
teachable_learnsets.husing this script by @Bassoonian in https://github.com/rh-hideout/pokeemerald-expansion/pull/4064- Further updated with new Indigo Disk data compatibility by @AsparagusEduardo in https://github.com/rh-hideout/pokeemerald-expansion/pull/4155
- Can be disabled via
P_LEARNSET_HELPER_TEACHABLE.
- Removed previously untutorable moves from Mew’s unteachable moves by @fdeblasio in https://github.com/rh-hideout/pokeemerald-expansion/pull/4142
- Level up learnsets can now be switched by generational config by @MartyKen in https://github.com/rh-hideout/pokeemerald-expansion/pull/4049
-
Ability Refactor: new struct called
Abilitythat stores both name and description of abilities by @Bassoonian in https://github.com/rh-hideout/pokeemerald-expansion/pull/3861- AI ability scores moved to this struct by @Bassoonian in https://github.com/rh-hideout/pokeemerald-expansion/pull/3862
- Added ability flags to replace arrays and switch statements by @cfmnephrite in https://github.com/rh-hideout/pokeemerald-expansion/pull/3886
cantBeCopied: Cannot be copied by Role Play or Doodle.cantBeSwapped: Cannot be swapped with Skill Swap or Wandering Spirit.cantBeTraced: Cannot be copied by Trace.cantBeSuppressed: Cannot be negated by Gastro Acid or Neutralizing Gas.cantBeOverwritten: Cannot be overwritten by Entrainment, Worry Seed or Simple Beam. Mummy/Lingering Aroma checks forcantBeSuppressedinstead.breakable: Can be bypassed by Mold Breaker-like abilities.failsOnImposter: Currently unused.- Cleanup by @cfmnephrite in https://github.com/rh-hideout/pokeemerald-expansion/pull/3889
-
Type info consolidation by @fdeblasio in https://github.com/rh-hideout/pokeemerald-expansion/pull/4185
- New struct called
TypeInfothat stores:- Name
- Generic move name
- Icon Palette index number
- Type Z-Move
- Type Max Move
- Commented out data to assist users that desire to use it in their own hacks and as a reference for them to add items of new types.
- Type-enhancing item (eg. Charcoal)
- Type-resist berry
- Type Gems
- Z-Crystal
- Tera Shard
- Arceus form
- Cleanup by @AsparagusEduardo in https://github.com/rh-hideout/pokeemerald-expansion/pull/4276
- New struct called
🧬 General 🧬
Added
- Added optional high-quality RNG by @tertu-m in https://github.com/rh-hideout/pokeemerald-expansion/pull/3780
- Can be toggled with
HQ_RANDOM. - Cleanup by
- Can be toggled with
- Added defines to RHH’s rom header
MOVES_COUNTandNUM_SPECIESby @Ninjdai1 in https://github.com/rh-hideout/pokeemerald-expansion/pull/3831- Cleanup by @Ninjdai1 in https://github.com/rh-hideout/pokeemerald-expansion/pull/3992
ITEMS_COUNTandITEM_NAME_LENGTHby @Ninjdai1 in https://github.com/rh-hideout/pokeemerald-expansion/pull/3988
- IWRAM and EWRAM variables can now be assigned at boot by using
EWRAM_INITandIWRAM_INITby @aronson in https://github.com/rh-hideout/pokeemerald-expansion/pull/3892- For example:
EWRAM_INIT u32 gFoo = 1337; IWRAM_INIT u32 gFastFoo = 31337; - Cleanup by @aronson in https://github.com/rh-hideout/pokeemerald-expansion/pull/3903
- For example:
- Level Caps by @AlexOn1ine, @SBird1337 and PokemonCrazy in https://github.com/rh-hideout/pokeemerald-expansion/pull/3632
- Types of caps (set in
B_EXP_CAP_TYPE):- None (
EXP_CAP_NONE): Regular behavior, no level caps are applied. - Hard (
EXP_CAP_HARD): Pokémon with a level equal or above cap cap cannot gain any experience. - Soft (
EXP_CAP_SOFT): Pokémon with a level equal or above cap will gain reduced experience.
- None (
- Cap level can be set using either:
LEVEL_CAP_FLAG_LIST: Level cap is chosen according to the first unset flag insLevelCapFlagMap.LEVEL_CAP_VARIABLE: Uses a defined variable to dynamically change level cap.
- Additional options include:
B_RARE_CANDY_CAP: If set to true, Rare Candies can’t be used to go over the level cap.B_LEVEL_CAP_EXP_UP: If set to true, mons under level cap will receive more experience.
- Cleanup by @AsparagusEduardo in https://github.com/rh-hideout/pokeemerald-expansion/pull/4275
- Types of caps (set in
- Added new metaprogram macros by @cfmnephrite in https://github.com/rh-hideout/pokeemerald-expansion/pull/3968
- Allows to set up default data without explicitily defining it.
- Eg. setting Poké Balls as the default ball for all trainer classes.
- Allows to set up default data without explicitily defining it.
- Elite Four/Champion transitions can now easily be applied to any trainer in their data by @fdeblasio in https://github.com/rh-hideout/pokeemerald-expansion/pull/4000
- Based off @ShinyDragonHunter’s BetterMugshots branch.
- To use, use these in
src/data/trainers.h:- Use
mugshotEnabledto enable it for the specific trainer. - Use
mugshotColorto choose the color of the background for the transition between the following:MUGSHOT_COLOR_PURPLEMUGSHOT_COLOR_GREENMUGSHOT_COLOR_PINKMUGSHOT_COLOR_BLUEMUGSHOT_COLOR_YELLOW
- Use
- Cleanup using metaprogram by @fdeblasio in https://github.com/rh-hideout/pokeemerald-expansion/pull/4140
- Added
OW_DOUBLE_APPROACH_WITH_ONE_MONconfig to allow being spotted by two trainers with one mon in party for a 2v1 battle by @Bassoonian in https://github.com/rh-hideout/pokeemerald-expansion/pull/4007 - Added configs to enable metric system units by @pkmnsnfrn in https://github.com/rh-hideout/pokeemerald-expansion/pull/4183
- Toggled by
UNITSininclude/config.h. - Cleanup by @pkmnsnfrn in https://github.com/rh-hideout/pokeemerald-expansion/pull/4193
- Toggled by
- Implemented custom GiveMon scripting command by @LOuroboros, with help from @ghoulslash and @mrgriffin in https://github.com/rh-hideout/pokeemerald-expansion/pull/3924
- Based off @ghoulslash’s custom_givemon branch.
- In addition to Species, Level and Held Item, users can now specify:
- Poké Ball
- Nature
- Ability number
- You can pass
NUM_ABILITY_PERSONALITYto generate the ability based on personality by @LOuroboros in https://github.com/rh-hideout/pokeemerald-expansion/pull/4192
- You can pass
- Gender
- EVs
- IVs
- Moves
- Shininess
- Gigantamax Factor
- Tera Type
- Save-compatible SaveBlock3, with 1624 bytes by @mrgriffin in https://github.com/rh-hideout/pokeemerald-expansion/pull/4112
- IMPORTANT: This is incompatible with the “Extra save space with two lines of code” tutorial, which allocates that additional space to
SaveBlock1,SaveBlock2, andPokemonStorageinstead. To preserve save compatibility, changeSAVE_BLOCK_3_CHUNK_SIZEto 0 and keepSECTOR_DATA_SIZEas 4084.
- IMPORTANT: This is incompatible with the “Extra save space with two lines of code” tutorial, which allocates that additional space to
- Trainer Control
- Trainer data encapsulation by @AsparagusEduardo in https://github.com/rh-hideout/pokeemerald-expansion/pull/4216
- Added options for
TrainerMon:- By @mrgriffin in https://github.com/rh-hideout/pokeemerald-expansion/pull/3438
- Dynamax Level (
dynamaxLevel) - Gigantamax Factor (
gigantamaxFactor)
- Dynamax Level (
- By @Nopinou in https://github.com/rh-hideout/pokeemerald-expansion/pull/4169
- AI flags to signal when to Dynamax (
shouldDynamax) - AI flags to signal when to Terastalize (
shouldTerastal)
- AI flags to signal when to Dynamax (
- By @mrgriffin in https://github.com/rh-hideout/pokeemerald-expansion/pull/3438
- Sets neutral nature and ability to 0 as default by @AlexOn1ine in https://github.com/rh-hideout/pokeemerald-expansion/pull/4172
- Added
randompercentageandrandomelementscript commands by @mrgriffin in https://github.com/rh-hideout/pokeemerald-expansion/pull/4189- Allows to do the following:
@ VAR_RESULT is one of Treecko, Torchic, or Mudkip randomelement SPECIES_TREECKO, SPECIES_TORCHIC, SPECIES_MUDKIP @ Gives a random one of Treecko, Torchic, or Mudkip. givemon VAR_RESULT, 5@ VAR_RESULT is TRUE 25% of the time, and FALSE 75% of the time. randompercentage 25 @ Gives a Wobbuffet that is shiny 25% of the time. givemon SPECIES_WOBBUFFET, 20, isShiny=VAR_RESULT
- Allows to do the following:
Changed
- Simplified creation of Object Events by adding
overworld_ascending_framesfor sequentialoverworld_ascendings by @mrgriffin in https://github.com/rh-hideout/pokeemerald-expansion/pull/3625 - Comparison functions now follow -1, 1, 0 convention by @DizzyEggg in https://github.com/rh-hideout/pokeemerald-expansion/pull/3777
- Centralized Trainer sprites by @fdeblasio in https://github.com/rh-hideout/pokeemerald-expansion/pull/3597
- Standarized usage of array shuffling to use
Shufflefunction by @tertu-m in https://github.com/rh-hideout/pokeemerald-expansion/pull/3801 - Turned nature names into compound strings by @Bassoonian in https://github.com/rh-hideout/pokeemerald-expansion/pull/3871
TrainerMoneystruct is renamed toTrainerClassand now includes Trainer Class name by @fdeblasio in https://github.com/rh-hideout/pokeemerald-expansion/pull/3875- Improve error message with unsupported cpp by @DizzyEggg in https://github.com/rh-hideout/pokeemerald-expansion/pull/4272
Fixed
- Fixed potential compiler errors by @DizzyEggg in https://github.com/rh-hideout/pokeemerald-expansion/pull/4252
- Fixed
ScriptGiveMonParameterizednot recognizing the state ofP_FLAG_FORCE_SHINYandP_FLAG_FORCE_NO_SHINYby @LOuroboros in https://github.com/rh-hideout/pokeemerald-expansion/pull/4256 - Fixed a graphical issue when catching a form of a Pokémon for the first time by @AsparagusEduardo in https://github.com/rh-hideout/pokeemerald-expansion/pull/4279
- Fixed
ScriptGiveMonParameterizedrandomizing nature even when being set by @LOuroboros in https://github.com/rh-hideout/pokeemerald-expansion/pull/4271
✨ Feature Branches ✨
Incorporated @SBird1337’s Dynamic Multichoices by @SBird1337 in https://github.com/rh-hideout/pokeemerald-expansion/pull/3826
- This allows to set up custom multichoices much easier!
- Allows you to control what options appear based custom conditions (such as them being based on what items you have currently, or even completely at random!).
- Event callbacks can be added as well, to fully customize what happens with your multichoices.
- Included there’s
DYN_MULTICHOICE_CB_SHOW_ITEM, which shows icons of the items defined by your script.
- Included there’s
- Compatible with Poryscript.
- For more information and how to use it, please visit the Pokécommunity thread.
Incorporated @ghoulslash’s Saveblock Cleansing branch by @Bassoonian in https://github.com/rh-hideout/pokeemerald-expansion/pull/4113
- Differences from the the standalone branch:
- Moved configs to dedicated file (
include/config/save.h).- Fixed comments to the proper amount of space saved.
- Added
FREE_MYSTERY_GIFT, saving 876 bytes inSaveBlock1.
- Added new
FREE_EXTRA_SEEN_FLAGS_SAVEBLOCK2to Pokedex struct to save an extra 108 inSaveBlock2by @AsparagusEduardo in https://github.com/rh-hideout/pokeemerald-expansion/pull/4213 - Renamed
FREE_EXTRA_SEEN_FLAGStoFREE_EXTRA_SEEN_FLAGS_SAVEBLOCK1by @AsparagusEduardo in https://github.com/rh-hideout/pokeemerald-expansion/pull/4213
- Converted
#ifndefconfigs to the config format the rest of expansion uses - Cleaned up the code and fixed to work on
modern.
- Moved configs to dedicated file (
TheXaman’s Debug Menu:
Added
- “Give Pokémon Complex” option can now set EVs by @LOuroboros in https://github.com/rh-hideout/pokeemerald-expansion/pull/3566
- Fix by @gabrielcowley in https://github.com/rh-hideout/pokeemerald-expansion/pull/3930
- Added “Clear bag” option by @LOuroboros in https://github.com/rh-hideout/pokeemerald-expansion/
- Added new party debug options by @LOuroboros, with help from @ghoulslash and @mrgriffin in https://github.com/rh-hideout/pokeemerald-expansion/pull/3924
- “Check IV”: Checks the selected Pokémon’s IVs.
- “Check EV”: Checks the selected Pokémon’s EVs.
- “Clear Party”: Deletes all Pokémon from the Player’s party.
- Cleanup by @AsparagusEduardo in https://github.com/rh-hideout/pokeemerald-expansion/pull/4275
- Upgraded “Poison Party” to “Inflict Status1” by @LOuroboros in https://github.com/rh-hideout/pokeemerald-expansion/pull/4235
- Now it can also inflict: Paralysis, Sleep, Burn, Freeze and Frostbite.
- Can be applied to a single member or the whole party.
- Built using SBird’s Multichoice.
Changed
- Cleaned up text and adjusted size to support longer text by @fdeblasio in https://github.com/rh-hideout/pokeemerald-expansion/pull/3919
- Reorganization and better naming by @LOuroboros in https://github.com/rh-hideout/pokeemerald-expansion/pull/3926
- Removed duplicated “Give all TMs” option by @AsparagusEduardo in https://github.com/rh-hideout/pokeemerald-expansion/pull/4025
Fixed
- Fixed sound effect clipping when giving an item via debug menu by using a shorter sound by @AsparagusEduardo in https://github.com/rh-hideout/pokeemerald-expansion/pull/4025
🐉 Pokémon 🐉
Added
- Added Indigo Disk Pokémon data:
- Doesn’t break saves since it uses the reserved IDs used in 1.7.0
- Species data by @kittenchilly in https://github.com/rh-hideout/pokeemerald-expansion/pull/3878
- Cleanup by @kittenchilly in https://github.com/rh-hideout/pokeemerald-expansion/pull/3974
- Sprites from PokéCommunity’s 64x64 DS-Style thread by @AlexOn1ine in https://github.com/rh-hideout/pokeemerald-expansion/pull/4117
- Front/Back sprites for: Gouging Fire, Raging Bolt, Iron Boulder, Iron Crown, Archaludon, Hydrapple.
- Icon for: Hydrapple.
- Cries by @AsparagusEduardo in https://github.com/rh-hideout/pokeemerald-expansion/pull/4164
- Added
P_FOOTPRINTSconfig to disable Pokémon footprints, saving around 35KB of ROM space by @Bassoonian in https://github.com/rh-hideout/pokeemerald-expansion/pull/3902- Cleanup by
- @AsparagusEduardo in https://github.com/rh-hideout/pokeemerald-expansion/pull/3925
- @AsparagusEduardo in https://github.com/rh-hideout/pokeemerald-expansion/pull/4251
- Cleanup by
- Added missing
P_UPDATED_EVSconfig that allows setting the EV yield changes across generations by @Bassoonian in https://github.com/rh-hideout/pokeemerald-expansion/pull/3993 - Added missing
P_UPDATED_EXP_YIELDSconfig that allows setting the Experience yield changes across generations by @Bassoonian in https://github.com/rh-hideout/pokeemerald-expansion/pull/3995 - Added evolution methods that require custom trackers (
MON_DATA_EVOLUTION_TRACKER) by @Bassoonian in https://github.com/rh-hideout/pokeemerald-expansion/pull/4087EVO_LEVEL_MOVE_TWENTY_TIMES:- Stantler can now evolve into Wyrdeer by using Psyshield Bash 20 times.
- Primeape can now evolve into Annihilape by using Rage Fist 20 times.
EVO_LEVEL_RECOIL_DAMAGE_MALE/EVO_LEVEL_RECOIL_DAMAGE_FEMALE- White-Striped Basculin can now evolve into Basculegion when leveling up after receiving 294HP of recoil damage and being the corresponding gender.
- Added missing Paldean Wooper icon by @kittenchilly in https://github.com/rh-hideout/pokeemerald-expansion/pull/4260
- Added missing data for placeholder Pokémon by @AsparagusEduardo in https://github.com/rh-hideout/pokeemerald-expansion/pull/4281
- Internal Mothim forms used for accurate breeding.
- Internal Scatterbug/Spewpa forms that can be used to specify Vivillon form in previous stages.
- Totem Pokémon
- Partner Pikachu/Eevee
Changed
- Made all species IDs absolute instead of relative, to avoid confusion when adding new species by @AsparagusEduardo in https://github.com/rh-hideout/pokeemerald-expansion/pull/4281
- Moved shared Pokédex text descriptions to their own file by @AsparagusEduardo in https://github.com/rh-hideout/pokeemerald-expansion/pull/4281
- Renamed
species_info/gen_X.htospecies_info/gen_X_families.h - Added missing entries for Hidden Abilities that default to
ABILITY_NONE. - Updated Gen 9 mon sprites from PokéCommunity’s 64x64 DS-Style thread by @AlexOn1ine in https://github.com/rh-hideout/pokeemerald-expansion/pull/3969
- Brute Bonnet
- Chi-Yu
- Flutter Mane
- Iron Bundle
- Sandy Shocks
- Scream Tail
- Skeledirge
- Slither Wing
- Added
MON_TYPESandMON_EGG_GROUPSmetaprogram macros by @Bassoonian in https://github.com/rh-hideout/pokeemerald-expansion/pull/4154- They’re used to define a single type/egg group without needing to define it twice.
Still supports double types:-.types = { TYPE_WATER, TYPE_WATER }, +.types = MON_TYPES(TYPE_WATER), ... -.eggGroups = { EGG_GROUP_WATER_3, EGG_GROUP_WATER_3 }, +.eggGroups = MON_EGG_GROUPS(EGG_GROUP_WATER_3),-.types = { TYPE_GROUND, TYPE_ROCK }, +.types = MON_TYPES(TYPE_GROUND, TYPE_ROCK), ... -.eggGroups = { EGG_GROUP_MONSTER, EGG_GROUP_FIELD }, +.eggGroups = MON_EGG_GROUPS(EGG_GROUP_MONSTER, EGG_GROUP_FIELD),
- They’re used to define a single type/egg group without needing to define it twice.
- To avoid confusion, reverted gSpeciesInfo “INFO” macros by @AsparagusEduardo in https://github.com/rh-hideout/pokeemerald-expansion/pull/4230
⚔️ Battle General ⚔️
Added
-
Implemented optional Gen1 type immunity logic. by @GraionDilach in https://github.com/rh-hideout/pokeemerald-expansion/pull/3627
-
Added Calyrex’s blue Dynamax aura by @AsparagusEduardo in https://github.com/rh-hideout/pokeemerald-expansion/pull/4018
-
Expanded
VAR_TERRAINfunctionality- Added
B_VAR_STARTING_STATUS_TIMERto allowVAR_TERRAIN(now calledB_VAR_STARTING_STATUS) to last only a certain amount of turns instead of permanently by @LOuroboros in https://github.com/rh-hideout/pokeemerald-expansion/pull/4132 - Further expanded by @ghoulslash in https://github.com/rh-hideout/pokeemerald-expansion/pull/4176
- Can be used to set up these as well:
- Trick Room
- Magic Room
- Wonder Room
- Tailwind (for player or opponent sides independenly)
- Can be used to set up these as well:
- Cleanup by @AsparagusEduardo in https://github.com/rh-hideout/pokeemerald-expansion/pull/4237
- Added
-
AI score debug menu can now cycle through battlers by pressing L/R by @ghoulslash in https://github.com/rh-hideout/pokeemerald-expansion/pull/4134
Changed
- Simplified Battle Partners code (eg. Steven) by @AlexOn1ine in https://github.com/rh-hideout/pokeemerald-expansion/pull/3592
- Based off @ShinyDragonHunter’s CustomMultiBattles branch.
- Removed specialized code for Steven partner cases.
- Partners are now stored in their own array.
- Fixed infinite loop by @GraionDilach in https://github.com/rh-hideout/pokeemerald-expansion/pull/3808
- B_VAR_TERRAIN_TIMERRenamed VAR_TERRAIN to B_VAR_TERRAIN and added a var-based field terrain timer by @LOuroboros in https://github.com/rh-hideout/pokeemerald-expansion/pull/4132
Fixed
- Fixed AI calculations potentially stomping data when emiting data by @DizzyEggg in https://github.com/rh-hideout/pokeemerald-expansion/pull/3784
- Fixed Battle AI debug screen showing shiny sprites by @fdeblasio in https://github.com/rh-hideout/pokeemerald-expansion/pull/3922
- Fixed Gigantamax Factor not changing form by @AsparagusEduardo in https://github.com/rh-hideout/pokeemerald-expansion/pull/4108
- Fixed Quick Draw having increased chances of activation in double battles by @ghoulslash in https://github.com/rh-hideout/pokeemerald-expansion/pull/4266
🤹 Moves 🤹
Added
- Added missing move effects:
- Ally Switch by @DizzyEggg in https://github.com/rh-hideout/pokeemerald-expansion/pull/3533
- Cleanup by @DizzyEggg in https://github.com/rh-hideout/pokeemerald-expansion/pull/3835
- Doodle by @kittenchilly in https://github.com/rh-hideout/pokeemerald-expansion/pull/3609
- Cleanup by @AlexOn1ine in https://github.com/rh-hideout/pokeemerald-expansion/pull/3800
- Fillet Away by @kittenchilly in https://github.com/rh-hideout/pokeemerald-expansion/pull/3616
- Shed Tail by @AlexOn1ine in https://github.com/rh-hideout/pokeemerald-expansion/pull/4016
- Last Respects by @AsparagusEduardo in https://github.com/rh-hideout/pokeemerald-expansion/pull/4151
- Tidy Up by @AlexOn1ine in https://github.com/rh-hideout/pokeemerald-expansion/pull/4136
- Ally Switch by @DizzyEggg in https://github.com/rh-hideout/pokeemerald-expansion/pull/3533
- Added Indigo Disk Moves
- Data by @Bassoonian in https://github.com/rh-hideout/pokeemerald-expansion/pull/3704
- Moves with existing effects by @Bassoonian in https://github.com/rh-hideout/pokeemerald-expansion/pull/3704
- Thunderclap
- Mighty Cleave
- Tachyon Cutter
- Hard Press
- Temper Flare
- Animation by @ZnogyroP in https://github.com/rh-hideout/pokeemerald-expansion/pull/4145
- Supercell Slam
- Malignant Chain
- New move effects
- By @AlexOn1ine in https://github.com/rh-hideout/pokeemerald-expansion/pull/3853
- Burning Bulwark (uses Protect’s animation as placeholder)
- Alluring Voice (and animation)
- Fickle Beam
- Electro Shot
- Animation by @AlexOn1ine in https://github.com/rh-hideout/pokeemerald-expansion/pull/4148
- Psychic Noise by @AlexOn1ine in https://github.com/rh-hideout/pokeemerald-expansion/pull/4005
- Animation by @ZnogyroP in https://github.com/rh-hideout/pokeemerald-expansion/pull/4145
- Cleanup by @AlexOn1ine in https://github.com/rh-hideout/pokeemerald-expansion/pull/4021
- Upper Hand (and animation) by @ZnogyroP in https://github.com/rh-hideout/pokeemerald-expansion/pull/4085
- Dragon Cheer by @AlexOn1ine in https://github.com/rh-hideout/pokeemerald-expansion/pull/4122
- Cleanup by @AlexOn1ine, based on comments by @Skeli789 and @mrgriffin in https://github.com/rh-hideout/pokeemerald-expansion/pull/4136
- By @AlexOn1ine in https://github.com/rh-hideout/pokeemerald-expansion/pull/3853
- Added move animations for existing moves:
- By @ZnogyroP, with adjustments from @AlexOn1ine and @ghoulslash in https://github.com/rh-hideout/pokeemerald-expansion/pull/3989
- Raging Bull
- Gigaton Hammer
- Ice Spinner
- Aqua Cutter
- Jet Punch by @PCG06 in https://github.com/rh-hideout/pokeemerald-expansion/pull/4067
- By @ZnogyroP in https://github.com/rh-hideout/pokeemerald-expansion/pull/4145
- Last Respects
- Lumina Crash
- Kowtow Cleave
- Torch Song
- Aqua Step
- Hydro Steam
- Tidy Up
- Pounce
- Trailblaze
- Chilling Water
- Rage Fist
- By @ZnogyroP, with adjustments from @AlexOn1ine and @ghoulslash in https://github.com/rh-hideout/pokeemerald-expansion/pull/3989
Changed
- Updated move data to Gen 9 with configs by @Bassoonian in https://github.com/rh-hideout/pokeemerald-expansion/pull/3704
- Added
sketchBannedmove flag, given to:- Sketch, Dark Void, Hyperspace Fury, Revival Blessing, Torque moves.
- Luster Purge: 70 Power -> 95 Power
- Mist Ball: 70 Power -> 95 Power
- Aeroblast: Added Wind Move flag.
- Added
- Ivy Cudgel’s type now changes based on Ogerpon’s form rather than held item by @kittenchilly in https://github.com/rh-hideout/pokeemerald-expansion/pull/3865
- Renamed
healBlockBannedflag tohealingMoveby @AsparagusEduardo in https://github.com/rh-hideout/pokeemerald-expansion/pull/3981 - Removed some hardcoded move IDs
- By @AsparagusEduardo in https://github.com/rh-hideout/pokeemerald-expansion/pull/3982
MOVE_EXPLOSION,MOVE_SELF_DESTRUCT,MOVE_FRUSTRATION,MOVE_AURA_WHEEL,MOVE_PRESENT,MOVE_BLIZZARD.
- By @ZnogyroP in https://github.com/rh-hideout/pokeemerald-expansion/pull/4085
MOVE_SUCKER_PUNCH.
- By @AsparagusEduardo in https://github.com/rh-hideout/pokeemerald-expansion/pull/3982
- Removed now redundant
EFFECT_HURRICANEin favor ofEFFECT_THUNDERby @AsparagusEduardo in https://github.com/rh-hideout/pokeemerald-expansion/pull/3982 - Renamed
constants/z_move_effects.htoconstants/battle_z_move_effects.hby @AsparagusEduardo in https://github.com/rh-hideout/pokeemerald-expansion/pull/3982 - Updated Draco Meteor’s animation to use @Skeli789’s from CFRU, by @AlexOn1ine in https://github.com/rh-hideout/pokeemerald-expansion/pull/3989
- Improved Double Shock’s animation by @AlexOn1ine in https://github.com/rh-hideout/pokeemerald-expansion/pull/3989
- Set
EFFECT_PLACEHOLDERas the default move effect by @AsparagusEduardo in https://github.com/rh-hideout/pokeemerald-expansion/pull/4079 - Renamed
EFFECT_FAKE_OUTtoEFFECT_FIRST_TURN_ONLYdue to the flinch effect separation by @AlexOn1ine in https://github.com/rh-hideout/pokeemerald-expansion/pull/4081 - Renamed
EFFECT_WRING_OUTtoEFFECT_VARY_POWER_BASED_ON_HPand now it usesargumentto set its base power by @LOuroboros in https://github.com/rh-hideout/pokeemerald-expansion/pull/4180
Fixed
- Fixed
GetBattleAnimMoveTargetsfunction that caused multiple animation issues, such as Overheat’s animation by @ghoulslash in https://github.com/rh-hideout/pokeemerald-expansion/pull/4139 - Fixed hardcoded battle strings by @ZnogyroP in https://github.com/rh-hideout/pokeemerald-expansion/pull/4147
- Hospitality had Sinistcha’s name hardcoded.
- Battler prefixes (eg. “The opposing”) were hardcoded in some places.
- Fixed Supreme Overlord’s incorrect effect by @AsparagusEduardo in https://github.com/rh-hideout/pokeemerald-expansion/pull/4151
- Fixed Hard Press’ base power by @LOuroboros in https://github.com/rh-hideout/pokeemerald-expansion/pull/4180
- Fixed Teeter Dance not being copyable by Dancer in singles by @AlexOn1ine in https://github.com/rh-hideout/pokeemerald-expansion/pull/4129
- Known issue: In doubles, it copies the move, but only confuses a single Pokémon.
🎭 Abilities 🎭
Added
- Added Mind’s Eye by @AlexOn1ine in https://github.com/rh-hideout/pokeemerald-expansion/pull/3782
- Added Hospitality by @AlexOn1ine in https://github.com/rh-hideout/pokeemerald-expansion/pull/3818
- Fixed Dynamax interaction by @AlexOn1ine in https://github.com/rh-hideout/pokeemerald-expansion/pull/3821
- Added Embody Aspect (all 4 versions) by @AlexOn1ine in https://github.com/rh-hideout/pokeemerald-expansion/pull/3821
- Added Supersweet Syrup by @ghoulslash in https://github.com/rh-hideout/pokeemerald-expansion/pull/4115
- Cleanup by
- @Bassoonian in https://github.com/rh-hideout/pokeemerald-expansion/pull/4170
- @AlexOn1ine in https://github.com/rh-hideout/pokeemerald-expansion/pull/4171
- Cleanup by
- Indigo Disk Abilities
- Data by @Bassoonian in https://github.com/rh-hideout/pokeemerald-expansion/pull/3838
Changed
- Updated ability banlists to Indigo Disk data by @kittenchilly in https://github.com/rh-hideout/pokeemerald-expansion/pull/3609
Fixed
- Fixed Tangling Hair preventing Rocky Helmet from triggering interaction by @AlexOn1ine, with help from @ZnogyroP in https://github.com/rh-hideout/pokeemerald-expansion/pull/4219
🧶 Items 🧶
Added
- Added Meteorite item form change functionality for Deoxys by @kittenchilly in https://github.com/rh-hideout/pokeemerald-expansion/pull/3770
- Added item price configs by @Bassoonian in https://github.com/rh-hideout/pokeemerald-expansion/pull/3834
I_PRICEandI_BERRY_PRICE.- Fixed missing data by @kittenchilly in https://github.com/rh-hideout/pokeemerald-expansion/pull/3836
- Added Pokemon Box Link functionality by @kittenchilly in https://github.com/rh-hideout/pokeemerald-expansion/pull/3837
- Added Indigo Disk item data by @kittenchilly in https://github.com/rh-hideout/pokeemerald-expansion/pull/3854
- Metal Alloy
- Stellar Tera Shard
- Added Legends: Arceus item data by @Bassoonian in https://github.com/rh-hideout/pokeemerald-expansion/pull/3825
- Jubilife Muffin - Local specialty (Full Heal)
- Remedy - Medicine (Potion)
- Fine Remedy - Medicine (Super Potion)
- Super Remedy - Medicine (Hyper Potion)
- Aux items
- Aux Evasion
- Aux Power
- Aux Guard
- Aux Powerguard
- Sprites based off lichen’s sprites from Relic Castle by @MartyKen in https://github.com/rh-hideout/pokeemerald-expansion/pull/4160
- Choice Dumpling
- Swap Snack
- Twice Spiced Radish
- Pokéshi Doll
- Berry Expansion by @Bassoonian in https://github.com/rh-hideout/pokeemerald-expansion/pull/3618
- Berry Mutations (from XY): Planting a Berry tree next to another has a
BERRY_MUTATION_CHANCE(25% by default) chance of causing a mutation (as dictated bysBerryMutations). Mutations mean that besides the usual output, the Berry plant will have a single Berry of the mutation (e.g. planting a Iapapa Berry next to a Mago Berry will cause it to have a single Pomeg Berry on top of its usual output).- Enabled via
OW_BERRY_MUTATIONSconfig.
- Enabled via
- Easier Berry Debugging: Add berry manipulation functions to the debug menu to allow for forced growth and more.
- Mulch (from Gen IV and XY): Using it on soil affects the growth, watering and production values of the plants.
- Enabled via
OW_BERRY_MULCH_USAGEconfig.
- Enabled via
- Gradient watering (from Gen IV and XY) (
OW_BERRY_MOISTUREandOW_BERRY_ALWAYS_WATERABLE): rather than keeping track of if each stage has been watered like Gen III, the humidity of the soil is kept track of separately.- Enabled via
OW_BERRY_MOISTUREconfig. - Switch between Gen4/6 via
OW_BERRY_ALWAYS_WATERABLEconfig. - Rate of drying set by
OW_BERRY_DRAIN_RATEconfig.
- Enabled via
- Weeding from XY: Berries may require unweeding for additional produce.
- Enabled via
OW_BERRY_WEEDSconfig.
- Enabled via
- Pests (from XY): Bug-type Pokémon may appear to feast on your plants.
- Enabled via
OW_BERRY_PESTSconfig.
- Enabled via
- Customisable stages: XY has six stages rather than four, so with this easy toggle you can choose the amount of stages without influencing the growth time.
- Enabled via
OW_BERRY_SIX_STAGESconfig.
- Enabled via
- Growth configs: Pick a generation whose Berry growth rates to use
- Changed via
OW_BERRY_GROWTH_RATEconfig.
- Changed via
- Yield configs: Pick a generation whose Berry yields to use
- Changed via
OW_BERRY_YIELD_RATEconfig.
- Changed via
- Cleanup by
- @Bassoonian in https://github.com/rh-hideout/pokeemerald-expansion/pull/3931
- @GraionDilach in https://github.com/rh-hideout/pokeemerald-expansion/pull/4028
- @AsparagusEduardo in https://github.com/rh-hideout/pokeemerald-expansion/pull/4275
- Berry Mutations (from XY): Planting a Berry tree next to another has a
- Added missing pre-Gen7 Power Item config (giving 4 EVs instead of 8) by @Bassoonian in https://github.com/rh-hideout/pokeemerald-expansion/pull/3961
- Added LGPE+ Premier Ball Bonus config by @AsparagusEduardo in https://github.com/rh-hideout/pokeemerald-expansion/pull/4191
- Originally based off pret’s tutorial, but with the following changes:
- If there’s no space for the full amount of Premier Balls that would’ve been given, give the partial amount.
- Shows the amount of Premier Balls given.
- Originally based off pret’s tutorial, but with the following changes:
Changed
- Raised the limit of max items per stack to 999 by @LOuroboros in https://github.com/rh-hideout/pokeemerald-expansion/pull/3923
- Unified item data
- Move descriptions are now defined in
src/data/items.hinstead ofsrc/data/text/item_descriptions.hby @LOuroboros in https://github.com/rh-hideout/pokeemerald-expansion/pull/3432- Cleanup by
- @Bassoonian in https://github.com/rh-hideout/pokeemerald-expansion/pull/3797
- @AsparagusEduardo in https://github.com/rh-hideout/pokeemerald-expansion/pull/4088
- Cleanup by
- Moved Item Effects (
gItemEffectTable) togItemsInfoby @AsparagusEduardo in https://github.com/rh-hideout/pokeemerald-expansion/pull/3991 - Renamed
gItemstogItemsInfoby @Bassoonian in https://github.com/rh-hideout/pokeemerald-expansion/pull/4068
- Move descriptions are now defined in
- Item Balls now can be defined in the map’s JSON (or using PoryMap) via the common script
Common_EventScript_FindIteminstead of needing to define a new script for it by @pkmnsnfrn in https://github.com/rh-hideout/pokeemerald-expansion/pull/3942"trainer_type": "TRAINER_TYPE_NONE", - "trainer_sight_or_berry_tree_id": "0", - "script": "AbandonedShip_CaptainsOffice_EventScript_ItemStorageKey", + "trainer_sight_or_berry_tree_id": "ITEM_STORAGE_KEY", + "script": "Common_EventScript_FindItem", "flag": "FLAG_ITEM_ABANDONED_SHIP_CAPTAINS_OFFICE_STORAGE_KEY"- Item count can also be defined by using the
movement_range_xfield:"trainer_sight_or_berry_tree_id": "ITEM_NUGGET", "script": "Common_EventScript_FindItem", "flag": "FLAG_ITEM_AQUA_HIDEOUT_B1F_NUGGET" + "movement_range_x": 2, - Existing scripts have been adapted to use this new format.
- Item count can also be defined by using the
- Added plural item name support with new
pluralNamefield ingItemsInfoby @pkmnsnfrn in https://github.com/rh-hideout/pokeemerald-expansion/pull/3942- When obtaining multiples of an item and the field is not defined, it appends an
sat the end instead (eg. “Brendan got 40 Potions!”). - Python migration script available in
migration_scripts/item_ball_refactor.pyby @pkmnsnfrn in https://github.com/rh-hideout/pokeemerald-expansion/pull/3997 - Deprecated
GetBerryCountStringby @Bassoonian in https://github.com/rh-hideout/pokeemerald-expansion/pull/4012 - Cleanup by
- When obtaining multiples of an item and the field is not defined, it appends an
- Combined
CannotUseBagBattleItemandCannotUsePartyBattleItemintoCannotUseItemsInBattleby @LOuroboros in https://github.com/rh-hideout/pokeemerald-expansion/pull/3524
Fixed
- Fixed some ball multiplier data by @Bassoonian in https://github.com/rh-hideout/pokeemerald-expansion/pull/3939
- Fixed
B_SPORT_BALL_MODIFIERconfig being ignored and always applying a 1.5x multiplier. - Added missing
B_SAFARI_BALL_MODIFIERthat makes Safari Balls have a 1x multiplier from Gen7 onwards. - Added missing
B_LURE_BALL_MODIFIERstate that sets Lure Ball’s multiplier to 4x from Gen8 onwards.
- Fixed
- Fixed Quick Claw having increased chances of activation in double battles by @ghoulslash in https://github.com/rh-hideout/pokeemerald-expansion/pull/4266
🤖 Battle AI 🤖
Added
- Added
AI_CalcMoveScorefunction to more easily control score increases by @AlexOn1ine in https://github.com/rh-hideout/pokeemerald-expansion/pull/3984 - Added
AI_FLAG_POWERFUL_STATUSAI flag, replacingAI_FLAG_SCREENERby @AlexOn1ine in https://github.com/rh-hideout/pokeemerald-expansion/pull/4125- It’s meant to force the AI to do status instead of fainting the target (eg. setting up Trick Room to support the rest of the team)
Changed
- AI flags are now saved by battler position instead of per side by @ghoulslash in https://github.com/rh-hideout/pokeemerald-expansion/pull/3003
- Cleanup by @AlexOn1ine in https://github.com/rh-hideout/pokeemerald-expansion/pull/4114
Fixed
- Improved AI score changes handling by @AlexOn1ine in https://github.com/rh-hideout/pokeemerald-expansion/pull/4036
- AI will not further increase Attack / Sp. Atk stat if it knows it faints to target.
- AI will not use Throat Chop if opposing mon has a better move.
- AI will select Throat Chop if the sound move is the best damaging move from opposing mon.
- Cleanup by
- @AlexOn1ine in https://github.com/rh-hideout/pokeemerald-expansion/pull/4074
- @AlexOn1ine in https://github.com/rh-hideout/pokeemerald-expansion/pull/4075
- @AlexOn1ine in https://github.com/rh-hideout/pokeemerald-expansion/pull/4199
- Fixed AI not setting sets up double flags correctly by @DizzyEggg in https://github.com/rh-hideout/pokeemerald-expansion/pull/4228
- Move most damage
AI_BadMovechecks toAI_CalcDamageby @AlexOn1ine in https://github.com/rh-hideout/pokeemerald-expansion/pull/4238- Fixes AI trying to use Burn Up after losing its fire type.
- Fixes AI trying to use Electric moves when the target has Volt Absorb.
- Fixed AI vs AI battles would crash during the throw animation by @DizzyEggg in https://github.com/rh-hideout/pokeemerald-expansion/pull/4240
- Fixed AI considering Mold Breaker but not Turboblaze/Teravolt for flinch-related decisions by @AsparagusEduardo in https://github.com/rh-hideout/pokeemerald-expansion/pull/4244
🧹 Other Cleanup 🧹
- Removed hardcoded uses of
MOVE_STUFF_CHEEKSandMOVE_ME_FIRSTby @AsparagusEduardo in https://github.com/rh-hideout/pokeemerald-expansion/pull/3950 - Cleaned up
CheckMoveLimitationsto use less horizontal space by @AsparagusEduardo in https://github.com/rh-hideout/pokeemerald-expansion/pull/3950 - Small
CanFirstMonBoostHeldItemRarityoptimization by @AsparagusEduardo in https://github.com/rh-hideout/pokeemerald-expansion/pull/4008 - Tag previously-unused icon pals as such in code. by @GraionDilach in https://github.com/rh-hideout/pokeemerald-expansion/pull/4072
- Converted a bunch of
#if/#elseto regular conditions by @Bassoonian in https://github.com/rh-hideout/pokeemerald-expansion/pull/4071 - Clean up contest strings by @Bassoonian in https://github.com/rh-hideout/pokeemerald-expansion/pull/3876
- Fixed inconsistent braces style by @AsparagusEduardo in https://github.com/rh-hideout/pokeemerald-expansion/pull/4023
- Replaced some
AI_GetMoveEffectivenessinstances withAI_CanStatusfor speeding up calculations by @ghoulslash in https://github.com/rh-hideout/pokeemerald-expansion/pull/4166 - Remove some unused data by @DizzyEggg in https://github.com/rh-hideout/pokeemerald-expansion/pull/4239
- Use
u32instead ofu8/u16in gflib files by @DizzyEggg in https://github.com/rh-hideout/pokeemerald-expansion/pull/4250 - Unify monSpritesGfx bytes/ptr field by @DizzyEggg in https://github.com/rh-hideout/pokeemerald-expansion/pull/4252
gHeapcan go in the middle of ram by @DizzyEggg in https://github.com/rh-hideout/pokeemerald-expansion/pull/4253- Corrected initial value of
targetSpeciesvariable inGetEvolutionTargetSpeciesby @LOuroboros in https://github.com/rh-hideout/pokeemerald-expansion/pull/4269 - Replaces
MOVE_FIRST_IMPRESSIONargument with a check for Fake Out for 100% flinch effect by @AlexOn1ine in https://github.com/rh-hideout/pokeemerald-expansion/pull/4274
🧪 Test Runner 🧪
Added
- Added option to set flags in tests by @fakuzatsu in https://github.com/rh-hideout/pokeemerald-expansion/pull/3786
- Added missing Illuminate and Keen Eye Tests by @AlexOn1ine in https://github.com/rh-hideout/pokeemerald-expansion/pull/3782
- Added missing Belly Drum tests by @kittenchilly in https://github.com/rh-hideout/pokeemerald-expansion/pull/3616
- Added missing Stuff Cheeks by @AsparagusEduardo in https://github.com/rh-hideout/pokeemerald-expansion/pull/3950
- Added Teeter Dance + Dancer test for doubles by @AlexOn1ine in https://github.com/rh-hideout/pokeemerald-expansion/pull/4274
Changed
- Updated tests to use Gen 9 mon for appropiate abilities by @AlexOn1ine in https://github.com/rh-hideout/pokeemerald-expansion/pull/3740
- Tests no longer allow to use SEND_OUT if the chosen mon is fainted by @DizzyEggg in https://github.com/rh-hideout/pokeemerald-expansion/pull/3752
Fixed
- Consistent
BENCHMARKtiming by @mrgriffin in https://github.com/rh-hideout/pokeemerald-expansion/pull/3866 - Fixed Teatime test checking for Wonder Room instead of Magic Room by @AsparagusEduardo in https://github.com/rh-hideout/pokeemerald-expansion/pull/3950
- Fixed test battle move category assumptions by @AsparagusEduardo in https://github.com/rh-hideout/pokeemerald-expansion/pull/4051
- Fixed Tri Attack status ability immunity test by @AsparagusEduardo in https://github.com/rh-hideout/pokeemerald-expansion/pull/4229
- Fixed Dauntless Shield test names by @AsparagusEduardo in https://github.com/rh-hideout/pokeemerald-expansion/pull/4229
📦 Pret merges 📦
- 2023/12/30 by @Bassoonian in https://github.com/rh-hideout/pokeemerald-expansion/pull/3869
- 2024/02/10 by @AsparagusEduardo in https://github.com/rh-hideout/pokeemerald-expansion/pull/4173
- 2024/03/07 by @DizzyEggg in https://github.com/rh-hideout/pokeemerald-expansion/pull/4255
New Contributors
- @cfmnephrite made their first contribution in https://github.com/rh-hideout/pokeemerald-expansion/pull/3575
- @tertu-m made their first contribution in https://github.com/rh-hideout/pokeemerald-expansion/pull/3780
- @aronson made their first contribution in https://github.com/rh-hideout/pokeemerald-expansion/pull/3892
- @MartyKen made their first contribution in https://github.com/rh-hideout/pokeemerald-expansion/pull/4049
- @ZnogyroP made their first contribution in https://github.com/rh-hideout/pokeemerald-expansion/pull/4085
- @Nopinou made their first contribution in https://github.com/rh-hideout/pokeemerald-expansion/pull/4169
Full Changelog: https://github.com/rh-hideout/pokeemerald-expansion/compare/expansion/1.7.4...expansion/1.8.0
Version 1.7.4
## How to update
- If you haven't set up a remote, run the command `git remote add RHH https://github.com/rh-hideout/pokeemerald-expansion`.
- Once you have your remote set up, run the command `git pull RHH expansion/1.Y.Z`.
🧬 General 🧬
Fixed
- HGSS Dex fixes:
- Fixed inconsistent list tileset between capped and decapped modes by @ravepossum in https://github.com/rh-hideout/pokeemerald-expansion/pull/4126
- Fixed screen select bar popping in too early for area screen by @ravepossum in https://github.com/rh-hideout/pokeemerald-expansion/pull/4094
- Fixed Lotad/Seedot house using species weight instead of height by @Bassoonian in https://github.com/rh-hideout/pokeemerald-expansion/pull/4195
🐉 Pokémon 🐉
Fixed
- Fixed Ogerpon shiny palettes by @AsparagusEduardo in https://github.com/rh-hideout/pokeemerald-expansion/pull/4165
- Fixed Basculegion back sprite offset by @MelonSpeedruns in https://github.com/rh-hideout/pokeemerald-expansion/pull/4198
- Fixed Greninja form animations by @MelonSpeedruns in https://github.com/rh-hideout/pokeemerald-expansion/pull/4198
- Fixed compile error when
P_GEN_8_CROSS_EVOSis enabled but notP_GEN_9_CROSS_EVOSdue to Ursaluna’s cry being labled as Gen 9 by @AsparagusEduardo in https://github.com/rh-hideout/pokeemerald-expansion/pull/4210 - Fixed Curly Tatsugiri and Green Plumage Squawkabilly icons not showing up properly in later versions of Porymap by @kittenchilly in https://github.com/rh-hideout/pokeemerald-expansion/pull/4212
⚔️ Battle General ⚔️
Fixed
- Fixed disobedience not resetting multihit moves by @DizzyEggg in https://github.com/rh-hideout/pokeemerald-expansion/pull/4133
- Fixed switch in interactions with hold effects abilities by @AlexOn1ine in https://github.com/rh-hideout/pokeemerald-expansion/pull/4091
- Download activating on an empty field.
- Intimidate activating on an empty field and not activating upon new opponent switching in.
- Primal Reversion not happening immediately upon switching in from U-turn.
- Held items not being triggered when switching in fron U-turn and Intimidate being triggered beforehand.
- Fixed LastUsedBall issues not being saved and DisplayBall not being shown by @Wesmaster in https://github.com/rh-hideout/pokeemerald-expansion/pull/4209
🤹 Moves 🤹
Fixed
- Fixed move animations crashing on some emulators because of division by zero by @DizzyEggg in https://github.com/rh-hideout/pokeemerald-expansion/pull/4121
- Flip Turn, Anchor Shot, Snipe Shot and Incinerate were affected by this.
- Fixed Eerie Spell consuming double PP and showing its message twice by @AlexOn1ine in https://github.com/rh-hideout/pokeemerald-expansion/pull/4127
- Fixed Fairy Lock animation by @DizzyEggg in https://github.com/rh-hideout/pokeemerald-expansion/pull/4111
🎭 Abilities 🎭
Added
- Added Gen 5+ config for Soundproof no longer preventing Uproar status by @AlexOn1ine in https://github.com/rh-hideout/pokeemerald-expansion/pull/4174
Fixed
- Fixed Mycelium Might speed calculation by @AlexOn1ine in https://github.com/rh-hideout/pokeemerald-expansion/pull/4146
- Fixed Stench triggering on non-damaging attacks by @HungryPickle in https://github.com/rh-hideout/pokeemerald-expansion/pull/4159
- Fixed Disguise not ending the battle in the correct form by @AsparagusEduardo in https://github.com/rh-hideout/pokeemerald-expansion/pull/4167
- Fixed Opportunist accumulating stat changes by @AlexOn1ine in https://github.com/rh-hideout/pokeemerald-expansion/pull/4168
🧶 Items 🧶
Fixed
- Kee Berry fixes by @AlexOn1ine in https://github.com/rh-hideout/pokeemerald-expansion/pull/4149
- Fixed triggering if the holder does a physical attack instead of receiving it.
- Fixed it boosting the target’s defense if the attacker holds a Kee Berry, while still displaying the boost animation for the holder.
- Fixed poison-healing items not reseting Toxic Counter by @DizzyEggg in https://github.com/rh-hideout/pokeemerald-expansion/pull/4135
🧹 Other Cleanup 🧹
Changed
- Clean up space/tabs difference by @Bassoonian in https://github.com/rh-hideout/pokeemerald-expansion/pull/4163
- Deleted a space by @cmy2008 in https://github.com/rh-hideout/pokeemerald-expansion/pull/4194
New Contributors
- @cmy2008 made their first contribution in https://github.com/rh-hideout/pokeemerald-expansion/pull/4194
- @MelonSpeedruns made their first contribution in https://github.com/rh-hideout/pokeemerald-expansion/pull/4198
Full Changelog: https://github.com/rh-hideout/pokeemerald-expansion/compare/expansion/1.7.3...expansion/1.7.4
Version 1.7.3
## How to update
- If you haven't set up a remote, run the command `git remote add RHH https://github.com/rh-hideout/pokeemerald-expansion`.
- Once you have your remote set up, run the command `git pull RHH expansion/1.7.3`.
🌋 IMPORTANT CHANGES 🌋
- Unused warnings are no longer treated as errrors by default by @AsparagusEduardo in https://github.com/rh-hideout/pokeemerald-expansion/pull/4092
- [Critical fix] Backported gHeap alignment fix from upstream pret by @AsparagusEduardo in https://github.com/rh-hideout/pokeemerald-expansion/pull/4089
- Fixes issue that causes graphics to bug when leaving Littleroot for Birch’s cutscene.
🧬 General 🧬
- Fixed HGSS Dex’s dark mode search palette by @ravepossum in https://github.com/rh-hideout/pokeemerald-expansion/pull/4095
🐉 Pokémon 🐉
Changed
- Condensed Oinkologne teachable learnsets (they previously had different tables despite having the same learnsets) by @Bassoonian in https://github.com/rh-hideout/pokeemerald-expansion/pull/4026
- Removed illegal teachable learnset moves that didn’t match Gen 7 or 9 by @Bassoonian in https://github.com/rh-hideout/pokeemerald-expansion/pull/4039 and https://github.com/rh-hideout/pokeemerald-expansion/pull/4042
Fixed
- Fixed incorrect family toggle preproc blocks by @AsparagusEduardo in https://github.com/rh-hideout/pokeemerald-expansion/pull/4024
- Cosplay and Cap Pikachu animations were still being included even if disabled.
- Fixed compile errors when:
- Feebas’ family was disabled but not Castform.
- Chatot was disabled but not Spiritomb.
- Virizion was disabled but not Tornadus or Thundurus.
- Zekrom was disabled but not Landorus.
- Kyurem was disabled but not Keldeo or Meloetta.
- Wishiwashi was disabled but not Rockruff.
- Fixed compile error when disabling Gen 4 cross-evolutions while having Kingdra enabled by @Skyeward and @Bassoonian in https://github.com/rh-hideout/pokeemerald-expansion/pull/4044 and https://github.com/rh-hideout/pokeemerald-expansion/pull/4046
⚔️ Battle General ⚔️
Fixed
- Fixed Steven double battle palette error by @johannakullmann in https://github.com/rh-hideout/pokeemerald-expansion/pull/4078
🤹 Moves 🤹
Changed
- Renamed
EFFECT_STEEL_BEAMtoEFFECT_MAX_HP_50_RECOILby @AlexOn1ine in https://github.com/rh-hideout/pokeemerald-expansion/pull/4043
Fixed
- Fixed Pursuit’s effect not working by @ZnogyroP @AlexOn1ine in https://github.com/rh-hideout/pokeemerald-expansion/pull/4086
🎭 Abilities 🎭
Fixed
- Fixed Emergency Exit issues:
- Fixed rounding error that caused it to not switch out when odd-numbered HP was off by 1 by @SBird1337 in https://github.com/rh-hideout/pokeemerald-expansion/pull/4040
- Eg: going from 101 Max HP to 50 HP would’ve not cause it to switch out.
- Fixes Emergency Exit switching out even if the Pokémon was healed above the threshold before it would’ve triggered by @AlexOn1ine in https://github.com/rh-hideout/pokeemerald-expansion/pull/4041
- Eg: going from 100 Max HP to 45 HP and eating a Sitrus Berry back to 55 HP would’ve cause it to switch out.
- Cleanup by @AlexOn1ine in https://github.com/rh-hideout/pokeemerald-expansion/pull/4100
- Fixed rounding error that caused it to not switch out when odd-numbered HP was off by 1 by @SBird1337 in https://github.com/rh-hideout/pokeemerald-expansion/pull/4040
- Fixed Corrosion only working for status moves by @AlexOn1ine in https://github.com/rh-hideout/pokeemerald-expansion/pull/4037
- Fixed Magic Guard not preventing Mind Blown recoil damage by @AlexOn1ine in https://github.com/rh-hideout/pokeemerald-expansion/pull/4043
🧶 Items 🧶
Fixed
- Fixed oversight causing chosen fossil to be lost if bag is full by @fakuzatsu in https://github.com/rh-hideout/pokeemerald-expansion/pull/3978
- Fixed other Key Item script oversights by @Bassoonian in https://github.com/rh-hideout/pokeemerald-expansion/pull/4066
- Fixed Life Orb causing damage on switch-in from Eject Pack and Red Card by @AlexOn1ine in https://github.com/rh-hideout/pokeemerald-expansion/pull/4038
- Fixed Glimmering Charm sprite by @SonikkuA-DatH and @AlexOn1ine in https://github.com/rh-hideout/pokeemerald-expansion/pull/4047
🤖 Battle AI 🤖
Fixed
- Fixed AI trying to switch into the same mon twice in the same turn by @DizzyEggg in https://github.com/rh-hideout/pokeemerald-expansion/pull/4098
🧪 Test Runner 🧪
Added
- Corrosion tests by @AlexOn1ine in https://github.com/rh-hideout/pokeemerald-expansion/pull/4037
- Pursuit/Tangling Hair interaction by @ZnogyroP @AlexOn1ine in https://github.com/rh-hideout/pokeemerald-expansion/pull/4086
Changed
- Passing
KNOWN_FAILINGtests are now listed separately fromPASSEDtests by @AsparagusEduardo in https://github.com/rh-hideout/pokeemerald-expansion/pull/4063
New Contributors
- @Skyeward made their first contribution in https://github.com/rh-hideout/pokeemerald-expansion/pull/4044
Full Changelog: https://github.com/rh-hideout/pokeemerald-expansion/compare/expansion/1.7.2...expansion/1.7.3
Version 1.7.2
## How to update
- If you haven't set up a remote, run the command `git remote add RHH https://github.com/rh-hideout/pokeemerald-expansion`.
- Once you have your remote set up, run the command `git pull RHH expansion/1.7.2`.
🧬 General 🧬
Changed
- Pokédex Ratings now dynamically adapt to the size of the regional dex, instead of being harcoded at set intervals of 10 up to 200 by @Bassoonian in https://github.com/rh-hideout/pokeemerald-expansion/pull/3900
- Mythical Pokémon are skipped from the rating unless they have the
dexForceRequiredflag by @Bassoonian in https://github.com/rh-hideout/pokeemerald-expansion/pull/3937
- Mythical Pokémon are skipped from the rating unless they have the
- Updates to INSTALL.MD for 1.7.0+ and misc clarifications by @ravepossum in https://github.com/rh-hideout/pokeemerald-expansion/pull/3983
Fixed
- Fixed HGSS Pokédex showing incorrect preevolutions by @kaisermg5 in https://github.com/rh-hideout/pokeemerald-expansion/pull/3894
- Fixed typo in HGSS Pokédex by @Ninjdai1 in https://github.com/rh-hideout/pokeemerald-expansion/pull/3958
- Fixed Hall of Fame not showing proper 4-digit dex numbers by @Bassoonian in https://github.com/rh-hideout/pokeemerald-expansion/pull/3901
- Fixed debug menu flags not redrawing correctly by @ravepossum in https://github.com/rh-hideout/pokeemerald-expansion/pull/3916
- Fixed issue when trying to add new party menu field moves by @johannakullmann in https://github.com/rh-hideout/pokeemerald-expansion/pull/3933
- Fixed RHH Rom Header shifting addresses by @Ninjdai1 in https://github.com/rh-hideout/pokeemerald-expansion/pull/3980
🐉 Pokémon 🐉
Added
- Added missing form dex entries by @AsparagusEduardo in https://github.com/rh-hideout/pokeemerald-expansion/pull/3972
- Meloetta Pirouette
- Mega Diancie
- Hoopa Unbound
- Gigantamax Sandaconda
Changed
- Multiple Pokémon graphical improvements by @katykat5099 in https://github.com/rh-hideout/pokeemerald-expansion/pull/3805
- Improved Tyrantrum’s back sprite.
- Improved Zigzagoon and Linoone’s palette
- Updated Gen 9 Pokémon icons to @CyanSMP64’s improvements
- Annihilape
- Arctibax and Baxcalibur
- Bellibolt
- Bramblin and Brambleghast
- Cetoddle and Cetitan
- Charcadet, Armarouge and Ceruledge.
- Chi-Yu and Chien-Pao
- Clodsire
- Crocalor
- Dolliv
- Dudunsparce
- Esparthra
Fixed
- Multiple Pokémon graphical fixes by @katykat5099 in https://github.com/rh-hideout/pokeemerald-expansion/pull/3805
- Fixed Togepi having a missing pixel on its icon’s first frame.
- Fixed Litwick having a missing pixel on its front sprite.
- Fixed Krookodile having a stray pixel on its front sprite.
- Fixed Duraludon’s palette.
- Fixed Egg graphical data not being properly read by @AsparagusEduardo in https://github.com/rh-hideout/pokeemerald-expansion/pull/3879
- Fixed Dugtrio’s missing footprint and forms not appearing in the HGSS dex by @kaisermg5 in https://github.com/rh-hideout/pokeemerald-expansion/pull/3897
- Fixed Paldean Tauros having the base stats of Kantonian Tauros by @AlexOn1ine in https://github.com/rh-hideout/pokeemerald-expansion/pull/3970
- Fixed Hisuian Electrode having the wrong evolution method (evolving “at level 214” instead of via Leaf Stone) by @AlexOn1ine in https://github.com/rh-hideout/pokeemerald-expansion/pull/3970
⚔️ Battle General ⚔️
Changed
- Re-enabled Z-Move Usage in Battle Frontier by @damon-murdoch in https://github.com/rh-hideout/pokeemerald-expansion/pull/3883
Fixed
- Fixed weird stat drop animation by @DizzyEggg in https://github.com/rh-hideout/pokeemerald-expansion/pull/3870
- Fixed Battle Frontier Multi Battles randomly ending in loss by @Bassoonian in https://github.com/rh-hideout/pokeemerald-expansion/pull/3990
🤹 Moves 🤹
Fixed
- Fixed Bleakwind Storm, Wildbolt Storm and Sandsear Storm not targetting both foes and not skipping accuracy check under rain by @damon-murdoch in https://github.com/rh-hideout/pokeemerald-expansion/pull/3884
- Updated move animations to account for this target change by @ghoulslash in https://github.com/rh-hideout/pokeemerald-expansion/pull/3895
- Fixed Inner Focus breaking when
B_WAIT_TIME_MULTIPLIERconfig was being set to any value other than 16. - Fixed Collision Course’s and Electro Drift’s PP being 10 instead of 5 by @fdeblasio in https://github.com/rh-hideout/pokeemerald-expansion/pull/3890
- Fixed “Sea of Fire” Pledge effect damaging fainted PokémonSome pledge combo fixes by @ghoulslash in https://github.com/rh-hideout/pokeemerald-expansion/pull/3934
- Fixed Syrup Bomb’s effect not being cleared when the user leaves the field by @AlexOn1ine in https://github.com/rh-hideout/pokeemerald-expansion/pull/3948
- Fixed Dragon Darts hitting 3 times instead of 2 (full effect still not done) by @AlexOn1ine in https://github.com/rh-hideout/pokeemerald-expansion/pull/4014
🧶 Items 🧶
Fixed
- Fixed Unremarkable Teacup, Masterpiece Teacup and Syrupy Apple’s effects by @kittenchilly in https://github.com/rh-hideout/pokeemerald-expansion/pull/3858
- Fixed Poké Balls getting 100% catch rate by @AlexOn1ine in https://github.com/rh-hideout/pokeemerald-expansion/pull/3955
- Fixed item usage in double battles by @AlexOn1ine in https://github.com/rh-hideout/pokeemerald-expansion/pull/3977
🤖 Battle AI 🤖
Fixed
- Fixed small AI bulldoze effect bug by @AlexOn1ine in https://github.com/rh-hideout/pokeemerald-expansion/pull/3872
🧹 Other Cleanup 🧹
Fixed
- Fixed Quick/Wide Guard config comments by @Bassoonian in https://github.com/rh-hideout/pokeemerald-expansion/pull/3857
🧪 Test Runner 🧪
Added
- Added missing Strength Sap tests by @DizzyEggg in https://github.com/rh-hideout/pokeemerald-expansion/pull/3860
- Added Clanging Scales test by @AlexOn1ine in https://github.com/rh-hideout/pokeemerald-expansion/pull/3973
- Added 5 Parental Bond tests by @AlexOn1ine in https://github.com/rh-hideout/pokeemerald-expansion/pull/3973
Changed
- Consistent
BENCHMARKtiming by @mrgriffin in https://github.com/rh-hideout/pokeemerald-expansion/pull/3867
New Contributors
- @damon-murdoch made their first contribution in https://github.com/rh-hideout/pokeemerald-expansion/pull/3883
- @lordraindance2 made their first contribution in https://github.com/rh-hideout/pokeemerald-expansion/pull/3885
- @johannakullmann made their first contribution in https://github.com/rh-hideout/pokeemerald-expansion/pull/3933
Full Changelog: https://github.com/rh-hideout/pokeemerald-expansion/compare/expansion/1.7.1...expansion/1.7.2
Version 1.7.1
## How to update
- If you haven't set up a remote, run the command `git remote add RHH https://github.com/rh-hideout/pokeemerald-expansion`.
- Once you have your remote set up, run the command `git pull RHH expansion/1.7.1`.
🧬 General 🧬
Changed
- Deprecate agbcc and clarify gcc version usage in install instructions. by @GraionDilach in https://github.com/rh-hideout/pokeemerald-expansion/pull/3788
Fixed
- Fix Update Message Saying 1.6.2 by @kaicardenas2 in https://github.com/rh-hideout/pokeemerald-expansion/pull/3759
- Fix exp gain when defeating two opponents at once by @ghoulslash in https://github.com/rh-hideout/pokeemerald-expansion/pull/3798
- Fix debug menu toggling first flag by @DizzyEggg in https://github.com/rh-hideout/pokeemerald-expansion/pull/3796
🐉 Pokémon 🐉
Fixed
- Fix Maushold-3 and Maushold-4 icons being swapped by @kittenchilly in https://github.com/rh-hideout/pokeemerald-expansion/pull/3809
- Fixes Minior form change and likely other forms by @AlexOn1ine in https://github.com/rh-hideout/pokeemerald-expansion/pull/3822
- Fix P_FAMILY #if blocks for Regigigas and Giratina in front_pic_anims.h by @gabrielcowley in https://github.com/rh-hideout/pokeemerald-expansion/pull/3823
🤹 Moves 🤹
Added
- Adds data for The Indigo Disk moves by @Bassoonian in https://github.com/rh-hideout/pokeemerald-expansion/pull/3852
- Many moves still have placeholder effects.
Fixed
- Fix Telekinesis not working by @DizzyEggg in https://github.com/rh-hideout/pokeemerald-expansion/pull/3763
- Fix Ion Deluge interaction with Volt Absorb andLightning Rod by @DizzyEggg in https://github.com/rh-hideout/pokeemerald-expansion/pull/3764
- Fix Max Moves animations by @GraionDilach in https://github.com/rh-hideout/pokeemerald-expansion/pull/3769
- Fix Cotton Down overwriting gBattlerAttacker by @ghoulslash in https://github.com/rh-hideout/pokeemerald-expansion/pull/3783
- Fix Photon Geyser by @AlexOn1ine in https://github.com/rh-hideout/pokeemerald-expansion/pull/3803 and https://github.com/rh-hideout/pokeemerald-expansion/pull/3807
- Fix Metronome crash by @Bassoonian in https://github.com/rh-hideout/pokeemerald-expansion/pull/3852
🎭 Abilities 🎭
Fixed
- Fix Ice Face ignoring move effects by @DizzyEggg in https://github.com/rh-hideout/pokeemerald-expansion/pull/3755
- Fix Frisk ability pop-up showing wrong battler by @DizzyEggg in https://github.com/rh-hideout/pokeemerald-expansion/pull/3762
- Prankster tests + fixes by @DizzyEggg in https://github.com/rh-hideout/pokeemerald-expansion/pull/3766
🧶 Items 🧶
Fixed
- Fixes Item Metronome damage by @AlexOn1ine in https://github.com/rh-hideout/pokeemerald-expansion/pull/3767
- Fix gem boost description + test by @Bassoonian in https://github.com/rh-hideout/pokeemerald-expansion/pull/3817
🧹 Cleanup 🧹
- Clear BattleScripting struct at the battle start by @DizzyEggg in https://github.com/rh-hideout/pokeemerald-expansion/pull/3776
- Fix Rain Dance and Sunny Day not blending opponent sprite by @DizzyEggg in https://github.com/rh-hideout/pokeemerald-expansion/pull/3785
- Same lists for healing moves by @DizzyEggg in https://github.com/rh-hideout/pokeemerald-expansion/pull/3787
- [battle_controller_player.c] refactor and fix buffer overread by @SBird1337 in https://github.com/rh-hideout/pokeemerald-expansion/pull/3792
- Make overworld weather-based terrain setting effects use B_MSG_TERRAIN_SET constants for intro text by @ravepossum in https://github.com/rh-hideout/pokeemerald-expansion/pull/3793
- Clear Sky Battle & Dynamax flags upon whiteout by @Bassoonian in https://github.com/rh-hideout/pokeemerald-expansion/pull/3830
🧪 Test Runner 🧪
Added
- Small test runner improvements by @mrgriffin in https://github.com/rh-hideout/pokeemerald-expansion/pull/3761
- EXPECT_MUL_EQ thresholds are always at least ±1 by @kittenchilly in https://github.com/rh-hideout/pokeemerald-expansion/pull/3768
- Added last CannotUseItemsInBattle tests by @LOuroboros in https://github.com/rh-hideout/pokeemerald-expansion/pull/3789
New Contributors
- @kaicardenas2 made their first contribution in https://github.com/rh-hideout/pokeemerald-expansion/pull/3759
Full Changelog: https://github.com/rh-hideout/pokeemerald-expansion/compare/expansion/1.7.0...expansion/1.7.1
Version 1.7.0
## How to update
- If you haven't set up a remote, run the command `git remote add RHH https://github.com/rh-hideout/pokeemerald-expansion`.
- Once you have your remote set up, run the command `git pull RHH expansion/1.7.0`.
🌋 IMPORTANT CHANGES 🌋
The Expansion now uses Modern compilers by default
- We have enabled
-Werror -Wallin the Makefile. These flags show warnings for undefined behaviors in the old compiler (agbcc), and sets all warnings as errors. As such, we have updated the codebase so that all warnings that gcc 13 throws are handled:- CI now uses devkitarm container to run a more modern gcc by @SBird1337 in https://github.com/rh-hideout/pokeemerald-expansion/pull/3429
- Fix by @AsparagusEduardo in https://github.com/rh-hideout/pokeemerald-expansion/pull/3530
- Fixed
-Wall -Werrorerrors on Modern by @DizzyEggg in https://github.com/rh-hideout/pokeemerald-expansion/pull/3412 - Fixed warnings introduced by gcc 13 by @SBird1337 in https://github.com/rh-hideout/pokeemerald-expansion/pull/3428
-Warray-bounds-Waddress-Warray-parameter
- Fixed
-Wmaybe-uninitializedforModifyPersonalityForNaturetest by @SBird1337 in https://github.com/rh-hideout/pokeemerald-expansion/pull/3457
- CI now uses devkitarm container to run a more modern gcc by @SBird1337 in https://github.com/rh-hideout/pokeemerald-expansion/pull/3429
- Modern compiler may raise the following errors for code introduced from outside the expansion, so we recommend solving those errors:
unused-function. To solve it, addUNUSEDto the function definition.-static void Function(void) +static void UNUSED Function(void)unused-variable. To solve it, remove the unused variable.static void Function(void) { - u8 unused; u8 used; ...unused-but-set-variable. To solve it, addUNUSEDto the variable definition.static void Function(void) { - u8 unused; + u8 UNUSED unused; u8 used; unused = DoSomething(); ...
- Updated modern compiler install instructions by @hedara90 in https://github.com/rh-hideout/pokeemerald-expansion/pull/3527
- You may still use
agbccby addingagbccto yourmakecommand to finish the update process before fixing these errors.- eg.
make -j8 agbcc. - We may drop support for it in the future, so we recommend updating the code to support the new compilers.
- This will generate
pokeemerald_agbcc.gba, while modern will generatepokeemerald.gbaby @Bassoonian in https://github.com/rh-hideout/pokeemerald-expansion/pull/3462
- eg.
🧬 General 🧬
Added
- Incorporated @TheXaman’s HGSS Style Pokédex by @AaghatIsLive in https://github.com/rh-hideout/pokeemerald-expansion/pull/3288
- Includes Dark Mode
- Fix by @AaghatIsLive in https://github.com/rh-hideout/pokeemerald-expansion/pull/3479
- Updated evolution strings by @Pawkkie in https://github.com/rh-hideout/pokeemerald-expansion/pull/3375
- Changes to omit adding the code when disabling the feature by @SBird1337 in https://github.com/rh-hideout/pokeemerald-expansion/pull/3445
- Teachable move list fix by @GraionDilach in https://github.com/rh-hideout/pokeemerald-expansion/pull/3624
- Includes Dark Mode
- Incorporated @DizzyEggg’s nature color branch by @Bassoonian in https://github.com/rh-hideout/pokeemerald-expansion/pull/3582
- Shows nature stat modifiers in summary screen.
- Added
SUMMARY_SCREEN_NATURE_COLORSconfig to disable it. - Updates stat reduction to blue to align with official implementation.
- Added
I_SELL_VALUE_FRACTIONconfig that changes selling factor of items to 1/4th when set to Gen 9 by @kittenchilly in https://github.com/rh-hideout/pokeemerald-expansion/pull/3315 - Added
P_FRIENDSHIP_EVO_THRESHOLDconfig to update the Friendship evolution threshold to Gen8+’s standard by @kittenchilly in https://github.com/rh-hideout/pokeemerald-expansion/pull/3376 - Debug Menu
- Added
ROM SpaceUtility option to check ROM space by @mrgriffin in https://github.com/rh-hideout/pokeemerald-expansion/pull/3453 - Added
Toggle Match CallFlag option to toggle Match Call by @AsparagusEduardo in https://github.com/rh-hideout/pokeemerald-expansion/pull/3489 - Added
Move Reminderoption by @Bassoonian in https://github.com/rh-hideout/pokeemerald-expansion/pull/3707 - Moved Party/Boxes related functions to their own menu by @Bassoonian in https://github.com/rh-hideout/pokeemerald-expansion/pull/3707
- Added
- Added expansion Rom Header by @mrgriffin in https://github.com/rh-hideout/pokeemerald-expansion/pull/3454
- Added defines for Expansion version number.
- Added option to see the version number in debug menu.
- Added option to restore Japan-only Walda PC backgrounds by @fdeblasio in https://github.com/rh-hideout/pokeemerald-expansion/pull/3550
- Added
BATTLE_PYRAMID_RANDOM_ENCOUNTERSconfig to enable Battle Pyramid Wild Encounter randomization by @ghoulslash in https://github.com/rh-hideout/pokeemerald-expansion/pull/2581 - Added a
GetSpeciesPreEvolutionfunction by @LOuroboros in https://github.com/rh-hideout/pokeemerald-expansion/pull/3696
Changed
- Converted
Get(Box)MonData2to proper functions by @AsparagusEduardo in https://github.com/rh-hideout/pokeemerald-expansion/pull/3416 - Added
src/data/map_group_count.hto.gitignoreby @LOuroboros in https://github.com/rh-hideout/pokeemerald-expansion/pull/3423 Cheat Startoption now gives all badges and enables all Fly locations.Fly to...option no longer enables all Fly locations by @AsparagusEduardo in https://github.com/rh-hideout/pokeemerald-expansion/pull/3489- Better documentation for Type Effectiveness table by @AsparagusEduardo in https://github.com/rh-hideout/pokeemerald-expansion/pull/3374
- Generational defines now start at
GEN_1instead ofGEN_3by @Bassoonian in https://github.com/rh-hideout/pokeemerald-expansion/pull/3628- Fixes and cleanup
- By @GraionDilach in https://github.com/rh-hideout/pokeemerald-expansion/pull/3720
- By @AsparagusEduardo in https://github.com/rh-hideout/pokeemerald-expansion/pull/3723
- Fixes and cleanup
Fixed
- Fixed potential Fly and Badge mismatch when using debug options by @AsparagusEduardo in https://github.com/rh-hideout/pokeemerald-expansion/pull/3489
- Fixed Pokémon Animation debug menu ignoring animation delay by @AsparagusEduardo in https://github.com/rh-hideout/pokeemerald-expansion/pull/3562
- Fixed
IS_DITTOmacro by @LOuroboros in https://github.com/rh-hideout/pokeemerald-expansion/pull/3558 - Added RTC failsafe to Debug menu’s
Cheat Startoption by @ravepossum in https://github.com/rh-hideout/pokeemerald-expansion/pull/3561
🐉 Pokémon 🐉
Added
- Added Generation 9 species up to Teal Mask by @leo60228, @AlexOn1ine, @katykat5099, @kittenchilly and @AsparagusEduardo in https://github.com/rh-hideout/pokeemerald-expansion/pull/3249
- IMPORTANT: Enabling Gen 9 species currently break saves. If you don’t want to use them, you can disable
P_GEN_9_POKEMONininclude/config/species_enabled.h.- Reserved Indigo Disk IDs
- By @AsparagusEduardo in https://github.com/rh-hideout/pokeemerald-expansion/pull/3725
- By @AsparagusEduardo in https://github.com/rh-hideout/pokeemerald-expansion/pull/3726
- By @Bassoonian in https://github.com/rh-hideout/pokeemerald-expansion/pull/3727
- Reserved Form IDs that will be supported in future versions by @AsparagusEduardo in https://github.com/rh-hideout/pokeemerald-expansion/pull/3750
- Shadow Lugia
- Totem Forms
- Partner Pikachu and Eevee
- Reserved Indigo Disk IDs
- Updated UIs to support 4-digit Dex numbers.
- Added Dunsparce and Tandemaus evolution methods by @fdeblasio in https://github.com/rh-hideout/pokeemerald-expansion/pull/3547
- Tandemaus still does the evolution cutscene for now.
- Ported newer PokéCommunity sprites by @AlexOn1ine in https://github.com/rh-hideout/pokeemerald-expansion/pull/3643 and https://github.com/rh-hideout/pokeemerald-expansion/pull/3646
- Fixes and cleanup
- By @fdeblasio in https://github.com/rh-hideout/pokeemerald-expansion/pull/3539
- By @AsparagusEduardo in https://github.com/rh-hideout/pokeemerald-expansion/pull/3655 and https://github.com/rh-hideout/pokeemerald-expansion/pull/3749
- By @katykat5099 in https://github.com/rh-hideout/pokeemerald-expansion/pull/3751
- IMPORTANT: Enabling Gen 9 species currently break saves. If you don’t want to use them, you can disable
- Adjusted Pokemon sprites and palettes - Part 2 by @CyanSMP64 in https://github.com/rh-hideout/pokeemerald-expansion/pull/3612
- From Magnemite to Tangela + Hitmontop + Nidoking adjustment by MrDollSteak.
- Corrected sprite sizes and elevations
- Further palette adjustments by @CyanSMP64 in https://github.com/rh-hideout/pokeemerald-expansion/pull/3744
- Pidgeotto, Tentacruel, Feraligatr, Furret, Flaaffy, Marill, Azumarill and Miltank.
- Added missing Alcremie forms by @AsparagusEduardo in https://github.com/rh-hideout/pokeemerald-expansion/pull/3469
- Previously, only Strawberry Sweet forms were available
- Missing: Icons for non-Ruby Cream forms.
- Cleanup by @Bassoonian in https://github.com/rh-hideout/pokeemerald-expansion/pull/3488
- Added species define synonyms for base forms with form names by @AsparagusEduardo in https://github.com/rh-hideout/pokeemerald-expansion/pull/3248
- Eg.
SPECIES_GIRATINA_ALTEREDis equal toSPECIES_GIRATINA. - The original defines can be used in combination of
GET_BASE_SPECIES_ID(species)to check for the whole species instead of specific forms.
- Eg.
- Added Gen 7 Pokémon 2nd frames and animations by @katykat5099 in https://github.com/rh-hideout/pokeemerald-expansion/pull/3426
- Rowlet family
- Pikipek family
- Cutiefly family
- Rockruff family
- Oranguru
- Passimian
- Fixed its shiny palette.
- Togedemaru
- Drampa
- Jangmo-O family
- Added Gen 6 Pokémon 2nd frames and animations by @katykat5099 in https://github.com/rh-hideout/pokeemerald-expansion/pull/3543
- Chespin
- Bunnelby
- Fletchling family
- Floette family
- Added missing 2nd frame for Eternal Flower Form.
- Amaura
- Added mising World Cap Pikachu icon by @kittenchilly in https://github.com/rh-hideout/pokeemerald-expansion/pull/3401
- Added
P_CUSTOM_GENDER_DIFF_ICONSconfig to use custom female icon sprites for Pikachu and Wobbuffet by @kittenchilly in https://github.com/rh-hideout/pokeemerald-expansion/pull/3506- Removed
P_HIPPO_GENDER_DIFF_ICONSin favor of Hippopotas and Hippowdon to use this new config.
- Removed
- Added
P_UPDATED_FRIENDSHIPconfig that updates Pokémon base friendship to Gen 8+ standards by @kittenchilly in https://github.com/rh-hideout/pokeemerald-expansion/pull/3491
Changed
- Species Simplifier™ (Parts 1, 2 and 3)
- Moved most data from multiple arrays to new fields in
gSpeciesInfogSpeciesNamesarray ->speciesNamefield.gLevelUpLearnsetsarray ->levelUpLearnsetfield.gTeachableLearnsetsarray ->teachableLearnsetfield.gEvolutionTablearray ->evolutionsfield.- Fix by @LOuroboros in https://github.com/rh-hideout/pokeemerald-expansion/pull/3696
gFormSpeciesIdTablesarray ->formSpeciesIdTablefield.gFormChangeTablePointersarray ->formChangeTablefield.- Refactored Cry tables to simplify the process of adding new cries.
- Now there’s a single entry in the table per cry, and species are asigned cry IDs in
gSpeciesInfo’scryIdfield.
- Now there’s a single entry in the table per cry, and species are asigned cry IDs in
- Graphical data now have their pointers in
gSpeciesInfo(Sprites, palettes and animations)- Removed all files in
src/data/pokemon_graphics/with the exception offront_pic_anims.h.gMonBackPicCoordsarray ->backPicSizefield.gMonBackPicTablearray ->backPicfield.gMonBackPicTableFemalearray ->backPicFemalefield.
gMonFrontPicCoordsarray ->frontPicSizefield.gMonFrontPicTablearray ->frontPicfield.gMonFrontPicTableFemalearray ->frontPicFemalefield.
gMonPaletteTableFemalearray ->palettefield.gMonPaletteTableFemalearray ->paletteFemalefield.
gMonShinyPaletteTablearray ->shinyPalettefield.gMonShinyPaletteTableFemalearray ->shinyPaletteFemalefield.
gEnemyMonElevationarray ->enemyMonElevationfield.gMonIconPaletteIndicesarray ->iconPalIndexfield.gMonIconPaletteIndicesFemalearray ->iconPalIndexFemalefield.
- Removed unused 2nd animations.
- Removed all files in
- Dex Entries
- Individual form information is visible in the HGSS Pokédex (Vanilla Dex TBD)
- National Dex numbers are assigned to the species in
gSpeciesInfo, removing the need ofsSpeciesToHoennPokedexNumandsSpeciesToNationalPokedexNumarrays. - Height and Weight are now saved separately per form, so weight in battle is now more accurate.
- Pokédex size page proportions are also separate.
- Pokédex descriptions are now saved as compound strings in
gSpeciesInfoand differ by form. Shared entries are at the top ofsrc/data/pokemon/species_info.h.- Missing Pokédex texts for forms by @Bassoonian in https://github.com/rh-hideout/pokeemerald-expansion/pull/3708
- Added toggles to disable specific family groups of species
- Located in
include/config/species_enabled.h.- Moved the original
P_GEN_x_POKEMONconfigs to this file.
- Moved the original
- Options to disable groups of species:
- Battle-gimmick forms (Megas, Primals, etc.)
- Regional Forms (Includes evolutions of those species, such as Sirfetch’d)
- Pikachu extra forms.
- Cross-Generation Evolutions
- Also added separate option to add cross-evolutions to the Regional Dex.
- Generation 1-3 families can now be disabled.
- Pokémon will not evolve into species that have been disabled.
- Pokémon will produce offspring of species that have been disabled.
- Pokémon will not change form into forms that have been disabled.
- Fixes and cleanup
- By @AsparagusEduardo in https://github.com/rh-hideout/pokeemerald-expansion/pull/3722
- Located in
- Grouped data by species family.
- Converted species flags to gcc flags.
- Converted
P_UPDATED_STATS“ifdef blocks” to ternaries. - Added Mega Evolution hidden ability failsafes.
- Separated
gSpeciesInfoby Generation by @AsparagusEduardo in https://github.com/rh-hideout/pokeemerald-expansion/pull/3729 - Fixes and cleanup
- By @AsparagusEduardo in https://github.com/rh-hideout/pokeemerald-expansion/pull/3656
- By @fdeblasio in https://github.com/rh-hideout/pokeemerald-expansion/pull/3698
- Moved most data from multiple arrays to new fields in
- Updated
P_UPDATED_ABILITIESGen 9’s config for Piplup’s line, Gallade and Shiftry by @Bassoonian in https://github.com/rh-hideout/pokeemerald-expansion/pull/3353- Shiftry’s 2nd regular ability was changed from Early Bird to Wind Rider.
- Piplup, Prinplup and Empoleon’s Hidden abilities were changed from Defiant to Competitive.
- Gallade was given Sharpness as a 2nd regular ability.
- Updated Legends Arceus Pokémon data and Level Up learnsets to Scarlet/Violet’s by @kittenchilly in https://github.com/rh-hideout/pokeemerald-expansion/pull/3458
- Applied missing uses of
PLACEHOLDER_ANIM_SINGLE_FRAMEby @AsparagusEduardo in https://github.com/rh-hideout/pokeemerald-expansion/pull/3562 - Renamed
PLACEHOLDER_TWO_FRAME_ANIMATIONtoPLACEHOLDER_ANIM_TWO_FRAMESby @AsparagusEduardo in https://github.com/rh-hideout/pokeemerald-expansion/pull/3562 - Removed Old Unown Level Up Learnsets by @AsparagusEduardo in https://github.com/rh-hideout/pokeemerald-expansion/pull/3562
- Added
FORM_CHANGE_TIME_OF_DAYform change that automatically changes Form during times of day (used by Shaymin to revert to Land Forme at night) by @AsparagusEduardo in https://github.com/rh-hideout/pokeemerald-expansion/pull/1690 - Added
FORM_CHANGE_STATUSform change that triggers when they adquire status condition (used by Shaymin to revert to Land Forme when frozen) by @Bassoonian in https://github.com/rh-hideout/pokeemerald-expansion/pull/3734- Currently it doesn’t:
- Prevent Shaymin from changing into Sky Forme when frozen.
- Change Form in the Battle Pike.
- Currently it doesn’t:
- Evolutions now call for
GetTimeOfDayinstead of checking the times directly by @fdeblasio in https://github.com/rh-hideout/pokeemerald-expansion/pull/3369- Dusk Ball and Form changes also use this function by @Bassoonian in https://github.com/rh-hideout/pokeemerald-expansion/pull/3585
- Added config for different times of day ranges by @fdeblasio in https://github.com/rh-hideout/pokeemerald-expansion/pull/3579
- Fixes and cleanup by @AsparagusEduardo in https://github.com/rh-hideout/pokeemerald-expansion/pull/3648 and https://github.com/rh-hideout/pokeemerald-expansion/pull/3701
Fixed
- Fixed Koffing and Weezing’s abilities ignoring
P_UPDATED_ABILITIESconfig and always using Gen8’s config by @Bassoonian in https://github.com/rh-hideout/pokeemerald-expansion/pull/3353 - Fixed Pumpkaboo macro typo by @AlexOn1ine in https://github.com/rh-hideout/pokeemerald-expansion/pull/3541
- Multiple fixes by @AsparagusEduardo in https://github.com/rh-hideout/pokeemerald-expansion/pull/3544
- Fixed Mega Gardevoir/Gallade not having their updated Egg Groups.
- Fixed mon not having their appropiate items.
- Alolan Sandlash (Grip Claw, Rare)
- Alolan Muk (Black Sludge, Common)
- Alolan Golem (Cell Battery, Common)
- Alolan Marowak (Thick Club, Rare)
- Alolan Ninetales (Snowball, Rare)
- Fixed missing species flags.
- Giratina Origin (Legendary flag)
- Deoxys Attack (Mythical flag)
- Deoxys Defense (Mythical flag)
- Deoxys Speed (Mythical flag)
- Shaymin Sky (Mythical flag)
- Fixed Aegislash Blade giving the wrong EV yield.
- Fixed Zygarde 10% with Power Construct having the same stats as Zygarde 50%.
- Fixed Galarian Weezing having inproper noFlip property.
- Fixed Stantler not evolving when
P_GEN_9_POKEMONis set toFALSEby @fdeblasio in https://github.com/rh-hideout/pokeemerald-expansion/pull/3548 - Fixes Hisuian Sneasel’s type order by @Bassoonian in https://github.com/rh-hideout/pokeemerald-expansion/pull/3706
⚔️ Battle General ⚔️
Added
- Dynamax by @AgustinGDLV and @AsparagusEduardo in https://github.com/rh-hideout/pokeemerald-expansion/pull/2417 + Tests
- Requires a Dynamax Band in the bag and for the
B_FLAG_DYNAMAX_BATTLEflag to be assigned and set.- Pokémon holding a Mega Stone or Z-Crystal can’t Dynamax.
- Gigantamax forms.
- G-Max Moves.
- Forms determined using the Form Change tables.
P_GIGANTAMAX_FORMSconfig to disable those forms.
- Since we currently don’t modify the
BoxPokemonstruct:- Dynamax levels are set to 0 (1.5x HP increase)
- Species always change into their Gigantamax Forms.
- AI Dynamaxes the last Pokémon left in their party.
- Instances where HP/Max HP percentages are used now use
GetNonDynamaxHPandGetNonDynamaxMaxHPrespectively. - Trainer slide-in messages by @Bassoonian in https://github.com/rh-hideout/pokeemerald-expansion/pull/3581
- Fixes and cleanup
- By @AsparagusEduardo in
- By @AlexOn1ine in
- Requires a Dynamax Band in the bag and for the
- Added support for Sky Battles by @pkmnsnfrn in https://github.com/rh-hideout/pokeemerald-expansion/pull/2950
- Requires both
B_FLAG_SKY_BATTLEandB_VAR_SKY_BATTLEto be assigned. - Use the
TrySkyBattlespecial in scripts to check if the player can participate in a Sky Battle and readies the party if it’s succesful. Saves the result in VAR_RESULT.Route123_EventScript_Alberto_Battle_Event_Script: msgbox Route123_EventScript_Alberto_Text_AskSkyBattle, MSGBOX_YESNO compare VAR_RESULT, NO goto_if_eq Route123_EventScript_Alberto_DenySkyBattle special TrySkyBattle compare VAR_RESULT, TRUE goto_if_eq Route123_EventScript_Alberto_StartBattle msgbox Route123_EventScript_Alberto_Text_No_Flying_Pokemon closemessage release end - The
B_SKY_BATTLE_STRICT_ELIGIBILITYconfig will restrict certain Pokémon from participating based on XY’s list when enabled. By default is disabled and allows all Pokémon that are Flying-type and/or have Levitate as their ability. - Banned moves are defined by the
skyBattleBannedflag. Besides moves banned officially in XY, Gen7+ moves are added viaB_EXTRAPOLATED_MOVE_FLAGSconfig by @AsparagusEduardo in https://github.com/rh-hideout/pokeemerald-expansion/pull/3714 - Effects that interact with grounded battlers do not happen in Sky Battles.
- Fix by @pkmnsnfrn in https://github.com/rh-hideout/pokeemerald-expansion/pull/3617
- Cleanup by @AlexOn1ine in https://github.com/rh-hideout/pokeemerald-expansion/pull/3621
- Requires both
- Added
B_TOXIC_REVERSALconfig to revert bad poison to regular poison at the end of battles by @Bassoonian in https://github.com/rh-hideout/pokeemerald-expansion/pull/3605 - Added
B_SANDSTORM_SPDEF_BOOSTconfig to disable Sandstorm’s Sp. Defense boost for Rock-type Pokémon when set toGEN_3or less by @Petuuuhhh in https://github.com/rh-hideout/pokeemerald-expansion/pull/3387 - Added
B_QUICK_MOVE_CURSOR_TO_RUNconfig to allow a B Button shortcut for moving the cursor to the run option in Wild Battles by @voloved in https://github.com/rh-hideout/pokeemerald-expansion/pull/3362 - Added
B_TRY_CATCH_TRAINER_BALLconfig to disable losing the Poké Ball used to try to catch a Trainer’s Pokémon by @Bassoonian in https://github.com/rh-hideout/pokeemerald-expansion/pull/3684 - Added
P_CATCH_CURVEconfig that updates catch calculations to Gen 6+ by @AtariDreams in https://github.com/rh-hideout/pokeemerald-expansion/pull/3685 - Added Snow weather animation by @kittenchilly in https://github.com/rh-hideout/pokeemerald-expansion/pull/3440
- Added a
flushtextboxmacro to flush the text box in battles by @LOuroboros in https://github.com/rh-hideout/pokeemerald-expansion/pull/3442
Changed
- Removed redundant Battle Types by @AgustinGDLV in https://github.com/rh-hideout/pokeemerald-expansion/pull/2417
BATTLE_TYPE_KYOGRE_GROUDONBATTLE_TYPE_REGIBATTLE_TYPE_GROUDONBATTLE_TYPE_KYOGREBATTLE_TYPE_RAYQUAZA- Intros, terrain and music determined by the species itself.
- Regigigas, Regieleki and Regidrago play
MUS_VS_REGI.
- Regigigas, Regieleki and Regidrago play
- Converted most battle preproc
#ifblocks to Cifs by @AsparagusEduardo in https://github.com/rh-hideout/pokeemerald-expansion/pull/3392 - Removed pointless for loop in CB2_InitBattleInternal by @LOuroboros in https://github.com/rh-hideout/pokeemerald-expansion/pull/3422
- Refactored Battle Frontier bans to check the base species by @Bassoonian in https://github.com/rh-hideout/pokeemerald-expansion/pull/3465
- Better support for adding new species.
- Also adds Gen4+ Special Pokémon to the list.
- Obedience levels now increase per badge by @kittenchilly in https://github.com/rh-hideout/pokeemerald-expansion/pull/3475
- Also sets
B_OBEDIENCE_MECHANICS’s default config toGEN_LATEST, where obedience restrictions also apply to non-outsider Pokémon, albeit based on their level met rather than actual level. - Thanks to combination of the added obedience levels matching ORAS’ with vanilla Emerald’s encounter levels, there’s not a single instance were players need to worry about caught Pokémon not obeying as soon as they are caught.
- Also sets
- Decoupled Affection values from Friendship rater thresholds, making them occur less often than what they used to by @kittenchilly in https://github.com/rh-hideout/pokeemerald-expansion/pull/3495
- Because of the lessened frequency, they have been turned on by default.
- Added
HITMARKER_DISABLE_ANIMATIONto temporarily disable animations (used in Bug Bite’s berry consumption) by @ghoulslash in https://github.com/rh-hideout/pokeemerald-expansion/pull/3607
Fixed
- Fixed Psychic Terrain blocking moves that target all battler or all opponents by @DizzyEggg in https://github.com/rh-hideout/pokeemerald-expansion/pull/3521
- Fixed issue with “Cycle through Poké Balls” feature not working properly by @fdeblasio in https://github.com/rh-hideout/pokeemerald-expansion/pull/3534
- Fixed Burmy not transforming at the end of battle if it didn’t switch in during a Single Battle by @benicioneto in https://github.com/rh-hideout/pokeemerald-expansion/pull/3728
- Fixed Player Partner not playing its Shiny animation by @ghoulslash in https://github.com/rh-hideout/pokeemerald-expansion/pull/3757
🤹 Moves 🤹
Added
- Added Teal Mask Moves by @AlexOn1ine in https://github.com/rh-hideout/pokeemerald-expansion/pull/3402 + Tests
- Matcha Gotcha
- Syrup Bomb
- Animation by @SonikkuA-DatH and @AlexOn1ine in https://github.com/rh-hideout/pokeemerald-expansion/pull/3474
- Fixes by @AlexOn1ine in
- Ivy Cudgel
- Type is shown in interfaces by @Bassoonian in https://github.com/rh-hideout/pokeemerald-expansion/pull/3590
- Tweaks and fixes
- By @AlexOn1ine in https://github.com/rh-hideout/pokeemerald-expansion/pull/3721
- Fixed Ivy Cudgel test name by @AsparagusEduardo in https://github.com/rh-hideout/pokeemerald-expansion/pull/3742
- Added Glaive Rush’s effect by @AlexOn1ine in https://github.com/rh-hideout/pokeemerald-expansion/pull/3476
- Added Raging Bull’s effect by @AlexOn1ine in https://github.com/rh-hideout/pokeemerald-expansion/pull/3552
- Added Chilly Reception’s effect by @RapidNutcracker in https://github.com/rh-hideout/pokeemerald-expansion/pull/3379
- Added Rage Fist’s effect by @AlexOn1ine in https://github.com/rh-hideout/pokeemerald-expansion/pull/3573
- Added define synonyms (eg.
MOVE_VICE_GRIPvs the currentMOVE_VISE_GRIP) by @Bassoonian in https://github.com/rh-hideout/pokeemerald-expansion/pull/3580 - Added combined Pledge move effects by @AlexOn1ine, @Skeli789 and @LOuroboros in https://github.com/rh-hideout/pokeemerald-expansion/pull/3336
- Status animations by @SonikkuA-DatH
- Added
B_WIDE_GUARDandB_QUICK_GUARDconfigs for Wide Guard and Quick Guard to fail when used consecutively in Gen 5 by @AlexOn1ine in https://github.com/rh-hideout/pokeemerald-expansion/pull/3614 - Added
B_IMPRISONconfig that makes Imprison not fail if opposin Pokémon don’t have any moves that the user knows from Gen 5 onwards by @AlexOn1ine in https://github.com/rh-hideout/pokeemerald-expansion/pull/3710
Changed
- Added
B_EXTRAPOLATED_MOVE_FLAGSconfig to extend move flag for moves removed in Gen8+.- Razor Wind, Silver Wind and Ominous Wind are given the
windMoveflag. - Dynamax Cannon, Behemoth Blade and Behemoth Blade are given the
assistBannedflag. - Bitter Blade and Matcha Gotcha are given the
healBlockBannedflag.
- Razor Wind, Silver Wind and Ominous Wind are given the
- Added new move flags by @kittenchilly in https://github.com/rh-hideout/pokeemerald-expansion/pull/3425
twoTurnMove(replacesIsTwoTurnsMove)forcePressure(for self-targeted moves that are affected by Pressure)cantUseTwice(replacesEFFECT_GIGATON_HAMMER)healBlockBanned(replaces anEFFECT_xswitch inIsHealBlockPreventingMove)encoreBanned(replacesifchain inCmd_trysetencore)assistBanned(originally usedcopycatBanned+EFFECT_SEMI_INVULNERABLEandEFFECT_SKY_DROP)parentalBondBanned
- Updated missing move flags for every move by @kittenchilly in https://github.com/rh-hideout/pokeemerald-expansion/pull/3425
- Updated Grassy Glide’s power from 60 to 55 when
B_UPDATED_MOVE_DATAis set toGEN_9or later (Teal Mask) by @kittenchilly in https://github.com/rh-hideout/pokeemerald-expansion/pull/3425 - Simplified Octolock script and converted its
varioustocallnativeby @AlexOn1ine in https://github.com/rh-hideout/pokeemerald-expansion/pull/3437 - Added
CanAbilityPreventStatLossto centralize stat lowering immunities by @AlexOn1ine in https://github.com/rh-hideout/pokeemerald-expansion/pull/3437- Fixed multiple abilities not showing the ability name in their message.
- Renamed
EFFECT_SMELLINGSALTtoEFFECT_SMELLING_SALTSby @AlexOn1ine in https://github.com/rh-hideout/pokeemerald-expansion/pull/3504 - New move animations by @Captain-Ford and @AlexOn1ine in https://github.com/rh-hideout/pokeemerald-expansion/pull/3529
- Phantom Force
- Trick or Treat
- Acrobatics
- Head Smash
- Psyshock
- Charge Beam
- Plasma Fists now setup
STATUS_FIELD_ION_DELUGEinstead of having their ownSTATUS4by @AlexOn1ine in https://github.com/rh-hideout/pokeemerald-expansion/pull/3476 - Battle Dome points are now based on move data instead of being arbitrarily assigned by @Bassoonian in https://github.com/rh-hideout/pokeemerald-expansion/pull/3596
Fixed
- Multiple Relic Song fixes by @AlexOn1ine in https://github.com/rh-hideout/pokeemerald-expansion/pull/3476
- Fixed Acid and Crunch move descriptions being updated by
B_UPDATED_MOVE_DATAalongside their effects by @fdeblasio in https://github.com/rh-hideout/pokeemerald-expansion/pull/3586 - Fixed Howl buffing the user’s ally if they have Soundproof by @AlexOn1ine in https://github.com/rh-hideout/pokeemerald-expansion/pull/3593
- Fixed Floral Healing not increasing its effect on Grassy Terrain + Tests by @AlexOn1ine in https://github.com/rh-hideout/pokeemerald-expansion/pull/3604
- Fixed Spirit Shackle/Anchor Shot not trapping the targets by @AlexOn1ine in https://github.com/rh-hideout/pokeemerald-expansion/pull/3668
- Fixed Defog not consuming PP if the foe has -6 evasion by @AlexOn1ine in https://github.com/rh-hideout/pokeemerald-expansion/pull/3668
- Fixed Mirror Coat being able to reflect Pain Split damage by @AlexOn1ine in https://github.com/rh-hideout/pokeemerald-expansion/pull/3668
- Fixed incorrect Fling damage calculation due to the item being removed before them by @AlexOn1ine in https://github.com/rh-hideout/pokeemerald-expansion/pull/3670
- Fixed Z-Moves using the base move’s priority by @AlexOn1ine in https://github.com/rh-hideout/pokeemerald-expansion/pull/3690
- Fixed Metal Burst, Trump Card and Comeuppance not being considered as damaging moves by @AlexOn1ine in https://github.com/rh-hideout/pokeemerald-expansion/pull/3697
- Fixed Fiery Wrath animation bug that caused the user to flip upside down by @AlexOn1ine in https://github.com/rh-hideout/pokeemerald-expansion/pull/3739
- Fixed Baton Pass not passing Embargo’s remaining turns by @DizzyEggg in https://github.com/rh-hideout/pokeemerald-expansion/pull/3745
- Fixed Raging Fury not causing rampage on user by @AsparagusEduardo in https://github.com/rh-hideout/pokeemerald-expansion/pull/3754
🎭 Abilities 🎭
Added
- Added Opportunist + Tests by @ghoulslash in https://github.com/rh-hideout/pokeemerald-expansion/pull/2994
- Added Zero to Hero + Tests by @AlexOn1ine in https://github.com/rh-hideout/pokeemerald-expansion/pull/3542
- Fix by @AlexOn1ine https://github.com/rh-hideout/pokeemerald-expansion/pull/3552
- Added
B_ILLUMINATE_EFFECTconfig for Illuminate’s Gen9 effect by @Bassoonian in https://github.com/rh-hideout/pokeemerald-expansion/pull/3482 - Added
B_WEAK_ARMOR_SPEEDconfig for Weak Armor’s Gen 5-6 effect by @AsparagusEduardo in https://github.com/rh-hideout/pokeemerald-expansion/pull/3498 - Added
B_PROTEAN_LIBEROconfig for Protean/Libero only triggering once per switch-in as of Gen 9 by @AlexOn1ine in https://github.com/rh-hideout/pokeemerald-expansion/pull/3614 - Added
B_INTREPID_SWORDandB_DAUNTLESS_SHIELDconfigs for Intrepid Sword and Dauntless Sword only triggering once per battle by @AlexOn1ine in https://github.com/rh-hideout/pokeemerald-expansion/pull/3614 - Added configs for disabling ability overworld effects as of Gen 9 by @Bassoonian in https://github.com/rh-hideout/pokeemerald-expansion/pull/3480
- Synchronize, Compound Eyes, Super Luck, Cute Charm, Illuminate, Infiltrator, Harvest, Lightning Rod, Storm Drain, Flash Fire, Magnet Pull and Static.
- Àbility data (not yet functional) by @kittenchilly in https://github.com/rh-hideout/pokeemerald-expansion/pull/3349
- Hospitality
- Mind’s Eye
- Embody Aspect (one ability per effect)
- Toxic Chain
- Supersweet Syrup
Changed
- Pickup Table has been changed so that their percentages can be customized more easily, by @kittenchilly and @AsparagusEduardo in https://github.com/rh-hideout/pokeemerald-expansion/pull/3351
- The data has been changed to Sword & Shield’s.
- Moved
B_SYNCHRONIZE_NATUREtoinclude/config/overworld.hand renamed it toOW_SYNCHRONIZE_NATUREby @Bassoonian in https://github.com/rh-hideout/pokeemerald-expansion/pull/3480
Fixed
- Fixed Synchronize not working with Gift Pokémon and scripted Wild Battles by @Bassoonian in https://github.com/rh-hideout/pokeemerald-expansion/pull/3480
- Fixed Anger Shell being triggered multiple times by multi-hit moves by @DizzyEggg in https://github.com/rh-hideout/pokeemerald-expansion/pull/3508
- Fixed Absorbing abilities not cancelling multi-hit moves + Tests (eg. Sap Sipper vs Bullet Seed) by @DizzyEggg in https://github.com/rh-hideout/pokeemerald-expansion/pull/3516
- Fixed issue that caused Shadow Tag to not work by @fdeblasio in https://github.com/rh-hideout/pokeemerald-expansion/pull/3549
- Fixed assumption that
gLastUsedAbilityisu8by @Bassoonian in https://github.com/rh-hideout/pokeemerald-expansion/pull/3569 - Fixes Protosynthesis and Quark Drive ability pop up appearing more than once by @AlexOn1ine in https://github.com/rh-hideout/pokeemerald-expansion/pull/3595
- Fixed Trace not triggering when switching in by secondary effects like U-Turn, Eject Pack or Explosion by @LOuroboros in https://github.com/rh-hideout/pokeemerald-expansion/pull/3623
- Fixed Defiant not being triggered by Cotton Down interaction by @AlexOn1ine in https://github.com/rh-hideout/pokeemerald-expansion/pull/3657
- Fixed self-targeted moves triggering Stamina, like Substitute by @AlexOn1ine in https://github.com/rh-hideout/pokeemerald-expansion/pull/3669
- Fixed Quick Draw not working properly by @AlexOn1ine in https://github.com/rh-hideout/pokeemerald-expansion/pull/3724
- Fixed Neutraling Gas switch-out combined with Electric Surge causing a visual glitch by @DizzyEggg in https://github.com/rh-hideout/pokeemerald-expansion/pull/3746
- Fixed Innards Out damaging Pokémon with Magic Guard by @DizzyEggg in https://github.com/rh-hideout/pokeemerald-expansion/pull/3758
- Fixed Innards Out damaging Pokémon despite being suppressed by Gastro Acid by @DizzyEggg in https://github.com/rh-hideout/pokeemerald-expansion/pull/3758
🧶 Items 🧶
Added
- Repeated Medicine usage by @Bassoonian in https://github.com/rh-hideout/pokeemerald-expansion/pull/3005
- You can use multiple medicine items in a row without going back to the bag menu. Supports Rare and Exp. Candies.
- Added
B_LIGHT_BALL_ATTACK_BOOSTconfig to disable Light Ball’s Pshycal Attack boost when set toGEN_3or less by @Petuuuhhh in https://github.com/rh-hideout/pokeemerald-expansion/pull/3387 - Added Teal Mask items by @kittenchilly in https://github.com/rh-hideout/pokeemerald-expansion/pull/3349
- Sprites (except for Fairy Feather) by @hedara90 in https://github.com/rh-hideout/pokeemerald-expansion/pull/3527
- Fairy Feather by @kittenchilly in https://github.com/rh-hideout/pokeemerald-expansion/pull/3520
- Sprite by Anarlaurendil on Deviantart.
- Despite being introduced in Gen 9, it’s still affected by the
I_TYPE_BOOST_POWERconfig to be consistent with other type items (10% boost when set to Gen 3).
- Evolution items
- Syrupy Apple
- Unremarkable Teacup
- Masterpiece Teacup
- Form change items
- Cornerstone Mask
- Wellspring Mask
- Hearthflame Mask
- EV modifier items
- Health Mochi
- Muscle Mochi
- Resist Mochi
- Genius Mochi
- Clever Mochi
- Swift Mochi
- Fresh Start Mochi
- Glimmering Charm
- Since there’s no raids, it currently does nothing.
- Implemented Rotom Catalog and Zygarde Cube by @kittenchilly in https://github.com/rh-hideout/pokeemerald-expansion/pull/3284
- Zygarde Cube follows Gen 8 functionality, where it allows to change Form and Ability but not teach moves.
- Rotom Catalog follows non-BDSP functionality, where all forms don’t need to be unlocked.
- Cleanup by @AsparagusEduardo in https://github.com/rh-hideout/pokeemerald-expansion/pull/3700
- Implemented support for Fusion items by @TeamAquasHideout and @kittenchilly in https://github.com/rh-hideout/pokeemerald-expansion/pull/3274
- Items:
- DNA Splicers
- N-Solarizer
- N-Lunarizer
- Reins of Unity
- Fused mon are stored at the end of in
PokemonStorage. - Fixes by @Bassoonian in https://github.com/rh-hideout/pokeemerald-expansion/pull/3602
- Fixes and cleanup
- By @AsparagusEduardo in https://github.com/rh-hideout/pokeemerald-expansion/pull/3644
- By @Bassoonian in https://github.com/rh-hideout/pokeemerald-expansion/pull/3692
- Items:
- Ported pokefirered’s Vs. Seeker by @Jaizu @pkmnsnfrn in https://github.com/rh-hideout/pokeemerald-expansion/pull/3256
- Requires
I_VS_SEEKER_CHARGINGflag to be assigned. - Cleanup by @GraionDilach in https://github.com/rh-hideout/pokeemerald-expansion/pull/3718
- Requires
- Added define synonyms (eg.
ITEM_STICKvs the currentITEM_LEEK) by @Bassoonian in https://github.com/rh-hideout/pokeemerald-expansion/pull/3580
Changed
- Removed unused holdEffectParam for items that double the amount of money gained in battle by @LOuroboros in https://github.com/rh-hideout/pokeemerald-expansion/pull/3528
- Using the name
Parcelinstead ofOak's Parcelby @Bassoonian in https://github.com/rh-hideout/pokeemerald-expansion/pull/3580 - Repel/Lure menu improvements @Jaizu and @pkmnsnfrn in https://github.com/rh-hideout/pokeemerald-expansion/pull/3594
- If
VAR_LAST_REPEL_LURE_USEDis enabled and a spray runs out:- It will show the name of the spray that ran out.
- If it was the last item of its type and strength, it will ask the player if they want to use a different one of the same type.
- B can now be pressed to cancel the menu.
- If
Fixed
- Fixed healing berries activating before Knock Off by @DizzyEggg in https://github.com/rh-hideout/pokeemerald-expansion/pull/3509
- Fixed crash damage triggering Eject Button by @AlexOn1ine in https://github.com/rh-hideout/pokeemerald-expansion/pull/3669 and https://github.com/rh-hideout/pokeemerald-expansion/pull/3738
- Fixed Quick Claw not reading
holdEffectParamby @AlexOn1ine in https://github.com/rh-hideout/pokeemerald-expansion/pull/3737 - Fixed Life Orb causing recoil when swapped via Magician when it shouldn’t by @DizzyEggg in https://github.com/rh-hideout/pokeemerald-expansion/pull/3753
🤖 Battle AI 🤖
- Added AI Tests
- By @DizzyEggg in https://github.com/rh-hideout/pokeemerald-expansion/pull/3361
- AI prefers Bubble over Water Gun if it’s slower (both are power 40).
- AI prefers Water Gun over Bubble if it knows that foe has Contrary.
- AI prefers moves with better accuracy, but only if they both require the same number of hits to KO.
- AI prefers moves which deal more damage instead of moves which are super-effective but deal less damage.
- AI prefers Earthquake over Drill Run if both require the same number of hits to KO.
- AI chooses the safest option to faint the target, taking into account accuracy and move effect.
- AI won’t use ground type attacks against flying type Pokémon unless Gravity is in effect.
- AI will not switch in a Pokémon which is slower and gets 1HKOed after fainting.
- AI switches if Perish Song is about to kill.
- AI won’t use a Weather changing move if partner already chose such move.
- AI will not use Helping Hand if partner does not have any damage moves.
- AI will not use a status move if partner already chose Helping Hand.
- AI without any flags chooses moves at random.
- By @AlexOn1ine in https://github.com/rh-hideout/pokeemerald-expansion/pull/3382
- AI prefers a weaker moves over one with a downside effect if both require the same number of hits to KO.
- AI prefers moves with the best possible score, chosen randomly if tied.
- AI can choose a status move that boosts the attack by two.
- By @AlexOn1ine in https://github.com/rh-hideout/pokeemerald-expansion/pull/3515
- AI won’t use Solar Beam if there is no Sun up or the user is not holding Power Herb.
- By @AlexOn1ine in https://github.com/rh-hideout/pokeemerald-expansion/pull/3583
- AI chooses moves with secondary effect that have a 100% chance to trigger
- Cleanup by @DizzyEggg in https://github.com/rh-hideout/pokeemerald-expansion/pull/3748
- By @DizzyEggg in https://github.com/rh-hideout/pokeemerald-expansion/pull/3361
- Smarter SwitchAI Mon Choices +
HasBadOddsSwitch Check by @Pawkkie in https://github.com/rh-hideout/pokeemerald-expansion/pull/3253- Use
AI_FLAG_SMART_MON_CHOICESto enable smarter decisions when choosing which mon gets sent out HasBadOddsexpandsAI_FLAG_SMART_SWITCHINGto switch out in cases where a mon has a bad matchup and lots of HP remaining
- Use
- Extend
AI_FLAG_SMART_SWITCHINGfor Encore / hazards / lowered attacking stats + Tests by @Pawkkie in https://github.com/rh-hideout/pokeemerald-expansion/pull/3557
Changed
- By @DizzyEggg in https://github.com/rh-hideout/pokeemerald-expansion/pull/3199
- Using move flags instead of lists for AI calculations by @AlexOn1ine in https://github.com/rh-hideout/pokeemerald-expansion/pull/3389
- Remove redundant AI score increases by @AlexOn1ine in https://github.com/rh-hideout/pokeemerald-expansion/pull/3504
- Remove
GetMoveDamageResultfunction by @AlexOn1ine in https://github.com/rh-hideout/pokeemerald-expansion/pull/3536
Fixed
- Fixed AI randomly choosing moves if they’re both super effective by @DizzyEggg in https://github.com/rh-hideout/pokeemerald-expansion/pull/3361
🧹 Other Cleanup 🧹
- Remove all trailing whitespace (upcoming) by @kittenchilly in https://github.com/rh-hideout/pokeemerald-expansion/pull/3473
- Debug menu cleanup and documentation by @AsparagusEduardo and @sphericalice in https://github.com/rh-hideout/pokeemerald-expansion/pull/3390
- Removed
powerfulMoveEffectsarray by @AlexOn1ine in https://github.com/rh-hideout/pokeemerald-expansion/pull/3515 - Added
-Woverride-initMakefile flag that agbcc has by default by @AsparagusEduardo in https://github.com/rh-hideout/pokeemerald-expansion/pull/3535 - Fixed static variable names by @Bassoonian in https://github.com/rh-hideout/pokeemerald-expansion/pull/3637
- Fixed config descriptions
- By @GraionDilach in https://github.com/rh-hideout/pokeemerald-expansion/pull/3717
- Fixed mistmatching
gBattleTextBuff3definitions by @GraionDilach in https://github.com/rh-hideout/pokeemerald-expansion/pull/3719
🧪 Test Runner 🧪
Added
- Added support for wild battle tests by @DizzyEggg in https://github.com/rh-hideout/pokeemerald-expansion/pull/3342
- Added support for AI battle tests by @DizzyEggg in https://github.com/rh-hideout/pokeemerald-expansion/pull/3361
- Experience tests by @DizzyEggg in https://github.com/rh-hideout/pokeemerald-expansion/pull/3342
- Catching Pokémon gives experience.
- Higher leveled Pokémon give more experience.
- Lucky Egg boosts gained exp points by 50%.
- Exp is scaled to player and opponent’s levels.
- Large exp gains are supported
- Held Exp. Share gives Experience to mons which did not participate in battle
- Added additional damage formula test by @AlexOn1ine in https://github.com/rh-hideout/pokeemerald-expansion/pull/3437
- Added Octolock tests by @AlexOn1ine in https://github.com/rh-hideout/pokeemerald-expansion/pull/3437
- Added Defiant/Sticky Web interaction test by @DizzyEggg in https://github.com/rh-hideout/pokeemerald-expansion/pull/3516
- Added Embargo tests by @LOuroboros in https://github.com/rh-hideout/pokeemerald-expansion/pull/3555
- Added missing Hyper Cutter tests by @AlexOn1ine in https://github.com/rh-hideout/pokeemerald-expansion/pull/3437
- Added missing Anger Shell tests by @DizzyEggg in https://github.com/rh-hideout/pokeemerald-expansion/pull/3508
- Added missing White Herb tests by @AlexOn1ine in https://github.com/rh-hideout/pokeemerald-expansion/pull/3611
- Added
SpeciesInfointegrity tests by @mrgriffin in https://github.com/rh-hideout/pokeemerald-expansion/pull/3688
Changed
- Moved battle tests off the heap by @mrgriffin in https://github.com/rh-hideout/pokeemerald-expansion/pull/3413
- Automatic
ASSUMPTION_FAILin tests when used species are disabled.- Because of this, instances of
ASSUME(P_GEN_x_POKEMON == TRUE)have been removed.
- Because of this, instances of
- Updated Gen 9-mon-exclusive ability tests to use Gen 9 mon by @AsparagusEduardo in https://github.com/rh-hideout/pokeemerald-expansion/pull/3733
Fixed
- Fixed VSCode error shenanigans when viewing tests by @AsparagusEduardo in https://github.com/rh-hideout/pokeemerald-expansion/pull/3383
- Fixed broken move animations in test replays by @DizzyEggg in https://github.com/rh-hideout/pokeemerald-expansion/pull/3398
- Performance improvement for test name matching by @jiangzhengwenjz in https://github.com/rh-hideout/pokeemerald-expansion/pull/3559
- Fixed Ice Heal test name typo by @AtariDreams in https://github.com/rh-hideout/pokeemerald-expansion/pull/3676
📦 Pret merges 📦
- 2023-10-02 by @AsparagusEduardo in https://github.com/rh-hideout/pokeemerald-expansion/pull/3372
- Slight RTC documentation + Evolution times constants (https://github.com/pret/pokeemerald/pull/1925)
- Add friendship evo threshold constant (https://github.com/pret/pokeemerald/pull/1928)
- Solved a bunch of -Wall errors on modern (https://github.com/pret/pokeemerald/pull/1926)
- 2023-10-27 by @AsparagusEduardo in https://github.com/rh-hideout/pokeemerald-expansion/pull/3471
- Add some task/sprite data defines (https://github.com/pret/pokeemerald/pull/1915)
- Fix mini_printf encoded string -Werror=pointer-sign warning (https://github.com/pret/pokeemerald/pull/1938)
- Remove all trailing whitespace (https://github.com/pret/pokeemerald/pull/1937)
- Use BUGFIX in assembly files (https://github.com/pret/pokeemerald/pull/1935)
- 2023-12-10 by @AsparagusEduardo in https://github.com/rh-hideout/pokeemerald-expansion/pull/3675
- Delete the redundant files generated after running build (https://github.com/pret/pokeemerald/pull/1944)
- Rename
EGG_GROUP_UNDISCOVEREDegg group toEGG_GROUP_NO_EGGS_DISCOVERED(https://github.com/pret/pokeemerald/pull/1939) - Renamed
SendMonToPCtoCopyMonToPC(https://github.com/pret/pokeemerald/pull/1940) - Document
datahpupdate(https://github.com/pret/pokeemerald/pull/1936) - Renamed
HITMARKER_IGNORE_SAFEGUARDtoHITMARKER_STATUS_ABILITY_EFFECT(https://github.com/pret/pokeemerald/pull/1959) - Moved files (https://github.com/pret/pokeemerald/pull/1953)
- Spinda Spots
- JP Fonts
redyellowgreen_frame.bin
- [Build System Rewrite] Linkerscript now tracks RAM/ROM usage (https://github.com/pret/pokeemerald/pull/1952)
- Fixed ld_script.ld artifact from a previous pret version by @AsparagusEduardo in https://github.com/rh-hideout/pokeemerald-expansion/pull/3731
- Updated the size of the
struct InGameTrade’sotNamevariable (https://github.com/pret/pokeemerald/pull/1962)
New Contributors
- @Petuuuhhh made their first contribution in https://github.com/rh-hideout/pokeemerald-expansion/pull/3387
- @katykat5099 made their first contribution in https://github.com/rh-hideout/pokeemerald-expansion/pull/3426
- @leo60228 made their first contribution in https://github.com/rh-hideout/pokeemerald-expansion/pull/3249
- @hedara90 made their first contribution in https://github.com/rh-hideout/pokeemerald-expansion/pull/3527
- @jiangzhengwenjz made their first contribution in https://github.com/rh-hideout/pokeemerald-expansion/pull/3559
- @ravepossum made their first contribution in https://github.com/rh-hideout/pokeemerald-expansion/pull/3561
- @RapidNutcracker made their first contribution in https://github.com/rh-hideout/pokeemerald-expansion/pull/3379
- @GraionDilach made their first contribution in https://github.com/rh-hideout/pokeemerald-expansion/pull/3624
- @AtariDreams made their first contribution in https://github.com/rh-hideout/pokeemerald-expansion/pull/3676
Full Changelog: https://github.com/rh-hideout/pokeemerald-expansion/compare/expansion/1.6.2...expansion/1.7.0
Version 1.6.2
## How to update
- If you haven't set up a remote, run the command `git remote add RHH https://github.com/rh-hideout/pokeemerald-expansion`.
- Once you have your remote set up, run the command `git pull RHH expansion/1.6.2`.
🌋 IMPORTANT CHANGES 🌋
Battle changes
- Battler Types are now obtained via
GetBattlerTypeinstead ofgBattleMons[battlerId].type1/2/3to better consider Roost. Be sure to update your custom battle effects to account for this change.
🧬 General 🧬
Fixed
- Fixed Cheat Start not initiating time-based events by @AsparagusEduardo in https://github.com/rh-hideout/pokeemerald-expansion/pull/3446
🐉 Pokémon 🐉
Changed
- Updated Cresselia’s base stats to Gen 9 by @LOuroboros in https://github.com/rh-hideout/pokeemerald-expansion/pull/3419
- Updated Zacian/Zamazenta base stats to Gen 9 by @AsparagusEduardo in https://github.com/rh-hideout/pokeemerald-expansion/pull/3421
Fixed
- Fixed Kleavor, Hisuian Sneasel and Sneasler missing their SV abilities by @LOuroboros in https://github.com/rh-hideout/pokeemerald-expansion/pull/3391
- Fixed Bergmite/Avalugg old and updated egg groups being switched by @AsparagusEduardo in https://github.com/rh-hideout/pokeemerald-expansion/pull/3380
🤹 Moves 🤹
Changed
- Quick Draw now uses weighted RNG by @Bassoonian in https://github.com/rh-hideout/pokeemerald-expansion/pull/3399
- Added
IS_BATTLER_TYPELESSmacro that checks if the specified battler has no valid type by @LOuroboros in https://github.com/rh-hideout/pokeemerald-expansion/pull/3303
Fixed
- Fixed Protect failing if the user flinched on the previous turn by @DizzyEggg in https://github.com/rh-hideout/pokeemerald-expansion/pull/3345
- Fixed entry hazards not working properly being cleared on switch-in by @DizzyEggg in https://github.com/rh-hideout/pokeemerald-expansion/pull/3316
- This includes Toxic Spikes not working if Pecha Berry actived on the previous turn.
- Fixed Roost overwriting other type changing at the end of the turn (Soak, Forest’s Curse, Color Change, etc.) by @BLourenco in https://github.com/rh-hideout/pokeemerald-expansion/pull/3258
- Now it suppresses the user’s Flying-type rather than remove and re-add it.
- Fixes Salt Cure visual bug if mon fainted by direct attack by @AlexOn1ine in https://github.com/rh-hideout/pokeemerald-expansion/pull/3388
- Fixed Purifying Salt not preventing the use of Rest by @Bassoonian in https://github.com/rh-hideout/pokeemerald-expansion/pull/3399
- Fixed Make it Rain lowering Sp. Attack twice if hitting 2 targets in double battles by @AlexOn1ine in https://github.com/rh-hideout/pokeemerald-expansion/pull/3441
- Fixed Reflect Type not properly handle 3rd types by @LOuroboros in https://github.com/rh-hideout/pokeemerald-expansion/pull/3303
- Fixed form change triggered by switching not occuring when using moves like U-Turn or Baton Pass by @AlexOn1ine in https://github.com/rh-hideout/pokeemerald-expansion/pull/3463
- Fixed Last Resort not counting Sleep Talk as used for its effect by @DizzyEggg in https://github.com/rh-hideout/pokeemerald-expansion/pull/3378
🎭 Abilities 🎭
Changed
- Removed unused
STATUS3_CANT_SCORE_A_CRITby @AlexOn1ine in https://github.com/rh-hideout/pokeemerald-expansion/pull/3377 - Moved Beads of Ruin and Sword of Ruin damage to the appropiate damage modifier functions by @kittenchilly in https://github.com/rh-hideout/pokeemerald-expansion/pull/3415
Fixed
- Fixed Intimidate increasing the attack of both opponents if one of them has Contrary in double battles by @DizzyEggg in https://github.com/rh-hideout/pokeemerald-expansion/pull/3365
- Fixed Battle/Shell Armor not preventing critical hits by @AlexOn1ine in https://github.com/rh-hideout/pokeemerald-expansion/pull/3377
- Fixed Rivalry’s effect being reversed by @AsparagusEduardo in https://github.com/rh-hideout/pokeemerald-expansion/pull/3381
- Fixed Rivalry lowering attack if either attacker or target were genderless by @AsparagusEduardo in https://github.com/rh-hideout/pokeemerald-expansion/pull/3381
- Fixed missing Poison Heal Ability Popup by @Bassoonian in https://github.com/rh-hideout/pokeemerald-expansion/pull/3385
- Fixed Parental Bond not working at all by @AsparagusEduardo in https://github.com/rh-hideout/pokeemerald-expansion/pull/3417
- Fixed Beads of Ruin and Sword of Ruin damage modifiers by @kittenchilly in https://github.com/rh-hideout/pokeemerald-expansion/pull/3415
- Fixed Sheer Force not negating effects that benefit the user (eg. Flame Charge, Power-Up Punch) by @DizzyEggg in https://github.com/rh-hideout/pokeemerald-expansion/pull/3378
- Fixed Strength Sap not healing the user when used on a Substitute by @DizzyEggg in https://github.com/rh-hideout/pokeemerald-expansion/pull/3486
- Fixed Substitute showing the “took damage for” message if Strength Sap was used on it by @DizzyEggg in https://github.com/rh-hideout/pokeemerald-expansion/pull/3486
- Fixed Weak Armor interrupting Multi Hit moves by @DizzyEggg in https://github.com/rh-hideout/pokeemerald-expansion/pull/3497
🧶 Items 🧶
Fixed
- Fixed Shiny Charm doing too many rerolls by default by @kittenchilly in https://github.com/rh-hideout/pokeemerald-expansion/pull/3327
- Fixed Berserk Gene activating for the wrong Pokémon double battles by @DizzyEggg in https://github.com/rh-hideout/pokeemerald-expansion/pull/3363
- Fixed Red Card not being consumed after opponent Sticky Web activation by @DizzyEggg in https://github.com/rh-hideout/pokeemerald-expansion/pull/3364
- Fixed implementation of Gen6 that didn’t allow for the Exp Share flag to be set via script without setting the item to the Gen 6+ version by @AsparagusEduardo in https://github.com/rh-hideout/pokeemerald-expansion/pull/3384
- Fixed Kee Berry raising defense by 1 stage instead of 2 by @AlexOn1ine in https://github.com/rh-hideout/pokeemerald-expansion/pull/3409
- Fixed Kee Berry incorrect stat raise message by @AlexOn1ine in https://github.com/rh-hideout/pokeemerald-expansion/pull/3409
- Fixed Razor Fang not being able to be used directly even if
I_USE_EVO_HELD_ITEMS_FROM_BAGwas set toTRUEby @fdeblasio in https://github.com/rh-hideout/pokeemerald-expansion/pull/3456
🧹 Cleanup 🧹
AbilityBattleEffectsusesB_MSG_TERRAINconstants for field terrain intro text by @LOuroboros in https://github.com/rh-hideout/pokeemerald-expansion/pull/3410- Removed all trailing whitespace by @kittenchilly in https://github.com/rh-hideout/pokeemerald-expansion/pull/3472
🧪 Test Runner 🧪
Added
- Flinch tests by @DizzyEggg in https://github.com/rh-hideout/pokeemerald-expansion/pull/3345
- Berserk Gene double battle tests by @DizzyEggg in https://github.com/rh-hideout/pokeemerald-expansion/pull/3363
- More specific Toxic Spikes tests by @DizzyEggg in https://github.com/rh-hideout/pokeemerald-expansion/pull/3316
- Red Card/Sticky Web test @DizzyEggg in https://github.com/rh-hideout/pokeemerald-expansion/pull/3364
- Intimidate/Contrary double battle test by @DizzyEggg in https://github.com/rh-hideout/pokeemerald-expansion/pull/3365
- Critical Hit tests by @AlexOn1ine in https://github.com/rh-hideout/pokeemerald-expansion/pull/3377
- Roost tests by @BLourenco in https://github.com/rh-hideout/pokeemerald-expansion/pull/3258
- Rivalry tests by @AsparagusEduardo in https://github.com/rh-hideout/pokeemerald-expansion/pull/3381
- Various tests by @Bassoonian in https://github.com/rh-hideout/pokeemerald-expansion/pull/3385
- Defeatist, Dragon’s Maw, Earth Eater, Gale Wings, Poison Heal, Rocky Payload, Sap Sipper, Steelworker and Transistor.
- Various tests by @Bassoonian in https://github.com/rh-hideout/pokeemerald-expansion/pull/3399
- Beast Boost, Ice Scales, Neuroforce, Purifying Salt, Quick Draw and Sharpness.
- Berry tests @AlexOn1ine in https://github.com/rh-hideout/pokeemerald-expansion/pull/3409
- Full: Apicot, Custap, Ganlon, Jaboca, Kee, Lansat, Liechi, Maranga, Micle, Petaya, Rowap and Salac Berries.
- TODO: Starf Berry.
- Weather and type-specific tests by @kittenchilly in https://github.com/rh-hideout/pokeemerald-expansion/pull/3260
- Full: Freezing, Hail, Moonlight, Morning Sun, Sandstorm, Snow, Solar Beam/Blade, Steel poisoning, Synthesis, Thunder and Weather Ball.
- Partial: Prankster, Safety Goggles, Aurora Veil, Hurricane, Leech Seed and OHKO moves.
- TODO: Harvest.
- Single Parental Bond test by @AsparagusEduardo in https://github.com/rh-hideout/pokeemerald-expansion/pull/3417
- Several tests by @DizzyEggg in https://github.com/rh-hideout/pokeemerald-expansion/pull/3378
- Full: Weak Armor, Last Resort, Stealth Rock.
- Completed Weak Armor tests by @AsparagusEduardo in https://github.com/rh-hideout/pokeemerald-expansion/pull/3493
- Partial: Defiant, Sheer Force, White Herb, Strength Sap.
- Full: Weak Armor, Last Resort, Stealth Rock.
Changed
- Red Card tests now check if the item was consumed by @DizzyEggg in https://github.com/rh-hideout/pokeemerald-expansion/pull/3364
- Tests now cannot use
iin their cycles to avoid messing withPARAMETRIZEby @mrgriffin in https://github.com/rh-hideout/pokeemerald-expansion/pull/3408 - Moved battle tests off the heap by @mrgriffin in https://github.com/rh-hideout/pokeemerald-expansion/pull/3414
- Moved Powder/Grass test to
move_flagsfolder by @kittenchilly in https://github.com/rh-hideout/pokeemerald-expansion/pull/3260 - Continuous
NOT x; NOT y;are now not allowed in tests due to them not acting as one would expect by @mrgriffin in https://github.com/rh-hideout/pokeemerald-expansion/pull/3459- Test writers should use
NONE_OF { x; y; }instead.
- Test writers should use
Fixed
- Fixed CreateNPCTrainerPartyForTrainer test failing on modern by @DizzyEggg in https://github.com/rh-hideout/pokeemerald-expansion/pull/3367
- Fixed
RNG_CRITICAL_HITby @mrgriffin and @AlexOn1ine in https://github.com/rh-hideout/pokeemerald-expansion/pull/3377 - Fixed
ASSUMPTIONSblock not working by @DizzyEggg in https://github.com/rh-hideout/pokeemerald-expansion/pull/3368- Fixup by @mrgriffin in https://github.com/rh-hideout/pokeemerald-expansion/pull/3408
- Fixed Beads of Ruin and Sword of Ruin damage tests by @kittenchilly in https://github.com/rh-hideout/pokeemerald-expansion/pull/3415
- Fixes test RNG by @mrgriffin and @AlexOn1ine in https://github.com/rh-hideout/pokeemerald-expansion/pull/3433
- Fixed battle test estimateCost bug by @mrgriffin in https://github.com/rh-hideout/pokeemerald-expansion/pull/3448
- Test cleanup and improvements by @AsparagusEduardo in https://github.com/rh-hideout/pokeemerald-expansion/pull/3449
- Removed duplicated Prankster TO_DO test.
- Corrected Multi-hit test names (4 and 5 hits stated 35% instead of 15%).
- Grouped Maranga Berry’s Physical vs Special tests using PARAMETRIZE.
- Improved Jaboca, Kee and Rowap tests by @AlexOn1ine
- Fixed
ModifyPersonalityForNatureby @mrgriffin in https://github.com/rh-hideout/pokeemerald-expansion/pull/3452 - Fixed test_runner.c modern warning by @mrgriffin in https://github.com/rh-hideout/pokeemerald-expansion/pull/3451
New Contributors
- @BLourenco made their first contribution in https://github.com/rh-hideout/pokeemerald-expansion/pull/3258
Full Changelog
https://github.com/rh-hideout/pokeemerald-expansion/compare/expansion/1.6.1...expansion/1.6.2
Version 1.6.1
## How to update
- If you haven't set up a remote, run the command `git remote add RHH https://github.com/rh-hideout/pokeemerald-expansion`.
- Once you have your remote set up, run the command `git pull RHH expansion/1.6.1`.
CRITICAL FIX, please update to avoid the issues detailed down below:
- Fixed deleting PC mon by placing another one on top with B by @AsparagusEduardo in https://github.com/rh-hideout/pokeemerald-expansion/pull/3360
Full Changelog: https://github.com/rh-hideout/pokeemerald-expansion/compare/expansion/1.6.0...expansion/1.6.1
Version 1.6.0
## How to update
- If you haven't set up a remote, run the command `git remote add RHH https://github.com/rh-hideout/pokeemerald-expansion`.
- Once you have your remote set up, run the command `git pull RHH expansion/1.6.0`.
Added
General
- Ported TheXaman’s latest changes to the Debug Menu by @AsparagusEduardo in https://github.com/rh-hideout/pokeemerald-expansion/pull/2815
- Arrows and ellipsis to mark submenus.
- Added 9th scrolling option to occupy the whole screen height.
- Combine Flags and Vars into one submenu.
- Moved Running Shoes flag to this menu.
- Added new window to flags/vars showing the current state and added submenu indicator.
- Colored toggle options for specific flags that change upon toggling.
- Added option to reset Pokédex flags to whatever is in the party and boxes.
- New “Fill PC/Item Pocket” submenu for filling both PC and Bag Pockets.
- Option to generate Box Mon with their own personalities/IVs.
- Moved “CHEAT Start” option to the Utility Submenu“
- Fixes:
- By @AsparagusEduardo in https://github.com/rh-hideout/pokeemerald-expansion/pull/3223
- By @DizzyEggg in https://github.com/rh-hideout/pokeemerald-expansion/pull/3317
- Allow Cycling Through Balls in the Last Ball Used Menu by @voloved in https://github.com/rh-hideout/pokeemerald-expansion/pull/3039
- Tweaks by @voloved in https://github.com/rh-hideout/pokeemerald-expansion/pull/3254
- Implemented Ultra Burst by @kittenchilly in https://github.com/rh-hideout/pokeemerald-expansion/pull/3221
- Config for LGPE friendship stat boost by @AsparagusEduardo in https://github.com/rh-hideout/pokeemerald-expansion/pull/2257
- Added a debug menu option to hatch eggs by @LOuroboros in https://github.com/rh-hideout/pokeemerald-expansion/pull/3155
- Option to run an AI vs AI battle by @DizzyEggg in https://github.com/rh-hideout/pokeemerald-expansion/pull/3216
- With fixes by @DizzyEggg in https://github.com/rh-hideout/pokeemerald-expansion/pull/3283
- Added missing Evolution data by @AsparagusEduardo in https://github.com/rh-hideout/pokeemerald-expansion/pull/3287
- Crabrawler can now evolve into Crabominable with an Ice Stone as of SV.
- Nosepass can now evolve into Probopass with a Thunder Stone as of LA.
- Added Sliggoo’s overworld fog evolution method by @kittenchilly in https://github.com/rh-hideout/pokeemerald-expansion/pull/3343
- Overworld snow weather now summons Snow or Hail based on a config by @kittenchilly in https://github.com/rh-hideout/pokeemerald-expansion/pull/3241
- Added unevolved Exp. multiplier by @kittenchilly in https://github.com/rh-hideout/pokeemerald-expansion/pull/3301
- Added config to support placing Pokémon in the PC when pressing the B button by @Bassoonian in https://github.com/rh-hideout/pokeemerald-expansion/pull/3329
- Added array shuffle implementation by @mrgriffin in https://github.com/rh-hideout/pokeemerald-expansion/pull/3097
- Fixes/improvements by @mrgriffin in https://github.com/rh-hideout/pokeemerald-expansion/pull/3128
Item Effects
- Added Generation 6 Exp. Share by @pkmnsnfrn in https://github.com/rh-hideout/pokeemerald-expansion/pull/3276
- Cleanup
- By @LOuroboros in https://github.com/rh-hideout/pokeemerald-expansion/pull/3291
- By @DizzyEggg in https://github.com/rh-hideout/pokeemerald-expansion/pull/3339
- Cleanup
- Added Exp. Charm by @kittenchilly in https://github.com/rh-hideout/pokeemerald-expansion/pull/3301
- Added Gen 4+’s Enigma Berry’s hold effect by @kittenchilly in https://github.com/rh-hideout/pokeemerald-expansion/pull/3300
- Added config for type-boosting held item power by @kittenchilly in https://github.com/rh-hideout/pokeemerald-expansion/pull/3326
Move Effects
- By @LOuroboros in https://github.com/rh-hideout/pokeemerald-expansion/pull/2870
- Triple Arrows
- Infernal Parade
- Lunar Blessing
- Take Heart
- Axe Kick
- By @AlexOn1ine in https://github.com/rh-hideout/pokeemerald-expansion/pull/3147
- Spin Out
- Make It Rain
- Collision Course/Electro Drift
- By @AlexOn1ine in https://github.com/rh-hideout/pokeemerald-expansion/pull/3178
- Mortal Spin
- Population Bomb
- By @AlexOn1ine in https://github.com/rh-hideout/pokeemerald-expansion/pull/3297
- Gigaton Hammer
- Salt Cure
Move Animations
- By @Skeli789 and @ghoulslash in https://github.com/rh-hideout/pokeemerald-expansion/pull/2861
- Spirit Break
- False Surrender
- Isle of Armor Moves
- Grassy Glide fix by @AlexOn1ine in https://github.com/rh-hideout/pokeemerald-expansion/pull/3092
- Crown Tundra Moves
- Legends: Arceus Moves
- By @AlexOn1ine in https://github.com/rh-hideout/pokeemerald-expansion/pull/3310
- Bitter Blade
- Double Shock by @AlexOn1ine in https://github.com/rh-hideout/pokeemerald-expansion/pull/3310
Graphics
- Added all remaining gender differences sprites by @SubzeroEclipse and @CyanSMP64 in:
- https://github.com/rh-hideout/pokeemerald-expansion/pull/3070
- https://github.com/rh-hideout/pokeemerald-expansion/pull/3082
- https://github.com/rh-hideout/pokeemerald-expansion/pull/3095
- https://github.com/rh-hideout/pokeemerald-expansion/pull/3122
- https://github.com/rh-hideout/pokeemerald-expansion/pull/3149
- Add new Substitute doll sprites by @kittenchilly in https://github.com/rh-hideout/pokeemerald-expansion/pull/3263
- Added icon for Clear Amulet by @PacFire in https://github.com/rh-hideout/pokeemerald-expansion/pull/3078
- Palette fixes by @AsparagusEduardo in https://github.com/rh-hideout/pokeemerald-expansion/pull/3086
- Tera Shard icons by @AlexOn1ine @PacFire in https://github.com/rh-hideout/pokeemerald-expansion/pull/3307
- A selection of mon animation frames by @Tacobell24 and @AsparagusEduardo in https://github.com/rh-hideout/pokeemerald-expansion/pull/3090
- Applin, Stufful, Chewtle, Rookidee, Rolycoly, Grubbin, Turtonator, Wimpod, Jangmo-O, Pyukumuku, Dewpider, Pincurchin, Sizzlipede, Salandit families and Alolan Exeggutor.
- Multiple Graphical Tweaks by @SonikkuA-DatH in https://github.com/rh-hideout/pokeemerald-expansion/pull/3127
- Added 2nd frames to Castform, Spinda (with help by @shinydragonhunter) and Cherrim.
- Added Castform’s Pokémon HOME shiny palettes.
- Adjusted Spheal’s 2nd frame and restored vanilla Emerald’s speen.
Changed
General
- Set GEN_LATEST to GEN_9 by default by @AsparagusEduardo in https://github.com/rh-hideout/pokeemerald-expansion/pull/3186
- Make -fanalyzer optional by @SBird1337 in https://github.com/rh-hideout/pokeemerald-expansion/pull/3265
- Updated Big Nugget’s Fling power to Gen 8+ by @AsparagusEduardo in https://github.com/rh-hideout/pokeemerald-expansion/pull/3296
Graphical changes
- Adjusted Pokemon sprites and palettes - Part 1 by @CyanSMP64 in https://github.com/rh-hideout/pokeemerald-expansion/pull/3235
- 0001 Bulbasaur to 0080 Slowbro
Refactors
- Inlined fixed Point Math by @SBird1337 in https://github.com/rh-hideout/pokeemerald-expansion/pull/3115
- Refactors battle damage modifier calculations to use the new functions in order to improve readability and performance.
- Fixes by @SBird1337 in https://github.com/rh-hideout/pokeemerald-expansion/pull/3125
- Refactored damage formula to match Gen5+ by @SBird1337 in https://github.com/rh-hideout/pokeemerald-expansion/pull/3196
- Gamefreak often times rounds down on n.5 in their fixed point mathematics.
- Fixed point arithmetic (multiplication) is not associative, this changes the order of operations to match the original games.
- A lot of the damage calculation function was quite messy, some aspects were factored in at the wrong place.
- The main damage calculation should now be clearer to read.
- Removed Vanilla trainer structs, converted trainer data to use the custom struct by @AsparagusEduardo in https://github.com/rh-hideout/pokeemerald-expansion/pull/3114
- Removed the sTMHMMoves array and made TMs/HMs read moves from their secondaryId item field by @LOuroboros in https://github.com/rh-hideout/pokeemerald-expansion/pull/3243
- Converted move flags and bans into GCC bitfields by @AsparagusEduardo in https://github.com/rh-hideout/pokeemerald-expansion/pull/2952
- Fixes by by @PCG06 in https://github.com/rh-hideout/pokeemerald-expansion/pull/3229
- Added bitfields for moves that fail with Me First and Gravity.
- Inverted certain logic and flags, since there are more moves that are affected by them than not.
- Protect
- Mirror Move
- King’s Rock
- Assist uses Copycat’s flag + the 2 additional move effects banned by it.
EFFECT_SEMI_INVULNERABLEEFFECT_SKY_DROP
- Made a separate config for move flag changes:
B_UPDATED_MOVE_FLAGS. - Adds
IS_MOVE_RECOILto help recoil move checks. - Adds functions to account for the
flagsfield being removed alongsideTestMoveFlagsandTestMoveFlagsInMoveset. - Adds
sParentalBondBannedEffectsto streamline adding new moves. - Unified multi-strike move flags by @AsparagusEduardo in https://github.com/rh-hideout/pokeemerald-expansion/pull/3126
- Some
gActiveBattlerfixes by @ghoulslash in https://github.com/rh-hideout/pokeemerald-expansion/pull/3259 - Got rid of the
gActiveBattlervariable by @DizzyEggg in https://github.com/rh-hideout/pokeemerald-expansion/pull/3262 - Scale Shot now uses Multi-hit Moves’ canceller by @AlexOn1ine in https://github.com/rh-hideout/pokeemerald-expansion/pull/3290
- Callnative functions now take ScriptContext arguments to allow using macros with .byte fields similar to vanilla battle script functions by @ghoulslash in https://github.com/rh-hideout/pokeemerald-expansion/pull/3294
- Converted some
VARIOUSs tocallnatives by @AsparagusEduardo in https://github.com/rh-hideout/pokeemerald-expansion/pull/3269 - Refactored battle terrain text string tables and removed
EFFECT_REMOVE_TERRAINby @LOuroboros in https://github.com/rh-hideout/pokeemerald-expansion/pull/3247
Move animations
- New Wood Hammer animation by @SBird1337 in https://github.com/rh-hideout/pokeemerald-expansion/pull/3192
Battle AI
- Added AI delay timer by @DizzyEggg in https://github.com/rh-hideout/pokeemerald-expansion/pull/3302
- Fixed
AI_WhoStrikesFirstconsidering status priority moves when it shouldn’t by @Joggel19 in https://github.com/rh-hideout/pokeemerald-expansion/pull/3064 - Fixed Beat Up Gen5+ AI damage calculation by @ghoulslash in https://github.com/rh-hideout/pokeemerald-expansion/pull/3104
- Improved AI switching, so it doesn’t get killed on switch-in by @DizzyEggg in https://github.com/rh-hideout/pokeemerald-expansion/pull/3146
- Added missing absorbing abilities to
FindMonThatAbsorbsOpponentsMoveby @Pawkkie in https://github.com/rh-hideout/pokeemerald-expansion/pull/3218 - Prevent certain status moves when item is known + Fake Out changes by @AlexOn1ine in https://github.com/rh-hideout/pokeemerald-expansion/pull/3219
- Improve AI switching with bad moves by @DizzyEggg in https://github.com/rh-hideout/pokeemerald-expansion/pull/3213
- Fixed
CanTargetFaintAiindex issue by @AlexOn1ine in https://github.com/rh-hideout/pokeemerald-expansion/pull/3306 - Transform updates
AI_PARTYdata by @ghoulslash in https://github.com/rh-hideout/pokeemerald-expansion/pull/3295 - Greatly reduce AI lag by @DizzyEggg in https://github.com/rh-hideout/pokeemerald-expansion/pull/3308
Cleanup
- Changed a lot of variables to
u32in order to speed up processes and AI - Simplify/Clean battle controllers code by @DizzyEggg in https://github.com/rh-hideout/pokeemerald-expansion/pull/3202
- Cleaned up remaining Castform hack code by @AsparagusEduardo in https://github.com/rh-hideout/pokeemerald-expansion/pull/3063
- Cleaned experience gain logic by @DizzyEggg in https://github.com/rh-hideout/pokeemerald-expansion/pull/3339
- Removed debug item effect override by @DizzyEggg in https://github.com/rh-hideout/pokeemerald-expansion/pull/3106
- By @AsparagusEduardo in https://github.com/rh-hideout/pokeemerald-expansion/pull/2952
- Removes unused
BattleScript_EffectStompandEFFECT_FLINCH_MINIMIZE_HIT. - Removes unused
BattleScript_FlinchEffect - Removes reduntant
EFFECT_TWISTERwhich was a copy ofEFFECT_FLINCH_HIT. - Fixes missing uses of
MOVE_UNAVAILABLEinbattle_ai_util.c. - Removed
sMovesNotAffectedByStenchin favor of checking for moves with Flinch chance. - Added
EFFECT_GEOMANCYtoIsTwoTurnsMove.
- Removes unused
- Animation script cleanup and fixes by @AsparagusEduardo in:
- Reverted BattleMove power to u8 by @AsparagusEduardo in https://github.com/rh-hideout/pokeemerald-expansion/pull/3187
- Optimize sprite.c by @mrgriffin in https://github.com/rh-hideout/pokeemerald-expansion/pull/3175
- Removed unused itemId field by @AsparagusEduardo in https://github.com/rh-hideout/pokeemerald-expansion/pull/3293
- Removed unused
EFFECT_UNUSED_125by @AlexOn1ine in https://github.com/rh-hideout/pokeemerald-expansion/pull/3290 - Removed redundant side macros/funcs by @gruxor and @DizzyEggg in https://github.com/rh-hideout/pokeemerald-expansion/pull/3299
GET_BATTLER_SIDE(replaced byGetBattlerSide)GET_BATTLER_SIDE2(replaced byGetBattlerSide)GetBattlerPosition(replaced by direct call togBattlerPositions)
- Added missing return in
IsBattlerGroundedby @DizzyEggg in https://github.com/rh-hideout/pokeemerald-expansion/pull/3328 GetBattlerHoldEffectusage optimizations by @AsparagusEduardo in https://github.com/rh-hideout/pokeemerald-expansion/pull/3330
Fixed
Softlocks
- Disabled species now default their graphics to
SPECIES_NONE, preventing softlocks when trying to load graphical data for disabled species by @AsparagusEduardo in https://github.com/rh-hideout/pokeemerald-expansion/pull/3116 - Fixed debug menu memory overflow when reducing
PC_ITEMS_COUNTto a value below 19 by @Bassoonian in https://github.com/rh-hideout/pokeemerald-expansion/pull/3154 - Fixed Ice Spinner logic causing a softlock by @LOuroboros in https://github.com/rh-hideout/pokeemerald-expansion/pull/3247
- Fixed “Daycare Egg” debug option generating invalid eggs when parents in the Daycare aren’t compatible or are missing by @DizzyEggg in https://github.com/rh-hideout/pokeemerald-expansion/pull/3335
General
- Fixed female Basculegion missing from the cry table by @Bassoonian in https://github.com/rh-hideout/pokeemerald-expansion/pull/3242
- Fixed preproc config for Diamond Storm by @LOuroboros in https://github.com/rh-hideout/pokeemerald-expansion/pull/3052
- Fixed null dereferencing errors with -fanalyzer on modern by @gruxor in https://github.com/rh-hideout/pokeemerald-expansion/pull/3165
- Fixed “Fill PC” debug option giving all mon Bulbasaur’s moves by @AsparagusEduardo in https://github.com/rh-hideout/pokeemerald-expansion/pull/2815
- Fixed some Hisuian Pokémon abilities to Gen 9 data by @AaghatIsLive in https://github.com/rh-hideout/pokeemerald-expansion/pull/3292
Graphics
- Killed the bKGD invalid index warnings and fixed the bit depth of the species sprites by @LOuroboros in https://github.com/rh-hideout/pokeemerald-expansion/pull/3051
- Tweaks by @AsparagusEduardo in https://github.com/rh-hideout/pokeemerald-expansion/pull/3205
- Fixed item sprites with palette errors by @gruxor in https://github.com/rh-hideout/pokeemerald-expansion/pull/3222
- Fixed Mega Venusaur icon to match regular Venusaur by @SubzeroEclipse in https://github.com/rh-hideout/pokeemerald-expansion/pull/3137
- Fixed Wailord icon sprite by @SubzeroEclipse in https://github.com/rh-hideout/pokeemerald-expansion/pull/3183
- Fixed overworld snow weather by @kittenchilly in https://github.com/rh-hideout/pokeemerald-expansion/pull/3241
Battle Mechanics
- General
- By @AsparagusEduardo in https://github.com/rh-hideout/pokeemerald-expansion/pull/2952
- Fixed Stench/King’s Rock interaction.
- Fixed Wandering Spirit skipping contact checks.
- Reset all battler IDs at battle start by @ghoulslash in https://github.com/rh-hideout/pokeemerald-expansion/pull/3111
- Fixed GetBattleAnimMoveTargets logic by @ghoulslash in https://github.com/rh-hideout/pokeemerald-expansion/pull/3278
- Fixed Magnet Rise animation moving the partner in double battles by @AlexOn1ine in https://github.com/rh-hideout/pokeemerald-expansion/pull/3280
- Fixed Status Z-Moves’ effect descriptions being cut off by @gabrielcowley in https://github.com/rh-hideout/pokeemerald-expansion/pull/3286
- By @kittenchilly in https://github.com/rh-hideout/pokeemerald-expansion/pull/3301
- Fixed traded Pokémon experience boost being applied twice.
- Fixed experience calculation inaccuracies.
- By @AsparagusEduardo in https://github.com/rh-hideout/pokeemerald-expansion/pull/2952
- Move effects
- Fixed
ABILITYEFFECT_ON_TERRAINsettinggBattlerAbilityincorrectly by @ghoulslash in https://github.com/rh-hideout/pokeemerald-expansion/pull/2796 - Fixed
TryChangeBattleTerrainoverwritinggBattlerAttackerby @ghoulslash in https://github.com/rh-hideout/pokeemerald-expansion/pull/2796 - Fixed Teatime skipping non-player Pokémon by @hetoord in https://github.com/rh-hideout/pokeemerald-expansion/pull/3096
- Fixed Pursuit commands check its move ID instead of its effect ID by @LOuroboros in https://github.com/rh-hideout/pokeemerald-expansion/pull/3231
- Fixed Fling issues by @DizzyEggg in https://github.com/rh-hideout/pokeemerald-expansion/pull/3191
- No longer consumes the item if user is fast asleep or paralyzed.
- When the user has no item, the “But it failed!” message no longer overwrites other messages like “X was fully paralyzed”
- Maranga and Kee Berries have their effects when being flung.
- Fixed Leppa Berry not recovering PP when being eaten by Bug Bite by @DizzyEggg in https://github.com/rh-hideout/pokeemerald-expansion/pull/3282
- Fixed Seed Sower in Double Battles by @ghoulslash in https://github.com/rh-hideout/pokeemerald-expansion/pull/2796
- Fixed Seed Sower changing move targets when triggered in double battles by @DizzyEggg in https://github.com/rh-hideout/pokeemerald-expansion/pull/3341
- Fixed Protect issues by @DizzyEggg in https://github.com/rh-hideout/pokeemerald-expansion/pull/3321
- Recoil moves no longer cause recoil damage if the target protected
- Fixed Multi-hit moves being able to hit a protected target past the first hit.
- Fixed Multi-hit moves decreasing speed on each hit when the target uses Silk Trap.
- Fixed
- Ability effects
- Fixed potential bug with weather and terrain ABILITYEFFECT ids by @ghoulslash in https://github.com/rh-hideout/pokeemerald-expansion/pull/3083
- Fixed Battle bond not triggering when KOing an ally by @DizzyEggg in https://github.com/rh-hideout/pokeemerald-expansion/pull/3279
- Fixed Toxic Debris issues that other effects to not trigger by @AlexOn1ine in https://github.com/rh-hideout/pokeemerald-expansion/pull/3306
- Fixed Toxic Debris not being able to set up 2 layers of Toxic Spikes by @AlexOn1ine in https://github.com/rh-hideout/pokeemerald-expansion/pull/3306
- Fixed Toxic Debris not triggering when user faints by @AlexOn1ine in https://github.com/rh-hideout/pokeemerald-expansion/pull/3323
- Item effects
- Fixed Metronome’s damage multiplier by @SBird1337 in https://github.com/rh-hideout/pokeemerald-expansion/pull/3246
Test Runner
General
- Fixed tests breaking on modern by @DizzyEggg in https://github.com/rh-hideout/pokeemerald-expansion/pull/3319
Tests added for:
- Move Effects
- By @LOuroboros in https://github.com/rh-hideout/pokeemerald-expansion/pull/2870
- Axe Kick
- Infernal Parade
- Take Heart
- Triple Arrows
- Teatime by @hetoord in https://github.com/rh-hideout/pokeemerald-expansion/pull/3096
- By @AlexOn1ine in https://github.com/rh-hideout/pokeemerald-expansion/pull/3147
- Spin Out
- Make It Rain
- Collision Course/Electro Drift
- By @AlexOn1ine in https://github.com/rh-hideout/pokeemerald-expansion/pull/3178
- Mortal Spin
- Population Bomb
- Fling by @DizzyEggg in https://github.com/rh-hideout/pokeemerald-expansion/pull/3191
- Leppa Berry interaction by @DizzyEggg in https://github.com/rh-hideout/pokeemerald-expansion/pull/3282
- Bug Bite by @DizzyEggg in https://github.com/rh-hideout/pokeemerald-expansion/pull/3282
- Multi-hit moves by @AlexOn1ine in https://github.com/rh-hideout/pokeemerald-expansion/pull/3290
- Protect by @DizzyEggg in https://github.com/rh-hideout/pokeemerald-expansion/pull/3321
- Fixed Protect tests failing on
upcomingby @DizzyEggg in https://github.com/rh-hideout/pokeemerald-expansion/pull/3348
- Fixed Protect tests failing on
- By @LOuroboros in https://github.com/rh-hideout/pokeemerald-expansion/pull/2870
- Item Effects
- Metronome by @SBird1337 in https://github.com/rh-hideout/pokeemerald-expansion/pull/3246
- Status-curing berries by @AlexOn1ine in https://github.com/rh-hideout/pokeemerald-expansion/pull/3289
- Gen 4+ Enigma Berry by @kittenchilly in https://github.com/rh-hideout/pokeemerald-expansion/pull/3300
- Fling/Bug Bite interaction by @DizzyEggg in https://github.com/rh-hideout/pokeemerald-expansion/pull/3311
- Ability Effects
- Battle bond by @DizzyEggg in https://github.com/rh-hideout/pokeemerald-expansion/pull/3279
- Toxic Debris by @AlexOn1ine in https://github.com/rh-hideout/pokeemerald-expansion/pull/3306
- Additional test by @AlexOn1ine in https://github.com/rh-hideout/pokeemerald-expansion/pull/3323
Pret merges:
- Pret merge (2023/08/31) by @AsparagusEduardo in https://github.com/rh-hideout/pokeemerald-expansion/pull/3268
- VAR_TEMP aliases
- TM and HM item constants by their move name without numbers.
- Stat change documentation.
- Factory Menu + Dome Tourney documentation.
- Berry Fix Documentation.
- Missing uses of
DISPLAY_WIDTHandDISPLAY_HEIGHT. - Static assertion for Battle Palace Flags.
- Static assertion for Rotating Gates.
- Automatic increase of
TEXT_BUFF_ARRAY_COUNTandPOKEMON_NAME_BUFFER_SIZE. - Proper
bravoTrainerTowerdocumentation. - Birth Island Rock documentation.
- 6 new bugfixes.
- Pret merge (2023/09/26) by @AsparagusEduardo in https://github.com/rh-hideout/pokeemerald-expansion/pull/3347
- Add include guards for assembly constants files
- Add
blockBoxRSfield toBoxPokemonstruct - Bugfix for abilities affecting wild encounter tables
- Fixes a potential buffer overread in
TryGetAbilityInfluencedWildMonIndex. The bug can occur if an electric type mon is in the first slots of a fishing encounter table and the player carries a mon with theABILITY_STATICability. This never happens in the vanilla codebase.
- Fixes a potential buffer overread in
- Add missing constant usage in
m4a_1
New Contributors
- @Joggel19 made their first contribution in https://github.com/rh-hideout/pokeemerald-expansion/pull/3064
- @PacFire made their first contribution in https://github.com/rh-hideout/pokeemerald-expansion/pull/3078
- @CyanSMP64 made their first contribution in https://github.com/rh-hideout/pokeemerald-expansion/pull/3149
- @PCG06 made their first contribution in https://github.com/rh-hideout/pokeemerald-expansion/pull/3229
- @gabrielcowley made their first contribution in https://github.com/rh-hideout/pokeemerald-expansion/pull/3286
Full Changelog: https://github.com/rh-hideout/pokeemerald-expansion/compare/expansion/1.5.3...expansion/1.6.0
Version 1.5.3
## How to update
- If you haven't set up a remote, run the command `git remote add RHH https://github.com/rh-hideout/pokeemerald-expansion`.
- Once you have your remote set up, run the command `git pull RHH expansion/1.5.3`.
CRITICAL FIX, please update to avoid the issues detailed down below:
- Fixed memory corruption when handling trigger sprites by @SBird1337 in https://github.com/rh-hideout/pokeemerald-expansion/pull/3238
- This had the posibility of manifesting in weird ways, like camera and music changes, NPC duplication and more. If you’ve had this issue in the past, we heavily recommend you update to this version of the expansion.
- Thank you @Bassoonian for helping us pinpointing the issue.
Fixed
Battle Mechanics
- General
- Fixed wild double battles with an in-game partner using
multi_fixed_wild, by @DizzyEggg in https://github.com/rh-hideout/pokeemerald-expansion/pull/3210 - Corrected conditionals used for
B_SPEED_BUFFING_RAPID_SPINandI_GEM_BOOST_POWERby @LOuroboros in https://github.com/rh-hideout/pokeemerald-expansion/pull/3232 - Fixed being unable to use a Z-Move when a previous mon in the player’s team Mega Evolved, by @kittenchilly in https://github.com/rh-hideout/pokeemerald-expansion/pull/3233
- Fixed wild double battles with an in-game partner using
- Move effects
- Fixed Jump Kick’s recoil happening before Spiky Shield’s damage by @DizzyEggg in https://github.com/rh-hideout/pokeemerald-expansion/pull/3208
Test Runner
Changed
- Organized tests into subfolders by @AsparagusEduardo in https://github.com/rh-hideout/pokeemerald-expansion/pull/2822
Fixed
- Fixed certain tests failing when Inverse Battle battle flag was defined, by @mrgriffin in https://github.com/rh-hideout/pokeemerald-expansion/pull/3215
New Contributors
- @kittenchilly made their first contribution in https://github.com/rh-hideout/pokeemerald-expansion/pull/3233
Full Changelog: https://github.com/rh-hideout/pokeemerald-expansion/compare/expansion/1.5.2...expansion/1.5.3
Version 1.5.2
## How to update
- If you haven't set up a remote, run the command `git remote add RHH https://github.com/rh-hideout/pokeemerald-expansion`.
- Once you have your remote set up, run the command `git pull RHH expansion/1.5.2`.
Changed
General
- Added config for Gem boost multiplier by @AlexOn1ine in https://github.com/rh-hideout/pokeemerald-expansion/pull/3144
Refactors
- Revamped GetTotalAccuracy by @LOuroboros in https://github.com/rh-hideout/pokeemerald-expansion/pull/3182
Fixed
Softlocks
- Fixed Z-Moves softlocking when their Z-Move effect failed to apply, by @DizzyEggg in https://github.com/rh-hideout/pokeemerald-expansion/pull/3108
Graphics
- Fixed ability pop-up not properly clearing the previous text, by @DizzyEggg in https://github.com/rh-hideout/pokeemerald-expansion/pull/3107
- Fixed wrong color in stat move animation by @DizzyEggg in https://github.com/rh-hideout/pokeemerald-expansion/pull/3161
- Fixed copyright screen not showing up on certain emulators by @DizzyEggg in https://github.com/rh-hideout/pokeemerald-expansion/pull/2664
Battle Mechanics
- General
- Primal Reversion
- Fixed it not activating when switching in after a fainting by @DizzyEggg in https://github.com/rh-hideout/pokeemerald-expansion/pull/3141
- Fixed it not activating when switching in after Eject Button by @DizzyEggg in https://github.com/rh-hideout/pokeemerald-expansion/pull/3141
- Fixed enemy parties not reverting to their original form post-battle by @AsparagusEduardo in https://github.com/rh-hideout/pokeemerald-expansion/pull/3150
- Fixed OTGender not being set in
FillPartnerParty, by @AlexOn1ine in https://github.com/rh-hideout/pokeemerald-expansion/pull/3163 - Fixed missing use of
CustomTrainerPartyAssignMovesinFillPartnerParty, by @AlexOn1ine in https://github.com/rh-hideout/pokeemerald-expansion/pull/3163 - Fixed trainer slide messages appearing for frontier trainers, by @DizzyEggg in https://github.com/rh-hideout/pokeemerald-expansion/pull/3162
- Fixed
jumpifsideaffectingpotentially returning the wrong side by @LOuroboros in https://github.com/rh-hideout/pokeemerald-expansion/pull/3200 - Fixed Trainer class balls not being assigned past the first Pokémon by @SubzeroEclipse in https://github.com/rh-hideout/pokeemerald-expansion/pull/3203
- Primal Reversion
- Move effects
- Fixed Multi-Hit moves only hitting once and powder moves affecting Grass types when called via Metronome or Mirror Move, by @DizzyEggg in https://github.com/rh-hideout/pokeemerald-expansion/pull/3135
- Fixed Teleport ending trainer battles, by @AlexOn1ine in https://github.com/rh-hideout/pokeemerald-expansion/pull/3166
- Ability effects
- Fixed multiple issues with Bad Dreams’ ability pop-up, by @DizzyEggg in https://github.com/rh-hideout/pokeemerald-expansion/pull/3131
- Fixed it activating even if there were no sleeping opponents.
- Fixed lag issue that caused it to not hide smoothly.
- Fixed it staying on screen if it fainted a target.
- Fixed Protosynthesis and Quark Drive boost amounts by @AlexOn1ine in https://github.com/rh-hideout/pokeemerald-expansion/pull/3139
- Fixed multiple issues with Primal Weather abilities by @DizzyEggg in https://github.com/rh-hideout/pokeemerald-expansion/pull/3138
- Fixed printing “move missed” message for cancelled moves.
- Fixed ‘move failed because of weather’ printing twice if it were going to hit multiple targets (eg. Surf).
- Fixed ‘move failed because of weather’ printing if the mon was confused/paralyzed/asleep.
- Fixed ‘move failed because of weather’ printing when failing multiple times in a row.
- Fixed Sticky Web/Mirror Armor’s interaction, by @DizzyEggg in https://github.com/rh-hideout/pokeemerald-expansion/pull/3160
- Fixed multiple issues with Bad Dreams’ ability pop-up, by @DizzyEggg in https://github.com/rh-hideout/pokeemerald-expansion/pull/3131
- Item effects
- Fixed Gem boost only applying to the first hit of a Multi-Hit move by @AlexOn1ine in https://github.com/rh-hideout/pokeemerald-expansion/pull/3144
- Fixed Utility Umbrella damage calculations by @AsparagusEduardo in https://github.com/rh-hideout/pokeemerald-expansion/pull/2835
- Fixed Ruin ability damage modifiers, by @AlexOn1ine in https://github.com/rh-hideout/pokeemerald-expansion/pull/3171
Battle AI
- Fixed Rollout’s and Fury Cutter’s AI power calculation by @DizzyEggg in https://github.com/rh-hideout/pokeemerald-expansion/pull/3110
- Fixed how AI categorizes weak moves by @DizzyEggg in https://github.com/rh-hideout/pokeemerald-expansion/pull/3109
- AI now gives priority to moves that always hit if the opponent’s evasion increases or the AI’s accuracy is reduced by @DizzyEggg in https://github.com/rh-hideout/pokeemerald-expansion/pull/3109
Pret merges:
- 23-07-25 by @mrgriffin in https://github.com/rh-hideout/pokeemerald-expansion/pull/3176
- Remove unused macro to fix syntax highlights https://github.com/pret/pokeemerald/pull/1899
- Update msys2 instructions https://github.com/pret/pokeemerald/8ec0bff0342413ac4996b63382c8d03a3b532899
- Fix priortiy typos https://github.com/pret/pokeemerald/pull/1900
- Declarations for 2- and 3-argument GetMonData https://github.com/pret/pokeemerald/pull/1756
- Detect potential misalignment in modern https://github.com/pret/pokeemerald/pull/1901
Test Runner
Changed
- Failed tests are now listed in the total, by @AsparagusEduardo in https://github.com/rh-hideout/pokeemerald-expansion/pull/3073
- Hydra now respects -jN by @mrgriffin in https://github.com/rh-hideout/pokeemerald-expansion/pull/3132
- Test runner test runner crashes are now detected by @mrgriffin in https://github.com/rh-hideout/pokeemerald-expansion/pull/3129
- Random functions that exclude elements based on conditions. Used by Metronome, multi-hit moves, and Loaded Dice by @mrgriffin in https://github.com/rh-hideout/pokeemerald-expansion/pull/3159
Fixed
- Fixed fixedPopup not being cleared while gTestRunnerHeadless is active, which caused some tests to fail on CI but not locally by @mrgriffin in https://github.com/rh-hideout/pokeemerald-expansion/pull/3133
Tests added for:
- General
- Primal Reversion, by @DizzyEggg in https://github.com/rh-hideout/pokeemerald-expansion/pull/3141
- Rain weather, by @AsparagusEduardo in https://github.com/rh-hideout/pokeemerald-expansion/pull/2835
- Sun weather, by @AsparagusEduardo in https://github.com/rh-hideout/pokeemerald-expansion/pull/2835
- Ability Effects
- Bad Dreams, by @DizzyEggg in https://github.com/rh-hideout/pokeemerald-expansion/pull/3131
- Tablets of Ruin by @AlexOn1ine in https://github.com/rh-hideout/pokeemerald-expansion/pull/3171
- Swords of Ruin by @AlexOn1ine in https://github.com/rh-hideout/pokeemerald-expansion/pull/3171
- Vessel of Ruin by @AlexOn1ine in https://github.com/rh-hideout/pokeemerald-expansion/pull/3171
- Beads of Ruin by @AlexOn1ine in https://github.com/rh-hideout/pokeemerald-expansion/pull/3171
- Primordial Sea by @DizzyEggg in https://github.com/rh-hideout/pokeemerald-expansion/pull/3138
- Desolate Land by @DizzyEggg in https://github.com/rh-hideout/pokeemerald-expansion/pull/3138
- Mirror Armor by @DizzyEggg in https://github.com/rh-hideout/pokeemerald-expansion/pull/3160
- Move Effects
- Metronome, by @DizzyEggg in https://github.com/rh-hideout/pokeemerald-expansion/pull/3135
- Mirror move, by @DizzyEggg in https://github.com/rh-hideout/pokeemerald-expansion/pull/3135
- Hydro Steam, by @AsparagusEduardo in https://github.com/rh-hideout/pokeemerald-expansion/pull/2835
- Sticky web by @DizzyEggg in https://github.com/rh-hideout/pokeemerald-expansion/pull/3160
- Court Change by @DizzyEggg in https://github.com/rh-hideout/pokeemerald-expansion/pull/3160
- Item Effects
- Utility Umbrella, by @AsparagusEduardo in https://github.com/rh-hideout/pokeemerald-expansion/pull/2835
Full Changelog: https://github.com/rh-hideout/pokeemerald-expansion/compare/expansion/1.5.1...expansion/1.5.2
Version 1.5.1
## How to update
- If you haven't set up a remote, run the command `git remote add RHH https://github.com/rh-hideout/pokeemerald-expansion`.
- Once you have your remote set up, run the command `git pull RHH expansion/1.5.1`.
Changed
General
- Easy Chat always shows words in uppercase by @AsparagusEduardo in https://github.com/rh-hideout/pokeemerald-expansion/pull/3050
Fixed
General
- Fixed Hisuian mon not evolving by @AsparagusEduardo in https://github.com/rh-hideout/pokeemerald-expansion/pull/3047
- Fixed regional forms not breeding correctly by @AsparagusEduardo in https://github.com/rh-hideout/pokeemerald-expansion/pull/3047
- Fixed Sylveon’s evolution method not requiring Friendship by @AsparagusEduardo in https://github.com/rh-hideout/pokeemerald-expansion/pull/3048
- Fixed being able to sell TMs set as reusable by @AsparagusEduardo in https://github.com/rh-hideout/pokeemerald-expansion/pull/3049
- Fixed shadows in Pokémon sprite viewer when toggling shininess by @gruxor in https://github.com/rh-hideout/pokeemerald-expansion/pull/3094
Softlocks
- Added safeguard for move animations to not create new sprites in case the maximum has been reached, which would lock the game by @DizzyEggg in https://github.com/rh-hideout/pokeemerald-expansion/pull/3084
- Changed Mega indicator sprites from 3 per battler to 1 per battler by @DizzyEggg in https://github.com/rh-hideout/pokeemerald-expansion/pull/3087
- Fixed the debug menu not removing list menu task, causing eventual softlock if used too many times, like when giving items/Pokémon by @DizzyEggg in https://github.com/rh-hideout/pokeemerald-expansion/pull/3088
Graphics
- Fixed Ball shortcut graphics moving offsync by @voloved in https://github.com/rh-hideout/pokeemerald-expansion/pull/3042
Battle Mechanics
- General
- Fixed disobedience not resetting move effects, causing the opponent getting stat changes originally for the player by @DizzyEggg in https://github.com/rh-hideout/pokeemerald-expansion/pull/3089
- Fix graphical/exp bugs with 2 vs 1 trainer battles by @DizzyEggg in https://github.com/rh-hideout/pokeemerald-expansion/pull/3105
- Item effects
- Fixed Clear Amulet showing ability popup and message when nullifying stat reducing effects by @AlexOn1ine in https://github.com/rh-hideout/pokeemerald-expansion/pull/3074
Battle AI
- Fixed Baton Pass sending an invalid mon when Ace mon is the last one alive by @AlexOn1ine in https://github.com/rh-hideout/pokeemerald-expansion/pull/3067
- Fixed overflow when AI chooses a new Pokemon to send out by @Pawkkie in https://github.com/rh-hideout/pokeemerald-expansion/pull/3068
Battle Tests
Added
- Test Runner support for illegal abilities by @AgustinGDLV in https://github.com/rh-hideout/pokeemerald-expansion/pull/3045
- This should NOT be used for test PRs unless the ability to test isn’t available on any Pokémon.
- Added tests for
- Items
- Air Balloon by @hetoord in https://github.com/rh-hideout/pokeemerald-expansion/pull/3071
- Clear Amulet by @AlexOn1ine in https://github.com/rh-hideout/pokeemerald-expansion/pull/3074
- Full ability tests for Scrappy, Own Tempo and Inner Focus by @AlexOn1ine in https://github.com/rh-hideout/pokeemerald-expansion/pull/3074
- Intimidate being blocked by Clear Body, Full Metal Body, Hyper Cutter and White Smoke by @AlexOn1ine in https://github.com/rh-hideout/pokeemerald-expansion/pull/3074
- Items
Changed
- Minor test changes by @mrgriffin in https://github.com/rh-hideout/pokeemerald-expansion/pull/3072
- Regularizes the whitespace.
- Removes unnecessary
;s after}s. - Parametrizes
item_effect_restore_hp.cand usesI_HEALTH_RECOVERYeverywhere. - Inlines uses of macros where I think it makes the test easier to follow.
- Use 3-arg
PASSES_RANDOMLYin the Snow + Blizzard test (improves performance). - More conservative
unlinkerror reporting. Ctrl-C inmake checkshould not complain about being unable to unlink ROMs which weren’t created yet. - Better names for the ROMs in
/tmp. - Prints the test runner number in Hydra, making it easier to track down bugs involving state leaking from a test to the following tests.
- Simplify
TO_DO_BATTLE_TEST’s implementation. - Introduce a
TearDownBattlefunction which was repeated twice.
Fixed
- Marks test as invalid if there’s more than one PASSES_RANDOMLY in a single test by @mrgriffin in https://github.com/rh-hideout/pokeemerald-expansion/pull/3065
- Fixed non-battle tests omitting errors when failing by @mrgriffin and @AsparagusEduardo in https://github.com/rh-hideout/pokeemerald-expansion/pull/3076
- Fixed non-battle tests showing false positive memory leak errors due to the test failing for a different cause by @mrgriffin and @AsparagusEduardo in https://github.com/rh-hideout/pokeemerald-expansion/pull/3076
- Fixed “Pastel Veil immediately cures Mold Breaker poison” test by @AlexOn1ine in https://github.com/rh-hideout/pokeemerald-expansion/pull/3074
Latest pret commit:
https://github.com/pret/pokeemerald/commit/9c4a59f865360b7d6e0dede0e52812b897526588
New Contributors
- @Pawkkie made their first contribution in https://github.com/rh-hideout/pokeemerald-expansion/pull/3068
- @voloved made their first contribution in https://github.com/rh-hideout/pokeemerald-expansion/pull/3042
Full Changelog: https://github.com/rh-hideout/pokeemerald-expansion/compare/expansion/1.5.0...expansion/1.5.1
Version 1.5.0
## How to update
- If you haven't set up a remote, run the command `git remote add RHH https://github.com/rh-hideout/pokeemerald-expansion`.
- Once you have your remote set up, run the command `git pull RHH expansion/1.5.0`.
Added
General
- Mega Evolution and Primal Reversion now play the Pokémon’s cry in its animation by @DizzyEggg in https://github.com/rh-hideout/pokeemerald-expansion/pull/2805
- Added Meltan and Melmetal teachable moves by @DizzyEggg in https://github.com/rh-hideout/pokeemerald-expansion/pull/2732
- Added option to clear PC boxes in Debug menu @LOuroboros in https://github.com/rh-hideout/pokeemerald-expansion/pull/2814
- Added missing Hisuian sprites and cries by @AlexOn1ine in https://github.com/rh-hideout/pokeemerald-expansion/pull/2725 and https://github.com/rh-hideout/pokeemerald-expansion/pull/2829
- Implement Customizable NPC Trainer Parties by @SBird1337 in https://github.com/rh-hideout/pokeemerald-expansion/pull/2733.
- Further fixes by
- Nickname, EVs, IVs, moves, species, held item, ability, level, ball, friendship, nature, gender and shininess can all be customized.
- IMPORTANT: In a future version, we’ll remove vanilla Trainer structs, so make sure to port your custom trainers to this system before then.
- Overworld Poison configs by @Bassoonian in https://github.com/rh-hideout/pokeemerald-expansion/pull/2884
- Gen 3: Health gets depleted every couple of steps and can faint from it.
- Gen 4: Health gets depleted every couple of steps, but once it reaches 1 HP it disappears.
- Gen 5+: Health does not get depleted at all.
- Reusable TMs by @Bassoonian in https://github.com/rh-hideout/pokeemerald-expansion/pull/2903 and https://github.com/rh-hideout/pokeemerald-expansion/pull/2930
- TMs are automatically counted as reusable when their importance is set to 1.
- Added config to toggle vanilla TMs’ importance to 1.
- Shops will only allow to buy a reusable TM if the player doesn’t already have one.
- Added config for setting the max amount of EVs to Gen6+’s (252) by @citrusbolt in https://github.com/rh-hideout/pokeemerald-expansion/pull/2825
- Added config for Gen 4’s berry EV-stat lowering behavior by @citrusbolt in https://github.com/rh-hideout/pokeemerald-expansion/pull/2825
- Added new conditions for the trainer slide-in system by @LOuroboros in https://github.com/rh-hideout/pokeemerald-expansion/pull/2713
- Added config for Gen 4’s transformed Pokémon using the opponent’s palette instead of its own by @Ultimate-Bob in https://github.com/rh-hideout/pokeemerald-expansion/pull/2852
- Breeding features by @Bassoonian in https://github.com/rh-hideout/pokeemerald-expansion/pull/2963
- Father TM Move inheritance (with config).
- Mother Egg Move inheritance (with config).
- Nature inheritance using an Everstone (with config).
- Ability inheritance (with config).
- Parent Egg Move transfer (with config).
- Power Item IV inheritance.
- Added Ability Patch’s Gen 9 functionality by @fdeblasio in https://github.com/rh-hideout/pokeemerald-expansion/pull/2989
- Added Gen 4-6 Pokemon back animations by @SonikkuA-DatH in https://github.com/rh-hideout/pokeemerald-expansion/pull/2954
Battle General
- Support for multi battles where Trainer has only one mon by @DizzyEggg in https://github.com/rh-hideout/pokeemerald-expansion/pull/2670
- Added
B_RESTORE_HELD_BATTLE_ITEMSthat restore non-berry single-use items after a battle by @AlexOn1ine in https://github.com/rh-hideout/pokeemerald-expansion/pull/2932 - Added Frostbite status by @Bassoonian in https://github.com/rh-hideout/pokeemerald-expansion/pull/2942, with fix by @AsparagusEduardo in https://github.com/rh-hideout/pokeemerald-expansion/pull/3019
- Added Snow Battle Weather by @CallmeEchoo in https://github.com/rh-hideout/pokeemerald-expansion/pull/2970
- Added
B_DOUBLE_WILD_REQUIRE_2_MONSconfig.- Allows to trigger a double wild battle when only having a single Pokémon alive by @pkmnsnfrn in https://github.com/rh-hideout/pokeemerald-expansion/pull/2878
Move Effects
- Added Healing Wish’s Gen 5+/8+ mechanics with config by @DizzyEggg in https://github.com/rh-hideout/pokeemerald-expansion/pull/2708
- Added Swallow/Spit Up’s Gen 5+ mechanics with config by @DizzyEggg in https://github.com/rh-hideout/pokeemerald-expansion/pull/2790
- Added Shell Trap’s effect by @DizzyEggg in https://github.com/rh-hideout/pokeemerald-expansion/pull/2716
- Added several Gen 9 Move effects:
- By @LOuroboros in https://github.com/rh-hideout/pokeemerald-expansion/pull/2834
- Psyblade
- Hydro Steam
- By @LOuroboros in https://github.com/rh-hideout/pokeemerald-expansion/pull/2534
- Stone Axe, with fix by @AlexOn1ine in https://github.com/rh-hideout/pokeemerald-expansion/pull/2969
- Ceaseless Edge, with fix by @AlexOn1ine in https://github.com/rh-hideout/pokeemerald-expansion/pull/2969
- Dire Claw
- Barb Barrage
- By @AgustinGDLV in https://github.com/rh-hideout/pokeemerald-expansion/pull/2883
- Revival Blessing, with fix by @AgustinGDLV in https://github.com/rh-hideout/pokeemerald-expansion/pull/3010
- By @LOuroboros in https://github.com/rh-hideout/pokeemerald-expansion/pull/2834
Item Effects
- Trade and Held Level up evolution items and can now be used to evolve the respective species by default like in Legends: Arceus by @LOuroboros in https://github.com/rh-hideout/pokeemerald-expansion/pull/3009
- Eg. Magmarizer can be used from the Bag to evolve Magmar into Magmortar.
- Item usages can be turned off via config.
- Added Legends: Arceus Evolution items by @AaghatIsLive in https://github.com/rh-hideout/pokeemerald-expansion/pull/2897
- Black Augurite
- Peat Block
- Linking Cord
- Existing no-item trade evolutions can now evolve by using this item from the bag.
- Added Gen IX item data by @Bassoonian in https://github.com/rh-hideout/pokeemerald-expansion/pull/2838
- Mirror Herb
- Effect by @ghoulslash in https://github.com/rh-hideout/pokeemerald-expansion/pull/2873
- Scroll of Darkness
- Scroll of Waters
- Adamant Crystal
- Lustrous Globe
- Griseous Core
- Big Bamboo Shoot
- Tiny Bamboo Shoot
- No current effect
- Auspicious Armor
- Booster Energy
- Gimmighoul Coin
- Leader’s Crest
- Malicious Armor
- Tera Orb
- Tera Shards
- Mirror Herb
- Max Mushrooms by @AgustinGDLV in https://github.com/rh-hideout/pokeemerald-expansion/pull/2902
- Berserk Gene by @CallmeEchoo in https://github.com/rh-hideout/pokeemerald-expansion/pull/2893
Battle AI
- Added
AI_FLAG_OMNISCIENTflag by @ghoulslash in https://github.com/rh-hideout/pokeemerald-expansion/pull/2872- It lets the AI know the entirety of the player’s party.
Tests
- Automatic tests now have a summary to list the amount of tests passed, failed and more by @AsparagusEduardo in https://github.com/rh-hideout/pokeemerald-expansion/pull/2722
- To avoid tests failing when disabling new species, tests now use Gen 1-3 Pokémon when possible. Otherwise, they use ASSUMEs if the required species is disabled by @DizzyEggg in https://github.com/rh-hideout/pokeemerald-expansion/pull/2818
- Sped up tests by using structured RNG in
PASSES_RANDOMLYby @mrgriffin in https://github.com/rh-hideout/pokeemerald-expansion/pull/2720- RandomElement for structured RNG by @mrgriffin in https://github.com/rh-hideout/pokeemerald-expansion/pull/2868, with fix by @AgustinGDLV in https://github.com/rh-hideout/pokeemerald-expansion/pull/3013
- Detect memory leaks in tests by @mrgriffin in https://github.com/rh-hideout/pokeemerald-expansion/pull/2698
- Detect more invalid test cases by @mrgriffin in https://github.com/rh-hideout/pokeemerald-expansion/pull/2955
- Tests now have their own build directory by @mrgriffin https://github.com/rh-hideout/pokeemerald-expansion/pull/3002
- New
TESTINGdefine by @mrgriffin https://github.com/rh-hideout/pokeemerald-expansion/pull/3002
Changed
General
- Partially fix Dex size inconsistencies by @DizzyEggg in https://github.com/rh-hideout/pokeemerald-expansion/pull/2799
- Debug menu’s Cheat Start now sets the Cable Club’s tutorial as complete. by @AsparagusEduardo in https://github.com/rh-hideout/pokeemerald-expansion/pull/2802
- Debug menu to give items based on the respective max quantity by @DizzyEggg in https://github.com/rh-hideout/pokeemerald-expansion/pull/2807
- Debug menu’s “Fill PC” option now adds one of each Pokémon instead of filling the boxes with Deoxys @LOuroboros in https://github.com/rh-hideout/pokeemerald-expansion/pull/2814
- Known Issue: All Pokémon have the same personality/gender/stats/moves as the first Bulbasaur generated.
- It sets the Dex flags for each Pokémon as well.
- Enables
FLAG_SYS_POKEMON_GET.
- Debug menu’s saveblock checks now use the proper max size of the saveblock instead of a hardcoded string value by @LOuroboros in https://github.com/rh-hideout/pokeemerald-expansion/pull/3017
- Disable Gen8+ Obedience Mechanics by default by @AsparagusEduardo in https://github.com/rh-hideout/pokeemerald-expansion/pull/2980
Graphical changes
- Fixed Gen 2 Pokémon sprite palettes up to Ampharos included by @Jaizu in https://github.com/rh-hideout/pokeemerald-expansion/pull/2783
- New move animations are set as default by @AlexOn1ine in https://github.com/rh-hideout/pokeemerald-expansion/pull/2964
Refactors
- Battle Item Refactor by @AgustinGDLV in https://github.com/rh-hideout/pokeemerald-expansion/pull/2902
- Divorces in-battle effects from out-of-battle ones, such that they use battle scripts, making it easier to test and add new effects.
- Further fixes by
- @Jaizu in https://github.com/rh-hideout/pokeemerald-expansion/pull/2918
- @CallmeEchoo in https://github.com/rh-hideout/pokeemerald-expansion/pull/2916, https://github.com/rh-hideout/pokeemerald-expansion/pull/2931 and https://github.com/rh-hideout/pokeemerald-expansion/pull/2940
- @AgustinGDLV in https://github.com/rh-hideout/pokeemerald-expansion/pull/2915 and https://github.com/rh-hideout/pokeemerald-expansion/pull/3022
- Refactored most Battle Form changes into the form change tables by @AsparagusEduardo in https://github.com/rh-hideout/pokeemerald-expansion/pull/2411
- This includes:
- Form changes upon fainting
- Form changes upon switching
- Form changes upon battle end.
- Mega Evolutions
- Primal Reversions
- Zacian/Zamazenta/Xerneas
- Burmy
- Zen Mode
- Power Construct
- Schooling
- Shields Down
- Forecast/Flower Gift, with fixes by @AgustinGDLV in https://github.com/rh-hideout/pokeemerald-expansion/pull/2978
- This includes:
- Hydra improvements (for Battle Tests)
- Prints a summary of how many tests ran/passed.
- Makes the pokemerald-test.elf file depend on tools.
- Shows SKIP log line when ASSUMPTIONS fail.
- Prints any buffered output at exit.
- OSX support by @Bassoonian in https://github.com/rh-hideout/pokeemerald-expansion/pull/2975
- Explosion looping is now handled by moveend instead of looping itself by @DizzyEggg in https://github.com/rh-hideout/pokeemerald-expansion/pull/2688
- Removed
zMovePowerfield ingBattleMovesin favor of a function. by @AsparagusEduardo in https://github.com/rh-hideout/pokeemerald-expansion/pull/2794 - Removed
ITEM_HAS_EFFECT, allowing for items in of any ID to have effects by @AsparagusEduardo in https://github.com/rh-hideout/pokeemerald-expansion/pull/2840 - Move direct statStage boosts to use statbuffchange by @ghoulslash in https://github.com/rh-hideout/pokeemerald-expansion/pull/3000
Cleanup
- Removed unused single-frame front pics by @AsparagusEduardo in https://github.com/rh-hideout/pokeemerald-expansion/pull/2793
- Removed duplicated code in
Cmd_pickupby @DizzyEggg in https://github.com/rh-hideout/pokeemerald-expansion/pull/2705 - Removed some unused Battle Test code.
- Removed unused script
BattleScript_TargetAbilityStatRaiseOnMoveEndby @DizzyEggg in https://github.com/rh-hideout/pokeemerald-expansion/pull/2727 - Purged existing bKGD warnings from graphics by @LOuroboros in https://github.com/rh-hideout/pokeemerald-expansion/pull/2735
- Use proper symbol name styles for Jangmo-o family by @AsparagusEduardo in https://github.com/rh-hideout/pokeemerald-expansion/pull/2739
- Removed trailing whitespaces by @AsparagusEduardo in https://github.com/rh-hideout/pokeemerald-expansion/pull/2787
- Debug Menu’s “Feature unavailable” messages now properly point to the corresponding config file @LOuroboros in https://github.com/rh-hideout/pokeemerald-expansion/pull/2814
- Removed
assistPossibleMovesfromBattleStructby @DizzyEggg in https://github.com/rh-hideout/pokeemerald-expansion/pull/2816 - Fixed instances of gSideTimers not using side constants by @AsparagusEduardo in https://github.com/rh-hideout/pokeemerald-expansion/pull/2867
- Fixed stat names not being properly capitalized by @AlexOn1ine in https://github.com/rh-hideout/pokeemerald-expansion/pull/2927
- Adds GetMovesArray in CanTargetFaintAi by @AlexOn1ine in https://github.com/rh-hideout/pokeemerald-expansion/pull/2936
- Add Thunder Cage case to trap anim IDs by @ghoulslash in https://github.com/rh-hideout/pokeemerald-expansion/pull/2941
- GetSideParty/GetBattlerParty by @mrgriffin in https://github.com/rh-hideout/pokeemerald-expansion/pull/2910
- Removed duplicate CanBePoisoned condition by @CallmeEchoo in https://github.com/rh-hideout/pokeemerald-expansion/pull/2988
- Convert a few various to callnatives by @ghoulslash in https://github.com/rh-hideout/pokeemerald-expansion/pull/2465
- Changed 999999 in DebugAction_Give_MaxMoney to MAX_MONEY constant by @pkmnsnfrn in https://github.com/rh-hideout/pokeemerald-expansion/pull/3015
- Optimized battle gender checks by @AsparagusEduardo in https://github.com/rh-hideout/pokeemerald-expansion/pull/3020
- Replace launchtemplate and launchtask in battle anims by @ghoulslash in https://github.com/rh-hideout/pokeemerald-expansion/pull/2640
Fixed
General
- Fixed Honey Gather in Battle Pyramid using an uninitialized
lvlDivBy10value by @DizzyEggg in https://github.com/rh-hideout/pokeemerald-expansion/pull/2705 - Fixed B_FLAG_NO_CATCHING not working despite flag being defined @LOuroboros in https://github.com/rh-hideout/pokeemerald-expansion/pull/2814
- Fixed Budew evolution method by @fdeblasio in https://github.com/rh-hideout/pokeemerald-expansion/pull/2928
- Fixed issue with Enamorus Therian cry define order that caused compile issue when Gen 7 and 8 species were disabled by @grunt-lucas in https://github.com/rh-hideout/pokeemerald-expansion/pull/2956
- Fixed Zacian/Zamazenta’s Iron Head PP not being calculated properly by @AsparagusEduardo in https://github.com/rh-hideout/pokeemerald-expansion/pull/2411
- Fixed ability select in Debug Menu’s “Give mon” option by @Bassoonian in https://github.com/rh-hideout/pokeemerald-expansion/pull/2999
- Fixed Esper Wing’s accuracy if
B_UPDATED_MOVE_DATAis set to Gen 9 by @fdeblasio in https://github.com/rh-hideout/pokeemerald-expansion/pull/3004 - Fixed Hisuian Sneasel not having a way to evolve by @LOuroboros in https://github.com/rh-hideout/pokeemerald-expansion/pull/3009
- Fixed Throat Spray’s description by @AsparagusEduardo in https://github.com/rh-hideout/pokeemerald-expansion/pull/3027
Graphics
- Fixed Debug menu displaying 3-digit map numbers incorrectly by @DizzyEggg in https://github.com/rh-hideout/pokeemerald-expansion/pull/2807
- Properly aligned Pokémon icons up to gen V by @Jaizu in https://github.com/rh-hideout/pokeemerald-expansion/pull/2879
- Fixed multiple Pokémon sprites by @Jaizu in https://github.com/rh-hideout/pokeemerald-expansion/pull/2926
- Fixed form change animation properly loading the respective Pokémon palettes by @Ultimate-Bob in https://github.com/rh-hideout/pokeemerald-expansion/pull/2852
- Fixed Illumise’s pallete causing issues in PC boxes by @AaghatIsLive in https://github.com/rh-hideout/pokeemerald-expansion/pull/2995
- Fixed for wrong mon positions for scripted wild double battles by @AlexOn1ine in https://github.com/rh-hideout/pokeemerald-expansion/pull/2996
- Fixed shiny animation not respecting Illusion mon target by @Ultimate-Bob in https://github.com/rh-hideout/pokeemerald-expansion/pull/2985
Battle Mechanics
- General
- Fixed Trainer slide-in not working properly on doubles by @DizzyEggg in https://github.com/rh-hideout/pokeemerald-expansion/pull/2699
- Z-moves now properly bypass protection while doing 25% of the original damage by @AgustinGDLV in https://github.com/rh-hideout/pokeemerald-expansion/pull/2730
- Fixed Mega Evolution and Primal Reversion healthbox icons not hiding when they’re supposed to by @DizzyEggg in https://github.com/rh-hideout/pokeemerald-expansion/pull/2805, with further fix by @Jaizu in https://github.com/rh-hideout/pokeemerald-expansion/pull/2898
- Fixed potential issues with confusion checks by @AgustinGDLV in https://github.com/rh-hideout/pokeemerald-expansion/pull/2855
- Fixed an oversight that caused consecutive battles double battles by @SBird1337 in https://github.com/rh-hideout/pokeemerald-expansion/pull/2894
- Fixed status Z-Moves overwriting damage-dealing Z-Moves by @AlexOn1ine in https://github.com/rh-hideout/pokeemerald-expansion/pull/2937
- Fixed Battle Vars and Flags not resetting after the player whites out by @pkmnsnfrn in https://github.com/rh-hideout/pokeemerald-expansion/pull/2875
- Fixed mons not disobeying with Gen8 mechanics disabled by @SubzeroEclipse in https://github.com/rh-hideout/pokeemerald-expansion/pull/2990
- Fixed turn order issues by @DizzyEggg in https://github.com/rh-hideout/pokeemerald-expansion/pull/2810
- Mega Evolution not being based on turn order.
- Focus Punch/Beak Blast/Shell Trap messages not being based on turn order.
- Fixed Beak Blast’s burn not showing up by @DizzyEggg in https://github.com/rh-hideout/pokeemerald-expansion/pull/2810
- Move effects
- Fixed Dragon Tail not activating Red Card if the target didn’t switch by @mrgriffin in https://github.com/rh-hideout/pokeemerald-expansion/pull/2707
- Fixed Dragon Tail printing “But it failed!” if the target didn’t switch by @mrgriffin in https://github.com/rh-hideout/pokeemerald-expansion/pull/2707
- Fixed Roar being not implemented with rejection sampling by @mrgriffin in https://github.com/rh-hideout/pokeemerald-expansion/pull/2707
- Fixed Mind Blown always fainting the user by @DizzyEggg in https://github.com/rh-hideout/pokeemerald-expansion/pull/2688
- Fixed Defog showing improper battle strings by @DizzyEggg in https://github.com/rh-hideout/pokeemerald-expansion/pull/2737
- Fixed Knock Off removing Choice Item restriction when the target has Gorilla Tactics as an ability by @CallmeEchoo in https://github.com/rh-hideout/pokeemerald-expansion/pull/2854
- Fixed Ominous Wind’s targeting by @Bassoonian in https://github.com/rh-hideout/pokeemerald-expansion/pull/2896
- Added missing forbidden Metronome move flags to LA and SV moves by @fdeblasio in https://github.com/rh-hideout/pokeemerald-expansion/pull/2949
- Fixed Anger Shell activating when fainted by @ghoulslash in https://github.com/rh-hideout/pokeemerald-expansion/pull/2945
- Fixed Burn Up/Double Shock being affected by the user’s ability by @AlexOn1ine in https://github.com/rh-hideout/pokeemerald-expansion/pull/2962
- Fixed Burn Up/Double Shock not removing their respective types if the target fainted by @AlexOn1ine in https://github.com/rh-hideout/pokeemerald-expansion/pull/2962
- Fixed Triple Dive’s effect by @AlexOn1ine in https://github.com/rh-hideout/pokeemerald-expansion/pull/2947
- Ability effects
- Fixed Volt Absorb stopping damage to other Pokémon from Explosion under the effect of Galvanize by @DizzyEggg in https://github.com/rh-hideout/pokeemerald-expansion/pull/2688
- Fixed Intimidate’s ability pop up showing the incorrect name by @DizzyEggg in https://github.com/rh-hideout/pokeemerald-expansion/pull/2712
- Fixed switch-in abilities activating on an empty field by @DizzyEggg in https://github.com/rh-hideout/pokeemerald-expansion/pull/2712
- Partially fixed Supreme Overlord’s effect by @LOuroboros in https://github.com/rh-hideout/pokeemerald-expansion/pull/2809
- Fixed Intimidate targetting dead sides and false postpones by @May8th1995 in https://github.com/rh-hideout/pokeemerald-expansion/pull/2850
- Fixed switch-in abilities activating on terrain change by @AgustinGDLV in https://github.com/rh-hideout/pokeemerald-expansion/pull/2881
- Fixed Leaf Guard not preventing Rest by @ShaeTsuPog in https://github.com/rh-hideout/pokeemerald-expansion/pull/2957
- Fixed Plus/Minus working with all damage-dealing moves instead of only pecial moves by @Bassoonian in https://github.com/rh-hideout/pokeemerald-expansion/pull/2974
- Fixed Impostor’s Popup showing the target’s ability instead of Impostor by @Ultimate-Bob in https://github.com/rh-hideout/pokeemerald-expansion/pull/2985
- Fixed Illusion’s working when it shouldn’t if the Pokémon with it is the last one in the party by @Ultimate-Bob in https://github.com/rh-hideout/pokeemerald-expansion/pull/2985
- Fixed Mimikyu’s Disguise not breaking by @AsparagusEduardo in https://github.com/rh-hideout/pokeemerald-expansion/pull/3025
- Item effects
- Fixed Eject Button interaction that forced incoming Pokémon with Intimidate to attack by @May8th1995 in https://github.com/rh-hideout/pokeemerald-expansion/pull/2846
- Fixed erroneous uses of non e-reader Enigma Berries by @AsparagusEduardo in https://github.com/rh-hideout/pokeemerald-expansion/pull/2839
Battle Animations
- Fixed potential Ability Popup tile corruption due to missing Word-alignment by @ghoulslash in https://github.com/rh-hideout/pokeemerald-expansion/pull/2812
- Fixed
GetBattleAnimMoveTargetsgetting the wrong indices when the attacker is not the player by @ghoulslash in https://github.com/rh-hideout/ - Fixed Ability Popup not disappearing when called by Wandering Spirit by @AlexOn1ine in https://github.com/rh-hideout/pokeemerald-expansion/pull/2920pokeemerald-expansion/pull/2848
- Added missing config to enable NEW_ROCKS_PARTICLE by @pkmnsnfrn in https://github.com/rh-hideout/pokeemerald-expansion/pull/2929
- Fixed healthboxes reappearing in the Battle Tower by @ghoulslash in https://github.com/rh-hideout/pokeemerald-expansion/pull/2849
- Fixes Speed Boost animation by @AlexOn1ine in https://github.com/rh-hideout/pokeemerald-expansion/pull/3033
Battle AI
- Fixed AI switching to an invalid party slot from Volt Switch/Roar when using the Ace Pokémon flag by @DizzyEggg in https://github.com/rh-hideout/pokeemerald-expansion/pull/2660
- Fixed AI not knowing how to handle Illusion by @DizzyEggg in https://github.com/rh-hideout/pokeemerald-expansion/pull/2726
- Initially treats the initial Illusion species as the real species.
- If the type effectiveness doesn’t match what it expects, or it uses a move that it cannot learn, the AI realises this and updates its data accordingly.
- Fixed AI damage calculation incorrectly when it has Protean/Libero by @DizzyEggg in https://github.com/rh-hideout/pokeemerald-expansion/pull/2714
- Fix CalcMoveBasePower using battler addresses, which messed with AI calculations by @ghoulslash in https://github.com/rh-hideout/pokeemerald-expansion/pull/2858
- Fixed Comatose AI checks by @AsparagusEduardo in https://github.com/rh-hideout/pokeemerald-expansion/pull/2866
- Fixed AI not considering Hidden Abilities in its team during switching logic by @AsparagusEduardo in https://github.com/rh-hideout/pokeemerald-expansion/pull/2908
- Fixed Z-Move and Triple Kick/Axel damage calculation by @AlexOn1ine in https://github.com/rh-hideout/pokeemerald-expansion/pull/2983
Pret merges
- Kept you waiting, huh? (pret sync 2023/03/03) by @AsparagusEduardo in https://github.com/rh-hideout/pokeemerald-expansion/pull/2801
- Palms are sweaty, arms are heavy, mom’s spaghetti (pret merge 2023/03/19) by @AsparagusEduardo in https://github.com/rh-hideout/pokeemerald-expansion/pull/2841
- I get knocked down, but I get up again (pret merge 2023/04/13) by @AsparagusEduardo in https://github.com/rh-hideout/pokeemerald-expansion/pull/2907
- Pret merge Friday by @Bassoonian in https://github.com/rh-hideout/pokeemerald-expansion/pull/2998
- One point five baby by @AsparagusEduardo in https://github.com/rh-hideout/pokeemerald-expansion/pull/3044
New Contributors
- @CallmeEchoo made their first contribution in https://github.com/rh-hideout/pokeemerald-expansion/pull/2854
- @pkmnsnfrn made their first contribution in https://github.com/rh-hideout/pokeemerald-expansion/pull/2878
- @AaghatIsLive made their first contribution in https://github.com/rh-hideout/pokeemerald-expansion/pull/2897
- @fdeblasio made their first contribution in https://github.com/rh-hideout/pokeemerald-expansion/pull/2928
- @citrusbolt made their first contribution in https://github.com/rh-hideout/pokeemerald-expansion/pull/2825
- @grunt-lucas made their first contribution in https://github.com/rh-hideout/pokeemerald-expansion/pull/2956
- @Ultimate-Bob made their first contribution in https://github.com/rh-hideout/pokeemerald-expansion/pull/2852
- @ShaeTsuPog made their first contribution in https://github.com/rh-hideout/pokeemerald-expansion/pull/2957
- @SubzeroEclipse made their first contribution in https://github.com/rh-hideout/pokeemerald-expansion/pull/2990
Full Changelog: https://github.com/rh-hideout/pokeemerald-expansion/compare/expansion/1.4.3...expansion/1.5.0
Version 1.4.3
## How to update
- If you haven't set up a remote, run the command `git remote add RHH https://github.com/rh-hideout/pokeemerald-expansion`.
- Once you have your remote set up, run the command `git pull RHH expansion/1.4.3`.
Changed
Cleanup
- Fixed instances of gSideTimers not using side constants by @AsparagusEduardo in https://github.com/rh-hideout/pokeemerald-expansion/pull/2867
Fixed
General
- Fixed the Overworld debug menu not giving using the appropiate max item quantities by @DizzyEggg in https://github.com/rh-hideout/pokeemerald-expansion/pull/2807
- Fixed the Overworld debug menu map number display not correctly showing 3 digits by @DizzyEggg in https://github.com/rh-hideout/pokeemerald-expansion/pull/2807
- Fixed Budew’s evolution method by @fdeblasio in https://github.com/rh-hideout/pokeemerald-expansion/pull/2928
Battle Mechanics
- General
- Fixed CanBeConfused not properly checking the battlerId passed into it by @AgustinGDLV in https://github.com/rh-hideout/pokeemerald-expansion/pull/2855
- Move effects
- Fixed Knocked-Off Choice items resetting the choiced move despite the holder having Gorilla Tactics by @CallmeEchoo in https://github.com/rh-hideout/pokeemerald-expansion/pull/2854
- Fixes Ominous Wind targeting by @Bassoonian in https://github.com/rh-hideout/pokeemerald-expansion/pull/2896
- Item effects
- Fixed erroneous uses of non e-reader Enigma Berries by @AsparagusEduardo in https://github.com/rh-hideout/pokeemerald-expansion/pull/2839
Full Changelog: https://github.com/rh-hideout/pokeemerald-expansion/compare/expansion/1.4.2...expansion/1.4.3
Version 1.4.2
## How to update
- If you haven't set up a remote, run the command `git remote add RHH https://github.com/rh-hideout/pokeemerald-expansion`.
- Once you have your remote set up, run the command `git pull RHH expansion/1.4.2`.
Fixed
General
- Fixed overworld_config.h reference in the overworld debug by @Bassoonian in https://github.com/rh-hideout/pokeemerald-expansion/pull/2811
Battle Mechanics
- General
- Fixed long z-move names not showing properly on the battle textbox by @DizzyEggg in https://github.com/rh-hideout/pokeemerald-expansion/pull/2789
- Move effects
- Fixes certain moves preventing Z status moves. by @AlexOn1ine in https://github.com/rh-hideout/pokeemerald-expansion/pull/2791
- Fixed Wring Out’s power by @AsparagusEduardo in https://github.com/rh-hideout/pokeemerald-expansion/pull/2824
- Ability effects
- Fixed wrong Contrary message when affected by Intimidate by @DizzyEggg in https://github.com/rh-hideout/pokeemerald-expansion/pull/2723
Battle AI
- Fixed uninitialized modifier variable in AI calc damage by @DizzyEggg in https://github.com/rh-hideout/pokeemerald-expansion/pull/2731
- Fixed AI mon getting lower score when it is faster by @AlexOn1ine in https://github.com/rh-hideout/pokeemerald-expansion/pull/2740
- Fixed status moves being considered for type effectiveness calculations by @AlexOn1ine in https://github.com/rh-hideout/pokeemerald-expansion/pull/2743
- Fixed AI not considering Nature Power in AI_CalcDamage by @AlexOn1ine in https://github.com/rh-hideout/pokeemerald-expansion/pull/2776
- Fixed Electrify check, as it workss on all move types, not just Normal by @AlexOn1ine in https://github.com/rh-hideout/pokeemerald-expansion/pull/2817
- Fixed score for Work up and Growth by @AlexOn1ine in https://github.com/rh-hideout/pokeemerald-expansion/pull/2813
- Fixed speed check on Electrify by @AlexOn1ine in https://github.com/rh-hideout/pokeemerald-expansion/pull/2819
Full Changelog: https://github.com/rh-hideout/pokeemerald-expansion/compare/expansion/1.4.1...expansion/1.4.2
Version 1.4.1
## How to update
- If you haven't set up a remote, run the command `git remote add RHH https://github.com/rh-hideout/pokeemerald-expansion`.
- Once you have your remote set up, run the command `git pull RHH expansion/1.4.1`.
CRITICAL FIX, please update to avoid the issues detailed down below:
- Fixed electricity move animations causing softlocks with weird graphical results by @DizzyEggg in #2785
Full Changelog: https://github.com/rh-hideout/pokeemerald-expansion/compare/expansion/1.4.0...expansion/1.4.1
Version 1.4.0
## How to update
- If you haven't set up a remote, run the command `git remote add RHH https://github.com/rh-hideout/pokeemerald-expansion`.
- Once you have your remote set up, run the command `git pull RHH expansion/1.4.0`.
Added
General
- Battle Auto-Tests by @mrgriffin in https://github.com/rh-hideout/pokeemerald-expansion/pull/2564
- Details of how they work and how to build them in
test\test_battle.h. - Add some tests for gen1-3 abilities by @SBird1337 in https://github.com/rh-hideout/pokeemerald-expansion/pull/2626
- Details of how they work and how to build them in
- Implemented Xhyzi’s RHH copyright intro by @AsparagusEduardo in https://github.com/rh-hideout/pokeemerald-expansion/pull/2415
- There’s a config to disable it, but we encourage keeping it :)
- Fixes by @SBird1337 and @LOuroboros in https://github.com/rh-hideout/pokeemerald-expansion/pull/2665, https://github.com/rh-hideout/pokeemerald-expansion/pull/2687 and https://github.com/rh-hideout/pokeemerald-expansion/pull/2684
- Config to restore Gen 3’s damage reduction to multi target moves by @AsparagusEduardo in https://github.com/rh-hideout/pokeemerald-expansion/pull/2542
- Config to disable incense baby mechanic as of Gen 9 by @AsparagusEduardo in https://github.com/rh-hideout/pokeemerald-expansion/pull/2531
- Config for PLA+ obedience mechanics by @Bassoonian in https://github.com/rh-hideout/pokeemerald-expansion/pull/2569
- Config for ball inheritence when breeding by @AsparagusEduardo in https://github.com/rh-hideout/pokeemerald-expansion/pull/2566
- Config to have Shuckle make Berry Juice from Oran Berries by @AsparagusEduardo in https://github.com/rh-hideout/pokeemerald-expansion/pull/2331
- Support for dynamic number of targets in move animations by @ghoulslash in https://github.com/rh-hideout/pokeemerald-expansion/pull/2649
Moves
- Generation IX Moves
- Base move data by @Bassoonian in https://github.com/rh-hideout/pokeemerald-expansion/pull/2467
- New moves with existing effects:
- Lumina Crash, Jet Punch, Ice Spinner, Triple Dive, Kowtow Cleave, Flower Trick, Torch Song, Aqua Step, Ruination, Pounce, Trailblaze, Chilling Water, Hyper Drill, Twin Beam, Armor Cannon, Bitter Blade, Comeuppance, Aqua Cutter, Blazing Torque, Noxious Torque, Combat Torque, Magical Torque
- New move effects:
- Wicked Torque (
EFFECT_SLEEP_HIT) - Double Shock (
EFFECT_DOUBLE_SHOCK) - Silk Trap (uses
EFFECT_PROTECTbut the condition to check the move in specific) by @ghoulslash in https://github.com/rh-hideout/pokeemerald-expansion/pull/2512 and https://github.com/rh-hideout/pokeemerald-expansion/pull/2610
- Wicked Torque (
- Missing move effects:
- Tera Blast, Axe Kick, Last Respects, Order Up, Spicy Extract, Spin Out, Population Bomb, Glaive Rush, Revival Blessing, Salt Cure, Mortal Spin, Doodle, Fillet Away, Raging Bull, Make It Rain, Collision Course, Electro Drift, Shed Tail, Chilly Reception, Tidy Up, Snowscape, Rage Fist, Gigaton Hammer
- Updated Gen 1-8 move effects to Gen 9 standards: by @Bassoonian in https://github.com/rh-hideout/pokeemerald-expansion/pull/2467
- LA moves with existing effects
- Psyshield Bash, Raging Fury, Wave Crash, Chloroblast, Mountain Gale, Headlong Rush, Esper Wing, Shelter, Bitter Malice, Power Shift, Springtide Storm, Bleakwind Storm, Wildbolt Storm, Sandsear Storm
- LA moves with new move effects
- Mystical Power (
EFFECT_SPECIAL_ATTACK_UP_HIT) - Victory Dance (
EFFECT_VICTORY_DANCE)
- Mystical Power (
- PP adjustments.
- (5 -> 10) Bleakwind Storm, Wildbolt Storm, Sandsear Storm
- (10 -> 5) Recover, Soft-Boiled, Rest, Milk Drink, Slack Off, Roost, Shore Up
- Power adjustments
- (50 -> 90) Triple Arrows
- (90 -> 120) Raging Fury
- (120 -> 150) Wave Crash
- (60 -> 80) Dire Claw
- (100 -> 120) Headlong Rush
- (60 -> 75) Bitter Malice
- (75 -> 80) Esper Wing
- (95 -> 100) Springtide Storm, Bleakwind Storm, Wildbolt Storm, Sandsear Storm
- (80 -> 75) Wicked Blow
- (70 -> 60) Grassy Glide
- (130 -> 120) Glacial Lance
- LA moves with existing effects
- Implementing Teatime effect by @SonikkuA-DatH in https://github.com/rh-hideout/pokeemerald-expansion/pull/1956
- Config for Gen 4’s Roost pure-Flying behavior (
B_ROOST_PURE_FLYING) by @mrgriffin in https://github.com/rh-hideout/pokeemerald-expansion/pull/2530 - Config for Gen 8 Howl’s effect by @DizzyEggg in https://github.com/rh-hideout/pokeemerald-expansion/pull/2700
- AI check by @ghoulslash in https://github.com/rh-hideout/pokeemerald-expansion/pull/2703
Abilities
- Generation IX Abilities
- 28 of 31 abilities implemented by @LOuroboros in https://github.com/rh-hideout/pokeemerald-expansion/pull/2470
- Lingering Aroma, Seed Sower, Thermal Exchange, Anger Shell, Purifying Salt, Well-Baked Body, Wind Rider, Rocky Payload, Wind Power, Electromorphosis, Protosynthesis, Quark Drive, Good as Gold, Vessel of Ruin, Sword of Ruin, Tablets of Ruin, Beads of Ruin, Orichalcum Pulse, Hadron Engine, Cud Chew, Sharpness, Supreme Overlord, Costar, Toxic Debris, Armor Tail, Earth Eater, Guard Dog and Mycelium Might
- Not implemented yet:
- Commander
- Opportunist
- Zero to Hero
- 28 of 31 abilities implemented by @LOuroboros in https://github.com/rh-hideout/pokeemerald-expansion/pull/2470
- Implemented Ice Face by @LOuroboros in https://github.com/rh-hideout/pokeemerald-expansion/pull/2255
Items
- Generation IX Item Effects by @ghoulslash in https://github.com/rh-hideout/pokeemerald-expansion/pull/2471
- Ability Shield, Clear Amulet, Punching Glove, Covert Cloak and Loaded Dice
- Gen 9 item data except icons by @AsparagusEduardo in https://github.com/rh-hideout/pokeemerald-expansion/pull/2595
- Added Destiny Knot’s breeding functionality by @Jaizu in https://github.com/rh-hideout/pokeemerald-expansion/pull/2616
- Allow Lv100 Pokémon to access level based evos via Rare Candy by @LOuroboros in https://github.com/rh-hideout/pokeemerald-expansion/pull/2460
Changed
Graphical changes
- Remove usage of Sugimori Palettes for Pokémon sprites by @AsparagusEduardo in https://github.com/rh-hideout/pokeemerald-expansion/pull/2318
- NOTICE: These will be tweaked over time, due to the PR not utilizing official palettes. Generation 1 Pokémon have already been fixed by @Jaizu in https://github.com/rh-hideout/pokeemerald-expansion/pull/2593
Refactors
- Readable BattleScript command arguments by @mrgriffin in https://github.com/rh-hideout/pokeemerald-expansion/pull/2529
- Add callnative battle script functions, as a way to convert the various macro to proper commands by @ghoulslash in https://github.com/rh-hideout/pokeemerald-expansion/pull/2464
- Converted Metal Burst damage calculation command by @ghoulslash in https://github.com/rh-hideout/pokeemerald-expansion/pull/2464
- Removed
SPECIES_FLAG_SHINY_LOCKEDin favor of actual flags to control when to generate Shiny/Non-Shiny mon (P_FLAG_FORCE_SHINYandP_FLAG_FORCE_NO_SHINY) by @AsparagusEduardo in https://github.com/rh-hideout/pokeemerald-expansion/pull/2453 - Optimized Intimidate’s code by @LOuroboros in https://github.com/rh-hideout/pokeemerald-expansion/pull/2452
- Cleaned redundant
ENDTURN_PLASMA_FISTSloop by @LOuroboros in https://github.com/rh-hideout/pokeemerald-expansion/pull/2520 - Refactor sInverseTypeEffectivenessTable to implicit lookup by @SBird1337 in https://github.com/rh-hideout/pokeemerald-expansion/pull/2528
- Reshape sBattlePointAwards to be easier to read by @ghoulslash in https://github.com/rh-hideout/pokeemerald-expansion/pull/2551
- Adjusted AnimTask_PrimalReversion layout by @LOuroboros in https://github.com/rh-hideout/pokeemerald-expansion/pull/2446
- Rolled
EFFECT_SCALDintoEFFECT_BURN_HITwith a config for its Gen6+ change by @AsparagusEduardo in https://github.com/rh-hideout/pokeemerald-expansion/pull/2326 - Refactored incense baby checks into table by @AsparagusEduardo in https://github.com/rh-hideout/pokeemerald-expansion/pull/2531
- Red Card and Eject Button effects check for
EFFECT_HIT_SWITCH_TARGETinstead of Dragon Tail and Circle Throw specifically by @AsparagusEduardo in https://github.com/rh-hideout/pokeemerald-expansion/pull/2439
Cleanup
- Moved config files to their own folder (
include/constants/x_config.h → include/config/x.h) by @AsparagusEduardo in https://github.com/rh-hideout/pokeemerald-expansion/pull/2453 - Fixed reference in INSTALL.md to pret’s repo instead of the expansion’s by @LOuroboros in https://github.com/rh-hideout/pokeemerald-expansion/pull/2468
- Reorganized SpecialStatus struct to minimize padding. by @AsparagusEduardo in https://github.com/rh-hideout/pokeemerald-expansion/pull/2511
- Using decimal numbers for constants/battle.h by @LOuroboros in https://github.com/rh-hideout/pokeemerald-expansion/pull/2513
- Updated SIDE constant usages by @LOuroboros in https://github.com/rh-hideout/pokeemerald-expansion/pull/2518
- Removed repeated stat change defines by @LOuroboros in https://github.com/rh-hideout/pokeemerald-expansion/pull/2524
- Cleanup HandleTerrainMove by @mrgriffin in https://github.com/rh-hideout/pokeemerald-expansion/pull/2527
- Removed unread third
roostTypeselement by @mrgriffin in https://github.com/rh-hideout/pokeemerald-expansion/pull/2530 - Renamed
CheckFocusPunch_ClearVarsBeforeTurnStartstoCheckChosenMoveForEffectsBeforeTurnStartsbecause that function doesn’t just check for Focus Punch anymore, and it doesn’t clear any variables either. by @LOuroboros in https://github.com/rh-hideout/pokeemerald-expansion/pull/2544 - Removed pointless timers from disable struct by @DizzyEggg in https://github.com/rh-hideout/pokeemerald-expansion/pull/2647
- Fixed
SpeciesInfo(BaseStats) struct offset labels by @DizzyEggg in https://github.com/rh-hideout/pokeemerald-expansion/pull/2666
Other
- Overworld Debug Menu now sets
FLAG_SYS_POKEMON_GETgiving yourself a Pokémon by @Bassoonian in https://github.com/rh-hideout/pokeemerald-expansion/pull/2475 - Allow exiting the Battle Debug menu pressing B by @Jaizu in https://github.com/rh-hideout/pokeemerald-expansion/pull/2598
Fixed
Softlocks
- Fix Beat Up’s battle script to avoid an out-of-bounds array access by @sphericalice in https://github.com/rh-hideout/pokeemerald-expansion/pull/2541
Graphics
- Fix Bastiodon’s second icon frame by @cynderquil in https://github.com/rh-hideout/pokeemerald-expansion/pull/1589
- Fixed Eggs sometimes reading garbage graphic data by @AsparagusEduardo in https://github.com/rh-hideout/pokeemerald-expansion/pull/2539
- Fix Transform’s interaction with gender differences by @Jaizu in https://github.com/rh-hideout/pokeemerald-expansion/pull/2618
- Fix buggy Pokémon animations with Illusion by @DizzyEggg in https://github.com/rh-hideout/pokeemerald-expansion/pull/2639
- Fixed potential graphical issues when calling
BattleScript_TrainerSlideMsgRetby @ghoulslash in https://github.com/rh-hideout/pokeemerald-expansion/pull/2466 - Fixed ability popup not showing all characters of Pokémon with full names by @Jaizu in https://github.com/rh-hideout/pokeemerald-expansion/pull/2586
Battle Mechanics
- General
- Fixed potential error in
TryChangeBattleTerrainby @LOuroboros in https://github.com/rh-hideout/pokeemerald-expansion/pull/2469 - Fixed Ball throw handling in double wild battles by @walkingeyerobot in https://github.com/rh-hideout/pokeemerald-expansion/pull/2587
- Fixed 1v2 battles with eggs by @DizzyEggg in https://github.com/rh-hideout/pokeemerald-expansion/pull/2658
- Fixed potential error in
- Z-Moves
- Fixed Z-Moves being usable if the base move was out of PP by @LOuroboros in https://github.com/rh-hideout/pokeemerald-expansion/pull/2418
- Fixed switching Z-Moves when pressing SELECT in battle by @AlexOn1ine in https://github.com/rh-hideout/pokeemerald-expansion/pull/2677
- Z-Move Indicator was wrongly displayed in double battles by @AlexOn1ine in https://github.com/rh-hideout/pokeemerald-expansion/pull/2678
- Fixed UI PP colors for Z moves by @AlexOn1ine in https://github.com/rh-hideout/pokeemerald-expansion/pull/2690
- Move effects
- Fixed Speed Swap’s effect by @LOuroboros in https://github.com/rh-hideout/pokeemerald-expansion/pull/2517
- Fixed Shell Trap being affected by Encore by @LOuroboros in https://github.com/rh-hideout/pokeemerald-expansion/pull/2544
- Fixed potential bug for moves that use
MOVE_EFFECT_FEINTby @LOuroboros in https://github.com/rh-hideout/pokeemerald-expansion/pull/2516 - Fixed Beak Blast potentially not assigning its state to the proper battler by @LOuroboros in https://github.com/rh-hideout/pokeemerald-expansion/pull/2544
- Fixed Psycho Shift not buffering the string index for its printfromtable call by @TeamAquasHideout in https://github.com/rh-hideout/pokeemerald-expansion/pull/2588
- Fixed Flame Burst hitting semi-invulnerable partner by @ghoulslash in https://github.com/rh-hideout/pokeemerald-expansion/pull/2601
- Fixed Wood Hammer doing 1/4th recoil damage instead of 1/3rd by @TeamAquasHideout in https://github.com/rh-hideout/pokeemerald-expansion/pull/2603
- Fixed U-turn not switching out the user if the target’s Emergendy Exit activates by @mrgriffin in https://github.com/rh-hideout/pokeemerald-expansion/pull/2605
- Fixed Encore not failing if the target hasn’t moved yet in that turn by @mrgriffin in https://github.com/rh-hideout/pokeemerald-expansion/pull/2605
- Fixed Fling’s berry check working backwards by @mrgriffin in https://github.com/rh-hideout/pokeemerald-expansion/pull/2607
- Fixed Jaw Lock’s effect not leaving upon the user being KO’d by @DizzyEggg in https://github.com/rh-hideout/pokeemerald-expansion/pull/2681
- Fixed Round’s power calculation only taking the partner into account by @ghoulslash in https://github.com/rh-hideout/pokeemerald-expansion/pull/2602
- Fixed subsequent Round users not executing their move directly after the first user by @ghoulslash in https://github.com/rh-hideout/pokeemerald-expansion/pull/2602
- Fixed Follow Me working in singles by @DizzyEggg in https://github.com/rh-hideout/pokeemerald-expansion/pull/2644
- Fixed Clanging Scales target and effect by @DizzyEggg in https://github.com/rh-hideout/pokeemerald-expansion/pull/2691
- Fixed After You’s effect being overritten by Gen 8+’s move action recalculation by @DizzyEggg in https://github.com/rh-hideout/pokeemerald-expansion/pull/2646
- Fixes Heal Block only targeting a single battler by @ghoulslash in https://github.com/rh-hideout/pokeemerald-expansion/pull/2649
- Fixed Venom Drench not taking target positions into account by @ghoulslash in https://github.com/rh-hideout/pokeemerald-expansion/pull/2649
- Ability effects
- Ability Pop-ups
- Fixed Insomnia not having an ability pop-up by @DizzyEggg in https://github.com/rh-hideout/pokeemerald-expansion/pull/2643
- Fixed Shields Down Ability pop-up by @DizzyEggg in https://github.com/rh-hideout/pokeemerald-expansion/pull/2692
- Fixed Pokémon with Clear Body-like abilities being immune to self-inflicted stat reductions (ie. Superpower, Shell Smash) by @LOuroboros in https://github.com/rh-hideout/pokeemerald-expansion/pull/2548
- Fixed Mimicry’s implementation by @LOuroboros in https://github.com/rh-hideout/pokeemerald-expansion/pull/2473
- Fixed Intimidate activating after Explosion when it shouldn’t by @LOuroboros in https://github.com/rh-hideout/pokeemerald-expansion/pull/2579
- Fixed Poison Point activating only if the Pokémon with Poison Point could be poisoned by the attacker by @mrgriffin in https://github.com/rh-hideout/pokeemerald-expansion/pull/2605
- Fixed Pastel Veil not granting Poison immunity @mrgriffin in https://github.com/rh-hideout/pokeemerald-expansion/pull/2605
- Fix Volt Absorb not activating with Thunder Wave by @DizzyEggg in https://github.com/rh-hideout/pokeemerald-expansion/pull/2635
- Fixed Damp not showing ability pop-up when reacting with Aftermath by @DizzyEggg in https://github.com/rh-hideout/pokeemerald-expansion/pull/2645
- Fixed Mirror Armor’s effect against Clear Body by @DizzyEggg in https://github.com/rh-hideout/pokeemerald-expansion/pull/2680
- Fixed Battle Bond activating multiple times in battle by @DizzyEggg in https://github.com/rh-hideout/pokeemerald-expansion/pull/2689
- Fixed Grass-typed Pokémon being affected by powder moves reflected by Magic Bounce by @DizzyEggg in https://github.com/rh-hideout/pokeemerald-expansion/pull/2633
- Ability Pop-ups
- Item effects
- Fixed a
HOLD_EFFECT_ZOOM_LENScheck that caused every move’s attack to be increased by the hold effect parameter by @LOuroboros in https://github.com/rh-hideout/pokeemerald-expansion/pull/2557 - Fixed Flame Orb/Toxic Orb/Sticky Barb triggering when the holder is fainted by @ghoulslash in https://github.com/rh-hideout/pokeemerald-expansion/pull/2585
- Fixed a
Move Animations
- Fixed Poison Gas animation for
MOVE_TARGET_BOTHby @ghoulslash in https://github.com/rh-hideout/pokeemerald-expansion/pull/2608 - Fixed Strange Steam’s animation by @AlexOn1ine in https://github.com/rh-hideout/pokeemerald-expansion/pull/2642
- Fix Spacial Rend animation by @DizzyEggg in https://github.com/rh-hideout/pokeemerald-expansion/pull/2671
- Fixed Fiery Wrath’s animation by @ghoulslash in https://github.com/rh-hideout/pokeemerald-expansion/pull/2649
- Fixed Electroweb’s animation by @ghoulslash in https://github.com/rh-hideout/pokeemerald-expansion/pull/2649
Battle AI
- Fix Helping Hand AI by @ghoulslash in https://github.com/rh-hideout/pokeemerald-expansion/pull/2533
- Rewritten AI entry hazard checks to fix multiple issues by @Sneed69 in https://github.com/rh-hideout/pokeemerald-expansion/pull/2106
- Fixed Stealth Rock’s AI check ignoring type effectiveness.
- Fixed Stealth Rock’s AI check assuming that Levitate bypasses it.
- Fixed spike AI check that Stealth Rock may overlap.
- Fixed spike AI check ignoring the amount of spikes some spike immunities.
- Fixed AI not accounting for Stealth Rock and Spikes overlapping.
- Fixed missic AI logic for Heal Pulse effects in double battles by @AlexOn1ine in https://github.com/rh-hideout/pokeemerald-expansion/pull/2662
- Fixes Pollen Puff AI issue #2611 by @AlexOn1ine in https://github.com/rh-hideout/pokeemerald-expansion/pull/2648
Other
- Fixed cry table alignment that caused species from
SPECIES_KYUREM_WHITEonward to play the wrong cries by @AsparagusEduardo in https://github.com/rh-hideout/pokeemerald-expansion/pull/2462 - Fixed right Frontier move tutor not loading their move list correctly. by @AsparagusEduardo in https://github.com/rh-hideout/pokeemerald-expansion/pull/2525
- Fixed reusable repels/lures function forcefully using items while menu config is on by @AsparagusEduardo in https://github.com/rh-hideout/pokeemerald-expansion/pull/2561
- Fixed Exp Candy S using the XS description by @AsparagusEduardo in https://github.com/rh-hideout/pokeemerald-expansion/pull/2572
- Fixed
B_DOUBLE_WILD_CHANCEbecoming 1% less than what’s set by @AsparagusEduardo in https://github.com/rh-hideout/pokeemerald-expansion/pull/2526
Pret merges
- Gen 9 when? (Pret sync 2022/11/24) by @AsparagusEduardo in https://github.com/rh-hideout/pokeemerald-expansion/pull/2456
- I’ll make your face the greatest in Hoenn! Or else you will DIE. (Pret merge 2022/12/16) by @AsparagusEduardo in https://github.com/rh-hideout/pokeemerald-expansion/pull/2519
- For me, it was tuesday. (pret merge 2023/01/03) by @AsparagusEduardo in https://github.com/rh-hideout/pokeemerald-expansion/pull/2559
- | || || |_ (pret merge 2023/01/20) by @AsparagusEduardo in https://github.com/rh-hideout/pokeemerald-expansion/pull/2583
- I like shorts, they’re comfy and easy to wear! (pret merge 2023/01/25) by @AsparagusEduardo in https://github.com/rh-hideout/pokeemerald-expansion/pull/2597
- It’s ya boi, pret merge! (pret merge 2023/02/16) by @AsparagusEduardo in https://github.com/rh-hideout/pokeemerald-expansion/pull/2697
New Contributors
- @cynderquil made their first contribution in https://github.com/rh-hideout/pokeemerald-expansion/pull/1589
- @Bassoonian made their first contribution in https://github.com/rh-hideout/pokeemerald-expansion/pull/2467
- @mrgriffin made their first contribution in https://github.com/rh-hideout/pokeemerald-expansion/pull/2527
- @TeamAquasHideout made their first contribution in https://github.com/rh-hideout/pokeemerald-expansion/pull/2588
- @walkingeyerobot made their first contribution in https://github.com/rh-hideout/pokeemerald-expansion/pull/2587
- @AlexOn1ine made their first contribution in https://github.com/rh-hideout/pokeemerald-expansion/pull/2642
Full Changelog: https://github.com/rh-hideout/pokeemerald-expansion/compare/expansion/1.3.0...expansion/1.4.0
Version 1.3.0
## How to update
- If you haven't set up a remote, run the command `git remote add RHH https://github.com/rh-hideout/pokeemerald-expansion`.
- Once you have your remote set up, run the command `git pull RHH expansion/1.3.0`.
Added
- Added class-based Poké Balls for trainers by @LOuroboros in https://github.com/rh-hideout/pokeemerald-expansion/pull/2385
- Config for running indoors by @AsparagusEduardo in https://github.com/rh-hideout/pokeemerald-expansion/pull/2388
- Implemented Lures and Repel/Lure “use another” menu by @AsparagusEduardo in https://github.com/rh-hideout/pokeemerald-expansion/pull/2319
- Implemented Honey’s Sweet Scent functionality by @AsparagusEduardo in https://github.com/rh-hideout/pokeemerald-expansion/pull/2391
- Implemented Parental Bond by @BuffelSaft in https://github.com/rh-hideout/pokeemerald-expansion/pull/1676
- Implemented Beat Up Gen 5+ effect with config. by @BuffelSaft in https://github.com/rh-hideout/pokeemerald-expansion/pull/1676
- Config for Dark Void being only usable by Darkrai by @AsparagusEduardo in https://github.com/rh-hideout/pokeemerald-expansion/pull/2428
Changed
- Improved Psycho Cut animation by @ghoulslash in https://github.com/rh-hideout/pokeemerald-expansion/pull/2390
- Multi-hit logic refactor. by @BuffelSaft in https://github.com/rh-hideout/pokeemerald-expansion/pull/1676
- Ported Gen 5 & 6 mon animations from Inclement Emerald + added most missing Gen 7 form animations by @AsparagusEduardo in https://github.com/rh-hideout/pokeemerald-expansion/pull/1927
- Restored GF Header. by @tustin2121 in https://github.com/rh-hideout/pokeemerald-expansion/pull/2426
Fixed
- Bug where badge boosts apply in all gens except gen 3. by @May8th1995 in https://github.com/rh-hideout/pokeemerald-expansion/pull/2383
- AI issue giving decrementing score to confuse hit instead of confuse by @May8th1995 in https://github.com/rh-hideout/pokeemerald-expansion/pull/2384
- Z-Move not being cleared if Pokémon faints by @AsparagusEduardo in https://github.com/rh-hideout/pokeemerald-expansion/pull/2389
- Integrated VBlank wait loop fix by @gruxor in https://github.com/rh-hideout/pokeemerald-expansion/pull/2392
- Fling only working with items with Fling Power equal to 0. by @LOuroboros in https://github.com/rh-hideout/pokeemerald-expansion/pull/2408
- Softlock when teaching a TM/HM after learning a move by level up. by @kaisermg5 in https://github.com/rh-hideout/pokeemerald-expansion/pull/2413
- Battle Palace AI bug that caused multiple issues. by @DizzyEggg in https://github.com/rh-hideout/pokeemerald-expansion/pull/2416
- Abilities that raise target’s stat after hit showing the wrong message. by @BuffelSaft in https://github.com/rh-hideout/pokeemerald-expansion/pull/2427
- Fixed Bad Dream’s ability popup message by @AsparagusEduardo in https://github.com/rh-hideout/pokeemerald-expansion/pull/2430
- Opponent’s Teleport ending Trainer Battle if it only has one Pokémon. by @LOuroboros in https://github.com/rh-hideout/pokeemerald-expansion/pull/2420
- Fixed Bug Bite deleting the user’s item. by @ghoulslash in https://github.com/rh-hideout/pokeemerald-expansion/pull/2433, with cleanup by @eatthepear in https://github.com/rh-hideout/pokeemerald-expansion/pull/2451
Pret merges
- Support for Porymap 5.0.0 (up to 9e24fe6ec8f23d042ba2b0fb2dd687ab82989c44 2022-11-08) by @AsparagusEduardo in https://github.com/rh-hideout/pokeemerald-expansion/pull/2422
Cleanup
- Uncommented evolution moves for each species by @LOuroboros in https://github.com/rh-hideout/pokeemerald-expansion/pull/2386
- Uncommented Hisuian Pokémon level up moves by @LOuroboros in https://github.com/rh-hideout/pokeemerald-expansion/pull/2449
- Removed worthless DEBUG_FLAG_PC_FROM_DEBUG_MENU config by @LOuroboros in https://github.com/rh-hideout/pokeemerald-expansion/pull/2423
- Actually removed ItemId_GetId by @LOuroboros in https://github.com/rh-hideout/pokeemerald-expansion/pull/2424
- Optimized Bad Dreams’ code by @LOuroboros in https://github.com/rh-hideout/pokeemerald-expansion/pull/2434
New Contributors
- @May8th1995 made their first contribution in https://github.com/rh-hideout/pokeemerald-expansion/pull/2383
- @kaisermg5 made their first contribution in https://github.com/rh-hideout/pokeemerald-expansion/pull/2413
- @tustin2121 made their first contribution in https://github.com/rh-hideout/pokeemerald-expansion/pull/2426
- @eatthepear made their first contribution in https://github.com/rh-hideout/pokeemerald-expansion/pull/2451
Full Changelog: https://github.com/rh-hideout/pokeemerald-expansion/compare/expansion/1.2.0...expansion/1.3.0
Version 1.2.0
## How to update
- If you haven't set up a remote, run the command `git remote add RHH https://github.com/rh-hideout/pokeemerald-expansion`.
- Once you have your remote set up, run the command `git pull RHH expansion/1.2.0`.
Added
- AI remembers Party mons - by @DizzyEggg in https://github.com/rh-hideout/pokeemerald-expansion/pull/2230
- Takes in consideration overwritten abilities - by @ghoulslash in https://github.com/rh-hideout/pokeemerald-expansion/pull/2355
- ABILITY_SYMBIOSIS - by @AgustinGDLV in https://github.com/rh-hideout/pokeemerald-expansion/pull/2117
- Teleport’s modern in-battle effect, with config - by @LOuroboros in https://github.com/rh-hideout/pokeemerald-expansion/pull/2121
- “Access PC” option in debug menu now gives full access to both Item and Pokémon Storage - by @LOuroboros in https://github.com/rh-hideout/pokeemerald-expansion/pull/2356
- Battle Arena’s move Mind ratings now expands to all moves - by @AsparagusEduardo in https://github.com/rh-hideout/pokeemerald-expansion/pull/2339 and https://github.com/rh-hideout/pokeemerald-expansion/pull/2365
- 4 new species flags - by @AsparagusEduardo in https://github.com/rh-hideout/pokeemerald-expansion/pull/2293
SPECIES_FLAG_ALL_PERFECT_IVSSPECIES_FLAG_SHINY_LOCKEDSPECIES_FLAG_CANNOT_BE_TRADEDSPECIES_FLAG_MEGA_EVOLUTION
- Config for Battle text pause times - by @AsparagusEduardo in https://github.com/rh-hideout/pokeemerald-expansion/pull/2380
Changed
- Updated move types now have their own separate config from
B_UPDATED_MOVE_DATA- by @AsparagusEduardo in https://github.com/rh-hideout/pokeemerald-expansion/pull/2361 - Mew now has special handling for it’s Teachable moveset by @AsparagusEduardo (it learns all moves minus certain exceptions) - in https://github.com/rh-hideout/pokeemerald-expansion/pull/2367
- Changed ballMultiplier to account for future Hisuian ball multipliers - by @AsparagusEduardo in https://github.com/rh-hideout/pokeemerald-expansion/pull/2376
P_NEW_POKEMONis now split by Generation - by @AsparagusEduardo in https://github.com/rh-hideout/pokeemerald-expansion/pull/2283HasAllMonsnow accounts for all mon except mythicals.
Fixed
- Natural Cure, Shed Skin and Early Bird check in ShouldSwitchIfGameStatePrompt - by @ghoulslash in https://github.com/rh-hideout/pokeemerald-expansion/pull/2336
- Multi-fixed-wild partner not calculating damage - by @StubbornOne in https://github.com/rh-hideout/pokeemerald-expansion/pull/2343
- Z-Power Ring check - by @LOuroboros in https://github.com/rh-hideout/pokeemerald-expansion/pull/2349
- Crash during Light That Burns The Sky’s animation - by @LOuroboros in https://github.com/rh-hideout/pokeemerald-expansion/pull/2350
- Z-Moves not showing the correct type in battle if it’s different from the base move’s type - by @LOuroboros in https://github.com/rh-hideout/pokeemerald-expansion/pull/2353
- Returning to the overworld after using the “Access PC” option in the debug menu makes option descriptions remain open - by @LOuroboros in https://github.com/rh-hideout/pokeemerald-expansion/pull/2356
- Pokémon Debug isn’t loading female icon palettes correctly - by @TheXaman in https://github.com/rh-hideout/pokeemerald-expansion/pull/2360
- Multi battle interface displays incorrectly - by @AsparagusEduardo in https://github.com/rh-hideout/pokeemerald-expansion/pull/2335
- Multi battle party menu displays incorrectly - by @AsparagusEduardo in https://github.com/rh-hideout/pokeemerald-expansion/pull/2335
- AI doesn’t track abilites when Traced - by @ghoulslash in https://github.com/rh-hideout/pokeemerald-expansion/pull/2364
- Berserk doesn’t activate if the mon falls to exactly half HP - by @StephenLynx in https://github.com/rh-hideout/pokeemerald-expansion/pull/2370
- Triple Kick and Triple Axel doing too much damage - by @Sneed69 in https://github.com/rh-hideout/pokeemerald-expansion/pull/2141
- Mega Evolved Pokémon are able to get Friendship effects in battle - by @LOuroboros in https://github.com/rh-hideout/pokeemerald-expansion/pull/2262
Cleanup
- Fixed typo in BoxMonKnowsMove - by @LOuroboros in https://github.com/rh-hideout/pokeemerald-expansion/pull/2338
- Renamed mislabeled labels in src/debug.c - by @LOuroboros in https://github.com/rh-hideout/pokeemerald-expansion/pull/2337 and https://github.com/rh-hideout/pokeemerald-expansion/pull/2340
- Removed references to
ITEM_EXPANSIONafter #2177 - by @AsparagusEduardo in https://github.com/rh-hideout/pokeemerald-expansion/pull/2293
Pret merges
- Up to 1ae5010233a07bbd4fbe80a340019e04215afb71 - by @AsparagusEduardo in https://github.com/rh-hideout/pokeemerald-expansion/pull/2359
- Up to bb2e64b3fc20f713356fb68326175871c8996331 - by @AsparagusEduardo in https://github.com/rh-hideout/pokeemerald-expansion/pull/2379
Full Changelog: https://github.com/rh-hideout/pokeemerald-expansion/compare/expansion/1.1.1...expansion/1.2.0
Added
- Option to change the weather from the Overworld Debug Menu by @TheXaman in https://github.com/rh-hideout/pokeemerald-expansion/pull/2315
- Corner case logic for AI Switching. by @Porygon23 in https://github.com/rh-hideout/pokeemerald-expansion/pull/2226
- Exp Candies now show the amount of experience gained by @AsparagusEduardo in https://github.com/rh-hideout/pokeemerald-expansion/pull/2282
- Config to limit the moves called by Metronome (by generation) by @AsparagusEduardo in https://github.com/rh-hideout/pokeemerald-expansion/pull/2327
Changed
- Changed Lure prices to the same standards as the default Repels by @Jaizu in https://github.com/rh-hideout/pokeemerald-expansion/pull/2309
- Debug menu:
- The changeable flags now start at 1 (0 isnt a flag) by @TheXaman in https://github.com/rh-hideout/pokeemerald-expansion/pull/2315
- Object events now get frozen while the menu is open to avoid potential nasty effects by @TheXaman in https://github.com/rh-hideout/pokeemerald-expansion/pull/2315
- Automated creation of MAP_GROUP_COUNT for the debug menu by @AsparagusEduardo in https://github.com/rh-hideout/pokeemerald-expansion/pull/2307
- Generating music names for the debug menu based on their labels by @AsparagusEduardo in https://github.com/rh-hideout/pokeemerald-expansion/pull/2306
Fixed
- Ability pop ups not appearing at all by @LOuroboros in https://github.com/rh-hideout/pokeemerald-expansion/pull/2314
- Dauntless Shield’s and Intrepid Sword’s effects only triggering for mon on the left in double battle, even if the mon with the abilities are on the right by @LOuroboros in https://github.com/rh-hideout/pokeemerald-expansion/pull/2313
- Flickering when switching menus in the Overworld Debug Menu @Jaizu in https://github.com/rh-hideout/pokeemerald-expansion/pull/2315
- Missing uses of Fairy type for Union Room and Battle Factory by @AsparagusEduardo in https://github.com/rh-hideout/pokeemerald-expansion/pull/2310
- Tutors changing the level of the taught Pokémon to the level that the last mon that used a Exp Candy reached by @AsparagusEduardo in https://github.com/rh-hideout/pokeemerald-expansion/pull/2282
- Exp candies giving the wrong amount of experience by @AsparagusEduardo in https://github.com/rh-hideout/pokeemerald-expansion/pull/2282
- Exp Candy XL breaking experience points by @AsparagusEduardo in https://github.com/rh-hideout/pokeemerald-expansion/pull/2282
- Ai check for switching when the target is semi invulnerable by @ghoulslash in https://github.com/rh-hideout/pokeemerald-expansion/pull/2324
Pret merges
- Up to (c1dfd3c9eca7d9dd73ac7dbaff0444d965758f4c) by @AsparagusEduardo in https://github.com/rh-hideout/pokeemerald-expansion/pull/2308
Cleanup
- Tidying graphics - Super Ancient Pokémon special weather by @Blackforest92 in https://github.com/rh-hideout/pokeemerald-expansion/pull/2303
Full Changelog: https://github.com/rh-hideout/pokeemerald-expansion/compare/expansion/1.1.0...expansion/1.2.0
Version 1.1.1
## How to update
- If you haven't set up a remote, run the command `git remote add RHH https://github.com/rh-hideout/pokeemerald-expansion`.
- Once you have your remote set up, run the command `git pull RHH expansion/1.1.1`.
What’s Changed
- Fixed battles breaking when ACE_POKEMON_FUNCTIONALITY was not set by @Porygon23 in https://github.com/rh-hideout/pokeemerald-expansion/pull/2334
Full Changelog: https://github.com/rh-hideout/pokeemerald-expansion/compare/expansion/1.1.0...expansion/1.1.1
Version 1.1.0
## How to update
- If you haven't set up a remote, run the command `git remote add RHH https://github.com/rh-hideout/pokeemerald-expansion`.
- Once you have your remote set up, run the command `git pull RHH expansion/1.1.0`.
Added
- Option to change the weather from the Overworld Debug Menu by @TheXaman in https://github.com/rh-hideout/pokeemerald-expansion/pull/2315
- Corner case logic for AI Switching. by @Porygon23 in https://github.com/rh-hideout/pokeemerald-expansion/pull/2226
- Exp Candies now show the amount of experience gained by @AsparagusEduardo in https://github.com/rh-hideout/pokeemerald-expansion/pull/2282
- Config to limit the moves called by Metronome (by generation) by @AsparagusEduardo in https://github.com/rh-hideout/pokeemerald-expansion/pull/2327
Changed
- Changed Lure prices to the same standards as the default Repels by @Jaizu in https://github.com/rh-hideout/pokeemerald-expansion/pull/2309
- Debug menu:
- The changeable flags now start at 1 (0 isnt a flag) by @TheXaman in https://github.com/rh-hideout/pokeemerald-expansion/pull/2315
- Object events now get frozen while the menu is open to avoid potential nasty effects by @TheXaman in https://github.com/rh-hideout/pokeemerald-expansion/pull/2315
- Automated creation of MAP_GROUP_COUNT for the debug menu by @AsparagusEduardo in https://github.com/rh-hideout/pokeemerald-expansion/pull/2307
- Generating music names for the debug menu based on their labels by @AsparagusEduardo in https://github.com/rh-hideout/pokeemerald-expansion/pull/2306
Fixed
- Ability pop ups not appearing at all by @LOuroboros in https://github.com/rh-hideout/pokeemerald-expansion/pull/2314
- Dauntless Shield’s and Intrepid Sword’s effects only triggering for mon on the left in double battle, even if the mon with the abilities are on the right by @LOuroboros in https://github.com/rh-hideout/pokeemerald-expansion/pull/2313
- Flickering when switching menus in the Overworld Debug Menu @Jaizu in https://github.com/rh-hideout/pokeemerald-expansion/pull/2315
- Missing uses of Fairy type for Union Room and Battle Factory by @AsparagusEduardo in https://github.com/rh-hideout/pokeemerald-expansion/pull/2310
- Tutors changing the level of the taught Pokémon to the level that the last mon that used a Exp Candy reached by @AsparagusEduardo in https://github.com/rh-hideout/pokeemerald-expansion/pull/2282
- Exp candies giving the wrong amount of experience by @AsparagusEduardo in https://github.com/rh-hideout/pokeemerald-expansion/pull/2282
- Exp Candy XL breaking experience points by @AsparagusEduardo in https://github.com/rh-hideout/pokeemerald-expansion/pull/2282
- Ai check for switching when the target is semi invulnerable by @ghoulslash in https://github.com/rh-hideout/pokeemerald-expansion/pull/2324
Pret merges
- Up to (c1dfd3c9eca7d9dd73ac7dbaff0444d965758f4c) by @AsparagusEduardo in https://github.com/rh-hideout/pokeemerald-expansion/pull/2308
Cleanup
- Tidying graphics - Super Ancient Pokémon special weather by @Blackforest92 in https://github.com/rh-hideout/pokeemerald-expansion/pull/2303
Full Changelog: https://github.com/rh-hideout/pokeemerald-expansion/compare/expansion/1.0.0...expansion/1.1.0
Version 1.0.0
## How to update
- If you haven't set up a remote, run the command `git remote add RHH https://github.com/rh-hideout/pokeemerald-expansion`.
- Once you have your remote set up, run the command `git pull RHH expansion/1.0.0`.
BREAKING
- Reworked TMHM into expandable list format by @gruxor in https://github.com/rh-hideout/pokeemerald-expansion/pull/2233
- Tutor moves and TM/HM moves have been combined into a single list of Teachable Moves.
- With this change, it allows users to have official data for compatibility if they add their own TMs/HMs and Tutors.
- Added Legends: Arceus species by @Blackforest92 in https://github.com/rh-hideout/pokeemerald-expansion/pull/2177
- Fixed PokemonSubstruct3 alignment by @AsparagusEduardo in https://github.com/rh-hideout/pokeemerald-expansion/pull/2265
ADDED
- Added Legends: Arceus’ move data by @LOuroboros in https://github.com/rh-hideout/pokeemerald-expansion/pull/2280
- Inclusion of the TheXaman’s Debug Menu by @TheXaman in https://github.com/rh-hideout/pokeemerald-expansion/pull/2277
- Introduced FORM_BATTLE form changes by @LOuroboros in https://github.com/rh-hideout/pokeemerald-expansion/pull/2273
- Form changes for Zacian, Zamazenta and Xerneas before a battle’s intro.
- Optional parameter to check for held item.
- Introduced
param3to facilitate this and merging of FORM_ITEM_USE.
- Introduced
CHANGED
- Merged FORM_ITEM_USE_TIME into FORM_ITEM_USE by @LOuroboros in https://github.com/rh-hideout/pokeemerald-expansion/pull/2304
- Comatose prevents Battle Pike’s status effects. by @AsparagusEduardo in https://github.com/rh-hideout/pokeemerald-expansion/pull/2198
- Updated Serene Grace checks in AI_CheckViability by @LOuroboros in https://github.com/rh-hideout/pokeemerald-expansion/pull/2218
FIXES
- Fixed Quash’s effect by @DizzyEggg in https://github.com/rh-hideout/pokeemerald-expansion/pull/2239
- Fixed pickup running when it shouldn’t in some cases. by @StephenLynx in https://github.com/rh-hideout/pokeemerald-expansion/pull/2284
- Dragon Tail Weak Armor fix by @DizzyEggg in https://github.com/rh-hideout/pokeemerald-expansion/pull/2278
- Fix Magic Bounce targets by @DizzyEggg in https://github.com/rh-hideout/pokeemerald-expansion/pull/2260
- Fixed ball multiplier fallthroughs by @AsparagusEduardo in https://github.com/rh-hideout/pokeemerald-expansion/pull/2290
- Weather forms fixes and config by @Sneed69 in https://github.com/rh-hideout/pokeemerald-expansion/pull/2150
- Fixed compile error when using
GEN_3setting for sport moves by @Yak-Attack-1012 in https://github.com/rh-hideout/pokeemerald-expansion/pull/2295
PRET MERGES
- Up to 578064d (2022-08-26) by @AsparagusEduardo in https://github.com/rh-hideout/pokeemerald-expansion/pull/2286
CLEANUP
- Updated README.md to reflect the new workflow by @LOuroboros in https://github.com/rh-hideout/pokeemerald-expansion/pull/2287
- Updated README.md with credits and wiki links by @ghoulslash in https://github.com/rh-hideout/pokeemerald-expansion/pull/2299
- Config refactor by @AsparagusEduardo in https://github.com/rh-hideout/pokeemerald-expansion/pull/2297
- Refactored uses of configs to be exclusivetly handled by preproc, as an optimization such that we don’t have stuff like (is 3 > 4?)
- Moved Gen definitions to
include/config.h, to be used by all config files. - Created
GEN_LATESTas a way to avoid conflicts with users that modify the default configs and have a way for them to easily set everything to their prefered generation.
- Tyding graphics
- Tidying Graphics/Battle_Anims by @Blackforest92 in https://github.com/rh-hideout/pokeemerald-expansion/pull/2289
- Acupressure by @Blackforest92 in https://github.com/rh-hideout/pokeemerald-expansion/pull/2301
- Small syntax fix for CanLearnTeachableMove by @LOuroboros in https://github.com/rh-hideout/pokeemerald-expansion/pull/2302
- Added missing constant in GetBattleMonMoveSlot by @LOuroboros in https://github.com/rh-hideout/pokeemerald-expansion/pull/2294
New Contributors
- @StephenLynx made their first contribution in https://github.com/rh-hideout/pokeemerald-expansion/pull/2284
- @Yak-Attack-1012 made their first contribution in https://github.com/rh-hideout/pokeemerald-expansion/pull/2295
Full Changelog: https://github.com/rh-hideout/pokeemerald-expansion/compare/expansion/0.9.0...expansion/1.0.0
Version 0.9.0
## How to update
- If you haven't set up a remote, run the command `git remote add RHH https://github.com/rh-hideout/pokeemerald-expansion`.
- Once you have your remote set up, run the command `git pull RHH expansion/0.9.0`.
This version was labeled retroactively after our versioning scheme was decided, meaning the version number may be arbitrary.
ADDED
- Support for double wild battles with a single opponent by @DizzyEggg in https://github.com/rh-hideout/pokeemerald-expansion/pull/2238
- Gen 8 EXP Candies by @AgustinGDLV in https://github.com/rh-hideout/pokeemerald-expansion/pull/2142
- Affection/friendship battle mechanics by @LOuroboros in https://github.com/rh-hideout/pokeemerald-expansion/pull/2173
CHANGED
- Moves with EFFECT_PLACEHOLDER can’t be used anymore. by @AsparagusEduardo in https://github.com/rh-hideout/pokeemerald-expansion/pull/2243
- Modified HP display to support HP with 4 digits by @DizzyEggg in https://github.com/rh-hideout/pokeemerald-expansion/pull/2256
- Enable BUGFIX by default by @AsparagusEduardo in https://github.com/rh-hideout/pokeemerald-expansion/pull/2258
- Updated Fairy icon to better match the rest of them by @AsparagusEduardo in https://github.com/rh-hideout/pokeemerald-expansion/pull/2269
FIXES
- Gen5+ multihit odds. by @aarant in https://github.com/rh-hideout/pokeemerald-expansion/pull/2219
- IsAbilityPreventingEscape message in party menu by @ghoulslash in https://github.com/rh-hideout/pokeemerald-expansion/pull/2125
- ENDTURN_WISH not resetting gBattleStruct->turnSideTracker by @DizzyEggg in https://github.com/rh-hideout/pokeemerald-expansion/pull/2236
- Ability pop-up not displaying long abilities properly by @DizzyEggg in https://github.com/rh-hideout/pokeemerald-expansion/pull/2234
- Doubles 2 vs 1 interface by @DizzyEggg in https://github.com/rh-hideout/pokeemerald-expansion/pull/2238
- Fixed creation trio orbs not boosting power for non-base forms. by @AsparagusEduardo in https://github.com/rh-hideout/pokeemerald-expansion/pull/2242
- LoadSpecialPokePic now loads gender differences correctly by @AsparagusEduardo in https://github.com/rh-hideout/pokeemerald-expansion/pull/2247
- Fixed Net Ball Gen 7+ multiplier by @AsparagusEduardo in https://github.com/rh-hideout/pokeemerald-expansion/pull/2259
- Fix Escape Rope Message when on gen 8 mechanics by @ThirdLemon in https://github.com/rh-hideout/pokeemerald-expansion/pull/2263
PRET MERGES
- Up to 578064d79966ebfcd0de8782f8b7294415fd6c87 by @AsparagusEduardo in https://github.com/rh-hideout/pokeemerald-expansion/pull/2264
CLEANUP
- Fix multiple pokemon icons & tidying pokemon graphic folders by @Blackforest92 in https://github.com/rh-hideout/pokeemerald-expansion/pull/2206
- Get rid of garbage bytes in graphics.c by @DizzyEggg in https://github.com/rh-hideout/pokeemerald-expansion/pull/2235
- Fixed P_UPDATED_ABILITIES’s comment by @LOuroboros in https://github.com/rh-hideout/pokeemerald-expansion/pull/2241
- Fixed critical capture fields not using TRUE or FALSE by @AsparagusEduardo in https://github.com/rh-hideout/pokeemerald-expansion/pull/2245
- Reworked branch defines into single compatibility define by @gruxor in https://github.com/rh-hideout/pokeemerald-expansion/pull/2237
- Removed unused local var in SetMonFormPSS by @LOuroboros in https://github.com/rh-hideout/pokeemerald-expansion/pull/2271
New Contributors
- @ThirdLemon made their first contribution in https://github.com/rh-hideout/pokeemerald-expansion/pull/2263
Full Changelog: https://github.com/rh-hideout/pokeemerald-expansion/compare/expansion/0.8.0...expansion/0.9.0
BREAKING
- Reworked TMHM into expandable list format by @gruxor in https://github.com/rh-hideout/pokeemerald-expansion/pull/2233
- Tutor moves and TM/HM moves have been combined into a single list of Teachable Moves.
- With this change, it allows users to have official data for compatibility if they add their own TMs/HMs and Tutors.
- Added Legends: Arceus species by @Blackforest92 in https://github.com/rh-hideout/pokeemerald-expansion/pull/2177
- Fixed PokemonSubstruct3 alignment by @AsparagusEduardo in https://github.com/rh-hideout/pokeemerald-expansion/pull/2265
ADDED
- Added Legends: Arceus’ move data by @LOuroboros in https://github.com/rh-hideout/pokeemerald-expansion/pull/2280
- Inclusion of the TheXaman’s Debug Menu by @TheXaman in https://github.com/rh-hideout/pokeemerald-expansion/pull/2277
- Introduced FORM_BATTLE form changes by @LOuroboros in https://github.com/rh-hideout/pokeemerald-expansion/pull/2273
- Form changes for Zacian, Zamazenta and Xerneas before a battle’s intro.
- Optional parameter to check for held item.
- Introduced
param3to facilitate this and merging of FORM_ITEM_USE.
- Introduced
CHANGED
- Merged FORM_ITEM_USE_TIME into FORM_ITEM_USE by @LOuroboros in https://github.com/rh-hideout/pokeemerald-expansion/pull/2304
- Comatose prevents Battle Pike’s status effects. by @AsparagusEduardo in https://github.com/rh-hideout/pokeemerald-expansion/pull/2198
- Updated Serene Grace checks in AI_CheckViability by @LOuroboros in https://github.com/rh-hideout/pokeemerald-expansion/pull/2218
FIXES
- Fixed Quash’s effect by @DizzyEggg in https://github.com/rh-hideout/pokeemerald-expansion/pull/2239
- Fixed pickup running when it shouldn’t in some cases. by @StephenLynx in https://github.com/rh-hideout/pokeemerald-expansion/pull/2284
- Dragon Tail Weak Armor fix by @DizzyEggg in https://github.com/rh-hideout/pokeemerald-expansion/pull/2278
- Fix Magic Bounce targets by @DizzyEggg in https://github.com/rh-hideout/pokeemerald-expansion/pull/2260
- Fixed ball multiplier fallthroughs by @AsparagusEduardo in https://github.com/rh-hideout/pokeemerald-expansion/pull/2290
- Weather forms fixes and config by @Sneed69 in https://github.com/rh-hideout/pokeemerald-expansion/pull/2150
- Fixed compile error when using
GEN_3setting for sport moves by @Yak-Attack-1012 in https://github.com/rh-hideout/pokeemerald-expansion/pull/2295
PRET MERGES
- Up to 578064d (2022-08-26) by @AsparagusEduardo in https://github.com/rh-hideout/pokeemerald-expansion/pull/2286
CLEANUP
- Updated README.md to reflect the new workflow by @LOuroboros in https://github.com/rh-hideout/pokeemerald-expansion/pull/2287
- Updated README.md with credits and wiki links by @ghoulslash in https://github.com/rh-hideout/pokeemerald-expansion/pull/2299
- Config refactor by @AsparagusEduardo in https://github.com/rh-hideout/pokeemerald-expansion/pull/2297
- Refactored uses of configs to be exclusivetly handled by preproc, as an optimization such that we don’t have stuff like (is 3 > 4?)
- Moved Gen definitions to
include/config.h, to be used by all config files. - Created
GEN_LATESTas a way to avoid conflicts with users that modify the default configs and have a way for them to easily set everything to their prefered generation.
- Tyding graphics
- Tidying Graphics/Battle_Anims by @Blackforest92 in https://github.com/rh-hideout/pokeemerald-expansion/pull/2289
- Acupressure by @Blackforest92 in https://github.com/rh-hideout/pokeemerald-expansion/pull/2301
- Small syntax fix for CanLearnTeachableMove by @LOuroboros in https://github.com/rh-hideout/pokeemerald-expansion/pull/2302
- Added missing constant in GetBattleMonMoveSlot by @LOuroboros in https://github.com/rh-hideout/pokeemerald-expansion/pull/2294
New Contributors
- @StephenLynx made their first contribution in https://github.com/rh-hideout/pokeemerald-expansion/pull/2284
- @Yak-Attack-1012 made their first contribution in https://github.com/rh-hideout/pokeemerald-expansion/pull/2295
Full Changelog: https://github.com/rh-hideout/pokeemerald-expansion/compare/expansion/0.9.0...expansion/1.0.0
How to make an Expansion version
If you need instructions on how to release a new Expansion version, check out the enclosed instruction book. - AsparagusEduardo
1.- Autogenerating a changelog for the master branch.
Requires Write access to the repo.
If the changelog you’re making is for a minor version (Eg. 1.3.0), make sure to sync the upcoming branch with master before starting. Keep in mind that if there are unreleased changes in master, they should be made into a patch version released alongside minor version.
- Go to https://github.com/rh-hideout/pokeemerald-expansion/releases.
- Press the option “Draft a new release”.
- Fill the following fields:
- In “Choose a tag”, write the name of the tag for the desired release number.
- Eg. for version 1.2.3, write
expansion/1.2.3. It cannot be an existing tag.
- Eg. for version 1.2.3, write
- In “Target” choose
master. - In “Previous tag”, select the latest version released.
- In “Choose a tag”, write the name of the tag for the desired release number.
- Press “Generate release notes”. This will fill the description with a list of PRs made to the
masterbranch since the lastest release. - You may copy the contents to your editor of choice for step 2.
- If the changelog you’re making is for a minor version (Eg. 1.3.0), proceed to step 1B, without closing the current window.
1B.- Autogenerating a changelog for the upcoming branch.
- Delete the text and title generated in the site.
- Change “Target” to
upcoming. - Press “Generate release notes”. This will autogenerate the description with changes from both branches, as they’ve been merged.
- Use a comparison tool to remove any shared PRs from
master. (I use WinMerge for this).- Also remove any shared “New Contributor” entries.
- You should now have a text that only contains PRs made to
upcoming.
2.- Sorting PRs in the changelog
- Copy the
docs/changelogs/template.mdfile into a new file with the corresponding version for file and folder. Eg, for 1.2.3, you copy the file intodocs/changelogs/1.2.x/1.2.3.md. - Use the following Regex to adapt all PR links into the format currently used:
- Search
in https://github\.com/rh-hideout/pokeemerald-expansion/pull/(\d+) - Replace
in [#$1](https://github.com/rh-hideout/pokeemerald-expansion/pull/$1)
- Search
- At the bottom of the template, replace the “____” in
<!--Last PR: ____-->with the number of the last PR in your autogenerated changelog. This will help you keep track of any new PRs that are merged in before you’re finished with your changelog. - Sort the PRs by the categories present in the PR taking the following considerations:
- Keep the language of the changelog as newbie friendly as possible, explaining how the PR affects them.
- The format of the main line is the following:
{{Description of the change}} by @{{GitHub user}} in {{PR link}} - If a PR reverted by a different PR, both should be removed.
- If the reverted PR’s contents are then re-added it should be treated as if it’s the first time added, with all the proper documentation needed.
- If a PR’s content fits into multiple categories, like fixing two unrelated Ability and Move effects, you may duplicate the PR line and put it in both categories, changing the description of it accordingly.
- When refering to an element present in the code, always enclose them with ` to easily tell them apart. Eg:
- “Converted
settotemboostcommand tocallnative” - “Changed
MOVEEND_defines to an enum”
- “Converted
- A PR’s technical changes that may conflict with user changes should have an entry in the “REFACTORS” section at the beginning of the changelog. Any of these changes that requires a migration script should also be marked as such by appending the corresponding emoji listed there. The section should include, but it’s not limited to:
- Massive data format and/or structuring changes.
- Converting defines to enums.
- Renaming structs and/or their fields.
- Removing enums/defines/structs.
- For fixes:
- Once on their respective categories, if a PR fixes multiple issues at once in that category, you may make a sublist of those issues to properly detail each one and avoid just writing “Fixed multiple ability issues” or an overly verbose sentence for the PR.
- Try to fit the contents of a PR as a single sentence in past tense that.
- DON’T write something like “Fixed Parental Bond”, as this doesn’t explain what was fixed in Parental Bond. Instead, write something like “Fixed Parental Bond not affecting Snore”.
- For new configs:
- Add the name of the config as part of the sentence, with subitems explaining what they do based on their generation if it’s a generational config. Eg:
* Added missing `B_AFTER_YOU_TURN_ORDER` config by @PhallenTree in [#5400](https://github.com/rh-hideout/pokeemerald-expansion/pull/5400) * Gen 5-7: After You fails if the order remains the same after using After You. * Gen 8+: After You no longer fails if the turn order remains the same after using After You.
- Add the name of the config as part of the sentence, with subitems explaining what they do based on their generation if it’s a generational config. Eg:
- For other new features:
- Explain how to use the feature completely, listing all its features as needed. For now, this is the only source of documentation for these features, so it’s important to be thorough.
3.- Preparing the code for the new version
- Search for all non-changelog instances of the previous released version and update them to the newer version. As of writing, it’s these files:
README.md:-Based off RHH's pokeemerald-expansion 1.2.2 https://github.com/rh-hideout/pokeemerald-expansion/ +Based off RHH's pokeemerald-expansion 1.2.3 https://github.com/rh-hideout/pokeemerald-expansion/-- Once you have your remote set up, run the command `git pull RHH expansion/X.Y.Z`, replacing X, Y and Z with the digits of the respective version you want to update to (eg, to update to 1.2.2, use `git pull RHH expansion/1.2.2`). +- Once you have your remote set up, run the command `git pull RHH expansion/X.Y.Z`, replacing X, Y and Z with the digits of the respective version you want to update to (eg, to update to 1.2.3, use `git pull RHH expansion/1.2.3`)..github/ISSUE_TEMPLATE/*.yaml- Patch version:
options: - 1.2.2 (Latest release) + 1.2.3 (Latest release) master (default, unreleased bugfixes) upcoming (Edge) + 1.2.2 1.2.1 1.2.0 - Minor Version:
options: - 1.2.2 (Latest release) + 1.2.3 (Latest release) master (default, unreleased bugfixes) upcoming (Edge) + 1.2.2 1.2.1 1.2.0 - 1.1.6 - 1.1.5 - 1.1.4 - 1.1.3 - 1.1.2 - 1.1.1 - 1.1.0 - pre-1.1.0 + pre-1.2.0
- Patch version:
docs/SUMMARY.md:- Patch version:
[Changelog](./CHANGELOG.md) - [1.2.x]() + - [Version 1.2.3](changelogs/1.2.x/1.2.3.md) - [Version 1.2.2](changelogs/1.2.x/1.2.2.md) - [Version 1.2.1](changelogs/1.2.x/1.2.1.md) - [Version 1.2.0](changelogs/1.2.x/1.2.0.md) - Minor version:
[Changelog](./CHANGELOG.md) + - [1.3.x]() + - [Version 1.3.0](changelogs/1.3.x/1.3.0.md) - [1.2.x]() - [Version 1.2.2](changelogs/1.2.x/1.2.2.md) - [Version 1.2.1](changelogs/1.2.x/1.2.1.md) - [Version 1.2.0](changelogs/1.2.x/1.2.0.md)
- Patch version:
include/constants/expansion.h:- The defines should already have the version we’re targetting as part of the previous changelog process.
-// Last version: 1.2.2 +// Last version: 1.2.3 #define EXPANSION_VERSION_MAJOR 1 #define EXPANSION_VERSION_MINOR 2 #define EXPANSION_VERSION_PATCH 3 // FALSE if this this version of Expansion is not a tagged commit, i.e. // it contains unreleased changes. -#define EXPANSION_TAGGED_RELEASE FALSE +#define EXPANSION_TAGGED_RELEASE TRUE
- The defines should already have the version we’re targetting as part of the previous changelog process.
4.- Make a PR with the changes listed in Steps 2/3.
- Also post the changelog for feedback from contributors and maintainers.
- Once all feedback has been addresses, you may merge.
5.- Create the release on GitHub
- Copy the contents of your manual changelog into the description of your release.
- Modify the title to “Version {{version}}”, eg. “Version 1.2.3”
- Be sure to have the “Set as the latest release” option set,
- Press “Publish Release”.
- This will create a new tag in the repo that users can pull from like they can with branches.
6.- Post-release handling
- DON’T ACCEPT ANY NEW PRs YET. We have to prepare for the next cycle first.
- Go to
include/constants/expansion.hand merge the following changes to the repo (PR or direct commit, doesn’t matter much):- Patch version:
// Last version: 1.2.3 #define EXPANSION_VERSION_MAJOR 1 #define EXPANSION_VERSION_MINOR 2 - #define EXPANSION_VERSION_PATCH 3 + #define EXPANSION_VERSION_PATCH 4 // FALSE if this this version of Expansion is not a tagged commit, i.e. // it contains unreleased changes. -#define EXPANSION_TAGGED_RELEASE TRUE +#define EXPANSION_TAGGED_RELEASE FALSE
- Patch version:
With this, the repo is ready again to receive new PRs.
Now you’re ready to make the announcements!
- We tend to post on the following Discord Servers:
- RH-Hideout
- Requires role to post in #announcements channel.
- Team Aqua’s Hideout
- Requires role to post in #romhacking-updates channel.
- What a Hack!
- Announcements are done in Spanish, but not the changelogs themselves.
- Requires role to ping “Decompilaciones” role.
- pret
- PokéCommunity
- RH-Hideout
You can make a highlight of changes in the announcement itself, but it’s not needed. (I also like using Discord emotes to highlight certain features during announcements, but gain, it’s not needed).
Release Schedule and Process
Version Lifecycle
Minor Release (90 days to next Minor Release)
upcoming and master are synchronized. Minor Release should occur once every three months. Maintainers can vote to do extra Minor Releases for special cases, but this should be considered highly irregular.
Patch Release (60 / 30 days to the next Minor Release)
Releases that focus primarily on bugfixes or improvements to the test system. Patch Releases should occur AT LEAST once a month, but can be more frequent than that.
Big Feature Freeze (30 days to the next Minor Release)
PRs with the Github label type: big feature will NOT be merged until after the next Minor Release.
Merge Freeze (14 days to the next Minor Release)
Pull Requests that DO NOT have one of the following Github labels:
bugfixtype: cleanuptype: creditstype: documentationcategory: battle-testswill NOT be merged until after the next Minor Release.
Sample Schedule
| Major | Minor | Patch | Type | Goal Date |
|---|---|---|---|---|
| 2 | 1 | 0 | Minor | Dec 1 2025 |
| 2 | 1 | 1 | Patch | Dec 31 2025 |
| 2 | 1 | 2 | Patch | Jan 30 2026 |
| 2 | 1 | 2 | Big Feature Freeze | Jan 30 2026 |
| 2 | 1 | 2 | Merge Freeze | Feb 15 2026 |
| 2 | 1 | 3 | Patch | Mar 1 2026 |
| 2 | 2 | 0 | Minor | Mar 1 2026 |
What is a “Big Feature”?
- If any maintainer thinks a PR is a Big Feature, then it is, no question asked
- If there is disagreement, it can be discussed in a PR thread, and can ultimately be resolved with a Maintainer vote.
- If you believe your PR should have this feature, please let a maintainer know.
How To Identify a Big Feature
- Big diffs: It’s easy for something to go unnoticed in review when it’s a tiny part of a massive diff.
- High-impact: High-impact changes are harder to review because they often have consequences that aren’t obvious to the reviewer. We catch these consequences from users who use upcoming reporting them.
- Subjective: Subjective changes are more likely to have differences of opinions between senate members.
- Pervasive: The PR touches several different parts of the codebase or is involved in several different parts of the codebase, even if those elements are small.
Release Blocking and Milestones
When an issue or PR is assigned to a milestone on Github by a Maintainer, that means it is “Blocking”. If another Maintainer agrees with this, then that version cannot be released until that issue is resolved or PR is merged.
This designation should be reserved for instances where an existing feature on upcoming or master is broken and causing problems for users or players.
Blocking issues or PRs can be deferred to future releases but should be discussed with the Maintainers that assigned the designation in the first place.
If a version’s milestone does not have any issues or PRs assigned to it, that version should be released as close to the goal date as possible.
Document Purpose
This document is a guide for maintainers to account for all the reccomended steps before merging in a pull request.
Checklist
Is the branch’s theoretical functionality in scope?
If you’re not sure if a branch’s functionality is in scope, start a conversation on Discord to resolve.
Does the branch successfully compile?
From make clean, the branch should locally compile.
Do all CI tests pass?
Contributors are asked to make sure tests pass locally, but maintainers should at least wait for the CI to pass before merging.
Have you verified that the functionality works in game without any problems?
If functionality cannot be verified with an automated test, proof of an in game test is required. Do not be afraid to reach out to the contributor or the community to make sure something works in game as it should.
If the branch ports behavior from another Pokémon game, have you verified that the behavior functions as faithfully as possible?
We have always tried to make sure we can mimic the original functionality as closely as possible so as to avoid confusion with users and players. Do not be afraid to ask the contributor / community for proof if you cannot personally verify.
If the branch is a popular feature within the community with an established feature branch, is this using that established branch as a base?
There are situations where this should and should not happen, and should be discussed with maintainers on a case by case basis.
If this branch changes a function that is expected to be modified by users, is there a migration script?
Not everything needs a migration script - if you’re unsure, start a discussion.
Should new functionality introduced by this branch be gated behind a config?
We don’t have a strict definition of when configs should be used, but you can start with
Why SHOULDN’T this be a config?
Are tests written for everything that can be tested?
If you’re not sure if something CAN be tested, start a discussion. Some contributors may not be capable of writing tests - we should guide them in #expansion-tests to do so.
If any new tests are KNOWN_FAILING, issues should be opened describing each of the KNOWN_FAILING tests and our understanding of why they fail.
Does the branch meet our config philosophy?
Does the branch meet our saves philosophy?
Does the submitted code follow the styleguide?
This applies to code that comes from other branches or games.
Is the pull request appropriately labeled?
Without labels, the CHANGELOG will not be properly formatted. For specifically the bugfix label, an additional label, detailing what area the bug exists in is required.
Is pokeemerald-expansion free from a merge freeze?
Our release schedule prevents us from merging Big Features and non-bugfixes within certain dates close to a release. Please use /release in the RHH Discord to clarify when these are occuring.
Merging
When a feature has passed all of the items on the checklist, it is ready to be merged. From GitHub’s interface, there are three different options for merging:
Squash and merge
This should be used for all PRs except when merging from either:
- a publicly available feature branch from by the community OR
upcoming,masterorpret/pokeemerald.
Create a merge commit
Use the “Create a merge commit” to preserve history if:
- The branch is a publicly available feature branch from the community
- It’s a upstream
pretmerge - It’s a
mastertoupcomingmerge - It’s a Release merge
Rebase and merge
We do not use this ever.
Document Purpose
This document is a guide for contributors and Senate to decide if a feature is within “scope” for pokeemerald-expansion. “Scope” in this case comprises a list of features and concepts that could be merged if an appropriate implementation is submitted. If a feature is not in scope, then it should not be merged.
⚠️ Even if an opened PR is within scope, this does not mean it will be merged, as pull requests will need to pass the pass the merge checklist, which includes our config phiilosophy, saves philosophy, and styleguide.
Definitions
Base Expansion Version
A .gba file built from an unmodified master or upcoming branch of pokeemerald-expansion.
Vanilla Emerald Version
A .gba file built from an unmodified master branch of pret’s pokeemerald.
Traditional Pokémon Titles
Traditional Pokémon titles must adhere to ALL of the following conditions. An exhaustive list can be found in the appendix of this document.
- They are a core series game Pokémon title.
- Their metagames have been played as part of an official Pokémon tournament.
- They feature turn based battle system.
Notable Addendunm
Inclusions
- While [Let’s Go, Pikachu!](https://bulbapedia.bulbagarden.net/wiki/Pok%C3%A9mon:_Let%27s_Go,_Pikachu!_and_Let%27s_Go,_Eevee!) and [Let’s Go, Eevee!](https://bulbapedia.bulbagarden.net/wiki/Pok%C3%A9mon:_Let%27s_Go,_Pikachu!_and_Let%27s_Go,_Eevee!) have not had metagames as part of an official Pokémon tournament, they have been granted a special exception and are deemed “Traditional”.
Exclusions
- Champions is not a core series game and is not included. Some specific categories allow for content from Champions, detailed below.
- Legends: Arceus, Legends: Z-A and Mega Dimension have not had metagames as part of an official Pokémon tournament, and therefore, are not traditional.
Scope Guidelines
A pull request meets the scope criteria if:
- The pull request does not belong to a category considered “not in scope” AND
- The feature belongs to a category considered “in scope”
In Scope Categories
Pokémon, Items, and Battle Data
Species that appear in a Traditional Pokémon Title or Pokémon Champions.
- This includes follower sprites for all species, including battle-only ones species like Mega Pyroar.
Items that meet ALL the following requirements are in scope:
- The item appears in a Traditional Pokémon Title or Pokémon Champions.
- The item is used in battle OR is mechanically or functionally unqiue from an existing item.
- The item does not only exist for story related purposes, such as the Jade Orb.
Moves, Move Animations, Abilities, Learnsets, Battle Mechanics, Weather Types, Status Conditions that appear in a Traditional Pokémon Title or Pokémon Champions.
Battle Quality of Life
Quality of Life improvements that appear in a Traditional Pokémon Title or Pokémon Champions AND reveal more battle information or improve battle experience. These include improved Battle Messages, Type Effectiveness Indicators, Simutaneous HP Drops, or Enemy HP Percentage.
Menu Features
Add menu changes / additions from Traditional Pokémon Title or Pokémon Champions, such as changes to PC functions.
Gimmicks / Special Battle Types
Gimmicks or Special Battle Types that appear in a Traditional Pokémon Title, such as Dynamax or Triple Battles.
Overworld Features
Add overworld changes / additions from Traditional Pokémon titles, such as followers, sideways stairs, etc.
Novel Experience
Adds a novel experience included in a Traditional Pokémon titles, such as Poffins, Fishing minigames, or Mining.
Battle AI Behavior
Improvements towards the capability of a human competitive player, and unique or interesting behaviours otherwise.
Base Link Compatibility
The ability for two Base Expansion Version’s to connect, trade, and battle one another.
Speed Up
Optimize code to run more efficiently, take up less space, and work better overall to improves the developer and / or player experience.
Compression
Reduces the size of graphic or sound assets, including automatic compression.
Helper Features
Eases the addition or inclusion of any of the aforementioned, or facilitates developer ease of use.
Special Exceptions
The following have been explicitly voted to be within scope.
- Pokémon Colosseum and Pokémon XD: Gale of Darkness are not core series games, but Shadow Pokémon and their related accessories (Shadow moves, purification) have been granted a special exception.
- Champions is not a core series game, but the Power Point and Individual Values changes have been granted a special exception.
Explictly Not In Scope Categories
Pokémon, Items, and Battle Data
Species, Items, Moves, Move Animations, Abilities, Learnsets, Battle Mechanics, Weather Types, Status Conditions that DO NOT appear in a Traditional Pokémon Title or Pokémon Champions.
Stat Points / Effort Value Cap
Stat Points functionality or Effort Values Caps and Changes from Champions.
Duplicate User Interfaces
Adds additional user interface that covers the same functionality of an existing feature, such as the HeartGold / SoulSilver Pokédex or Black / White Summary Screen.
Vanilla Link Compatability
The ability for Base Expansion Version and Vanilla Emerald Version to connect, trade, and battle one another.
Maps
Adds overworld maps.
Discussion Required Categories
Pull Requests that fall into this category are not in scope by default and should be brought up to maintainers, who will discuss and vote as to whether or not the feature is considered in scope. Considerations for acceptance may include invasiveness of implementation, popularity, ease of maintenance, etc.
Developer Ease of Use
Lowers barrier of entry for developers to use existing behavior or functionality.
Fangame Features
Adds a popular feature from other fangames or Pokémon experiences.
Popular Non-Traditional Features
Exceptions can be made for uniquely popular or requested features, such as Legends: Arceus’ Drowsy, or XD: Gale of Darkness’s Shadow Pokémon.
External Program
External programs like poryscript.
Intergenerational Feature Compatibility
Addresses limitations and issues resulting from including all generational behaviours in a GBA native title, and extrapolation of features no longer supported by Game Freak.
Workflow for Proposed Feature Scope Discussion
Contributors
- Make a thread for the feature on Discord
- Describe how the feature fits into this scope document, and why you feel it should be considered
- Optionally include either a draft PR or describe in some detail the proposed implementation.
- Non-mandatory, but implementation invasiveness, maintenance cost, etc. are major considerations, so use your judgement. Maintainers may ask for this information during discussion.
Maintainers
- Make a senate thread for the discussion
- Make and pin a two-week voting poll
- Discuss, conclude, and cast votes before the two-week deadline
- Inform contributor as to the results and reasons in their thread
- Amend this scope document if necessary
Appendix
Traditional Pokémon Titles
- Red
- Green
- Blue
- Yellow: Special Pikachu Edition
- Gold
- Silver
- Crystal
- Ruby
- Sapphire
- Emerald
- FireRed
- LeafGreen
- Diamond
- Pearl
- Platinum
- HeartGold
- SoulSilver
- Black
- White
- Black 2
- White 2
- X
- Y
- Omega Ruby
- Alpha Sapphire
- Sun
- Moon
- Ultra Sun
- Ultra Moon
- Let’s Go, Pikachu!
- Let’s Go, Eevee!
- Sword
- Shield
- The Isle of Armor
- The Crown Tundra
- Brilliant Diamond
- Shining Pearl
- Scarlet
- Violet
- The Teal Mask
- The Indigo Disk